朱晔和你聊Spring系列S1E11:小测Spring Cloud Kubernetes @ 阿里云K8S
朱晔和你聊Spring系列S1E11:小测Spring Cloud Kubernetes @ 阿里云K8S
有关Spring Cloud Kubernates(以下简称SCK)详见https://github.com/spring-cloud/spring-cloud-kubernetes,在本文中我们主要测试三个功能:
- 使用Kubernetes服务发现配合Spring Cloud Ribbon做服务调用
- 读取Kubernetes的ConfigMap配置并且支持修改后动态刷新
- Spring Boot Actuator对Kubernates Pod信息的感知
编写测试程序
首先,我们来创建pom文件,注意几点:
- Spring Boot版本不能太高
- 引入了 Spring Boot Web以及Actuator两个模块,我们开发一个Web项目进行测试
- 引入了 Spring Cloud的Ribbon模块,我们需要测试一下服务调用
- 引入了spring-cloud-starter-kubernetes-all依赖,我们的主要测试对象
- 额外引入了docker-maven-plugin插件用于帮助我们构建镜像
- 设置了finalName
文件如下:
<?xml version="1.0" encoding="UTF-8"?>
<project xmlns="http://maven.apache.org/POM/4.0.0" xmlns:xsi="http://www.w3.org/2001/XMLSchema-instance"
    xsi:schemaLocation="http://maven.apache.org/POM/4.0.0 https://maven.apache.org/xsd/maven-4.0.0.xsd">
    <modelVersion>4.0.0</modelVersion>
    <parent>
        <groupId>org.springframework.boot</groupId>
        <artifactId>spring-boot-starter-parent</artifactId>
        <version>2.0.9.RELEASE</version>
        <relativePath/>
    </parent>
    <groupId>me.josephzhu</groupId>
    <artifactId>springcloudk8sdemo</artifactId>
    <version>0.0.1-SNAPSHOT</version>
    <name>springcloudk8sdemo</name>

    <properties>
        <java.version>11</java.version>
    </properties>

    <dependencies>
        <dependency>
            <groupId>org.springframework.boot</groupId>
            <artifactId>spring-boot-starter-web</artifactId>
        </dependency>
        <dependency>
            <groupId>org.springframework.boot</groupId>
            <artifactId>spring-boot-starter-actuator</artifactId>
        </dependency>
        <dependency>
            <groupId>org.springframework.cloud</groupId>
            <artifactId>spring-cloud-starter-netflix-ribbon</artifactId>
        </dependency>
        <dependency>
            <groupId>org.springframework.cloud</groupId>
            <artifactId>spring-cloud-starter-kubernetes-all</artifactId>
            <version>1.0.3.RELEASE</version>
        </dependency>

        <dependency>
            <groupId>org.projectlombok</groupId>
            <artifactId>lombok</artifactId>
            <optional>true</optional>
        </dependency>
        <dependency>
            <groupId>org.springframework.boot</groupId>
            <artifactId>spring-boot-starter-test</artifactId>
            <scope>test</scope>
        </dependency>
    </dependencies>

    <build>
        <finalName>k8sdemo</finalName>
        <plugins>
            <plugin>
                <groupId>org.springframework.boot</groupId>
                <artifactId>spring-boot-maven-plugin</artifactId>
            </plugin>
            <plugin>
                <groupId>com.spotify</groupId>
                <artifactId>docker-maven-plugin</artifactId>
                <version>1.0.0</version>
                <configuration>
                    <imageName>zhuye/${project.artifactId}</imageName>
                    <dockerDirectory>src/main/docker</dockerDirectory>
                    <resources>
                        <resource>
                            <targetPath>/</targetPath>
                            <directory>${project.build.directory}</directory>
                            <include>${project.build.finalName}.jar</include>
                        </resource>
                    </resources>
                </configuration>
            </plugin>
        </plugins>
    </build>

    <dependencyManagement>
        <dependencies>
            <dependency>
                <groupId>org.springframework.cloud</groupId>
                <artifactId>spring-cloud-dependencies</artifactId>
                <version>Finchley.SR4</version>
                <type>pom</type>
                <scope>import</scope>
            </dependency>
        </dependencies>
    </dependencyManagement>

</project>
接下去在src/main/docker目录下创建Dockerfile文件:
FROM openjdk:11-jdk-slim
VOLUME /tmp
ADD k8sdemo.jar app.jar
ENTRYPOINT exec java $JAVA_OPTS -jar /app.jar
值得注意的是,JVM参数我们希望从环境变量注入。
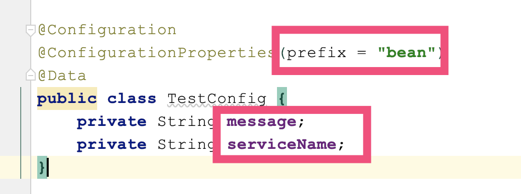
来看看代码,我们首先定义一个配置类:
package me.josephzhu.springcloudk8sdemo;

import lombok.Data;
import org.springframework.boot.context.properties.ConfigurationProperties;
import org.springframework.context.annotation.Configuration;

@Configuration
@ConfigurationProperties(prefix = "bean")
@Data
public class TestConfig {
    private String message;
    private String serviceName;
}
有了SCK的帮助,配置可以从ConfigMap加载,之后我们会看到ConfigMap的配置方式。下面我们定义一个控制器扮演服务端的角色:
package me.josephzhu.springcloudk8sdemo;

import org.springframework.beans.factory.annotation.Autowired;
import org.springframework.cloud.client.discovery.DiscoveryClient;
import org.springframework.web.bind.annotation.GetMapping;
import org.springframework.web.bind.annotation.RestController;

import java.net.InetAddress;
import java.net.UnknownHostException;
import java.util.List;

@RestController
public class TestServer {

    @Autowired
    private DiscoveryClient discoveryClient;

    @GetMapping("servers")
    public List<String> servers() {
        return discoveryClient.getServices();
    }

    @GetMapping
    public String ip() throws UnknownHostException {
        return InetAddress.getLocalHost().getHostAddress();
    }
}
可以看到这里定义了两个接口:
- servers 用于返回服务发现找到的所有服务(K8S的服务)
- 根路径返回了当前节点的IP地址
接下去定义另一个控制器扮演客户端的角色:
package me.josephzhu.springcloudk8sdemo;

import lombok.extern.slf4j.Slf4j;
import org.springframework.beans.factory.annotation.Autowired;
import org.springframework.web.bind.annotation.GetMapping;
import org.springframework.web.bind.annotation.RestController;
import org.springframework.web.client.RestTemplate;

import java.net.InetAddress;
import java.net.UnknownHostException;

@RestController
@Slf4j
public class TestClient {

    @Autowired
    private RestTemplate restTemplate;
    @Autowired
    private TestConfig testConfig;

    @GetMapping("client")
    public String client() throws UnknownHostException {
        String ip = InetAddress.getLocalHost().getHostAddress();
        String response = restTemplate.getForObject("http://"+testConfig.getServiceName()+"/", String.class);
        return String.format("%s -> %s", ip, response);
    }
}
这里就一个接口client接口,访问后通过RestTemplate来访问服务端根路径的接口,然后输出了客户端和服务端的IP地址。
然后我们定义一个全局的异常处理器,在出错的时候我们直接看到是什么错:
package me.josephzhu.springcloudk8sdemo;

import lombok.extern.slf4j.Slf4j;
import org.springframework.web.bind.annotation.ExceptionHandler;
import org.springframework.web.bind.annotation.RestControllerAdvice;

@RestControllerAdvice
@Slf4j
public class GlobalAdvice {

    @ExceptionHandler(Exception.class)
    public String exception(Exception ex){
        log.error("error:", ex);
        return ex.toString();
    }
}
最后我们定义启动程序:
package me.josephzhu.springcloudk8sdemo;

import lombok.extern.slf4j.Slf4j;
import org.springframework.beans.factory.annotation.Autowired;
import org.springframework.boot.SpringApplication;
import org.springframework.boot.autoconfigure.SpringBootApplication;
import org.springframework.cloud.client.discovery.EnableDiscoveryClient;
import org.springframework.cloud.client.loadbalancer.LoadBalanced;
import org.springframework.cloud.netflix.ribbon.RibbonClient;
import org.springframework.context.annotation.Bean;
import org.springframework.scheduling.annotation.EnableScheduling;
import org.springframework.scheduling.annotation.Scheduled;
import org.springframework.web.client.RestTemplate;

import java.lang.management.ManagementFactory;
import java.util.stream.Collectors;

@SpringBootApplication
@EnableDiscoveryClient
@EnableScheduling
@Slf4j
@RibbonClient(name = "k8sdemo")
public class Springcloudk8sdemoApplication {

    public static void main(String[] args) {
        log.info("jvm:{}",
                ManagementFactory.getRuntimeMXBean().getInputArguments().stream().collect(Collectors.joining(" ")));
        SpringApplication.run(Springcloudk8sdemoApplication.class, args);
    }

    @Autowired
    private TestConfig testConfig;

    @Scheduled(fixedDelay = 5000)
    public void hello() {
        log.info("config:{}", testConfig);
    }

    @LoadBalanced
    @Bean
    RestTemplate restTemplate() {
        return new RestTemplate();
    }
}
在这个启动程序中我们做了几件事情:
- 定义了一个定时器,5秒一次输出配置(随后用于观察ConfigMap配置动态刷新)
- 定义了RestTemplate和Ribbon配合使用
- 在启动的时候输出下JVM参数,以便证明JVM参数(通过环境变量)注入成功
配置文件方面,首先是application.yaml:
spring:
  application:
    name: k8sdemo
  cloud:
    kubernetes:
      reload:
        enabled: true
      config:
        sources:
          - name: ${spring.application.name}
干了三件事情:
- 定义应用程序名称
- 指定ConfigMap名称为应用程序名,也就是k8sdemo
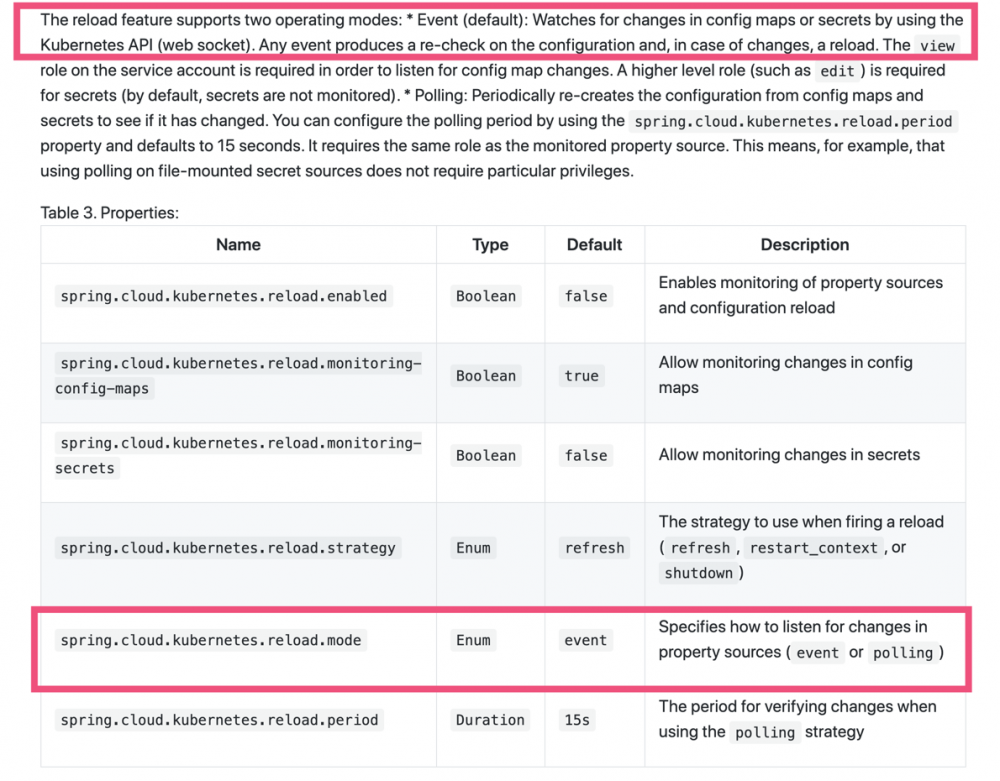
- 启用ConfigMap配置自动刷新(见下图,默认是event方式)
再定义一个bootstrap.yaml用于打开actuator的一些端点:
management:
  endpoint:
    restart:
      enabled: true
    health:
      enabled: true
    info:
      enabled: true
整个代码源码参见 https://github.com/JosephZhu1983/SpringCloudK8S
配置阿里云K8S集群
集群购买过程我就略去了,这些选项都可以勾上,Ingress特别记得需要,我们之后要在公网上进行测试。
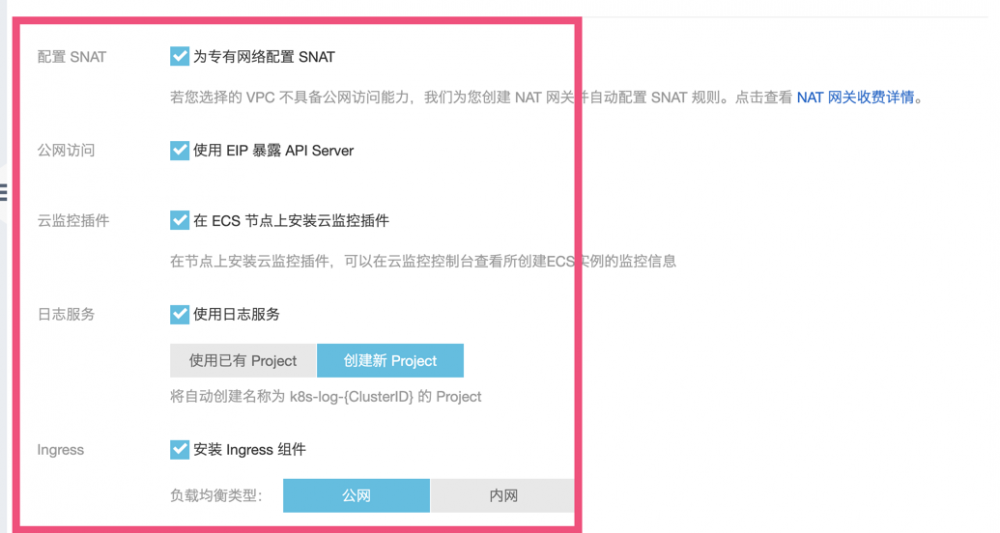
差不多30秒就有了一个K8S集群,这鬼东西要自己从头搭建一套高可用的没一天搞不下来,这里可以看到我买了一个3节点的托管版K8S,所谓托管版也就是K8S的管理节点我们直接用阿里云自己的,只需要买工作节点,省钱省心。

买好后记得配置下kubeconfig,这样才能通过kubectl访问集群。
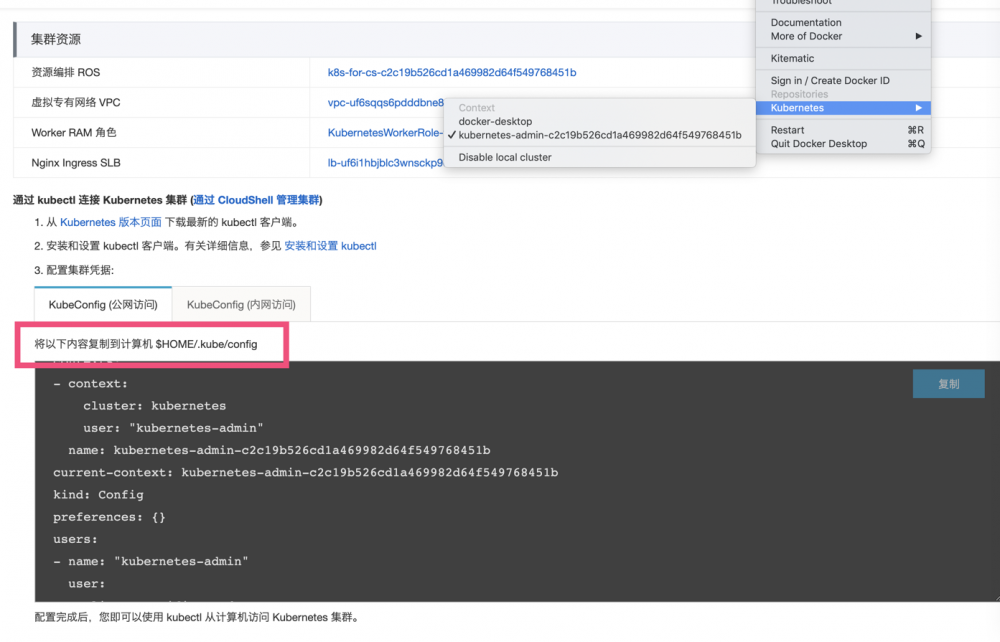
注意下,阿里云给出的配置别一股脑直接复制覆盖了原来的配置(比如你可能还有本地集群),也别直接粘贴到文件的最后,文件是有格式的,你需要把cluster、context和user三个配置分别复制到对应的地方。
构建镜像
我们知道在K8S部署程序不像虚拟机,唯一的交付是镜像,因此我们需要把镜像上传到阿里云。
首先,本地构建镜像:
mvn package docker:build -DskipTests
完成后查看镜像:

然后在阿里云开通镜像服务,创建自己的仓库:

根据里面的说明,给镜像打上标签后推送镜像到仓库:
docker login --username=【你的账号】 registry.cn-shanghai.aliyuncs.com
docker tag 80026bb476ce registry.cn-shanghai.aliyuncs.com/zhuyedocker/test:v6
docker push registry.cn-shanghai.aliyuncs.com/zhuyedocker/test:v6
完成后在镜像仓库查看镜像:

部署应用
通过镜像创建无状态应用:

创建的时候注意下面几点:
- 选择正确的镜像和Tag
- 我这里给予一个应用1C CPU 1.4G内存的配置
- 端口和应用一致,设置为8080
- 通过环境变量注入额外的JVM参数:-server -XX:+UseContainerSupport -XX:MaxRAMPercentage=50.0 -XX:InitialRAMPercentage=50.0 -XX:MinRAMPercentage=50.0 -XX:MaxMetaspaceSize=256M -XX:ThreadStackSize=256 -XX:+DisableExplicitGC -XX:+AlwaysPreTouch
这里我配置了JVM动态根据容器的资源限制来设置堆内存大小(此特性在部分版本的JDK8上支持,在9以后都支持),这比直接设置死Xms和Xmx好很多(设置死的话不方便进行扩容),这里我设置了50%,不建议设置更高(比如如果是2GB的内存限制,给堆设置为1.5GB显然是不合适的),毕竟Java进程所使用的内存除了堆之外还有堆外、线程栈(线程数*ThreadStackSize)、元数据区等,而且容器本身也有开销。
我这里展示的是编辑界面,创建界面略有不同但是类似:
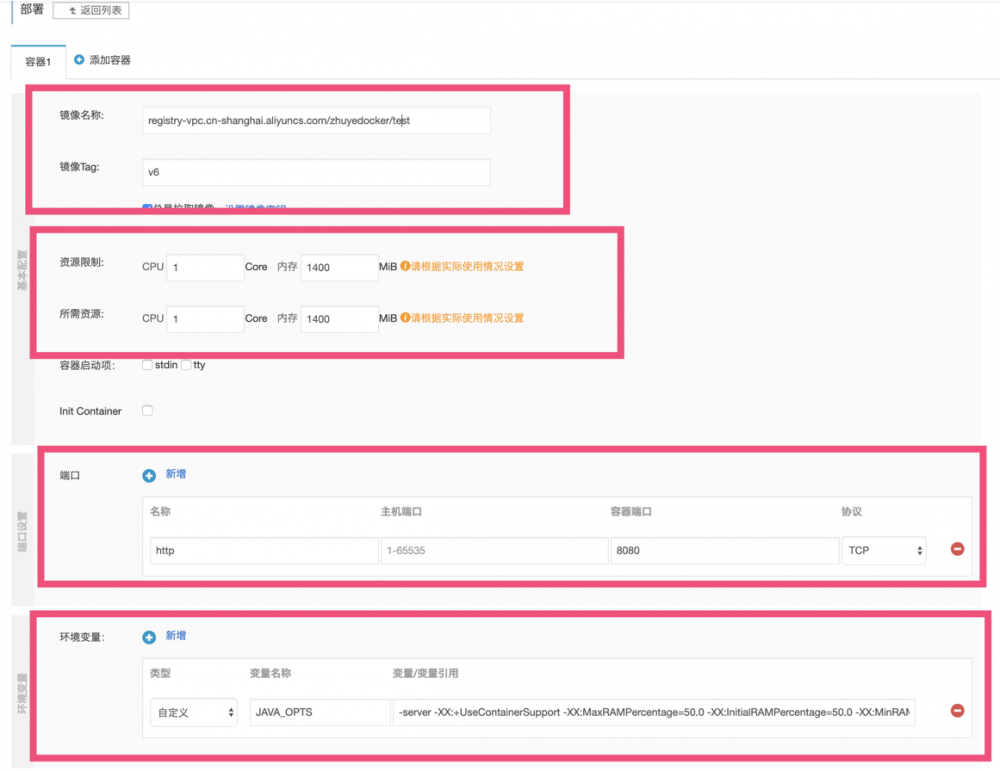
创建应用的时候你可以把Service和Ingress一并创建。

完成后可以进入应用详情看到2个节点状态都是运行中:

测试应用启动情况
来到Ingress界面可以看到我们的公网Ingress记录,可以直接点击访问:
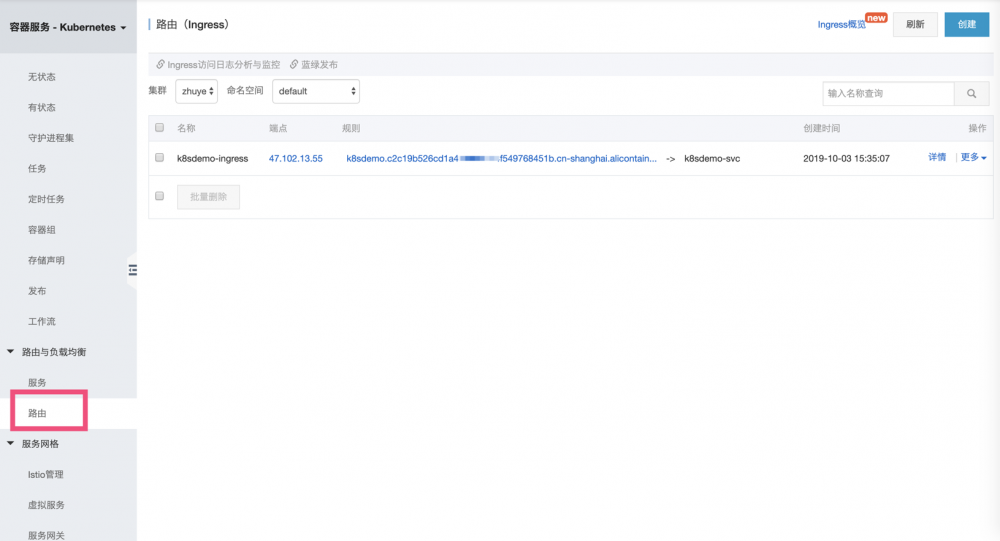
根节点输出的是IP,在之前的截图中我们可以看到服务运行在1.13和0.137两个IP上:

多刷新几次浏览器可以看到负载均衡的效果。
访问services可以查看到所有K8S的服务:

访问actuator/info可以看到有关K8S的详情(感谢SCK),显然我们代码里获取到的IIP是PodIP:

测试读取K8S配置
接下去我们来到配置项来配置ConfigMap:
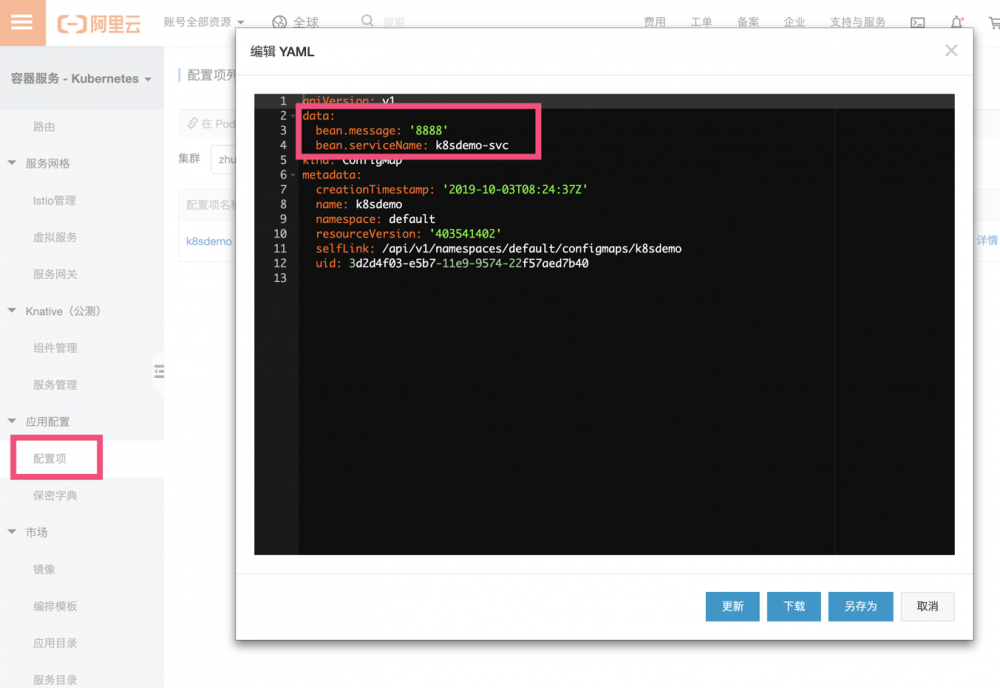
这里配置项的名称需要和配置文件中的对应起来,也就是k8sdemo。然后配置项的Key需要和代码中的对应:
我们来看看应用的日志:
2019-10-03 11:30:33.442 INFO 1 --- [pool-1-thread-1] m.j.s.Springcloudk8sdemoApplication : config:TestConfig(message=8888, serviceName=k8sdemo-svc)
的确正确获取到了配置,我们修改下配置项bean.message为9999,随后再来看看日志:
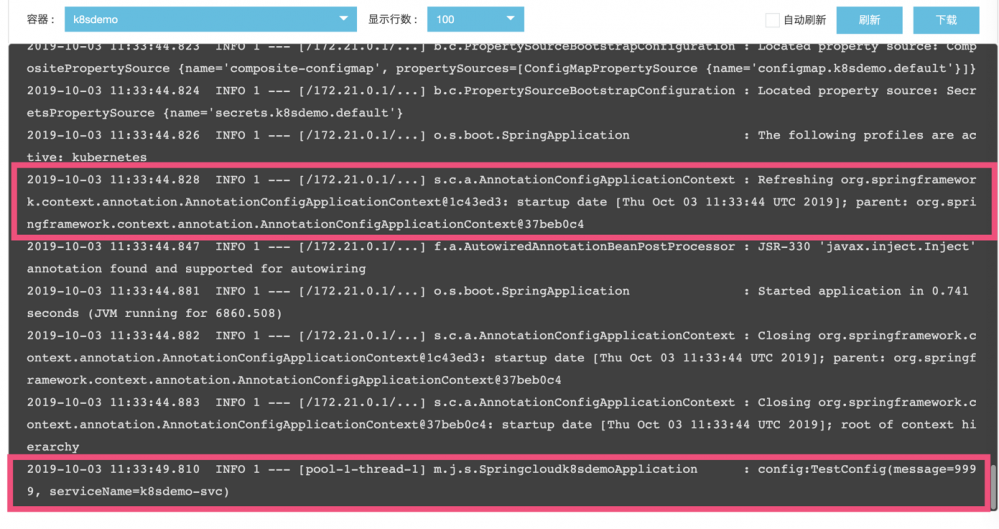
可以看到程序发现了配置的变更,刷新了上下文,然后获取到了最新的配置。
测试通过K8S服务发现进行服务调用:
访问client接口可以看到1.13正常从0.137获取到了数据:

多刷新几次:

我们访问到应用的负载均衡是由Ingress实现的,应用访问服务端的负载均衡是由Ribbon实现的。
查看JVM内存情况
还记得吗,我们在创建应用的时候给的内存是1.4GB,然后我们设置了JVM使用50%的内存(初始和最大都是50%),现在我们来看看是不是这样。
首先来看看pod的情况:

然后执行如下命令在Pod内运行jinfo
kubectl exec k8sdemo-7b44d9fbff-c4jkf -- jinfo 1
可以看到如下结果,初始和最大堆是700M左右,说明参数起作用了:

小结
本文我们简单展示了一下Spring Cloud Kubernetes的使用,以及如何通过阿里云的K8S集群来部署我们的微服务,我们看到:
- 如何通过SCK来读取ConfigMap的配置,支持动态刷新
- 如何通过SCK来使用K8S的服务发现进行服务调用
- JVM内存参数设置问题
- 如何把镜像推到阿里云并且在阿里云的K8S跑起来我们的镜像
有关K8S和基于Spring Boot/Spring Cloud的微服务结合使用,有几点需要注意:
- Spring Cloud 有自己的服务注册中心,比如Eureka。如果你希望统一使用K8S做服务发现,那么可以使用Spring Cloud Kubernetes。如果你希望使用Eureka作为服务发现,那么服务之间调用都建议通过Feign或Ribbon调用,而不是使用K8S的Service域名或Ingress调用,两套服务发现体系混用的话比较混乱而且有协同性问题。
- 在K8S而不是VM中部署应用,最主要的区别是不能认为服务的IP是固定的,因为Pod随时可能重新调度,对于某些框架,需要依赖有状态的应用IP,比如XXL Job这可能是一个问题,需要改造。
- Pod的生命周期和VM不同,考虑各种日志和OOM Dump的收集和保留问题。
- 应用无故重启,考虑健康检测、资源不足等问题,在K8S部署应用需要观察应用的重启问题,合理设置reques和limit配置以及JVM参数(比如-XX:+UseContainerSupport -XX:MaxRAMPercentage=50.0 -XX:InitialRAMPercentage=50.0 -XX:MinRAMPercentage=50.0),审查健康检测的配置是否合理。
- 本文标签: 目录 db tar 数据 HTML REST build 处理器 id ribbon tag 云 端口 UI App Eureka schema message 服务端 Spring cloud stream 源码 负载均衡 配置 CTO 插件 Uber Job 希望 springcloud 微服务 测试 https map 域名 list final ACE IO Dockerfile JVM web git 集群 代码 key 开发 生命 plugin docker tag 服务注册 apache ip cat GitHub XML dependencies http ORM springboot 注册中心 java pom 进程 管理 Docker 参数 src bean 高可用 Netflix 2019 spring maven 线程 Bootstrap Kubernetes 阿里云 client Service Spring Boot Feign 部署
- 版权声明: 本文为互联网转载文章,出处已在文章中说明(部分除外)。如果侵权,请联系本站长删除,谢谢。
- 本文海报: 生成海报一 生成海报二


![[HBLOG]公众号](https://www.liuhaihua.cn/img/qrcode_gzh.jpg)

