java架构之路-(SpringMVC篇)SpringMVC主要流程源码解析(上)源码执行流程
做过web项目的小伙伴,对于SpringMVC,Struts2都是在熟悉不过了,再就是我们比较古老的servlet,我们先来复习一下我们的servlet生命周期。
servlet生命周期
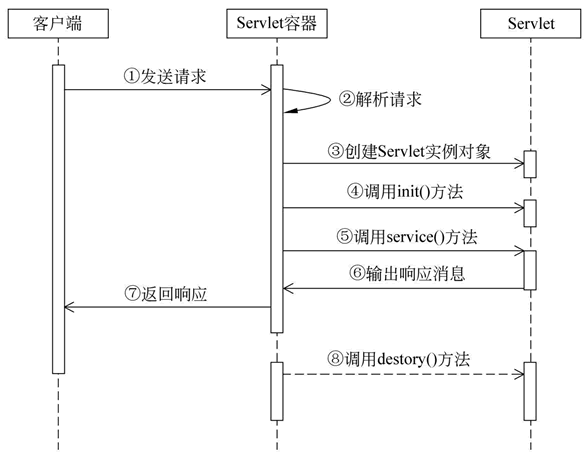
1)初始化阶段
当客户端向 Servlet 容器发出 HTTP 请求要求访问 Servlet 时,Servlet 容器首先会解析请求,检查内存中是否已经有了该 Servlet 对象,如果有,则直接使用该 Servlet 对象,如果没有,则创建 Servlet 实例对象,然后通过调用 init() 方法实现 Servlet 的初始化工作。需要注意的是,在 Servlet 的整个生命周期内,它的 init() 方法只能被调用一次。
2)运行阶段
这是 Servlet 生命周期中最重要的阶段,在这个阶段中,Servlet 容器会为这个请求创建代表 HTTP 请求的 ServletRequest 对象和代表 HTTP 响应的 ServletResponse 对象,然后将它们作为参数传递给 Servlet 的 service() 方法。service() 方法从 ServletRequest 对象中获得客户请求信息并处理该请求,通过 ServletResponse 对象生成响应结果。在 Servlet 的整个生命周期内,对于 Servlet 的每一次访问请求,Servlet 容器都会调用一次 Servlet 的 service() 方法,并且创建新的 ServletRequest 和 ServletResponse 对象,也就是说,service() 方法在 Servlet 的整个生命周期中会被调用多次。
3)销毁阶段
当服务器关闭或 Web 应用被移除出容器时,Servlet 随着 Web 应用的关闭而销毁。在销毁 Servlet 之前,Servlet 容器会调用 Servlet 的 destroy() 方法,以便让 Servlet 对象释放它所占用的资源。在 Servlet 的整个生命周期中,destroy() 方法也只能被调用一次。需要注意的是,Servlet 对象一旦创建就会驻留在内存中等待客户端的访问,直到服务器关闭或 Web 应用被移除出容器时,Servlet 对象才会销毁。
上述文字摘自 http://c.biancheng.net/view/3989.html
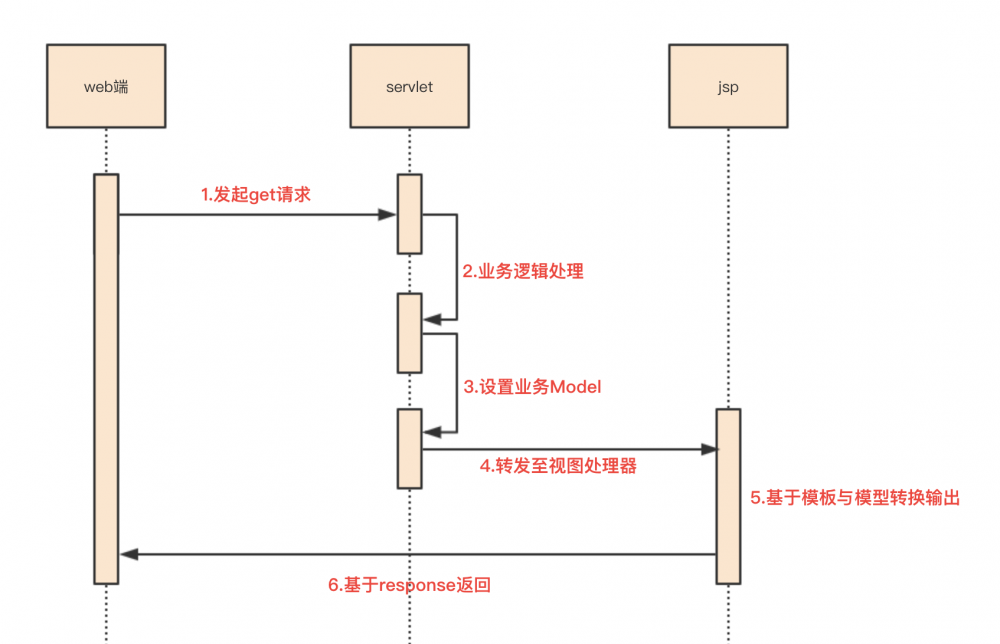
整个过程是比较复杂的,而且我们的参数是通过问号的形式来传递的,比如http://boke?id=1234,id为1234来传递的,如果我们要http://boke/1234这样来传递参数,servlet是做不到的,我们来看一下我们SpringMVC还有哪些优势。
1.基于注解方式的URL映射。比如http://boke/type/{articleType}/id/{articleId}
2.表单参数自动映射,我们不在需要request.getParament得到参数,参数可以通过name属性来自动映射到我们的控制层下。
3.缓存的处理,SprinMVC提供了缓存来提高我们的效率。
4.全局异常处理,通过过滤器也可以实现,只不过SprinMVC的方法会更简单一些。
5.拦截器的实现,通过过滤器也可以实现,只不过SprinMVC的方法会更简单一些。
6.下载处理
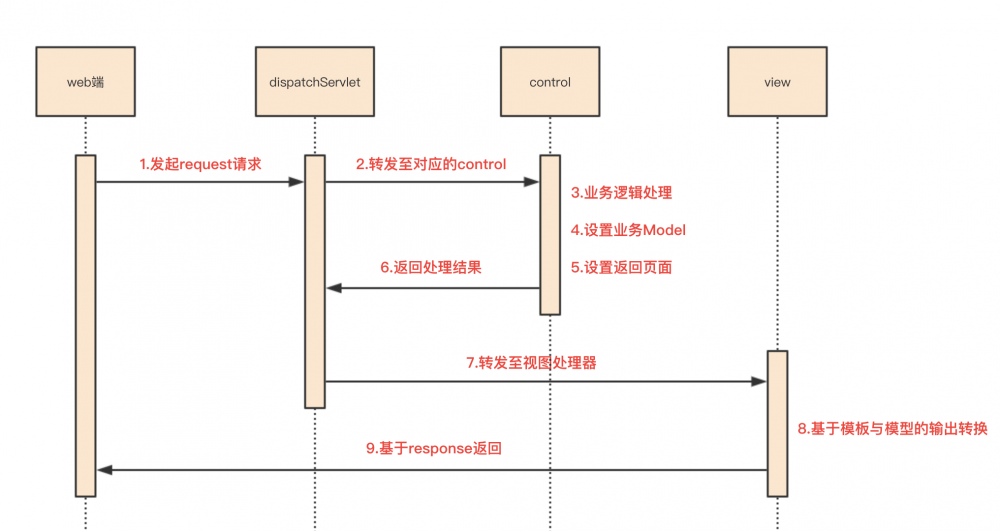
我们来对比一下SprinMVC的流程图。
SprinMVC的流程图
下面我们先熟悉一下源码,来个实例,来一个最精简启动SpringMVC。
最精简启动SpringMVC
建立Maven项目就不说了啊,先设置我们的pom文件
<dependencies>
    <dependency>
        <groupId>javax.servlet</groupId>
        <artifactId>javax.servlet-api</artifactId>
        <version>3.1.0</version>
    </dependency>
    <dependency>
        <groupId>org.springframework</groupId>
        <artifactId>spring-webmvc</artifactId>
        <version>4.3.8.RELEASE</version>
    </dependency>
</dependencies>
再来编写我们的Web.xml
<?xml version="1.0" encoding="UTF-8"?>
<web-app xmlns:xsi="http://www.w3.org/2001/XMLSchema-instance"
         xmlns="http://java.sun.com/xml/ns/javaee"
         xsi:schemaLocation="http://java.sun.com/xml/ns/javaee http://java.sun.com/xml/ns/javaee/web-app_3_0.xsd"
         id="WebApp_ID" version="3.0">
    <display-name>spring mvc</display-name>
    <servlet>
        <servlet-name>dispatcherServlet</servlet-name>
        <servlet-class>org.springframework.web.servlet.DispatcherServlet</servlet-class>
        <init-param>
            <param-name>contextConfigLocation</param-name>
            <param-value>
                classpath:/spring-mvc.xml
            </param-value>
        </init-param>
    </servlet>
    <servlet-mapping>
        <servlet-name>dispatcherServlet</servlet-name>
        <url-pattern>/</url-pattern>
    </servlet-mapping>
</web-app>
我们来简单些一个Controller
package com.springmvcbk.controller;

import org.springframework.web.servlet.ModelAndView;
import org.springframework.web.servlet.mvc.Controller;
import javax.servlet.http.HttpServletRequest;
import javax.servlet.http.HttpServletResponse;

public class SpringmvcbkController implements Controller {

    public ModelAndView handleRequest(HttpServletRequest request, HttpServletResponse response) throws Exception {
        ModelAndView modelAndView = new ModelAndView();
        modelAndView.setViewName("/WEB-INF/page/index.jsp");
        modelAndView.addObject("name","张三");
        return modelAndView;
    }
}
写一个index.jsp页面吧。
<%@ page language="java" contentType="text/html; charset=UTF-8"
         pageEncoding="UTF-8" %>
<!DOCTYPE html PUBLIC "-//W3C//DTD HTML 4.01 Transitional//EN" "http://www.w3.org/TR/html4/loose.dtd">
<html>
<head>
    <meta http-equiv="Content-Type" content="text/html; charset=UTF-8">
    <title>Insert title here</title>
</head>
<body>
good man is love
${name}
</body>
</html>
最后还有我们的spring-mvc.xml
<?xml version="1.0" encoding="GBK"?>
<beans xmlns="http://www.springframework.org/schema/beans"
       xmlns:xsi="http://www.w3.org/2001/XMLSchema-instance"
       xmlns:context="http://www.springframework.org/schema/context"
       xmlns:mvc="http://www.springframework.org/schema/mvc"
       xsi:schemaLocation="http://www.springframework.org/schema/beans
       http://www.springframework.org/schema/beans/spring-beans.xsd
       http://www.springframework.org/schema/context
       http://www.springframework.org/schema/context/spring-context.xsd
       http://www.springframework.org/schema/mvc
       http://www.springframework.org/schema/mvc/spring-mvc.xsd">

    <bean name="/hello" class="com.springmvcbk.controller.SpringmvcbkController"/>
</beans>
注意自己的路径啊,走起,测试一下。
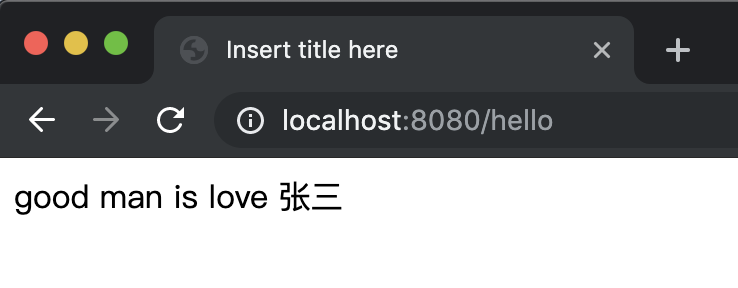
这样我们最精简的SpringMVC就配置完成了。讲一下这段代码是如何执行的,上面图我们也看到了,请求过来优先去找我们的dispatchServlet,也就是我们Spring-MVC.xml配置文件,通过name属性来找的。找到我们对应的类,我们的继承我们的Controller接口来处理我们的请求,也就是图中的3,4,5步骤。然后再把结果塞回给dispatchServlet。返回页面,走起。
这个是我们表层的理解,后续我们逐渐会深入的,我们再来看另外一种实现方式。
package com.springmvcbk.controller;

import org.springframework.web.HttpRequestHandler;
import javax.servlet.ServletException;
import javax.servlet.http.HttpServletRequest;
import javax.servlet.http.HttpServletResponse;
import java.io.IOException;

public class SpringmvcbkController2 implements HttpRequestHandler {

    public void handleRequest(HttpServletRequest httpServletRequest, HttpServletResponse httpServletResponse) throws ServletException, IOException {
        httpServletRequest.setAttribute("name","李斯");
        httpServletRequest.getRequestDispatcher("/WEB-INF/page/index.jsp").forward(httpServletRequest,httpServletResponse);
    }
}

这种方式也是可以的。
整个过程是如何实现的?
1. dispatchServlet 如何找到对应的Control?
2. 如何执行调用Control 当中的业务方法?
在面试中要回答好上述问题,就必须得弄清楚spring mvc 的体系组成。
spring mvc 的体系组成
只是举了几个例子的实现,SpringMVC还有很多的实现方法。我们来看一下内部都有什么核心的组件吧。
HandlerMapping->url与控制器的映谢
HandlerAdapter->控制器执行适配器
ViewResolver->视图仓库
view->具体解析视图
HandlerExceptionResolver->异常捕捕捉器
HandlerInterceptor->拦截器
稍后我们会逐个去说一下这些组件,我们看一下我们的UML类图吧,讲解一下他们之间是如果先后工作调用的。
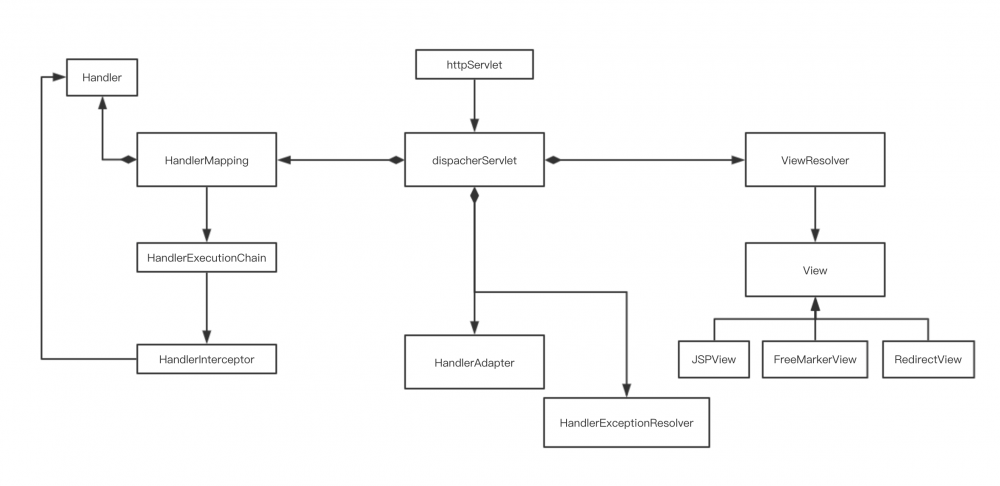 图没上色,也没写汉字注释,看着有点蒙圈....我来说一下咋回事。HTTPServlet发出请求,我们的DispatcherServlet拿到请求去匹配我们的HandlerMapping,经过HandlerMapping下的HandlerExecutionChain,HandlerInterceptor生成我们的Handl,返回给DispatcherServlet,拿到了Handl,给我们的Handl传递给HandlerAdapter进行处理,得到我们的View再有DispatcherServlet传递给ViewResolver,经由View处理,返回response请求。
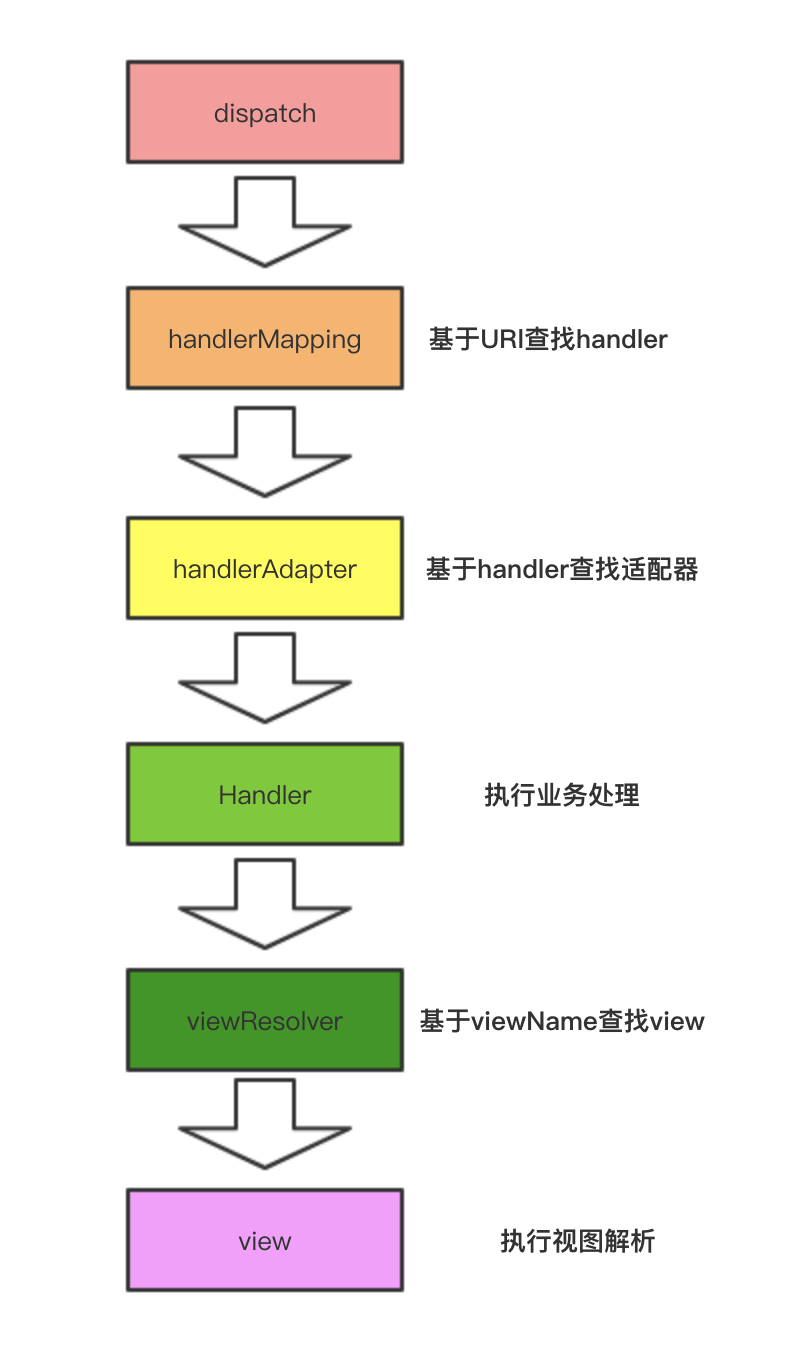
我们先来看看我们的Handler是如何生产的。
Handler
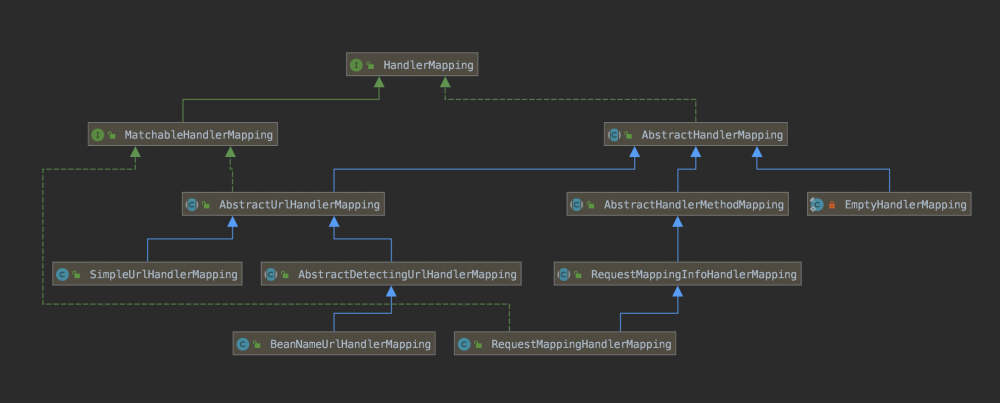
这个是SpringMVC自己的继承UML图,最下层的两个是我们常用的,一个是通过name来注入的,一个是通过注解的方式来注入的,他是通过一系列的HandlerInterceptor才生成我们的Handler。
目前主流的三种mapping 如下
1. SimpleUrlHandlerMapping:基于手动配置url与control映谢
2. BeanNameUrlHandlerMapping: 基于ioc name 中已 "/" 开头的Bean时行 注册至映谢.
3. RequestMappingHandlerMapping:基于@RequestMapping注解配置对应映谢
另外两个不说了,太常见不过了。我们来尝试自己配置一个SimpleUrlHandlerMapping
<?xml version="1.0" encoding="GBK"?>
<beans xmlns="http://www.springframework.org/schema/beans"
       xmlns:xsi="http://www.w3.org/2001/XMLSchema-instance"
       xmlns:context="http://www.springframework.org/schema/context"
       xmlns:mvc="http://www.springframework.org/schema/mvc"
       xsi:schemaLocation="http://www.springframework.org/schema/beans
       http://www.springframework.org/schema/beans/spring-beans.xsd
       http://www.springframework.org/schema/context
       http://www.springframework.org/schema/context/spring-context.xsd
       http://www.springframework.org/schema/mvc
       http://www.springframework.org/schema/mvc/spring-mvc.xsd">
    <bean name="hello2" class="com.springmvcbk.controller.SpringmvcbkController2"/>

    <bean class="org.springframework.web.servlet.handler.SimpleUrlHandlerMapping">
        <property name="urlMap">
            <props>
                <prop key="hello.do">hello2</prop>
            </props>
        </property>
    </bean>
</beans>
注意SimpleUrlHandlerMapping是没有/的,而我们的BeanNameUrlHandlerMapping必须加/的。
我们来走一下动态代码,只看取得Handler这段,(初始化的阶段可以自己研究一下)
 1 /**
 2  * Return the HandlerExecutionChain for this request.
 3  * <p>Tries all handler mappings in order.
 4  * @param request current HTTP request
 5  * @return the HandlerExecutionChain, or {@code null} if no handler could be found
 6  */
 7 protected HandlerExecutionChain getHandler(HttpServletRequest request) throws Exception {
 8     for (HandlerMapping hm : this.handlerMappings) {
 9         if (logger.isTraceEnabled()) {
10             logger.trace(
11                     "Testing handler map [" + hm + "] in DispatcherServlet with name '" + getServletName() + "'");
12         }
13         HandlerExecutionChain handler = hm.getHandler(request);
14         if (handler != null) {
15             return handler;
16         }
17     }
18     return null;
19 }
我们找到我们的DispatcherServlet类的getHandler方法上。在源码的1150行,也就是我上图的第7行。打个断点。优先遍历我们handlerMappings集合,找到以后去取我们的handler。
HandlerExecutionChain handler = hm.getHandler(request);方法就是获得我们的Handler方法,这里只是获得了一个HandlerExecutionChain执行链,也就是说我们在找到handler的前后都可能做其它的处理。再来深入一下看getHandler方法。
这时会调用AbstractHandlerMapping类的getHandler方法,然后优先去AbstractUrlHandlerMapping的getHandlerInternal取得handler
 1 /**
 2  * Look up a handler for the URL path of the given request.
 3  * @param request current HTTP request
 4  * @return the handler instance, or {@code null} if none found
 5  */
 6 @Override
 7 protected Object getHandlerInternal(HttpServletRequest request) throws Exception {
 8     String lookupPath = getUrlPathHelper().getLookupPathForRequest(request);//取得路径
 9     Object handler = lookupHandler(lookupPath, request);//拿着路径去LinkedHashMap查找是否存在
10     if (handler == null) {
11         // We need to care for the default handler directly, since we need to
12         // expose the PATH_WITHIN_HANDLER_MAPPING_ATTRIBUTE for it as well.
13         Object rawHandler = null;
14         if ("/".equals(lookupPath)) {
15             rawHandler = getRootHandler();
16         }
17         if (rawHandler == null) {
18             rawHandler = getDefaultHandler();
19         }
20         if (rawHandler != null) {
21             // Bean name or resolved handler?
22             if (rawHandler instanceof String) {
23                 String handlerName = (String) rawHandler;
24                 rawHandler = getApplicationContext().getBean(handlerName);
25             }
26             validateHandler(rawHandler, request);
27             handler = buildPathExposingHandler(rawHandler, lookupPath, lookupPath, null);
28         }
29     }
30     if (handler != null && logger.isDebugEnabled()) {
31         logger.debug("Mapping [" + lookupPath + "] to " + handler);
32     }
33     else if (handler == null && logger.isTraceEnabled()) {
34         logger.trace("No handler mapping found for [" + lookupPath + "]");
35     }
36     return handler;
37 }
得到request的路径,带着路径去我们已经初始化好的LinkedHashMap查看是否存在。
/**
 * Look up a handler instance for the given URL path.
 * <p>Supports direct matches, e.g. a registered "/test" matches "/test",
 * and various Ant-style pattern matches, e.g. a registered "/t*" matches
 * both "/test" and "/team". For details, see the AntPathMatcher class.
 * <p>Looks for the most exact pattern, where most exact is defined as
 * the longest path pattern.
 * @param urlPath URL the bean is mapped to
 * @param request current HTTP request (to expose the path within the mapping to)
 * @return the associated handler instance, or {@code null} if not found
 * @see #exposePathWithinMapping
 * @see org.springframework.util.AntPathMatcher
 */
protected Object lookupHandler(String urlPath, HttpServletRequest request) throws Exception {
    // Direct match?
    Object handler = this.handlerMap.get(urlPath);//拿着路径去LinkedHashMap查找是否存在
    if (handler != null) {
        // Bean name or resolved handler?
        if (handler instanceof String) {
            String handlerName = (String) handler;
            handler = getApplicationContext().getBean(handlerName);
        }
        validateHandler(handler, request);
        return buildPathExposingHandler(handler, urlPath, urlPath, null);
    }

    // Pattern match?
    List<String> matchingPatterns = new ArrayList<String>();
    for (String registeredPattern : this.handlerMap.keySet()) {
        if (getPathMatcher().match(registeredPattern, urlPath)) {
            matchingPatterns.add(registeredPattern);
        }
        else if (useTrailingSlashMatch()) {
            if (!registeredPattern.endsWith("/") && getPathMatcher().match(registeredPattern + "/", urlPath)) {
                matchingPatterns.add(registeredPattern +"/");
            }
        }
    }

    String bestMatch = null;
    Comparator<String> patternComparator = getPathMatcher().getPatternComparator(urlPath);
    if (!matchingPatterns.isEmpty()) {
        Collections.sort(matchingPatterns, patternComparator);
        if (logger.isDebugEnabled()) {
            logger.debug("Matching patterns for request [" + urlPath + "] are " + matchingPatterns);
        }
        bestMatch = matchingPatterns.get(0);
    }
    if (bestMatch != null) {
        handler = this.handlerMap.get(bestMatch);
        if (handler == null) {
            if (bestMatch.endsWith("/")) {
                handler = this.handlerMap.get(bestMatch.substring(0, bestMatch.length() - 1));
            }
            if (handler == null) {
                throw new IllegalStateException(
                        "Could not find handler for best pattern match [" + bestMatch + "]");
            }
        }
        // Bean name or resolved handler?
        if (handler instanceof String) {
            String handlerName = (String) handler;
            handler = getApplicationContext().getBean(handlerName);
        }
        validateHandler(handler, request);
        String pathWithinMapping = getPathMatcher().extractPathWithinPattern(bestMatch, urlPath);

        // There might be multiple 'best patterns', let's make sure we have the correct URI template variables
        // for all of them
        Map<String, String> uriTemplateVariables = new LinkedHashMap<String, String>();
        for (String matchingPattern : matchingPatterns) {
            if (patternComparator.compare(bestMatch, matchingPattern) == 0) {
                Map<String, String> vars = getPathMatcher().extractUriTemplateVariables(matchingPattern, urlPath);
                Map<String, String> decodedVars = getUrlPathHelper().decodePathVariables(request, vars);
                uriTemplateVariables.putAll(decodedVars);
            }
        }
        if (logger.isDebugEnabled()) {
            logger.debug("URI Template variables for request [" + urlPath + "] are " + uriTemplateVariables);
        }
        return buildPathExposingHandler(handler, bestMatch, pathWithinMapping, uriTemplateVariables);
    }

    // No handler found...
    return null;
}
到这里其实我们就可以得到我们的Handler了,但是SpringMVC又经过了buildPathExposingHandler处理,经过HandlerExecutionChain,看一下是否需要做请求前处理,然后得到我们的Handler。得到Handler以后也并没有急着返回,又经过了一次HandlerExecutionChain处理才返回的。
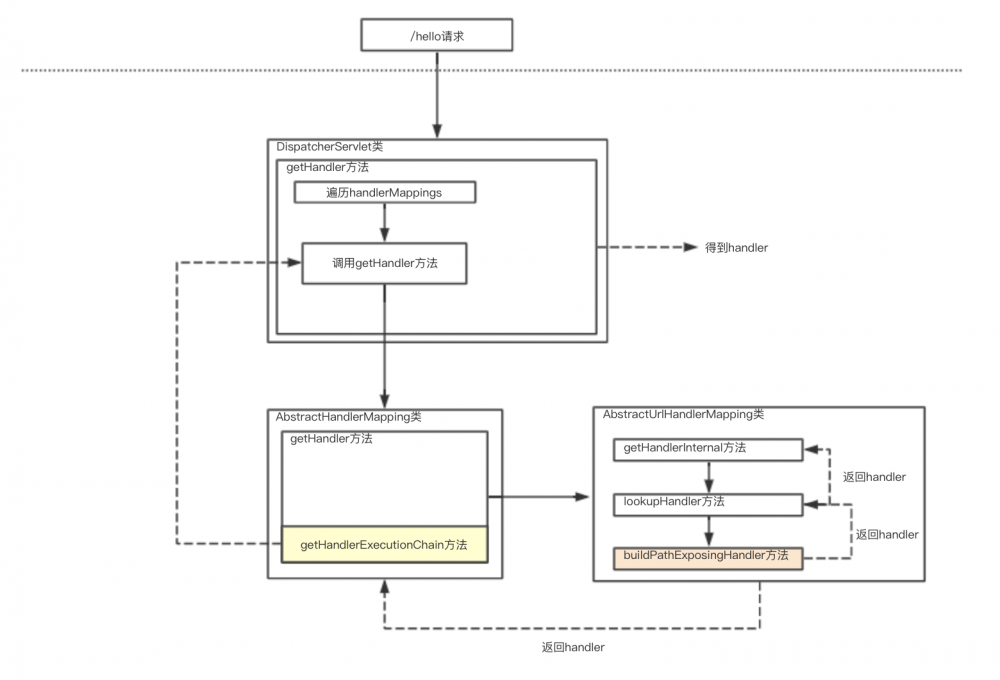
图中我们可以看到去和回来的时候都经过了HandlerExecutionChain处理的。就这样我们的handler就得到了。注意的三种mapping的方式可能有略微差异,但不影响大体流程。
HandlerAdapter
拿到我们的Handler,我们该查我们的HandlerAdapter了,也就是我们的适配器。我们回到我们的DispatchServlet类中
/**
 * Return the HandlerAdapter for this handler object.
 * @param handler the handler object to find an adapter for
 * @throws ServletException if no HandlerAdapter can be found for the handler. This is a fatal error.
 */
protected HandlerAdapter getHandlerAdapter(Object handler) throws ServletException {
    for (HandlerAdapter ha : this.handlerAdapters) {
        if (logger.isTraceEnabled()) {
            logger.trace("Testing handler adapter [" + ha + "]");
        }
        if (ha.supports(handler)) {
            return ha;
        }
    }
    throw new ServletException("No adapter for handler [" + handler +
            "]: The DispatcherServlet configuration needs to include a HandlerAdapter that supports this handler");
}
还是我们的循环调用,我们的适配器有四种,分别是AbstractHandlerMethodAdapter,HTTPRequestHandlerAdapter,SimpleControllerHandlerAdapter,SimpleServletHandlerAdapter

mv = ha.handle(processedRequest, response, mappedHandler.getHandler());方法开始处理我们的请求,返回ModelAndView。
返回以后,我们交给我们的ViewResolver来处理。
ViewResolver

ContentNegotiatingViewResolver下面还有很多子类,我就不展示了。 选择对应的ViewResolver解析我们的ModelAndView得我到我们的view进行返回。
说到这一个请求的流程就算是大致结束了。我们来看两段核心的代码。
/**
 * Process the actual dispatching to the handler.
 * <p>The handler will be obtained by applying the servlet's HandlerMappings in order.
 * The HandlerAdapter will be obtained by querying the servlet's installed HandlerAdapters
 * to find the first that supports the handler class.
 * <p>All HTTP methods are handled by this method. It's up to HandlerAdapters or handlers
 * themselves to decide which methods are acceptable.
 * @param request current HTTP request
 * @param response current HTTP response
 * @throws Exception in case of any kind of processing failure
 */
protected void doDispatch(HttpServletRequest request, HttpServletResponse response) throws Exception {
    HttpServletRequest processedRequest = request;
    HandlerExecutionChain mappedHandler = null;
    boolean multipartRequestParsed = false;

    WebAsyncManager asyncManager = WebAsyncUtils.getAsyncManager(request);

    try {
        ModelAndView mv = null;
        Exception dispatchException = null;

        try {
            processedRequest = checkMultipart(request);
            multipartRequestParsed = (processedRequest != request);

            // Determine handler for the current request.
            mappedHandler = getHandler(processedRequest);
            if (mappedHandler == null || mappedHandler.getHandler() == null) {
                noHandlerFound(processedRequest, response);
                return;
            }

            // Determine handler adapter for the current request.
            HandlerAdapter ha = getHandlerAdapter(mappedHandler.getHandler());

            // Process last-modified header, if supported by the handler.
            String method = request.getMethod();
            boolean isGet = "GET".equals(method);
            if (isGet || "HEAD".equals(method)) {
                long lastModified = ha.getLastModified(request, mappedHandler.getHandler());
                if (logger.isDebugEnabled()) {
                    logger.debug("Last-Modified value for [" + getRequestUri(request) + "] is: " + lastModified);
                }
                if (new ServletWebRequest(request, response).checkNotModified(lastModified) && isGet) {
                    return;
                }
            }

            if (!mappedHandler.applyPreHandle(processedRequest, response)) {
                return;
            }

            // Actually invoke the handler.
            mv = ha.handle(processedRequest, response, mappedHandler.getHandler());

            if (asyncManager.isConcurrentHandlingStarted()) {
                return;
            }

            applyDefaultViewName(processedRequest, mv);
            mappedHandler.applyPostHandle(processedRequest, response, mv);
        }
        catch (Exception ex) {
            dispatchException = ex;
        }
        catch (Throwable err) {
            // As of 4.3, we're processing Errors thrown from handler methods as well,
            // making them available for @ExceptionHandler methods and other scenarios.
            dispatchException = new NestedServletException("Handler dispatch failed", err);
        }
        processDispatchResult(processedRequest, response, mappedHandler, mv, dispatchException);
    }
    catch (Exception ex) {
        triggerAfterCompletion(processedRequest, response, mappedHandler, ex);
    }
    catch (Throwable err) {
        triggerAfterCompletion(processedRequest, response, mappedHandler,
                new NestedServletException("Handler processing failed", err));
    }
    finally {
        if (asyncManager.isConcurrentHandlingStarted()) {
            // Instead of postHandle and afterCompletion
            if (mappedHandler != null) {
                mappedHandler.applyAfterConcurrentHandlingStarted(processedRequest, response);
            }
        }
        else {
            // Clean up any resources used by a multipart request.
            if (multipartRequestParsed) {
                cleanupMultipart(processedRequest);
            }
        }
    }
}
这个是DispatchServlet类里面doDispatch方法,也就是我们请求来的时候进行解析的方法。
/**
 * Render the given ModelAndView.
 * <p>This is the last stage in handling a request. It may involve resolving the view by name.
 * @param mv the ModelAndView to render
 * @param request current HTTP servlet request
 * @param response current HTTP servlet response
 * @throws ServletException if view is missing or cannot be resolved
 * @throws Exception if there's a problem rendering the view
 */
protected void render(ModelAndView mv, HttpServletRequest request, HttpServletResponse response) throws Exception {
    // Determine locale for request and apply it to the response.
    Locale locale = this.localeResolver.resolveLocale(request);
    response.setLocale(locale);

    View view;
    if (mv.isReference()) {
        // We need to resolve the view name.
        view = resolveViewName(mv.getViewName(), mv.getModelInternal(), locale, request);
        if (view == null) {
            throw new ServletException("Could not resolve view with name '" + mv.getViewName() +
                    "' in servlet with name '" + getServletName() + "'");
        }
    }
    else {
        // No need to lookup: the ModelAndView object contains the actual View object.
        view = mv.getView();
        if (view == null) {
            throw new ServletException("ModelAndView [" + mv + "] neither contains a view name nor a " +
                    "View object in servlet with name '" + getServletName() + "'");
        }
    }

    // Delegate to the View object for rendering.
    if (logger.isDebugEnabled()) {
        logger.debug("Rendering view [" + view + "] in DispatcherServlet with name '" + getServletName() + "'");
    }
    try {
        if (mv.getStatus() != null) {
            response.setStatus(mv.getStatus().value());
        }
        view.render(mv.getModelInternal(), request, response);
    }
    catch (Exception ex) {
        if (logger.isDebugEnabled()) {
            logger.debug("Error rendering view [" + view + "] in DispatcherServlet with name '" +
                    getServletName() + "'", ex);
        }
        throw ex;
    }
}
这个是DispatchServlet类里面render方法,也就是我们处理完成要返回时的方法。大家有兴趣的可以逐行逐步的去走下流程。里面东西也不少的,这里就不一一讲解了。


最进弄了一个公众号,小菜技术,欢迎大家的加入

- 本文标签: CEO IO equals root key ip src UI trigger 遍历 id tag 源码 参数 tar strace 注释 ioc web XML ArrayList servlet build 配置 IOS 解析 MQ 类图 classpath SpringMVC 生命 代码 bean java Collections HashMap pom schema map JAVA架构 HTML Struts2 适配器 测试 list js http API Service spring 实例 回答 maven final cat 下载 App Collection 缓存 服务器 value https W3C IDE Property parse bug rmi tab dependencies find ACE
- 版权声明: 本文为互联网转载文章,出处已在文章中说明(部分除外)。如果侵权,请联系本站长删除,谢谢。
- 本文海报: 生成海报一 生成海报二


![[HBLOG]公众号](https://www.liuhaihua.cn/img/qrcode_gzh.jpg)

