SpringCloud:OAuth2和JWT
搭建一个oauth2服务器,包括认证、授权和资源服务器
本文分为两个部分
- 第一部分比较简单,将客户端信息和用户信息固定在程序里,令牌存储在内存中
- 第二部分从数据库读取用户信息,使用jwt生成令牌
一、简化版
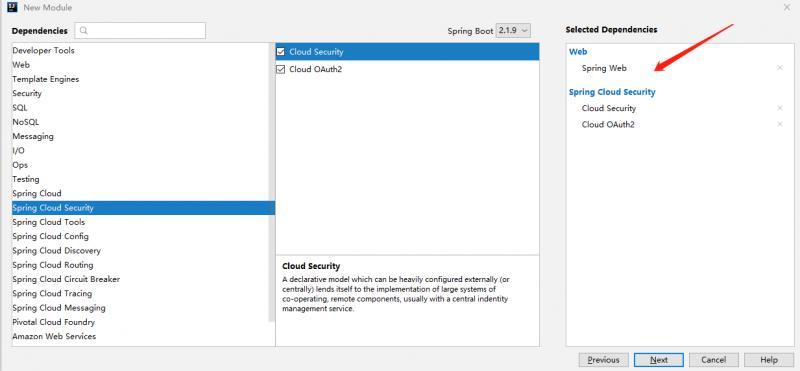
使用Spring Initializr新建项目,勾选如下三个选项
pom.xml
<dependencies>
        <dependency>
            <groupId>org.springframework.boot</groupId>
            <artifactId>spring-boot-starter-web</artifactId>
        </dependency>
        <dependency>
            <groupId>org.springframework.cloud</groupId>
            <artifactId>spring-cloud-starter-oauth2</artifactId>
        </dependency>
        <dependency>
            <groupId>org.springframework.cloud</groupId>
            <artifactId>spring-cloud-starter-security</artifactId>
        </dependency>

        <dependency>
            <groupId>org.springframework.boot</groupId>
            <artifactId>spring-boot-starter-test</artifactId>
            <scope>test</scope>
        </dependency>
    </dependencies>
复制代码
配置Spring Security
新建类WebSecurityConfig 继承 WebSecurityConfigurerAdapter,并添加@Configuration @EnableWebSecurity注解,重写三个方法,代码如下,详细讲解在代码下面
@Configuration
@EnableWebSecurity
public class WebSecurityConfig extends WebSecurityConfigurerAdapter {
    @Autowired
    private UserServiceDetail userServiceDetail;

    @Bean
    public PasswordEncoder passwordEncoder() {
        return new BCryptPasswordEncoder();
    }
    @Override
    protected void configure(AuthenticationManagerBuilder auth) throws Exception {
        auth.userDetailsService(userServiceDetail).passwordEncoder(passwordEncoder());
        //内存存储
//        auth
//                .inMemoryAuthentication()
//                .passwordEncoder(passwordEncoder())
//                .withUser("user")
//                .password(passwordEncoder().encode("user"))
//                .roles("USER");

    }


    /**
     * 配置了默认表单登陆以及禁用了 csrf 功能,并开启了httpBasic 认证
     *
     * @param http
     * @throws Exception
     */
    @Override
    protected void configure(HttpSecurity http) throws Exception {
        http    // 配置登陆页/login并允许访问
                .formLogin().permitAll()
                // 登出页
                .and().logout().logoutUrl("/logout").logoutSuccessUrl("/")
                // 其余所有请求全部需要鉴权认证
                .and().authorizeRequests().anyRequest().authenticated()
                // 由于使用的是JWT,我们这里不需要csrf
                .and().csrf().disable();
    }

    @Override
    @Bean
    public AuthenticationManager authenticationManagerBean() throws Exception {
        return super.authenticationManagerBean();
    }
}
复制代码
主要讲解一下
protected void configure(AuthenticationManagerBuilder auth) throws Exception
复制代码
这个方法是用来验证用户信息的。将前端输入的用户名和密码与数据库匹配,如果有这个用户才能认证成功。我们注入了一个 UserServiceDetail ,这个service的功能就是验证。 .passwordEncoder(passwordEncoder()) 是使用加盐解密。
UserServiceDetail
实现了 UserDetailsService 接口,所以需要实现唯一的方法
package zcs.oauthserver.service;

import org.springframework.security.core.authority.SimpleGrantedAuthority;
import org.springframework.security.core.userdetails.UserDetails;
import org.springframework.security.core.userdetails.UserDetailsService;
import org.springframework.security.core.userdetails.UsernameNotFoundException;
import org.springframework.stereotype.Service;
import zcs.oauthserver.model.UserModel;

import java.util.ArrayList;
import java.util.List;

@Service
public class UserServiceDetail implements UserDetailsService {
    @Override
    public UserDetails loadUserByUsername(String s) throws UsernameNotFoundException {
        List<SimpleGrantedAuthority> authorities = new ArrayList<>();
        authorities.add(new SimpleGrantedAuthority("ROLE"));
        return new UserModel("user","user",authorities);
    }
}
复制代码
这里先用假参数实现功能,后面添加数据库
参数s是前端输入的用户名,通过该参数查找数据库,获取密码和角色权限,最后将这三个数据封装到 UserDetails 接口的实现类中返回。这里封装的类可以使用 org.springframework.security.core.userdetails.User 或者自己实现 UserDetails 接口。
UserModel
实现 UserDetails 接口
package zcs.oauthserver.model;

import org.springframework.security.core.GrantedAuthority;
import org.springframework.security.core.authority.SimpleGrantedAuthority;
import org.springframework.security.core.userdetails.UserDetails;
import org.springframework.security.crypto.bcrypt.BCryptPasswordEncoder;

import java.util.Collection;
import java.util.List;

public class UserModel implements UserDetails {
    private String userName;

    private String password;

    private List<SimpleGrantedAuthority> authorities;

    public UserModel(String userName, String password, List<SimpleGrantedAuthority> authorities) {
        this.userName = userName;
        this.password = new BCryptPasswordEncoder().encode(password);;
        this.authorities = authorities;
    }

    @Override
    public Collection<? extends GrantedAuthority> getAuthorities() {
        return authorities;
    }

    @Override
    public String getPassword() {
        return password;
    }

    @Override
    public String getUsername() {
        return userName;
    }

    @Override
    public boolean isAccountNonExpired() {
        return true;
    }

    @Override
    public boolean isAccountNonLocked() {
        return true;
    }

    @Override
    public boolean isCredentialsNonExpired() {
        return true;
    }

    @Override
    public boolean isEnabled() {
        return true;
    }
}

复制代码
新增username、password和authorities,最后一个存储的是该用户的权限列表,也就是用户拥有能够访问哪些资源的权限。 密码加盐处理 。
配置Oauth2认证服务器
新建配置类AuthorizationServerConfig 继承 AuthorizationServerConfigurerAdapter,并添加@Configuration @EnableAuthorizationServer注解表明是一个认证服务器
重写三个函数
ClientDetailsServiceConfigurer
AuthorizationServerSecurityConfigurer
AuthorizationServerEndpointsConfigurer
@Configuration
@EnableAuthorizationServer
public class AuthorizationServerConfig extends AuthorizationServerConfigurerAdapter {
	//从WebSecurityConfig加载
    @Autowired
    private AuthenticationManager authenticationManager;
    //内存存储令牌
    private TokenStore tokenStore = new InMemoryTokenStore();

    /**
     * 配置客户端详细信息
     *
     * @param clients
     * @throws Exception
     */
    @Override
    public void configure(ClientDetailsServiceConfigurer clients) throws Exception {
        clients.inMemory()
            	//客户端ID
                .withClient("zcs")
                .secret(new BCryptPasswordEncoder().encode("zcs"))
                //权限范围
                .scopes("app")
            	//授权码模式
                .authorizedGrantTypes("authorization_code")
                //随便写
                .redirectUris("www.baidu.com");
//        clients.withClientDetails(new JdbcClientDetailsService(dataSource));
    }

    @Override
    public void configure(AuthorizationServerEndpointsConfigurer endpoints) throws Exception {
        endpoints.tokenStore(tokenStore)
                .authenticationManager(authenticationManager);
    }

    /**
     * 在令牌端点定义安全约束
     * 允许表单验证,浏览器直接发送post请求即可获取tocken
     * 这部分写这样就行
     * @param security
     * @throws Exception
     */
    @Override
    public void configure(AuthorizationServerSecurityConfigurer security) throws Exception {
        security
                // 开启/oauth/token_key验证端口无权限访问
                .tokenKeyAccess("permitAll()")
                // 开启/oauth/check_token验证端口认证权限访问
                .checkTokenAccess("isAuthenticated()")
                .allowFormAuthenticationForClients();
    }
}

复制代码
客户端详细信息同样也是测试用,后续会加上数据库。令牌服务暂时是用内存存储,后续加上jwt。
先实现功能最重要,复杂的东西一步步往上加。
配置资源服务器
资源服务器也就是服务程序,是需要访问的服务器
新建ResourceServerConfig继承ResourceServerConfigurerAdapter
@Configuration
@EnableResourceServer
public class ResourceServerConfig extends ResourceServerConfigurerAdapter {
    @Override
    public void configure(HttpSecurity http) throws Exception {
        http
//                antMatcher表示只能处理/user的请求
                .antMatcher("/user/**")
                .authorizeRequests()
                .antMatchers("/user/test1").permitAll()
                .antMatchers("/user/test2").authenticated()
//                .antMatchers("user/test2").hasRole("USER")
//                .anyRequest().authenticated()
        ;
    }
}
复制代码
ResourceServerConfigurerAdapter 的Order默认值是3,小于 WebSecurityConfigurerAdapter ,值越小优先级越大
关于 ResourceServerConfigurerAdapter 和 WebSecurityConfigurerAdapter 的详细说明见
www.jianshu.com/p/fe1194ca8…
新建UserController
@RestController
public class UserController {
    @GetMapping("/user/me")
    public Principal user(Principal principal) {
        return principal;
    }

    @GetMapping("/user/test1")
    public String test() {
        return "test1";
    }

    @GetMapping("/user/test2")
    public String test2() {
        return "test2";
    }

}
复制代码
测试
- 获取code 浏览器访问
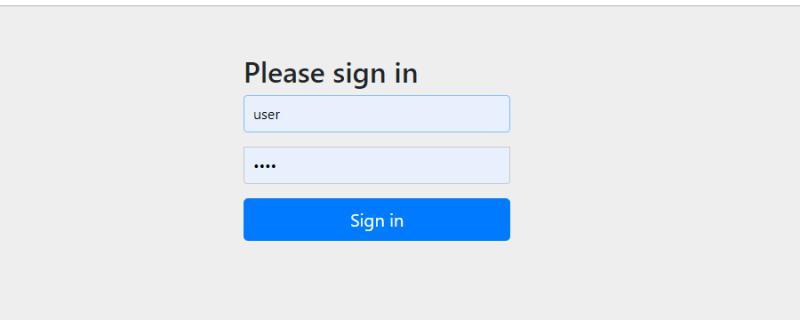
http://127.0.0.1:9120/oauth/authorize?client_id=zcs&response_type=code&redirect_uri=www.baidu.com,然后跳出登陆页面,
认证
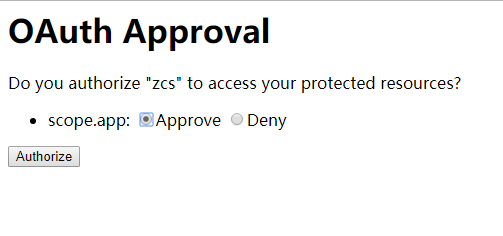
地址栏会出现回调页面,并且带有code参数 http://127.0.0.1:9120/oauth/www.baidu.com?code=FGQ1jg
- 获取token postman访问
http://127.0.0.1:9120/oauth/token?code=FGQ1jg&grant_type=authorization_code&redirect_uri=www.baidu.com&client_id=zcs&client_secret=zcs,code填写刚才得到的code,使用POST请求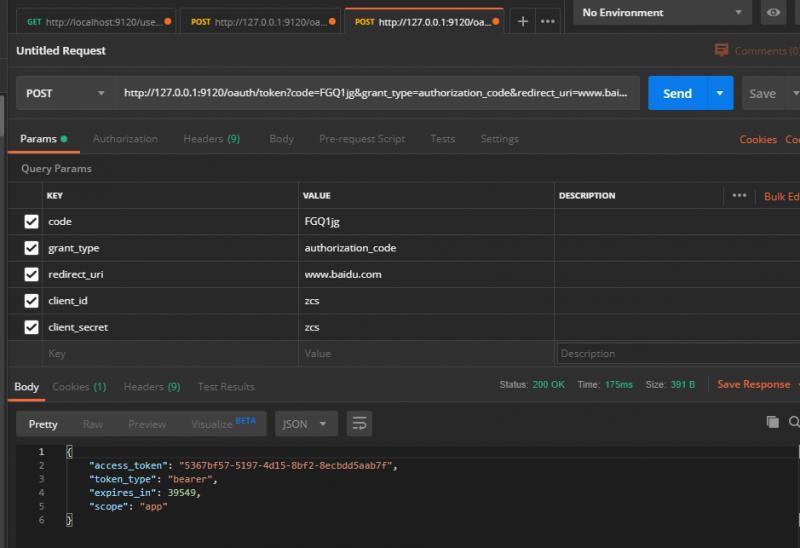
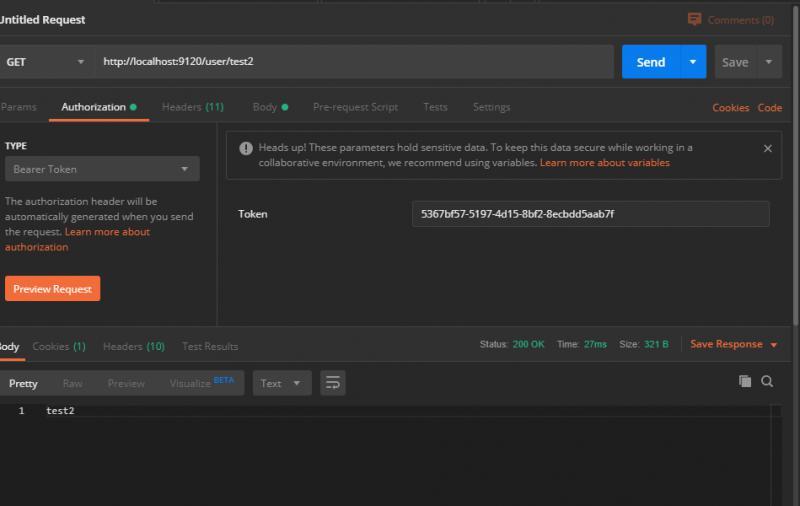
- 访问资源 /user/test2是受保护资源,我们通过令牌访问
二、升级版
有很多人会把JWT和OAuth2来作比较,其实它俩是完全不同的概念,没有可比性。
JWT是一种认证协议,提供一种用于发布接入令牌、并对发布的签名接入令牌进行验证的方法。
OAuth2是一种授权框架,提供一套详细的授权机制。
Spring Cloud OAuth2集成了JWT作为令牌管理,因此使用起来很方便
JwtAccessTokenConverter 是用来生成token的转换器,而token令牌默认是有签名的,且资源服务器需要验证这个签名。此处的加密及验签包括两种方式: 对称加密、非对称加密(公钥密钥) 对称加密需要授权服务器和资源服务器存储同一key值,而非对称加密可使用密钥加密,暴露公钥给资源服务器验签,本文中使用非对称加密方式。
通过jdk工具生成jks证书,通过cmd进入jdk安装目录的bin下,运行命令
keytool -genkeypair -alias oauth2-keyalg RSA -keypass mypass -keystore oauth2.jks -storepass mypass
会在当前目录生成oauth2.jks文件,放入resource目录下。
maven默认不加载resource目录下的文件,所以需要在pom.xml中配置,在build下添加配置
<build>
        <plugins>
            <plugin>
                <groupId>org.springframework.boot</groupId>
                <artifactId>spring-boot-maven-plugin</artifactId>
            </plugin>
        </plugins>
        <resources>
            <resource>
                <directory>src/main/resources</directory>
                <includes>
                    <include>**/*.*</include>
                </includes>
            </resource>
        </resources>
    </build>

复制代码
在原来的AuthorizationServerConfig中更改部分代码
@Autowired
    private TokenStore tokenStore;

	@Override
    public void configure(AuthorizationServerEndpointsConfigurer endpoints) throws Exception {
//        endpoints.tokenStore(tokenStore)
//                .authenticationManager(authenticationManager);
        endpoints.authenticationManager(authenticationManager)
                .accessTokenConverter(jwtAccessTokenConverter())
                .tokenStore(tokenStore);
    }

    @Bean
    public TokenStore tokenStore() {
        return new JwtTokenStore(jwtAccessTokenConverter());
    }

    /**
     * 非对称加密算法对token进行签名
     * @return
     */
    @Bean
    public JwtAccessTokenConverter jwtAccessTokenConverter() {
        final JwtAccessTokenConverter converter = new CustomJwtAccessTokenConverter();
        // 导入证书
        KeyStoreKeyFactory keyStoreKeyFactory =
                new KeyStoreKeyFactory(new ClassPathResource("oauth2.jks"), "mypass".toCharArray());
        converter.setKeyPair(keyStoreKeyFactory.getKeyPair("oauth2"));
        return converter;
    }

复制代码
jwtAccessTokenConverter 方法中有一个 CustomJwtAccessTokenConverter 类,这是继承了 JwtAccessTokenConverter ,自定义添加了额外的token信息
/**
 * 自定义添加额外token信息
 */
public class CustomJwtAccessTokenConverter extends JwtAccessTokenConverter {
    @Override
    public OAuth2AccessToken enhance(OAuth2AccessToken accessToken, OAuth2Authentication authentication) {
        DefaultOAuth2AccessToken defaultOAuth2AccessToken = new DefaultOAuth2AccessToken(accessToken);
        Map<String, Object> additionalInfo = new HashMap<>();
        UserModel user = (UserModel)authentication.getPrincipal();
        additionalInfo.put("USER",user);
        defaultOAuth2AccessToken.setAdditionalInformation(additionalInfo);
        return super.enhance(defaultOAuth2AccessToken,authentication);
    }
}

复制代码
- 本文标签: 安装 Spring Security spring XML cmd client 数据库 ORM HashMap IDE 协议 参数 pom Word map id tk rmi App authenticate build tar bean Spring cloud 数据 服务器 REST maven http 安全 Collection 加密 目录 CTO 认证 dataSource https Service UI springcloud web list db core 密钥 IO JDBC logo 代码 classpath final ip Security 配置 token java key 端口 src cat plugin ArrayList 管理 测试 dependencies Authorization
- 版权声明: 本文为互联网转载文章,出处已在文章中说明(部分除外)。如果侵权,请联系本站长删除,谢谢。
- 本文海报: 生成海报一 生成海报二


![[HBLOG]公众号](https://www.liuhaihua.cn/img/qrcode_gzh.jpg)

