Spring Cloud Zuul:API网关服务
Spring Cloud Zuul 是Spring Cloud Netflix 子项目的核心组件之一,可以作为微服务架构中的API网关使用,支持动态路由与过滤功能,本文将对其用法进行详细介绍。
Zuul简介
API网关为微服务架构中的服务提供了统一的访问入口,客户端通过API网关访问相关服务。API网关的定义类似于设计模式中的门面模式,它相当于整个微服务架构中的门面,所有客户端的访问都通过它来进行路由及过滤。它实现了请求路由、负载均衡、校验过滤、服务容错、服务聚合等功能。
创建一个zuul-proxy模块
这里我们创建一个zuul-proxy模块来演示zuul的常用功能。
在pom.xml中添加相关依赖
<dependency>
    <groupId>org.springframework.cloud</groupId>
    <artifactId>spring-cloud-starter-netflix-eureka-client</artifactId>
</dependency>
<dependency>
    <groupId>org.springframework.cloud</groupId>
    <artifactId>spring-cloud-starter-netflix-zuul</artifactId>
</dependency>
复制代码
在application.yml中进行配置
server:
  port: 8801
spring:
  application:
    name: zuul-proxy
eureka:
  client:
    register-with-eureka: true
    fetch-registry: true
    service-url:
      defaultZone: http://localhost:8001/eureka/
复制代码
在启动类上添加@EnableZuulProxy注解来启用Zuul的API网关功能
@EnableZuulProxy
@EnableDiscoveryClient
@SpringBootApplication
public class ZuulProxyApplication {

    public static void main(String[] args) {
        SpringApplication.run(ZuulProxyApplication.class, args);
    }

}
复制代码
常用功能
启动相关服务
这里我们通过启动eureka-server,两个user-service,feign-service和zuul-proxy来演示Zuul的常用功能,启动后注册中心显示如下。

配置路由规则
- 我们可以通过修改application.yml中的配置来配置路由规则,这里我们将匹配
/userService/**的请求路由到user-service服务上去,匹配/feignService/**的请求路由到feign-service上去。
zuul:
  routes: #给服务配置路由
    user-service:
      path: /userService/**
    feign-service:
      path: /feignService/**
复制代码
-
访问 http://localhost:8801/userService/user/1 可以发现请求路由到了user-service上了;
-
访问 http://localhost:8801/feignService/user/1 可以发现请求路由到了feign-service上了。
默认路由规则
- Zuul和Eureka结合使用,可以实现路由的自动配置,自动配置的路由以服务名称为匹配路径,相当于如下配置:
zuul:
  routes: #给服务配置路由
    user-service:
      path: /user-service/**
    feign-service:
      path: /feign-service/**
复制代码
-
访问 http://localhost:8801/user-service/user/1 同样可以路由到了user-service上了;
-
访问 http://localhost:8801/feign-service/user/1 同样可以路由到了feign-service上了。
-
如果不想使用默认的路由规则,可以添加以下配置来忽略默认路由配置:
zuul:
  ignored-services: user-service,feign-service #关闭默认路由配置
复制代码
负载均衡功能
多次调用 http://localhost:8801/user-service/user/1 进行测试,可以发现运行在8201和8202的user-service服务交替打印如下信息。
2019-10-05 10:31:58.738  INFO 11520 --- [nio-8202-exec-5] c.macro.cloud.controller.UserController  : 根据id获取用户信息,用户名称为:macro
2019-10-05 10:32:00.356  INFO 11520 --- [nio-8202-exec-6] c.macro.cloud.controller.UserController  : 根据id获取用户信息,用户名称为:macro
复制代码
配置访问前缀
我们可以通过以下配置来给网关路径添加前缀,此处添加了/proxy前缀,这样我们需要访问 http://localhost:8801/proxy/user-service/user/1 才能访问到user-service中的接口。
zuul:
  prefix: /proxy #给网关路由添加前缀
复制代码
Header过滤及重定向添加Host
- Zuul在请求路由时,默认会过滤掉一些敏感的头信息,以下配置可以防止路由时的Cookie及Authorization的丢失:
zuul:
  sensitive-headers: Cookie,Set-Cookie,Authorization #配置过滤敏感的请求头信息,设置为空就不会过滤
复制代码
- Zuul在请求路由时,不会设置最初的host头信息,以下配置可以解决:
zuul:
  add-host-header: true #设置为true重定向是会添加host请求头
复制代码
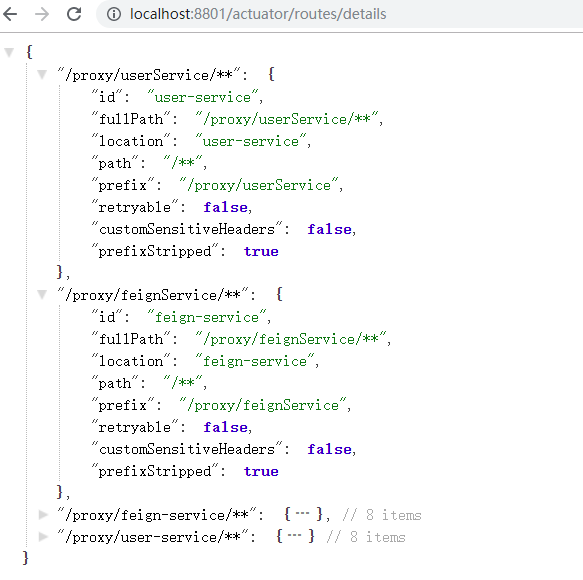
查看路由信息
我们可以通过SpringBoot Actuator来查看Zuul中的路由信息。
- 在pom.xml中添加相关依赖:
<dependency>
    <groupId>org.springframework.boot</groupId>
    <artifactId>spring-boot-starter-actuator</artifactId>
</dependency>
复制代码
- 修改application.yaml配置文件,开启查看路由的端点:
management:
  endpoints:
    web:
      exposure:
        include: 'routes'
复制代码
- 通过访问 http://localhost:8801/actuator/routes 查看简单路由信息:

- 通过访问 http://localhost:8801/actuator/routes/details 查看详细路由信息:

过滤器
路由与过滤是Zuul的两大核心功能,路由功能负责将外部请求转发到具体的服务实例上去,是实现统一访问入口的基础,过滤功能负责对请求过程进行额外的处理,是请求校验过滤及服务聚合的基础。
过滤器类型
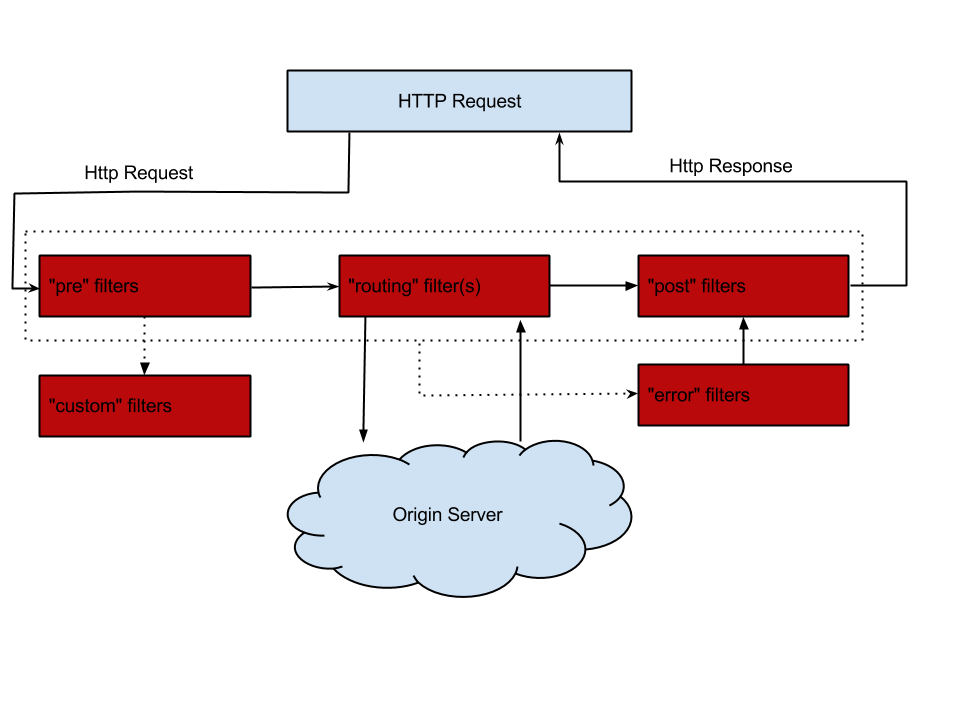
Zuul中有以下几种典型的过滤器类型。
- pre:在请求被路由到目标服务前执行,比如权限校验、打印日志等功能;
- routing:在请求被路由到目标服务时执行,这是使用Apache HttpClient或Netflix Ribbon构建和发送原始HTTP请求的地方;
- post:在请求被路由到目标服务后执行,比如给目标服务的响应添加头信息,收集统计数据等功能;
- error:请求在其他阶段发生错误时执行。
过滤器的生命周期
下图描述了一个HTTP请求到达API网关后,如何在各种不同类型的过滤器中流转的过程。

自定义过滤器
接下来我们自定义一个过滤器来演示下过滤器的作用。
添加PreLogFilter类继承ZuulFilter
这是一个前置过滤器,用于在请求路由到目标服务前打印请求日志。
/**
 * Created by macro on 2019/9/9.
 */
@Component
public class PreLogFilter extends ZuulFilter {
    private Logger LOGGER = LoggerFactory.getLogger(this.getClass());

    /**
     * 过滤器类型,有pre、routing、post、error四种。
     */
    @Override
    public String filterType() {
        return "pre";
    }

    /**
     * 过滤器执行顺序,数值越小优先级越高。
     */
    @Override
    public int filterOrder() {
        return 1;
    }

    /**
     * 是否进行过滤,返回true会执行过滤。
     */
    @Override
    public boolean shouldFilter() {
        return true;
    }

    /**
     * 自定义的过滤器逻辑,当shouldFilter()返回true时会执行。
     */
    @Override
    public Object run() throws ZuulException {
        RequestContext requestContext = RequestContext.getCurrentContext();
        HttpServletRequest request = requestContext.getRequest();
        String host = request.getRemoteHost();
        String method = request.getMethod();
        String uri = request.getRequestURI();
        LOGGER.info("Remote host:{},method:{},uri:{}", host, method, uri);
        return null;
    }
}
复制代码
过滤器功能演示
添加过滤器后,我们访问 http://localhost:8801/user-service/user/1 测试下,会打印如下日志。
2019-10-05 15:13:10.232  INFO 11040 --- [nio-8801-exec-7] com.macro.cloud.filter.PreLogFilter      : Remote host:0:0:0:0:0:0:0:1,method:GET,uri:/user-service/user/1
复制代码
核心过滤器
| 过滤器名称 | 过滤类型 | 优先级 | 过滤器的作用 |
|---|---|---|---|
| ServletDetectionFilter | pre | -3 | 检测当前请求是通过DispatcherServlet处理运行的还是ZuulServlet运行处理的。 |
| Servlet30WrapperFilter | pre | -2 | 对原始的HttpServletRequest进行包装。 |
| FormBodyWrapperFilter | pre | -1 | 将Content-Type为application/x-www-form-urlencoded或multipart/form-data的请求包装成FormBodyRequestWrapper对象。 |
| DebugFilter | route | 1 | 根据zuul.debug.request的配置来决定是否打印debug日志。 |
| PreDecorationFilter | route | 5 | 对当前请求进行预处理以便执行后续操作。 |
| RibbonRoutingFilter | route | 10 | 通过Ribbon和Hystrix来向服务实例发起请求,并将请求结果进行返回。 |
| SimpleHostRoutingFilter | route | 100 | 只对请求上下文中有routeHost参数的进行处理,直接使用HttpClient向routeHost对应的物理地址进行转发。 |
| SendForwardFilter | route | 500 | 只对请求上下文中有forward.to参数的进行处理,进行本地跳转。 |
| SendErrorFilter | post | 0 | 当其他过滤器内部发生异常时的会由它来进行处理,产生错误响应。 |
| SendResponseFilter | post | 1000 | 利用请求上下文的响应信息来组织请求成功的响应内容。 |
禁用过滤器
- 我们可以对过滤器进行禁用的配置,配置格式如下:
zuul:
  filterClassName:
    filter:
      disable: true
复制代码
- 以下是禁用PreLogFilter的示例配置:
zuul:
  PreLogFilter:
    pre:
      disable: true
复制代码
Ribbon和Hystrix的支持
由于Zuul自动集成了Ribbon和Hystrix,所以Zuul天生就有负载均衡和服务容错能力,我们可以通过Ribbon和Hystrix的配置来配置Zuul中的相应功能。
- 可以使用Hystrix的配置来设置路由转发时HystrixCommand的执行超时时间:
hystrix:
  command: #用于控制HystrixCommand的行为
    default:
      execution:
        isolation:
          thread:
            timeoutInMilliseconds: 1000 #配置HystrixCommand执行的超时时间,执行超过该时间会进行服务降级处理
复制代码
- 可以使用Ribbon的配置来设置路由转发时请求连接及处理的超时时间:
ribbon: #全局配置
  ConnectTimeout: 1000 #服务请求连接超时时间(毫秒)
  ReadTimeout: 3000 #服务请求处理超时时间(毫秒)
复制代码
常用配置
zuul:
  routes: #给服务配置路由
    user-service:
      path: /userService/**
    feign-service:
      path: /feignService/**
  ignored-services: user-service,feign-service #关闭默认路由配置
  prefix: /proxy #给网关路由添加前缀
  sensitive-headers: Cookie,Set-Cookie,Authorization #配置过滤敏感的请求头信息,设置为空就不会过滤
  add-host-header: true #设置为true重定向是会添加host请求头
  retryable: true # 关闭重试机制
  PreLogFilter:
    pre:
      disable: false #控制是否启用过滤器
复制代码
使用到的模块
springcloud-learning
├── eureka-server -- eureka注册中心
├── user-service -- 提供User对象CRUD接口的服务
├── feign-service -- feign服务调用测试服务
└── zuul-proxy -- zuul作为网关的测试服务
复制代码
- 本文标签: Service 测试 Spring cloud tar 设计模式 微服务 src id servlet zuul 数据 XML Authorization web springcloud 时间 重试机制 client IO pom Netflix UI 实例 生命 apache Hystrix 负载均衡 代码 retry 参数 NIO remote Feign 配置 App http spring bug https API Proxy Eureka ORM tab ribbon cat CTO 2019 统计 springboot ip 注册中心 IDE 组织
- 版权声明: 本文为互联网转载文章,出处已在文章中说明(部分除外)。如果侵权,请联系本站长删除,谢谢。
- 本文海报: 生成海报一 生成海报二


![[HBLOG]公众号](https://www.liuhaihua.cn/img/qrcode_gzh.jpg)

