Skywalking第三篇——Byte Buddy基础
上一节介绍了 Java Agent 的基础知识,其中用 Byte Buddy 实现了计算方法执行时间的功能。本节将简单介绍 Byte Buddy 的基础知识,注意,本节不是 Byte Buddy 的完整使用教程,目标只限于了解 Byte Buddy 的基础,为后续介绍 Skywalking 实现扫清障碍。
【 本文介绍的所有内容,都可以在官方教程(http://bytebuddy.net/#/tutorial) 中找到哈。由于能力所限,如果出现错误,欢迎大家在公众号直接发消息指正哈 】

Byte Buddy 基础

Byte Buddy 说白了就是个运行时动态修改/生成代码的工具包,为什么需要动态生成呢?还不是为了“增强”目标代码的功能,就类似于 Spring AOP 功能,拦截到目标方法之后,想干啥干啥。
现在有cglib、javassist之类的工具包,为啥还要 Byte Buddy 呢?轮子嘛,各有各的好处,无非就是生成的代码更精简、生成代码的速度更快等方面的比较(在官网上有个对比的表格,感兴趣的自己看看吧)。
Byte Buddy 动态生成代码有三种常见的方式:
subclass :这种方式比较好理解,就是为目标类生成一个子类,在子类方法中插入动态代码。
rebasing :这种方式动态生成一个与目标方法同名的方法,而原来的目标方法将被重命名保存。例如:
// Foo就是那个被拦截的目标类,本来有一个返回值为"bar"的bar()方法
class Foo {
// 生成一个全新的bar()方法
String bar() { return "foo" + bar$original(); }
// 将原来的bar()方法重命名保存起来 ╮(╯_╰)╭
private String bar$original() { return "bar"; }
}
redefinition :直接修改目标方法,原来的目标方法直接就丢失了。
Byte Buddy 中用 TypeDescription 是来描述一个类型,就和 Java 反射中的 Class 类似。Byte Buddy 中的 TypePool 类似于 ClassLoader ,我们可以从中获取类对应的 TypeDescription 。后面的示例中会看到这俩货。

操纵字段和方法

先来看一段代码,这段代码会创建一个 Object 的子类,然后修改它默认的 toString()方法:
String toString = new ByteBuddy() // Byte Buddy的API入口
.subclass(Object.class) // subclass方式
.name("example.Type") // 创建一个名为"example.Type"类
.method(ElementMatchers.named("toString")) // 拦截其中的toString()方法
// 让toString()方法返回固定值
.intercept(FixedValue.value("Hello World!"))
.make()
.load(Main.class.getClassLoader()) // 加载这个类
.getLoaded()
.newInstance() // Java 反射创建实例
.toString(); // 调用toString()方法
这里挨个说一下各个调用是干啥的:
-
subclass(Object.class) :创建一个Object的子类
-
name("example.Type") : 新建的类名叫做“example.Type”
-
method() :要拦截“example.Type”中的方法
-
ElementMatchers.named("toString") :拦截条件,拦截toString()这个方法
-
intercept() :指定了拦截到的方法要修改成什么样子,是不是和 Spring AOP有点像了
-
make() :创建上面生成的这个类型
-
load() :加载这个生成的类
-
newInstance() :Java 反射的API,创建实例
你看看,用 Byte Buddy 生成字节码也是很 easy 的嘛,不就是学API嘛╮(╯_╰)╭
再来看个稍微复杂点的栗子:
class Foo { // Foo 中定义了三个方法
public String bar() { return null; }
public String foo() { return null; }
public String foo(Object o) { return null; }
}
Foo dynamicFoo = new ByteBuddy()
.subclass(Foo.class)
.method(isDeclaredBy(Foo.class)) // 匹配Foo中所有的方法
.intercept(FixedValue.value("One!"))
.method(named("foo")) // 匹配名为foo的方法
.intercept(FixedValue.value("Two!"))
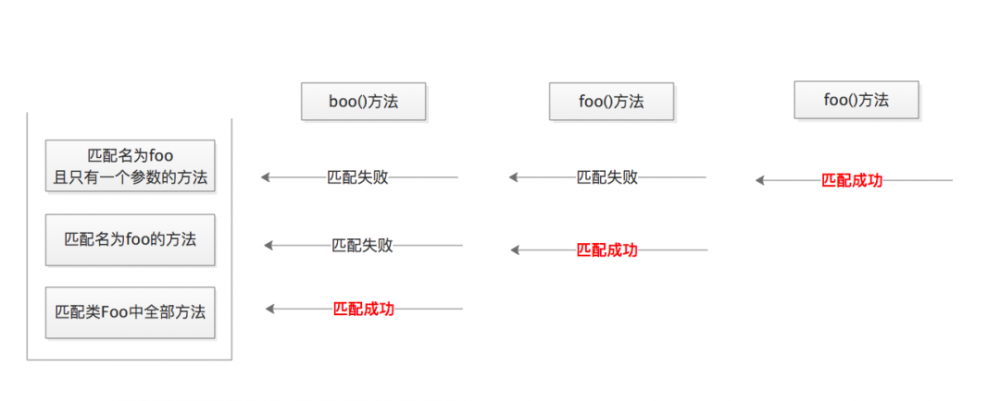
.method(named("foo").and(takesArguments(1))) // 匹配名为foo且只有一个参数的方法
.intercept(FixedValue.value("Three!"))
.make()
.load(getClass().getClassLoader())
.getLoaded()
.newInstance();
这里method()方法出现了三次,每次出现后面都跟着不同的intercept()方法。Byte Buddy 是按照 栈的方式 来的(不知道栈的童鞋,出门右转,看漫画吧), 后定义method()方法在栈顶,先定义的方法在栈底 。
在匹配方法的时候, 从栈顶开始匹配,匹配到就返回 ,大概如下图所示:

除了使用method()方法拦截方法之外,Byte Buddy 还提供了defineMethod() 方法来定义一个新方法,来吧,直接上代码:
Class<? extends Foo> loaded = new ByteBuddy()
.subclass(Foo.class)
.defineMethod("doo", // 方法名
String.class, // 返回值
Modifier.PUBLIC) // public修饰,你懂的
.withParameter(String.class, "s") // 方法参数
.intercept(FixedValue.value("Zero!")) // 方法的具体实现
.make()
.load(Main.class.getClassLoader(), ClassLoadingStrategy.Default.INJECTION)
.getLoaded(); // 获取加载后的Class
Foo dynamicFoo = loaded.newInstance(); // 反射
// 要调用新定义的doo()方法,只能通过反射方式
Method m = loaded.getDeclaredMethod("doo", String.class);
System.out.println(m.invoke(dynamicFoo, new Object[]{""}));
那怎么新增字段呢?Byte Buddy 提供了defineField() 方法,食用方式与defineMethod()方法类似,不再赘述。
前面的栗子中,方法的实现都被修改成了返回固定值,这没啥实际价值啊。Byte Buddy 中可以通过 MethodDelegation 将拦截到的目标方法委托为另一个类中的方法处理,不多说,直接上代码吧:
class DB {
public String hello(String name) {
System.out.println("DB:" + name);
return null;
}
}
class Interceptor {
public static String intercept(String name) { return "String"; }
public static String intercept(int i) { return "int"; }
public static String intercept(Object o) { return "Object";}
}
String helloWorld = new ByteBuddy()
.subclass(DB.class)
.method(named("hello"))
// 拦截DB.hello()方法,并委托给Interceptor中的静态方法处理
.intercept(MethodDelegation.to(Interceptor.class))
.make()
.load(ClassLoader.getSystemClassLoader(), ClassLoadingStrategy.Default.INJECTION)
.getLoaded()
.newInstance()
.hello("World");
System.out.println(helloWorld);
Target中有三个方法,最终会委托到那个方法上呢?答案是 intercept(String name) ,委托并不是根据名称来的,而是和 Java 编译器在选重载时用的那个参数绑定类似(不了解参数绑定的童鞋,出门左转,找本Java虚拟机的博客看一下哈)
在Target中定义的这些委托方法,是可以添加注解的,这些注解主要是告诉 Byte Buddy 应该注入哪些东西哈,来段代码看看吧:
class Interceptor {
@RuntimeType
public Object intercept(
@This Object obj, // 目标对象
@AllArguments Object[] allArguments, // 注入目标全部参数
@SuperCall Callable<?> zuper, // 调用目标方法,必不可少哦
@Origin Method method, // 目标方法
@Super DB db // 目标对象
) {
System.out.println(obj);
System.out.println(db);
// 从上面两行输出可以看出,obj和db是一个对象
try {
return zuper.call(); // 调用目标方法
} finally {
}
}
说明一个每个注解的作用:
@RuntimeType: 告诉 Byte Buddy 不要进行严格的参数类型检测,要不匹配不上了,而是使用类型转换方式(runtime type casting),尝试匹配这个方法
@This: 注入被拦截的目标对象(DB对象)。
@AllArguments: 注入目标方法的全部参数,是不是与 Java 反射那套类似了。
@Origin: 注入目标方法的信息。如果拦截的是字段的话,该注解应该标注Field类型参数。
@Super: 注入目标对象(文档上说是个代理对象╮(╯_╰)╭)。通过该对象可以调用目标对象的所有方法。
@SuperCall: 这个注解比较特殊,我们要在委托方法中调用目标方法的话,需要通过这种方式注入,与 Spring AOP中的 ProceedingJoinPoint.proceed() 有点类似,不觉得吗?
注意:这是不修改参数的方式哈,从上面的示例的调用也能看出来,参数不用单独传递,都包含其中了。另,@SuperCall还可以修饰Runnable类型的参数,只不过目标方法的返回值就拿不到了╮(╯_╰)╭。
细节: 要委托到Target的实例方法就要委托给Target实例,要委托为Target的静态方法就要委托给Target.class,:
MethodDelegation.to(Target.class) // 委托到Target的静态方法
MethodDelegation.to(new Target()) // 委托到Target的实例方法
动态修改参数的方式需要用到 @Morph 注解以及一些绑定操作,直接看代码:
String hello = new ByteBuddy()
.subclass(DB.class)
.method(named("hello"))
.intercept(MethodDelegation.withDefaultConfiguration()
.withBinders(
// 要用@Morph注解之前,需要通过Morph.Binder告诉Byte Buddy你要注入个啥类型
Morph.Binder.install(OverrideCallable.class)
)
.to(new Target()))
.make()
.load(Main.class.getClassLoader(), ClassLoadingStrategy.Default.INJECTION)
.getLoaded()
.newInstance()
.hello("World");
class Interceptor {
@RuntimeType
public Object intercept(@This Object obj,
@AllArguments Object[] allArguments,
@Origin Method method,
@Super DB db,
@Morph OverrideCallable callable // 通过@Morph注解注入
) throws Throwable {
try {
System.out.println("before");
// 带参数调用哦,和Spring AOP一样一样的了
Object result = callable.call(allArguments);
System.out.println("after");
return result;
} catch (Throwable t) {
throw t;
} finally {
System.out.println("finally");
}
}
}
对了,OverrideCallable是个我们自定义的接口:
public interface OverrideCallable {
Object call(Object[] args);
}
@DefaultCall 与 @SuperCall类似,只不过调用的是default method。
除了拦截static方法和实例方法,Byte Buddy 还可以拦截构造方法,直接看代码吧:
class DB { // 只有一个有参数的构造方法
public DB(String name) { System.out.println("DB:" + name); }
}
class Interceptor { // Interceptor实现没啥,和前面一样
@RuntimeType
public void intercept(@This Object obj,
@AllArguments Object[] allArguments) {
System.out.println("after constructor!");
}
}
Constructor<? extends DB> constructor = new ByteBuddy()
.subclass(DB.class)
.constructor(any()) // 拦截所有构造方法
// 拦截的操作:首先调用目标对象的构造方法,根据前面自动匹配,
// 这里直接匹配到参数为String.class的构造方法
.intercept(SuperMethodCall.INSTANCE.andThen(
// 执行完原始构造方法,再开始执行拦截器的代码
MethodDelegation.withDefaultConfiguration().to(new Interceptor())
))
.make()
.load(Main.class.getClassLoader(), ClassLoadingStrategy.Default.INJECTION)
.getLoaded()
.getConstructor(String.class); // 下面就是反射逻辑了哈
constructor.newInstance("MySQL");
SuperMethodCall在官方文档中的解释: This implementation will create a new method which simply calls its super method(生成一个方法,直接调用super method,翻译成目标方法好点吧). If no such method is defined, an exception will be thrown.(找不到,抛异常) Constructors are considered to have a super method if the direct super class defines a constructor with an identical signature.(如果是构造方法,则根据方法签名匹配)。
行了,Byte Buddy 的基础知识就到这里吧,在后续Skywalking分析中,要是碰到了其他API,再单独介绍一下。
下一篇开始进入正题,介绍Skywalking Agent的代码了哈!


往期精彩


![[HBLOG]公众号](https://www.liuhaihua.cn/img/qrcode_gzh.jpg)

