SpringCloud实现分库分表模式下,数据库实时扩容方案 原 荐
正文
SpringCloud实现分库分表模式下,数据库实时扩容方案
原
荐

字数 743
阅读 14
收藏 1
Eureka Spring BIND Spring Cloud Entity
本文源码: GitHub·点这里 || GitEE·点这里
一、项目结构
1、工程结构
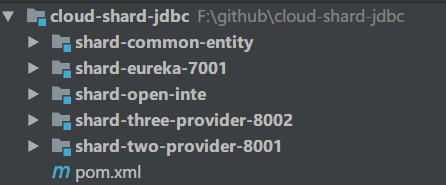
2、模块命名
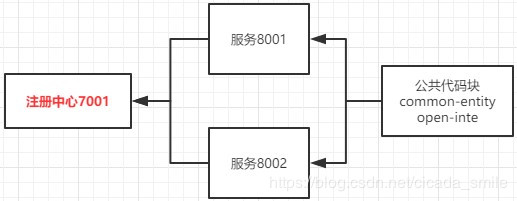
shard-common-entity:   公共代码块
shard-open-inte:        开放接口管理
shard-eureka-7001:      注册中心
shard-two-provider-8001: 8001 基于两台库的服务
shard-three-provider-8002:8002 基于三台库的服务
3、代码依赖结构
4、项目启动顺序
(1)shard-eureka-7001:        注册中心
(2)shard-two-provider-8001:  8001 基于两台库的服务
(3)shard-three-provider-8002:8002 基于三台库的服务
按照顺序启动,且等一个服务完全启动后,在启动下一个服务,不然可能遇到一些坑。
二、核心代码块
1、8001 服务提供一个对外服务
基于Feign的调用方式 作用:基于两台分库分表的数据查询接口。
import org.springframework.cloud.netflix.feign.FeignClient;
import org.springframework.web.bind.annotation.PathVariable;
import org.springframework.web.bind.annotation.RequestMapping;
import shard.jdbc.common.entity.TableOne;
/**
 * shard-two-provider-8001
 * 对外开放接口
 */
@FeignClient(value = "shard-provider-8001")
public interface TwoOpenService {
    @RequestMapping("/selectOneByPhone/{phone}")
    TableOne selectOneByPhone(@PathVariable("phone") String phone) ;
}
2、8002 服务提供一个对外服务
基于Feign的调用方式 作用:基于三台分库分表的数据存储接口。
import org.springframework.cloud.netflix.feign.FeignClient;
import org.springframework.web.bind.annotation.RequestBody;
import org.springframework.web.bind.annotation.RequestMapping;
import shard.jdbc.common.entity.TableOne;

/**
 * 数据迁移服务接口
 */
@FeignClient(value = "shard-provider-8002")
public interface MoveDataService {
    @RequestMapping("/moveData")
    Integer moveData (@RequestBody TableOne tableOne) ;
}
3、基于8002服务数据查询接口
查询流程图 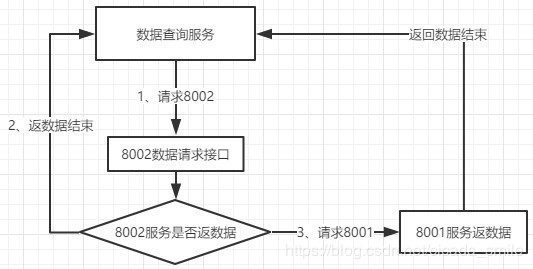
代码块
/**
 * 8001 端口 :基于两台分库分表策略的数据查询接口
 */
@Resource
private TwoOpenService twoOpenService ;
@Override
public TableOne selectOneByPhone(String phone) {
    TableOne tableOne = tableOneMapper.selectOneByPhone(phone);
    if (tableOne != null){
        LOG.info("8002 === >> tableOne :"+tableOne);
    }
    // 8002 服务没有查到数据
    if (tableOne == null){
        // 调用 8001 开放的查询接口
        tableOne = twoOpenService.selectOneByPhone(phone) ;
        LOG.info("8001 === >> tableOne :"+tableOne);
    }
    return tableOne ;
}
4、基于 8001 数据扫描迁移代码
迁移流程图 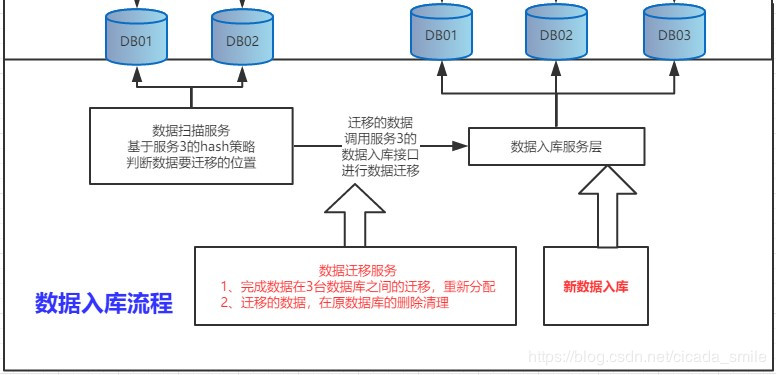
代码块
/**
 * 8002 端口开放的数据入库接口
 */
@Resource
private MoveDataService moveDataService ;
/**
 * 扫描,并迁移数据
 * 以 库 db_2 的 table_one_1 表为例
 */
@Override
public void scanDataRun() {
    String sql = "SELECT id,phone,back_one backOne,back_two backTwo,back_three backThree FROM table_one_1" ;
    // dataTwoTemplate 对应的数据库:ds_2
    List<TableOne> tableOneList = dataTwoTemplate.query(sql,new Object[]{},new BeanPropertyRowMapper<>(TableOne.class)) ;
    if (tableOneList != null && tableOneList.size()>0){
        int i = 0 ;
        for (TableOne tableOne : tableOneList) {
            String db_num = HashUtil.moveDb(tableOne.getPhone()) ;
            String tb_num = HashUtil.moveTable(tableOne.getPhone()) ;
            // 只演示向数据新加库 ds_4 迁移的数据
            if (db_num.equals("ds_4")){
                i += 1 ;
                LOG.info("迁移总数数=>" + i + "=>库位置=>"+db_num+"=>表位置=>"+tb_num+"=>数据:【"+tableOne+"】");
                // 扫描完成:执行新库迁移和旧库清理过程
                moveDataService.moveData(tableOne) ;
                // dataTwoTemplate.update("DELETE FROM table_one_1 WHERE id=? AND phone=?",tableOne.getId(),tableOne.getPhone());
            }
        }
    }
}
三、演示执行流程
1、项目流程图
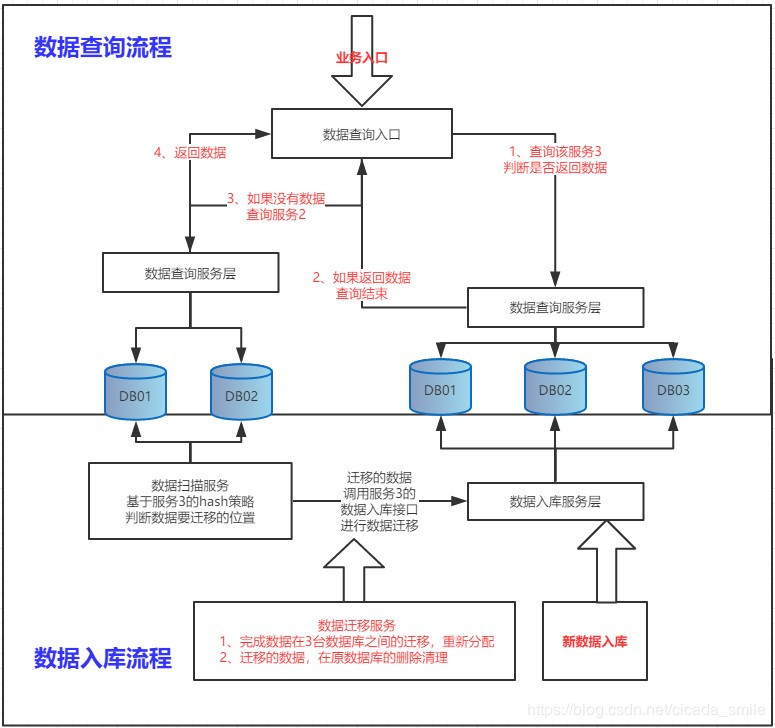
2、测试执行流程
(1)、访问8002 数据查询端口
http://127.0.0.1:8002/selectOneByPhone/phone20
日志输出:
8001 服务查询到数据
8001 === >> tableOne :+{tableOne}
(2)、执行8001 数据扫描迁移
http://127.0.0.1:8001/scanData
(3)、再次访问8002 数据查询端口
http://127.0.0.1:8002/selectOneByPhone/phone20
日志输出:
8002 服务查询到数据
8002 === >> tableOne :+{tableOne}
四、源代码地址
GitHub·地址
https://github.com/cicadasmile/spring-cloud-base
GitEE·地址
https://gitee.com/cicadasmile/spring-cloud-base

© 著作权归作者所有
打印
上一篇: SpringBoot2基础,进阶,数据库,中间件等系列文章目录分类
下一篇: SpringBoot2 配置多数据源,整合MybatisPlus增强插件

知了一笑


码云六周年
社区可以使用码云账号登录啦!往后余生,结伴同行
领取条件:在六周年期间绑定码云账号即可领取
粉丝 119
博文 70
码字总数 72469
作品 0
杭州
提问相关文章 最新文章
源码系列 手写spring mvc框架 基于Spring JDBC手写ORM框架 实现自己的MyBatis Spring AOP实战之源码分析 Spring IOC高级特性应用分析 ORM框架底层实现原理剖析 手写Spring MVC框架实现 手把手...
茶轴的青春
2018/04/17
34
0
简介 鸿鹄云Cloud是基于SpringCloud来封装的,是一系列框架的有序集合。利用Spring Boot的开发模式简化了分布式系统基础设施的开发,如服务发现、注册、配置中心、消息总线、负载均衡、断路器...
itcloud
2018/07/25
1K
0
简介 鸿鹄云Cloud是基于SpringCloud来封装的,是一系列框架的有序集合。利用Spring Boot的开发模式简化了分布式系统基础设施的开发,如服务发现、注册、配置中心、消息总线、负载均衡、断路器...
itcloud
2018/04/25
555
0
简介 鸿鹄云Cloud是基于SpringCloud来封装的,是一系列框架的有序集合。利用Spring Boot的开发模式简化了分布式系统基础设施的开发,如服务发现、注册、配置中心、消息总线、负载均衡、断路器...
明理萝
2018/09/07
242
1
什么是微服务? 什么是 springcloud? 引用维基百科: 微服务是一种架构风格,一个大型复杂软件应用由一个或多个微服务组成。系统中的各个微服务可被独立部署,各个微服务之间是松耦合的。每个微...
我是你大哥
2018/09/10
528
0
没有更多内容
加载失败,请刷新页面
加载更多正文 前几天,在ucloud上搭建的k8s集群(搭建教程后续会发出)。今天发现域名解析不了。 组件版本:k8s 1.15.0,coredns:1.3.1 过程是这样的: 首先用以下yaml文件创建了一个nginx服务 apiV...
码农实战
21分钟前
2
0

choose three Which three statements are true about indexes and their administration in an Orade database? A) An INVISIBLE index is not maintained when Data Manipulation Language......
oschina_5359
24分钟前
2
0
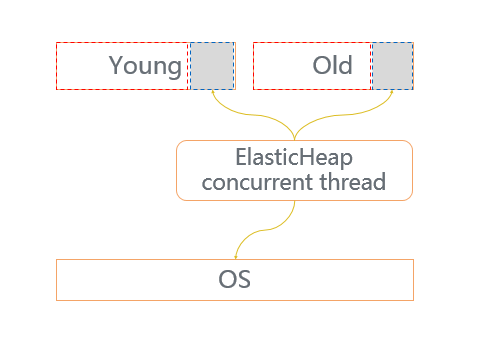
导读:新版本主要有三大变化:同步了 OpenJDK 上游社区 jdk8u222-ga 的最新更新;带来了正式的 feature:G1ElasticHeap;发布了用户期待的 Windows 实验版本 Experimental Windows version。...
阿里巴巴云原生
29分钟前
2
0
Linux磁盘管理好坏直接关系到整个系统的性能问题,Linux磁盘管理常用三个命令为df、du和fdisk。 df df命令参数功能:检查文件系统的磁盘空间占用情况。可以利用该命令来获取硬盘被占用了多少...
xiangyunyan
32分钟前
5
0

textarea按照普通元素设置height是没有作用的,可以这么来设置, 下面给上一段项目代码 JS代码: $.fn.extend({ txtaAutoHeight: function () { return this.each(function () {...
文文1
32分钟前
2
0
没有更多内容
加载失败,请刷新页面
加载更多- 本文标签: Select id 认证 DNS 总结 配置中心 配置 entity 域名 ORM update 软件 分布式系统 db JDBC 数据库 同步 管理 文章 解析 文件系统 源码 开发 Netflix js 2019 map src 空间 ioc spring 插件 springboot 端口 tar provider equals IDE ACE 程序员 AOP 测试 参数 Feign https 部署 sql client 代码 bean 目录 list 分布式 windows 开源 提问 数据 http App IO Nginx mybatis Spring cloud git 微服务 阿里巴巴 自适应 GitHub Service 云 value Spring Boot tab 负载均衡 性能问题 注册中心 UI core CTO mapper web Eureka springcloud ip Statement 集群 spring ioc API Property linux
- 版权声明: 本文为互联网转载文章,出处已在文章中说明(部分除外)。如果侵权,请联系本站长删除,谢谢。
- 本文海报: 生成海报一 生成海报二


![[HBLOG]公众号](https://www.liuhaihua.cn/img/qrcode_gzh.jpg)

