RocketMQ入门学习
分享目标
让大家知道除了传统的项目构建方式外还这样一个方便工具spring-boot的存在;
帮助大家入门spring-boot,如何使用它和怎么开始,一步步去掌握它;
它是什么?
Spring Boot makes it easy to create stand-alone, production-grade Spring based Applications that you can "just run".
We take an opinionated view of the Spring platform and third-party libraries so you can get started with minimum fuss. Most Spring Boot applications need very little Spring configuration.
You can use Spring Boot to create Java applications that can be started by using java -jar or more traditional war deployments. We also provide a command line tool that runs “spring scripts”.
它能做什么用?
官方口号 | Our primary goals are:
Provide a radically faster and widely accessible getting-started experience for all Spring development.
Be opinionated out of the box but get out of the way quickly as requirements start to diverge from the defaults.
Provide a range of non-functional features that are common to large classes of projects (such as embedded servers, security, metrics, health checks, and externalized configuration).
Absolutely no code generation and no requirement for XML configuration.
官方的Feature介绍:
Create stand-alone Spring applications
构建独立标准的Spring服务
Embed Tomcat, Jetty or Undertow directly (no need to deploy WAR files)
内置应用服务器
Provide opinionated 'starter' dependencies to simplify your build configuration
'starter'类包简化你配置
Automatically configure Spring and 3rd party libraries whenever possible
自动化配置Spring和第三方库
Provide production-ready features such as metrics, health checks and externalized configuration
标准化功能:监控、健康检测、抽象化配置等等
Absolutely no code generation and no requirement for XML configuration
用了它有哪些好处呢?
邓老爷子说的好:不管它黑猫白猫,逮到老鼠就是好猫。
我们就是:
不管这东西多么牛逼,对我有用有好处就是好东西;
否则,对不起请.....
回顾传统项目构建
这里选Web型项目来聊,后面默认都是


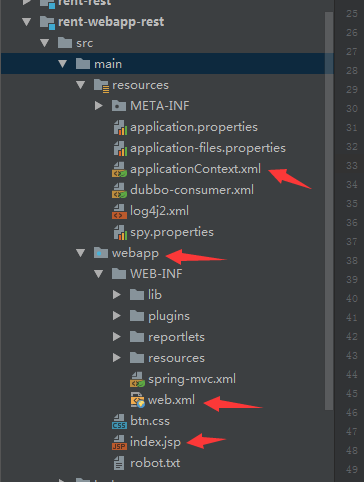
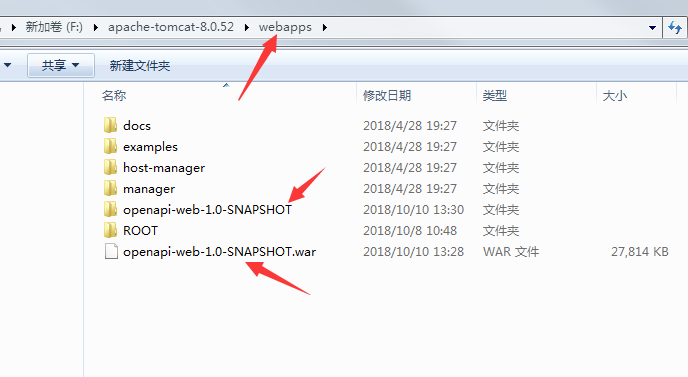
传统项目构建发布包方式:
- 构建War包由应用服务器解析生成目录
- 构建zip包,集成assembly自己编写启动脚本集成服务器等等
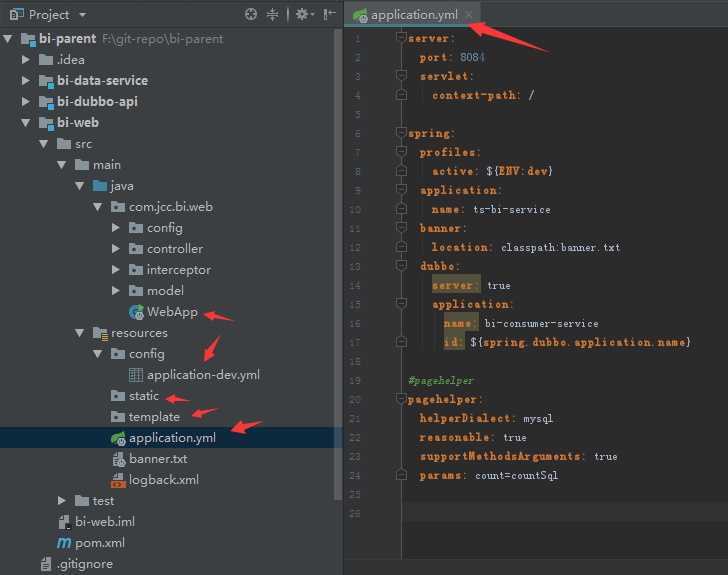
spring-boot又是什么样的结构


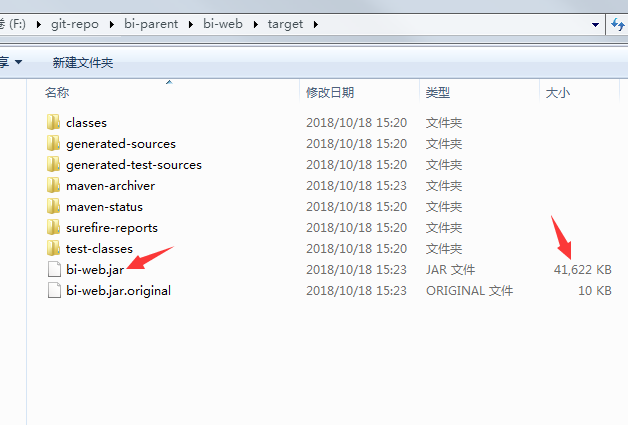
只需要将这个jar复制到服务器上,运行
java -jar bi-web.jar --spring.profiles.active=prod
服务器就启动完成
比较来看优缺点
1、没有webapp目录也没有讨厌的web.xml文件配置;
2、所有文件封装在一个jar内部,启动部署超级简单;
3、提过spring-boot-starter-parent这样依赖管理库,再也不需要在pom.xml文件中配置各种依赖包:版本匹配、查找依赖、冲突处理等等;
<parent>
	<groupId>org.springframework.boot</groupId>
	<artifactId>spring-boot-starter-parent</artifactId>
	<version>2.0.6.RELEASE</version>
</parent>
4、starter机制产品化的封装了常见工具:redis、mq、jpa,metrics、health checks等等,和对于他们的自动化配置和依赖jar管理;
我们如何去用它?
1、通过maven-archetype-quickstart创建maven项目 1、pom.xml的parent继承spring-boot-starter-parent包 2、dependencies中引入spring-boot-starter-web包 3、创建启动入口类main class
@SpringBootApplication
public class WebApp {
    public static void main(String[] args){
        SpringApplication.run(WebApp.class, args);
    }
}
4、IDE工具中启动这个main class即可;
推荐大家通过 bi-parent 项目来学习,作为spring-boot入门;
核心点:多看看文档
友情链接
spring-boot
spring-framework
bi-parent (本人构建的基础项目sample,减少大家重复造轮子)
附录一
<?xml version="1.0" encoding="UTF-8"?>
<project xmlns="http://maven.apache.org/POM/4.0.0" xmlns:xsi="http://www.w3.org/2001/XMLSchema-instance"
         xsi:schemaLocation="http://maven.apache.org/POM/4.0.0 http://maven.apache.org/xsd/maven-4.0.0.xsd">
    <modelVersion>4.0.0</modelVersion>
    <groupId>com.ts</groupId>
    <artifactId>cn-link-001</artifactId>
    <packaging>jar</packaging>
    <version>1.0.0-SNAPSHOT</version>
    <parent>
        <groupId>org.springframework.boot</groupId>
        <artifactId>spring-boot-starter-parent</artifactId>
        <version>2.0.6.RELEASE</version>
    </parent>
    <name>cn-link-sample</name>
    <properties>
        <project.build.sourceEncoding>UTF-8</project.build.sourceEncoding>
        <maven.compiler.source>1.8</maven.compiler.source>
        <maven.compiler.target>1.8</maven.compiler.target>
        <java.version>1.8</java.version>
        <start-class>com.isesol.CnLinkApp</start-class>
    </properties>
    <dependencies>
        <dependency>
            <groupId>org.springframework.boot</groupId>
            <artifactId>spring-boot-starter-data-redis</artifactId>
        </dependency>
        <dependency>
            <groupId>org.springframework.boot</groupId>
            <artifactId>spring-boot-starter-web</artifactId>
        </dependency>
        <dependency>
            <groupId>org.springframework.boot</groupId>
            <artifactId>spring-boot-starter-test</artifactId>
        </dependency>
    </dependencies>
    <build>
        <plugins>
            <plugin>
                <groupId>org.springframework.boot</groupId>
                <artifactId>spring-boot-maven-plugin</artifactId>
                <configuration>
                    <mainClass>${start-class}</mainClass>
                    <addResources>true</addResources>
                </configuration>
                <executions>
                    <execution>
                        <goals>
                            <goal>repackage</goal>
                        </goals>
                    </execution>
                </executions>
            </plugin>
        </plugins>
    </build>
</project>
想要在技术的海洋里遨游,我们都需要有颗虔诚的心
From Owen Jia ,推荐关注Owen Jia Blog
- 本文标签: build web NIO https App 目录 JPA pom Spring Boot 配置 schema apache plugin ip 部署 管理 http maven id cat dependencies zip ORM tomcat 虔诚 IDE src 自动化 MQ 产品 XML java Features springboot redis lib 服务器 IO tar 解析 spring Security jetty RocketMQ UI
- 版权声明: 本文为互联网转载文章,出处已在文章中说明(部分除外)。如果侵权,请联系本站长删除,谢谢。
- 本文海报: 生成海报一 生成海报二


![[HBLOG]公众号](https://www.liuhaihua.cn/img/qrcode_gzh.jpg)

