Mybatis中的设计模式运用
Mybatis是一种使用方便,查询灵活的ORM框架,支持定制化 SQL、存储过程以 及高级映射,支持多种主流数据库(mysql、oracle、PostgreSQL)。 本文以mysql为例,使用jdk8,mysql5.7,mybatis3.4。 给大家讲解它的源码中设计模式的运 用。
1. SqlSession的创建
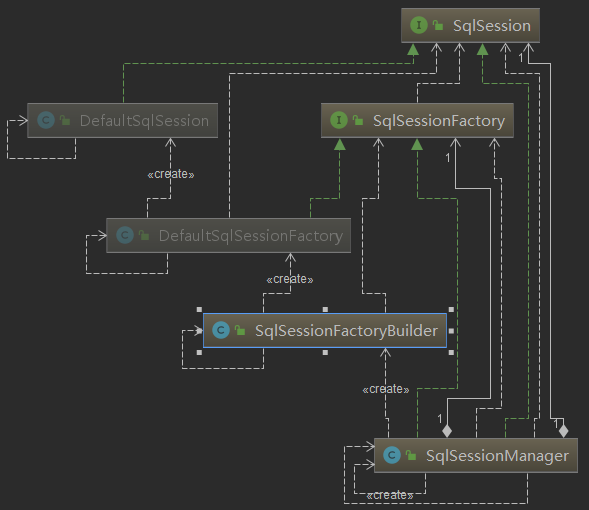
Mybatis的启动方式有两种,交给Spring来启动和编码方式启动。第一种方式:如果项目中用到了mybatis-spring.jar,那大多是通过Spring来启动。我们重点介绍一下第二种方式:编码启动,获取sqlsession的依赖关系图如下:

Reader reader = Resources.getResourceAsReader("Mybatis配置文件路径");
SqlSessionFactory sqlSessionFactory = new SqlSessionFactoryBuilder().build(reader);
SqlSession sqlSession = sqlSessionFactory.openSession();
可以看到,编码方式启动是通过调用SqlSessionFactoryBuilder类的build()方法来获取SqlSessionFactory对象的,然后通过SqlSessionFactory得到我们想要的SqlSession。
其中SqlSession和SqlSessionFactory这两个接口,及DefaultSqlSession和DefaultSqlSessionFactory这两个默认实现类,就是典型的 工厂方法模式 的实现。一个基础接口(SqlSession)定义了功能,每个实现接口的子类(DefaultSqlSession)就是产品,然后定义一个工厂接口(SqlSessionFactory),实现了工厂接口的就是工厂(DefaultSqlSessionFactory),采用 工厂方法模式 的优点是:一旦需要增加新的sqlsession实现类,直接增加新的SqlSessionFactory的实现类,不需要修改之前的代码,更好的满足了开闭原则。
其中用到的SqlSessionFactoryBuilder采用了 建造者(Builder)模式 。 正常一个对象的创建是使用new关键字完成,但是如果创建对象需要的构造参数很多,且不能保证每个参数都是正确的或者不能一次性得到构建所需的所有参数,就需要将构建逻辑从对象本身抽离出来,让对象只关注功能,把构建交给构建类,这样可以简化对象的构建,也可以 达到分步构建对象的目的 。
在SqlSessionFactoryBuilder中构建SqlSessionFactory分为了两步:
第一步,通过XMLConfigBuilder解析XML配置文件,读取配置参数,并将读取的数据存入Configuration类中。
第二步,通过build方法,生成DefaultSqlSessionFactory对象:
public SqlSessionFactory build(InputStream inputStream,String environment,Properties properties) {
...
XMLConfigBuilder parser = new XMLConfigBuilder(inputStream, environment, properties);
return build(parser.parse());
...
}
public SqlSessionFactory build(Configuration config) {
return new DefaultSqlSessionFactory(config);
}
上述两步都是在SqlSessionFactoryBuilder类中进行,SqlSessionFactoryBuilder类相当于一个操控台,将各方面的资源拿过来合成目标对象,Configuration类属于创建过程中一个重要的中间介质,最终分步构建出SqlSessionFactory 。
2. 创建数据源DataSource对象
创建datasource对象也有两种方式,交给Spring来创建和读取mybatis配置文件创建。
第一种方式:由spring读取配置文件,在org.mybatis.spring.boot.autoconfigure.MybatisAutoConfiguration使用datasource创建SqlSessionFactory。
第二种方式:Mybatis中的处理。

Mybatis把数据源分为三种:
-
Jndi: 使用jndi实现的数据源, 通过 JNDI 上下文中取值
-
Pooled:使用连接池的数据源
-
Unpooled:不使用连接池的数据源
Mybatis配置文件中关于数据库的配置:
<environments default="development">
<environment id="development">
<transactionManager type="JDBC"/>
<dataSource type="POOLED">
<property name="driver" value="${jdbc.driverClassName}"/>
<property name="url" value="${jdbc.url}"/>
<property name="username" value="${jdbc.username}"/>
<property name="password" value="${jdbc.password}"/>
</dataSource>
</environment>
</environments>
MyBatis是通过工厂方法模式来创建数据源DataSource对象的,根据配置文件中type的类型实例化具体的DataSourceFactory。这里是POOLED所以实例化的是PooledDataSourceFactory。通过其getDataSource()方法返回数据源DataSource。工厂方法模式在上面已经详细介绍,在这就不再赘述。
3. Executor(执行器)的实现
Executor是MyBatis执行器,负责SQL语句的生成和查询缓存的维护。Executor的功能和作用是:
-
根据传递的参数,完成SQL语句的动态解析,生成BoundSql对象,供StatementHandler使用;
-
为查询创建缓存,以提高性能;
-
创建JDBC的Statement连接对象,传递给StatementHandler对象,返回List查询结果。

最底层的接口是Executor,有两个实现类:BaseExecutor和CachingExecutor,CachingExecutor用于二级缓存,而BaseExecutor则用于一级缓存及基础的操作。并且由于BaseExecutor是一个抽象类,采用 模板方法设计模式 ,提供了三个实现:SimpleExecutor,BatchExecutor,ReuseExecutor,而具体使用哪一个Executor则是可以在mybatis-config.xml中进行配置的。
-
SimpleExecutor是最简单的执行器,根据对应的sql直接执行即可,不会做一些额外的操作。
-
BatchExecutor执行器,顾名思义,通过批量操作来优化性能。通常需要注意的是批量更新操作,由于内部有缓存的实现,使用完成后记得调用flushStatements来清除缓存。
-
ReuseExecutor 可重用的执行器,重用的对象是Statement,也就是说该执行器会缓存同一个sql的Statement,省去Statement的重新创建,优化性能。内部的实现是通过一个HashMap来维护Statement对象的。由于当前Map只在该session中有效,所以使用完成后记得调用flushStatements来清除Map。
-
这几个Executor的生命周期都是局限于SqlSession范围内。
以update操作为例,在BaseExcutor中是这么实现的:
@Override
public int update(MappedStatement ms, Object parameter) throws SQLException {
ErrorContext.instance().resource(ms.getResource()).activity("executing an update").object(ms.getId());
if (closed) {
throw new ExecutorException("Executor was closed.");
}
clearLocalCache();
return doUpdate(ms, parameter);
}
当调用到这个方法时,会根据是哪个子类的对象,调用子类的doUpdate方法。像doFlushStatements,doQuery,doQueryCursor也是这样调用的。
这样实现的优点是:1、封装不变部分,扩展可变部分。2、提取公共代码,便于维护。3、行为由父类控制,子类实现。
4. interceptor(拦截器)的实现
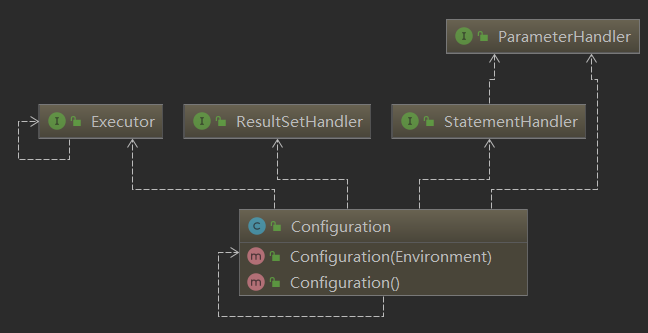
MyBatis 允许在sql语句执行过程中的某一点进行拦截调用,具体实现是通过对Executor、StatementHandler、PameterHandler和ResultSetHandler进行拦截代理。其中的业务含义如下介绍:
ParameterHandler:拦截参数的处理
ResultSetHandler:拦截结果集的处理
StatementHandler:拦截Sql语法构建的处理
Executor:拦截执行器的方法。

通过查看Configuration类的源代码我们可以看到,每次都对目标对象进行代理链的生成。
public ParameterHandler newParameterHandler(MappedStatement mappedStatement, Object parameterObject, BoundSql boundSql) {
ParameterHandler parameterHandler = mappedStatement.getLang().createParameterHandler(mappedStatement, parameterObject, boundSql);
parameterHandler = (ParameterHandler) interceptorChain.pluginAll(parameterHandler);
return parameterHandler;
}
public ResultSetHandler newResultSetHandler(Executor executor, MappedStatement mappedStatement, RowBounds rowBounds, ParameterHandler parameterHandler,
ResultHandler resultHandler, BoundSql boundSql) {
ResultSetHandler resultSetHandler = new DefaultResultSetHandler(executor, mappedStatement, parameterHandler, resultHandler, boundSql, rowBounds);
resultSetHandler = (ResultSetHandler) interceptorChain.pluginAll(resultSetHandler);
return resultSetHandler;
}
public StatementHandler newStatementHandler(Executor executor, MappedStatement mappedStatement, Object parameterObject, RowBounds rowBounds, ResultHandler resultHandler, BoundSql boundSql) {
StatementHandler statementHandler = new RoutingStatementHandler(executor, mappedStatement, parameterObject, rowBounds, resultHandler, boundSql);
statementHandler = (StatementHandler) interceptorChain.pluginAll(statementHandler);
return statementHandler;
}
public Executor newExecutor(Transaction transaction, ExecutorType executorType) {
executorType = executorType == null ? defaultExecutorType : executorType;
executorType = executorType == null ? ExecutorType.SIMPLE : executorType;
Executor executor;
if (ExecutorType.BATCH == executorType) {
executor = new BatchExecutor(this, transaction);
} else if (ExecutorType.REUSE == executorType) {
executor = new ReuseExecutor(this, transaction);
} else {
executor = new SimpleExecutor(this, transaction);
}
if (cacheEnabled) {
executor = new CachingExecutor(executor);
}
executor = (Executor) interceptorChain.pluginAll(executor);
return executor;
}
InterceptorChain里保存了所有的拦截器,它在mybatis初始化的时候创建。上面interceptorChain.pluginAll(executor)的含义是调用拦截器链里的每个拦截器依次对executor进行plugin(插入拦截),这种逻辑的向下传递,就是 责任链模式 。plugin方法用于封装目标对象,通过该方法我们可以返回目标对象本身,或者返回一个它的代理。当返回的是代理时,执行方法前会调用拦截器的intercept方法对其进行插入拦截。 在intercept方法中可以改变Mybatis的默认行为(诸如SQL重写之类的)。
以常见的PageInterceptor(给查询语句增加分页)为例( mybatis 拦截器只能使用注解实现 ):
@Intercepts({
@Signature(type = Executor.class, method = "query", args = {MappedStatement.class, Object.class,RowBounds.class, ResultHandler.class})
})
@Slf4j
public class PageInterceptor implements Interceptor {
...
/**
* 执行拦截逻辑的方法
*/
@Override
public Object intercept(Invocation invocation) throws Throwable {
. . .
}
@Override
public Object plugin(Object target) {
return Plugin.wrap(target, this);
}
...
}
上面这个例子中,拦截器的注解描述表明:该拦截器只拦截Executor的直接查库(不查询缓存)的query方法,也就是说只针对这种查询做出分页的增强处理。PageInterceptor实现的plugin方法中只有一句代码:Plugin.wrap(target, this),通过该方法返回的对象是目标对象还是对应的代理,决定是否触发intercept()方法。Plugin类的源码如下:
/**
* 继承了InvocationHandler
*/
public class Plugin implements InvocationHandler {
//目标对象
private final Object target;
// 拦截器
private final Interceptor interceptor;
private final Map<Class<?>, Set<Method>> signatureMap;
private Plugin(Object target, Interceptor interceptor, Map<Class<?>, Set<Method>> signatureMap) {
this.target = target;
this.interceptor = interceptor;
this.signatureMap = signatureMap;
}
//对一个目标对象进行包装,生成代理类。
public static Object wrap(Object target, Interceptor interceptor) {
//首先根据interceptor上面定义的注解 获取需要拦截的信息
Map<Class<?>, Set<Method>> signatureMap = getSignatureMap(interceptor);
//目标对象的Class
Class<?> type = target.getClass();
//返回需要拦截的接口信息
Class<?>[] interfaces = getAllInterfaces(type, signatureMap);
//如果长度为>0 则返回代理类 否则不做处理
if (interfaces.length > 0) {
return Proxy.newProxyInstance(
type.getClassLoader(),
interfaces,
new Plugin(target, interceptor, signatureMap));
}
return target;
}
//代理对象每次调用的方法
@Override
public Object invoke(Object proxy, Method method, Object[] args) throws Throwable {
try {
//通过method参数定义的类 去signatureMap当中查询需要拦截的方法集合
Set<Method> methods = signatureMap.get(method.getDeclaringClass());
//判断是否需要拦截
if (methods != null && methods.contains(method)) {
//执行拦截器的拦截方法
return interceptor.intercept(new Invocation(target, method, args));
}
//不拦截 直接通过目标对象调用方法
return method.invoke(target, args);
} catch (Exception e) {
throw ExceptionUtil.unwrapThrowable(e);
}
}
//根据拦截器接口(Interceptor)实现类上面的注解获取相关信息
private static Map<Class<?>, Set<Method>> getSignatureMap(Interceptor interceptor) {
//获取注解信息@Intercepts
Intercepts interceptsAnnotation = interceptor.getClass().getAnnotation(Intercepts.class);
if (interceptsAnnotation == null) {//为空则抛出异常
throw new PluginException("No @Intercepts annotation was found in interceptor " + interceptor.getClass().getName());
}
//获得Signature注解信息 是一个数组
Signature[] sigs = interceptsAnnotation.value();
Map<Class<?>, Set<Method>> signatureMap = new HashMap<Class<?>, Set<Method>>();
//循环注解信息
for (Signature sig : sigs) {
//根据Signature注解定义的type信息去signatureMap当中查询需要拦截方法的集合
Set<Method> methods = signatureMap.get(sig.type());
if (methods == null) { //第一次肯定为null 就创建一个并放入signatureMap
methods = new HashSet<Method>();
signatureMap.put(sig.type(), methods);
}
try {
//找到sig.type当中定义的方法 并加入到集合
Method method = sig.type().getMethod(sig.method(), sig.args());
methods.add(method);
} catch (NoSuchMethodException e) {
throw new PluginException("Could not find method >
}
}
return signatureMap;
}
//根据对象类型与signatureMap获取接口信息
private static Class<?>[] getAllInterfaces(Class<?> type, Map<Class<?>, Set<Method>> signatureMap) {
Set<Class<?>> interfaces = new HashSet<Class<?>>();
//循环type类型的接口信息 如果该类型存在与signatureMap当中则加入到set当中去
while (type != null) {
for (Class<?> c : type.getInterfaces()) {
if (signatureMap.containsKey(c)) {
interfaces.add(c);
}
}
type = type.getSuperclass();
}
//转换为数组返回
return interfaces.toArray(new Class<?>[interfaces.size()]);
}
}
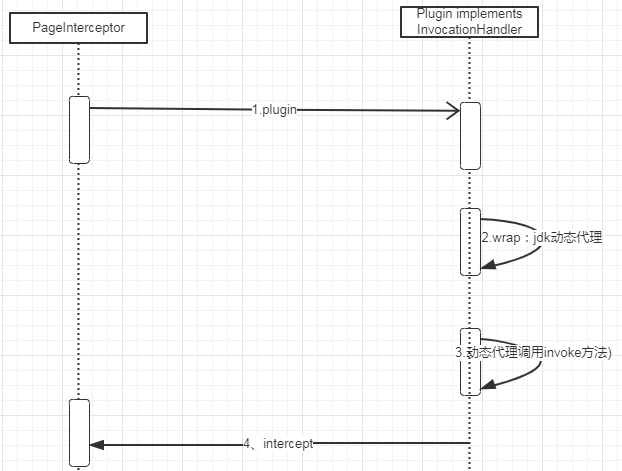
PageInterceptor生效的时序图如下:其中Plugin.wrap的target是Executor,this就是当前的interceptor。最后执行PageInterceptor中intercept方法。

其中第二步org.apache.ibatis.plugin.Plugin的wrap方法生成代理类用到了jdk动态代理,属于设计模式中的 代理模式 。
代理模式的设计意图是为一个对象提供一个替身或者占位符以控制对这个对象的访问,它给目标对象提供一个代理对象,由代理对象控制对目标对象的访问。
JAVA动态代理与静态代理相对,静态代理是在编译期就已经确定代理类和真实类的关系,并且生成代理类的。而动态代理是在运行期利用JVM的反射机制生成代理类,这里是直接生成类的字节码,然后通过类加载器载入JAVA虚拟机执行。JDK动态代理的实现是在运行时,根据一组接口定义,使用Proxy、InvocationHandler等工具类去生成一个代理类和代理类实例。
在Plugin的wrap方法中jdk动态代理解决的问题是(以Executor为例):在不知道被代理Executor的实现类是哪种(BatchExecutor or ReuseExecutor or SimpleExecutor or CachingExecutor)的情况下依然能够使用代理模式调用实现类的query方法或者是其它方法。这么做的好处就是扩展性高,职责清晰。
Mybatis中用到的设计模式还有很多,希望本文能起到一个引导的作用,让大家多看源码,关注设计模式,共同学习,共同进步。
Thanks!
作者简介:
章茂瑜,民生科技有限公司,用户体验技术部,移动金融开发平台开发工程师。

- 本文标签: 配置 ORM App 一级缓存 字节码 定制 分页 stream 数据库 生命 IDE plugin id java XML Statement dataSource map Action CTO 二级缓存 JVM 编译 mybatis 缓存 Oracle http 数据 sqlsession 希望 spring 实例 JDBC https final sql Property 设计模式 executor session ssl list Proxy find src UI SqlSessionFactory mysql parse iBATIS 连接池 db 开发 cat ACE 代码 cache HashMap apache value newProxyInstance 科技 build 金融 SqlSessionFactoryBuilder 解析 IO 类加载器 源码 参数 HashSet 产品 Word NSA StatementHandler 工程师 update key ResultSet tar MySQL5
- 版权声明: 本文为互联网转载文章,出处已在文章中说明(部分除外)。如果侵权,请联系本站长删除,谢谢。
- 本文海报: 生成海报一 生成海报二


![[HBLOG]公众号](https://www.liuhaihua.cn/img/qrcode_gzh.jpg)

