Spring Cloud Alibaba学习笔记(23) - 调用链监控工具Spring Cloud Sleuth + Zipkin
随着业务发展,系统拆分导致系统调用链路愈发复杂一个前端请求可能最终需要调用很多次后端服务才能完成,当整个请求陷入性能瓶颈或不可用时,我们是无法得知该请求是由某个或某些后端服务引起的,这时就需要解决如何快读定位服务故障点,以对症下药。于是就有了分布式系统调用跟踪的诞生。
Spring Cloud Sleuth 也为我们提供了一套完整的解决方案。在本文中,我们将详细介绍如何使用 Spring Cloud Sleuth + Zipkin 来为我们的微服务架构增加分布式服务跟踪的能力。
Spring Cloud Sleuth
Spring Cloud Sleuth implements a distributed tracing solution for Spring Cloud, borrowing heavily from Dapper, Zipkin and HTrace. For most users Sleuth should be invisible, and all your interactions with external systems should be instrumented automatically. You can capture data simply in logs, or by sending it to a remote collector service.
Spring Cloud Sleuth是Spring Cloud实施分布式跟踪解决方案,大量借用Dapper,Zipkin和HTrace。 对于大多数用户来说,侦探应该是隐形的,并且所有与外部系统的交互都应该自动进行检测。 您可以简单地在日志中捕获数据,也可以将数据发送到远程收集器服务。
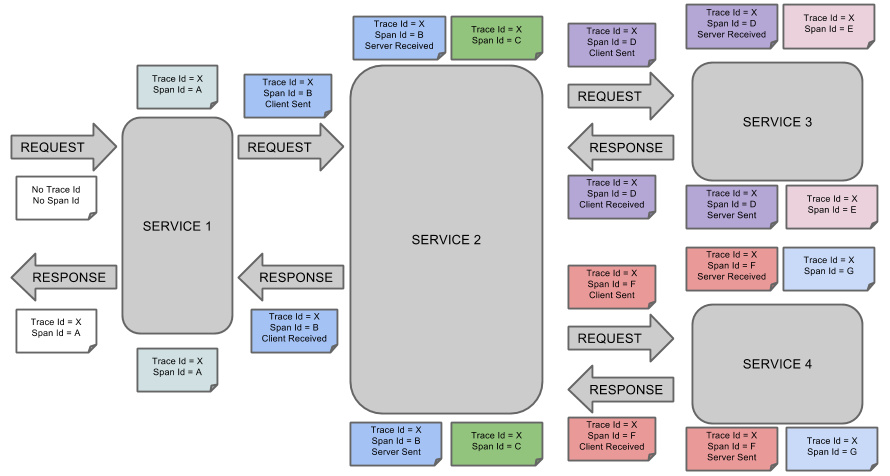
SpringCloudSleuth 借用了 Dapper 的术语:
- Span(跨度):Sleuth的基本工作单元,它用一个64位的id唯一标识。除Id外,span还包含其他数据,例如描述、时间戳事件、键值对的注解(标签)、span ID、span父ID等
- trace(跟踪):一组span组成的树状结构称之为trace
- Annotation(标注):用于及时记录事件的存在
- CS(Client Sent客户端发送):客户端发送一个请求,该annotation描述了span的开始
- SR(Server Received服务器端接收):服务器端获取请求并准备处理它
- SS(Server Sent服务器端发送):该annotation表明完成请求处理(当响应发回客户端时)
- CR(Client Received客户端接收):span结束的标识,客户端成功接收到服务器端的响应
Spring Cloud Sleuth 为服务之间调用提供链路追踪。通过 Sleuth 可以很清楚的了解到一个服务请求经过了哪些服务,每个服务处理花费了多长。从而让我们可以很方便的理清各微服务间的调用关系。此外 Sleuth 可以帮助我们:
- 耗时分析:通过 Sleuth 可以很方便的了解到每个采样请求的耗时,从而分析出哪些服务调用比较耗时;
- 可视化错误:对于程序未捕捉的异常,可以通过集成 Zipkin 服务界面上看到;
- 链路优化:对于调用比较频繁的服务,可以针对这些服务实施一些优化措施。
Spring Cloud Sleuth 可以结合 Zipkin,将信息发送到 Zipkin,利用 Zipkin 的存储来存储信息,利用 Zipkin UI 来展示数据。
这是 Spring Cloud Sleuth 的概念图:

应用整合Sleuth
只需要在pom.xml的 dependencies 中添加如下依赖,就可以为应用整合sleuth:
<dependency>
    <groupId>org.springframework.cloud</groupId>
    <artifactId>spring-cloud-starter-sleuth</artifactId>
</dependency>
整合完成之后,启动项目,调用一个请求(我人为的关闭了应用要调用的另一个微服务,导致了请求失败),这是看控制台日志:
2019-10-29 16:28:57.417  INFO [study01,,,] 5830 --- [-192.168.31.101] o.s.web.servlet.DispatcherServlet        : Completed initialization in 27 ms
2019-10-29 16:28:57.430  INFO [study01,,,] 5830 --- [-192.168.31.101] com.zaxxer.hikari.HikariDataSource       : HikariPool-1 - Starting...
2019-10-29 16:28:57.433  INFO [study01,,,] 5830 --- [-192.168.31.101] com.zaxxer.hikari.HikariDataSource       : HikariPool-1 - Start completed.
2019-10-29 16:28:58.520 DEBUG [study01,42d9bd786504f775,42d9bd786504f775,false] 5530 --- [nio-8881-exec-1] c.e.s.feignClient.CommentFeignClient     : [CommentFeignClient#find] ---> GET http://study02/find HTTP/1.1
2019-10-29 16:28:58.520 DEBUG [study01,42d9bd786504f775,42d9bd786504f775,false] 5530 --- [nio-8881-exec-1] c.e.s.feignClient.CommentFeignClient     : [CommentFeignClient#find] ---> END HTTP (0-byte body)
2019-10-29 16:28:58.520 DEBUG [study01,42d9bd786504f775,42d9bd786504f775,false] 5530 --- [nio-8881-exec-1] c.s.i.w.c.f.TraceLoadBalancerFeignClient : Before send
2019-10-29 16:28:58.646  INFO [study01,42d9bd786504f775,42d9bd786504f775,false] 5530 --- [nio-8881-exec-1] c.netflix.config.ChainedDynamicProperty  : Flipping property: study02.ribbon.ActiveConnectionsLimit to use NEXT property: niws.loadbalancer.availabilityFilteringRule.activeConnectionsLimit = 2147483647
2019-10-29 16:28:58.661  INFO [study01,42d9bd786504f775,42d9bd786504f775,false] 5530 --- [nio-8881-exec-1] c.netflix.loadbalancer.BaseLoadBalancer  : Client: study02 instantiated a LoadBalancer: DynamicServerListLoadBalancer:{NFLoadBalancer:name=study02,current list of Servers=[],Load balancer stats=Zone stats: {},Server stats: []}ServerList:null
2019-10-29 16:28:58.667  INFO [study01,42d9bd786504f775,42d9bd786504f775,false] 5530 --- [nio-8881-exec-1] c.n.l.DynamicServerListLoadBalancer      : Using serverListUpdater PollingServerListUpdater
2019-10-29 16:28:58.683  INFO [study01,42d9bd786504f775,42d9bd786504f775,false] 5530 --- [nio-8881-exec-1] c.n.l.DynamicServerListLoadBalancer      : DynamicServerListLoadBalancer for client study02 initialized: DynamicServerListLoadBalancer:{NFLoadBalancer:name=study02,current list of Servers=[],Load balancer stats=Zone stats: {},Server stats: []}ServerList:com.alibaba.cloud.nacos.ribbon.NacosServerList@591b62cf
2019-10-29 16:28:58.707 DEBUG [study01,42d9bd786504f775,42d9bd786504f775,false] 5530 --- [nio-8881-exec-1] o.s.c.s.i.a.ContextRefreshedListener     : Context successfully refreshed
2019-10-29 16:28:58.755 DEBUG [study01,42d9bd786504f775,42d9bd786504f775,false] 5530 --- [nio-8881-exec-1] c.s.i.w.c.f.TraceLoadBalancerFeignClient : Exception thrown
可以看见日志的形式和之前不太一样了,首先启动日志里面多了个中括号: [study01,,,] ;而当应用请求报异常的时候,中括号中有了这些数据: [study01,42d9bd786504f775,42d9bd786504f775,false]
study01是应用名称,42d9bd786504f775是 trace ID,42d9bd786504f775是span ID,false表示是不是要把这条数据上传给zipkin。这时,就可以通过日志分析应用哪里出了问题、哪个阶段出了问题。
PS:可以在应用中添加如下配置:
logging:
  level:
    org.springframework.cloud.sleuth: debug
这段配置的用处是让sleuth打印更多的日志,从而进一步帮助我们分析错误【我上面粘出的日志就是添加配置之后的结果】。
Zipkin
Zipkin 是 Twitter 的开源分布式跟踪系统,它基于 Google Dapper 实现,它致力于收集服务的时序数据,以解决微服务架构中的延迟问题,包括数据的收集、存储、查找和展现。
搭建Zipkin Server
下载Zipkin Server
使用Zipkin官方的Shell
curl -sSL https://zipkin.io/quickstart.sh | bash -s
Maven中央仓库
访问如下地址下载:
https://search.maven.org/remote_content?g=io.zipkin.java&a=zipkin-server&v=LATEST&c=exec
启动Zipkin Server
下载完成之后,在下载的jar所在目录,执行 java -jar *****.jar 命令即可启动Zipkin Server
访问http://localhost:9411 即可看到Zipkin Server的首页。

应用整合Zipkin
添加依赖:
<dependency>
    <groupId>org.springframework.cloud</groupId>
    <artifactId>spring-cloud-starter-zipkin</artifactId>
</dependency>
PS:当使用了 spring-cloud-starter-zipkin 之后,前面添加 spring-cloud-starter-sleuth 就不需要了,因为前者包含了后者。
添加配置
spring:
  zipkin:
    base-url: http://localhost:9411/
  sleuth:
    sampler:
      # 抽样率,默认是0.1(90%的数据会被丢弃)
      # 这边为了测试方便,将其设置为1.0,即所有的数据都会上报给zipkin
      probability: 1.0
启动项目,产生请求之后,打开zipkin控制台,可以刚刚请求的信息(按耗时降序排列):

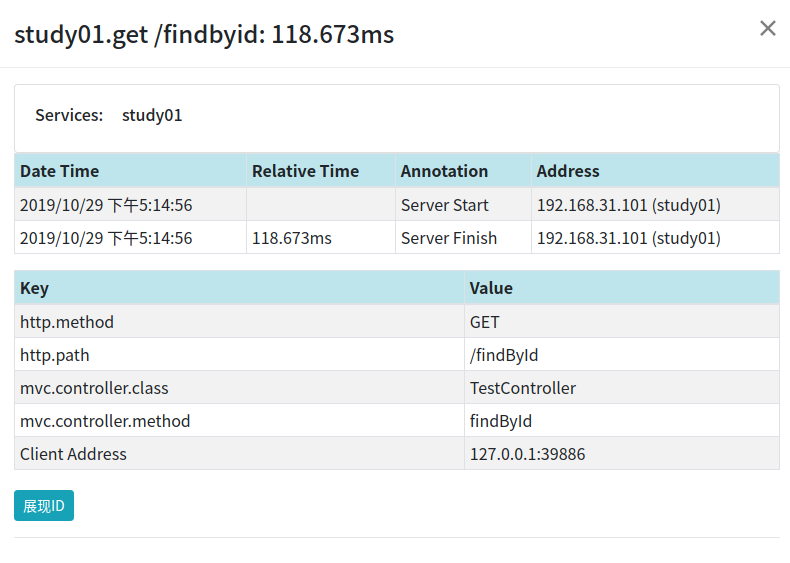
点击可以查看请求的详情:

这张图中, Server Start 表示的是 Server Received ; Server Finish 表示的是 Server Sent 。
因为客户端发生在浏览器上,而浏览器并没有整合zipkin,所以zipkin中没有 Client Sent 和 Client Received 数据。
Zipkin数据持久化
前面搭建Zipkin是基于内存的,如果Zipkin发生重启的话,数据就会丢失,这种方式是不适用于生产的,所以我们需要实现数据持久化。
Zipkin给出三种数据持久化方法:
- MySQL:存在性能问题,不建议使用
- Elasticsearch
- Cassandra
相关的官方文档:https://github.com/openzipkin/zipkin#storage-component , 本文将介绍 Elasticsearch实现Zipkin数据持久化
搭建Elasticsearch
我们需要下载什么版本的Elasticsearch呢,官方文档给出了建议,5-7版本都可以使用(本文使用的是Elasticsearch6.8.2,因为Elasticsearch7开始后需要jdk11支持):
The Elasticsearch component uses Elasticsearch 5+ features, but is tested against Elasticsearch 6-7.x.
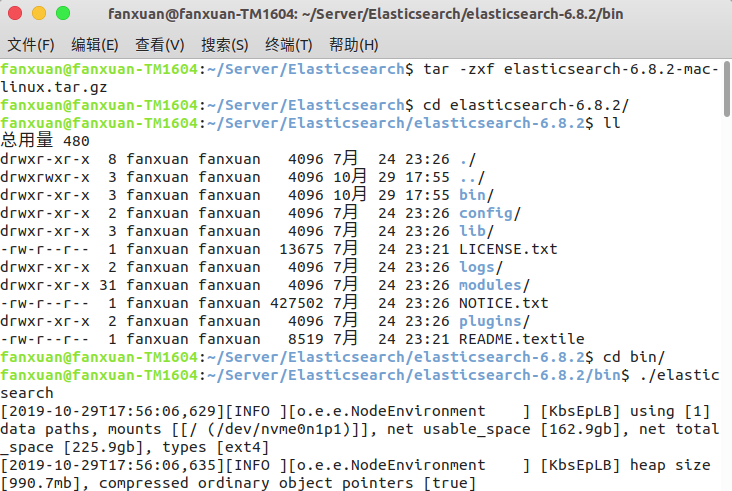
下载完成后,解压缩软件包,进入bin目录,执行 ./elasticsearch 即可启动Elasticsearch:

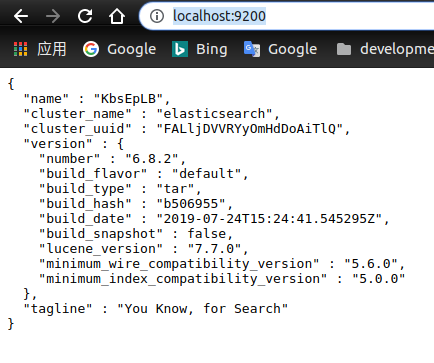
访问 http://localhost:9200/ ,出现如下页面,说明Elasticsearch启动成功:

让zipkin使用Elasticsearch存储数据
zipkin提供了很多的环境变量,配置环境变量就可以将数据存储进Elasticsearch。
- STORAGE_TYPE: 指定存储类型,可选项为:mysql, cassandra, elasticsearch
- ES_HOSTS:Elasticsearch地址,多个使用,分隔,默认http://localhost:9200
- ES_PIPELINE:指定span被索引之前的pipeline(Elasticsearch的概念)
- ES_TIMEOUT:连接Elasticsearch的超时时间,单位是毫秒;默认10000(10秒)
- ES_INDEX:zipkin所使用的索引前缀(zipkin会每天建立索引),默认zipkin
- ES_DATE_SEPARATOR:zipkin建立索引的日期分隔符,默认是-
- ES_INDEX_SHARDS:shard(Elasticsearch的概念)个数,默认5
- ES_INDEX_REPLICAS:副本(Elasticsearch的概念)个数,默认1
- ES_USERNAME/ES_PASSWORD:Elasticsearch账号密码
- ES_HTTP_LOGGING:控制Elasticsearch Api的日志级别,可选项为BASIC、HEADERS、BODY
更多环境变量参照:https://github.com/openzipkin/zipkin/tree/master/zipkin-server#environment-variables
执行下面代码重新启动zipkin:
STORAGE_TYPE=elasticsearch ES_HOSTS=localhost:9200 java -jar zipkin-server-2.12.9-exec.jar
产生请求之后,访问http://localhost:9411/zipkin/,可以看见刚刚请求的数据:

停调zipkin,然后再次启动,访问http://localhost:9411/zipkin/,可以看见数据依然存在:

说明此时,数据已经实现了持久化。
从官方文档可以看出,使用Elasticsearch进行zipkin数据持久化之后,Zipkin的依赖关系分析功能无法使用了。
Note: This store requires a spark job to aggregate dependency links.
我们需要整合 zipkin-dependencies 来实现依赖关系图功能。 zipkin-dependencies 是zipkin的一个子项目,启动非常的简单。
下载:
curl -sSL https://zipkin.io/quickstart.sh | bash -s io.zipkin.dependencies:zipkin-dependencies:LATEST zipkin-dependencies.jar
启动:
STORAGE_TYPE=elasticsearch ES_HOSTS=localhost:9200 java -jar zipkin-dependencies.jar
zipkin-dependencies使用Elasticsearch的环境变量
- STORAGE_TYPE: 指定存储类型,可选项为:mysql, cassandra, elasticsearch
- ES_HOSTS:Elasticsearch地址,多个使用,分隔,默认http://localhost:9200
- ES_INDEX:zipkin所使用的索引前缀(zipkin会每天建立索引),默认zipkin
- ES_DATE_SEPARATOR:zipkin建立索引的日期分隔符,默认是-
- ES_NODES_WAN_ONLY:如果设为true,则表示仅使用ES_HOSTS所设置的值,默认为false。当Elasticsearch集群运行在Docker中时,可将该环境变量设为true。
这边只需要把项目启动,就可以展示依赖关系图了,这里就不再演示了。
注意:zipkin-dependencies启动之后会自动停止,所以建议使用定时任务让操作系统定时启动zipkin-dependencies。
扩展:Zipkin Dependencies指定分析日期:
分析昨天的数据(OS/X下的命令)
STORAGE_TYPE=elasticsearch java -jar zipkin-dependencies.jar 'date -uv-ld + %F'
分析昨天的数据(Linux下的命令)
STORAGE_TYPE=elasticsearch java -jar zipkin-dependencies.jar 'date -u -d '1 day ago' + %F'
分析指定日期的数据
STORAGE_TYPE=elasticsearch java -jar zipkin-dependencies.jar 2019-10-29
- 本文标签: HTML zipkin update 开源 Sleuth maven ACE Ipo GitHub NIO linux list springcloud ssl dist 2019 ip Features 配置 App 分布式 java 性能问题 Netflix db Word tar Google Service XML bug 服务器 client 微服务 shell Logging sql CTO id spring 操作系统 Feign node http API Action Docker 分布式系统 web Connection 索引 servlet Job 集群 时间 Master 目录 dependencies ribbon remote src https 数据 Property Cassandra Elasticsearch zip dataSource Spring Cloud Sleuth pom 下载 find 代码 IO mysql 软件 Spring cloud 测试 lib git Twitter UI
- 版权声明: 本文为互联网转载文章,出处已在文章中说明(部分除外)。如果侵权,请联系本站长删除,谢谢。
- 本文海报: 生成海报一 生成海报二


![[HBLOG]公众号](https://www.liuhaihua.cn/img/qrcode_gzh.jpg)

