Springboot 系列(十五)如何编写自己的 Springboot starter

Springboot 中的自动配置确实方便,减少了我们开发上的复杂性,那么自动配置原理是什么呢?之前我也写过了一篇文章进行了分析。
Springboot 系列(三)Spring Boot 自动配置 。
由于自动配置用到了配置文件的绑定,如果你还不知道常见的配置文件的用法,可以参考这篇文章。
Springboot 系列(二)Spring Boot 配置文件 。
在这一次,通过学习 Springboot 自动配置模式,编写一个自己的 starter,用来加深对自动配置的理解。
熟悉模式,有助于提升编写的 starter 的规范性,编写自己的 starter 之前先来学习 Springboot 官方 starter 以及常见框架的整合 starter 的编写方式 ,可以领略到其中的奥秘。
2. Springboot 官方模式
选择一个官方的自动配置进行分析,这里就选择常见的配置端口号配置。
2.1. 引入依赖
使用端口号之前我们需要先引入 web 依赖。
<dependency>
	<groupId>org.springframework.boot</groupId>
	<artifactId>spring-boot-starter-web</artifactId>
</dependency>
如果你观察 starter 多的话,也许你发已经发现了一个 模式 , Springboot 官方的 starter 的名字都是 spring-boot-starter-xxxx 命名的。
查看 spring-boot-starter-web 会发现,其实这个依赖只是一个空盒子,除了依赖其他 pom 之外,没有一行代码。

这时,发现了另外一个 模式 : starter 只依赖其他 pom ,不做代码实现。
那么 spring-boot-starter-web 到底依赖了哪些依赖呢?
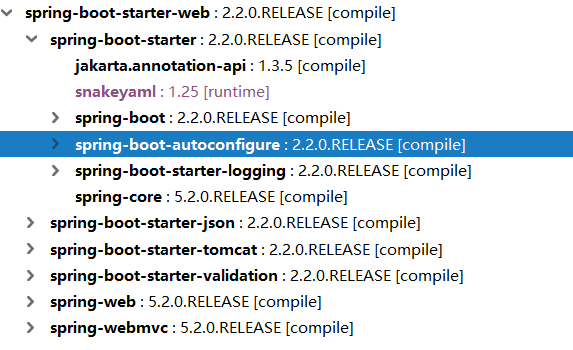
观察这个依赖信息,然后再参照其他的官方 starter ,可以找到几个 starter 固定的称之为 模式 的依赖引入。
spring-boot-starter
spring-boot-autoconfigure
2.2. 自动配置
引入依赖只有配置端口号,像这样。
server.port=8090
IDEA 中可以通过点击 server.port 找到这个配置绑定的类文件。可以看到配置最终会注入到 port 属性上。
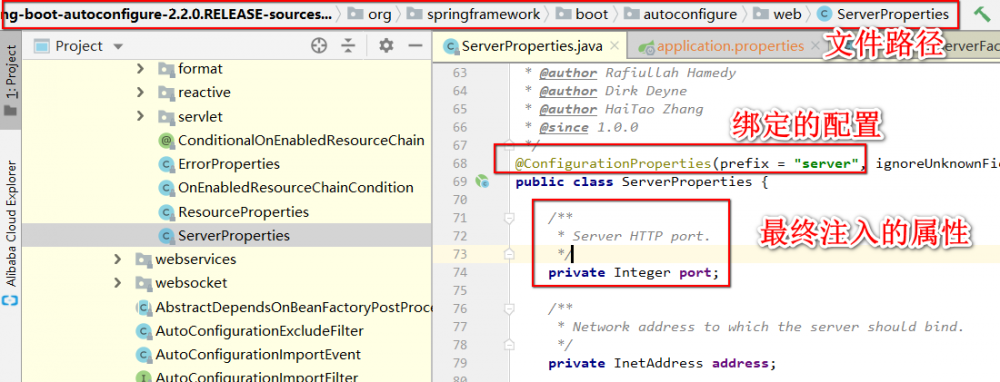
那么这个 ServerProperties 到底是哪里使用的呢?继续查找,找到一个和 Servlet 的有关的调用。

发现是被 ServletWebServerFactoryCustomizer 类进行了调用,这个类里面定义了
private final ServerProperties serverProperties;
用来使用配置的属性。
继续查看这个类的调用,发现只有一个类使用这个类,这个类是 ServletWebServerFactoryAutoConfiguration 。
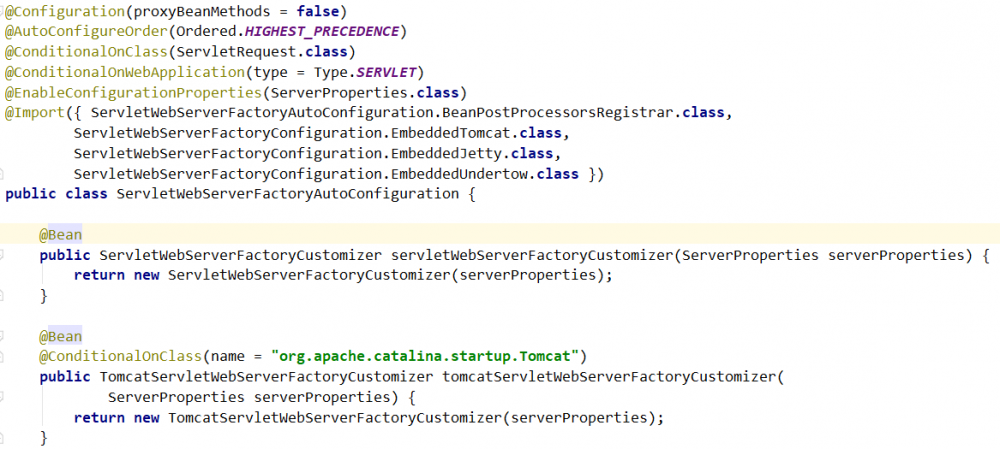
根据我们对注解的理解,这个类就是自动配置主要类了。你问我怎么看出来的吗?后面不是写着 AutoConfiguration 嘛?不好意思皮一下。
看这个类的几个注解的意思。
- 优先级别较高。
@AutoConfigureOrder(Ordered.HIGHEST_PRECEDENCE)
- 只有在
ServletRequest类存在和是 Web 应用时生效。
@ConditionalOnClass(ServletRequest.class)
@ConditionalOnWebApplication(type = Type.SERVLET)
- 开启了
ServerProperties的配置绑定。
@EnableConfigurationProperties(ServerProperties.class)
- 导入了几个类。
@Import({ ServletWebServerFactoryAutoConfiguration.BeanPostProcessorsRegistrar.class,
		ServletWebServerFactoryConfiguration.EmbeddedTomcat.class,
		ServletWebServerFactoryConfiguration.EmbeddedJetty.class,
		ServletWebServerFactoryConfiguration.EmbeddedUndertow.class })
注入配置到 Bean 工厂。
@Bean
public ServletWebServerFactoryCustomizer servletWebServerFactoryCustomizer(ServerProperties serverProperties) {
	return new ServletWebServerFactoryCustomizer(serverProperties);
}
自动配置仅仅是这些东西吗?根据之前文章里的分析,我们知道不止代码,至少还有一个指定自动配置类的配置文件需要读取。也就是 spring.factories 文件。
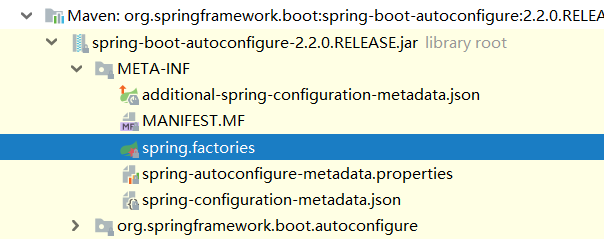
如果你不知道,可以先看这篇文章。 Springboot 系列(三)Spring Boot 自动配置 。
事实确实如此,可以在 spring.factories 中找到上面跟踪到的类。
也就是 ServletWebServerFactoryAutoConfiguration .
根据上面的分析,可以发现 Springboot 官方 starter 的几个 模式 。
- 使用
XXXProperties自动绑定XXX开头的配置信息,如:ServerProperties。 - 把
XXXProperties定义到要使用的类中,如:ServletWebServerFactoryCustomizer。 - 编写一个
XXXAutoConfiguration,开启XXXProperties的自动配置,限定生效场景,创建需要的类到Bean工厂。如:ServletWebServerFactoryAutoConfiguration。
3. 第三方集成模式
Springboot 官方是不可能把所有的框架都编写成 starter 的,这不可能也不现实。我们选择一个常用的框架进行分析。因为我已经看过了其他的第三方框架,所以在下面观察的过程中会直接支出相同点,而不再做对比。
3.1 引入依赖
<dependency>
    <groupId>org.mybatis.spring.boot</groupId>
    <artifactId>mybatis-spring-boot-starter</artifactId>
    <version>1.3.2</version>
</dependency>
这里 mybatis 框架的 starter 依赖符合一定的 规则 ,即 xxx-spring-boot-starter .
观察这个 starter ,发现它也没有做任何的代码实现,这一点和 springboot 官方一致。
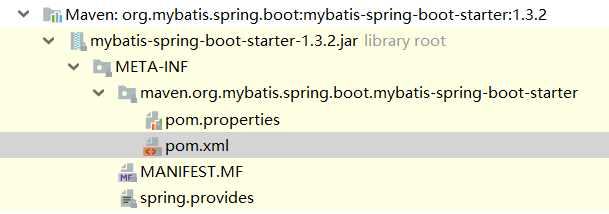
查看 mybatis-spring-boot-starter 的依赖项,有很多,其中和自动配置有关的主要是。
<dependency>
	<groupId>org.mybatis.spring.boot</groupId>
	<artifactId>mybatis-spring-boot-autoconfigure</artifactId>
</dependency>
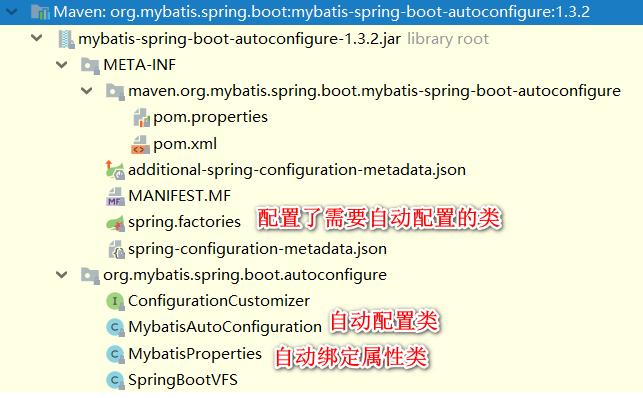
然后查看 mybatis-spring-boot-autoconfigure 的内容发现和 springboot 官方的 starter 结构上是差不多的。
3.2 自动配置
mybatis 的自动配置也是通过 spring.factories 来指明自动配置,然后通过 XxxAutoConfiguration 绑定 XxxProperties 来进行自动配置.
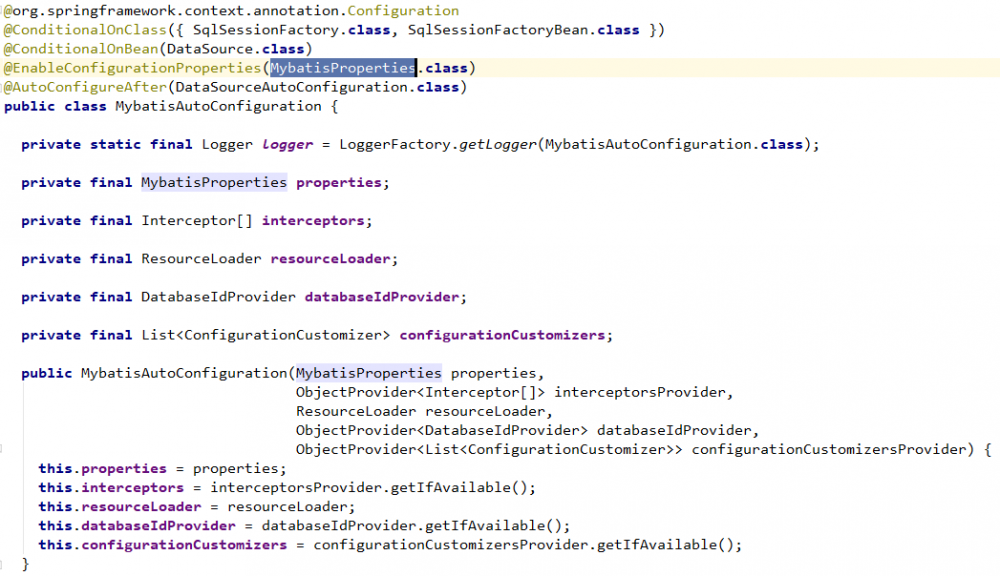
在原理上,和上面 springboot 官方的 starter 是相同的,所以不做过多的介绍了。
4. 编写自己的 starter
通过上面的介绍,我们可以大致得出编写自己的 starter 步骤。
- 创建名字为
xxx-spring-boot-starter的启动器项目。 - 创建名字为
xxx-spring-boot-autoconfigure的项目。xxxProperties xxxProperties XXXAutoConfiguration spring.factories
- 启动器项目为空项目,用来引入
xxx-spring-boot-autoconfigure等其他依赖。 - 项目引入
starter,配置需要配置的信息。
4.1 创建启动器项目
由于启动器不需要代码实现,只需要依赖其他项目,所以直接创建一个空的 maven 项目。但是名字要规范。
这里创建的 starter 是 myapp-spring-boot-starter 。

pom 文件非常简单,只需要引入要创建的 myapp-spring-boot-autoconfigure .
<?xml version="1.0" encoding="UTF-8"?>
<project xmlns="http://maven.apache.org/POM/4.0.0"
         xmlns:xsi="http://www.w3.org/2001/XMLSchema-instance"
         xsi:schemaLocation="http://maven.apache.org/POM/4.0.0 http://maven.apache.org/xsd/maven-4.0.0.xsd">
    <modelVersion>4.0.0</modelVersion>

    <groupId>net.codingme.starter</groupId>
    <artifactId>myapp-spring-boot-starter</artifactId>
    <version>1.0-SNAPSHOT</version>
    <!-- 启动器 -->
    <dependencies>
        <!--  引入自动配置项目 -->
        <dependency>
            <groupId>net.codingme.starter</groupId>
            <artifactId>myapp-spring-boot-autoconfigure</artifactId>
            <version>0.0.1-SNAPSHOT</version>
        </dependency>
    </dependencies>


</project>
4.2 创建自动配置项目
结合上面对 starter 的分析,直接创建一个名字为 myapp-spring-boot-autoconfigure 的项目。项目中只引入 springboot 父项目以及 spring-boot-starter 。
<?xml version="1.0" encoding="UTF-8"?>
<project xmlns="http://maven.apache.org/POM/4.0.0" xmlns:xsi="http://www.w3.org/2001/XMLSchema-instance"
         xsi:schemaLocation="http://maven.apache.org/POM/4.0.0 https://maven.apache.org/xsd/maven-4.0.0.xsd">
    <modelVersion>4.0.0</modelVersion>
    <parent>
        <groupId>org.springframework.boot</groupId>
        <artifactId>spring-boot-starter-parent</artifactId>
        <version>2.2.0.RELEASE</version>
        <relativePath/> <!-- lookup parent from repository -->
    </parent>
    <groupId>net.codingme.starter</groupId>
    <artifactId>myapp-spring-boot-autoconfigure</artifactId>
    <version>0.0.1-SNAPSHOT</version>
    <name>myapp-spring-boot-autoconfigure</name>
    <description>Demo project for Spring Boot</description>
    <properties>
        <java.version>1.8</java.version>
    </properties>

    <dependencies>
        <dependency>
            <groupId>org.springframework.boot</groupId>
            <artifactId>spring-boot-starter</artifactId>
        </dependency>
    </dependencies>
</project>
项目的总体结构看图。

在 HelloProperties 中通过注解 @ConfigurationProperties(prefix = "myapp.hello") 让类中的属性与 myapp.hello 开头的配置进行绑定。
/**
 * <p>
 *
 * @Author niujinpeng
 * @Date 2019/10/29 23:51
 */
@ConfigurationProperties(prefix = "myapp.hello")
public class HelloProperties {

    private String suffix;

    public String getSuffix() {
        return suffix;
    }

    public void setSuffix(String suffix) {
        this.suffix = suffix;
    }
}
然后在 HelloService 中的 sayHello 方法使用 HelloProperties 中自动绑定的值。
public class HelloService {
    HelloProperties helloProperties;

    public String sayHello(String name) {
        return "Hello " + name + "," + helloProperties.getSuffix();
    }

    public HelloProperties getHelloProperties() {
        return helloProperties;
    }

    public void setHelloProperties(HelloProperties helloProperties) {
        this.helloProperties = helloProperties;
    }
}
为了让 HelloService 可以自动注入且能正常使用 HelloProperties ,所以我们在
HelloServiceAutoConfiguration 类中把 HelloProperties.class 引入,然后把 HelloService 注入到 Bean。
/**
 * web应用才生效
 */
@ConditionalOnWebApplication
/**
 * 让属性文件生效
 */
@EnableConfigurationProperties(HelloProperties.class)
/***
 * 声明是一个配置类
 */
@Configuration
public class HelloServiceAutoConfiguration {

    @Autowired
    private HelloProperties helloProperties;

    @Bean
    public HelloService helloService() {
        HelloService helloService = new HelloService();
        helloService.setHelloProperties(helloProperties);
        return helloService;
    }
}
最后在 spring.factories 中只需要指定要自动配置的类即可。
# Auto Configure
org.springframework.boot.autoconfigure.EnableAutoConfiguration=/
net.codingme.starter.HelloServiceAutoConfiguration
到这里,自动配置项目就完成了。可以在 myapp-spring-boot-autoconfigure 项目执行 mvn install 把自动配置项目打包到本地仓库,然后使用相同的命令把 myapp-spring-boot-starter 安装到仓库。
4.3 使用自定义的启动器
创建一个 springboot 项目 myapp-spring-boot-starter-test 。
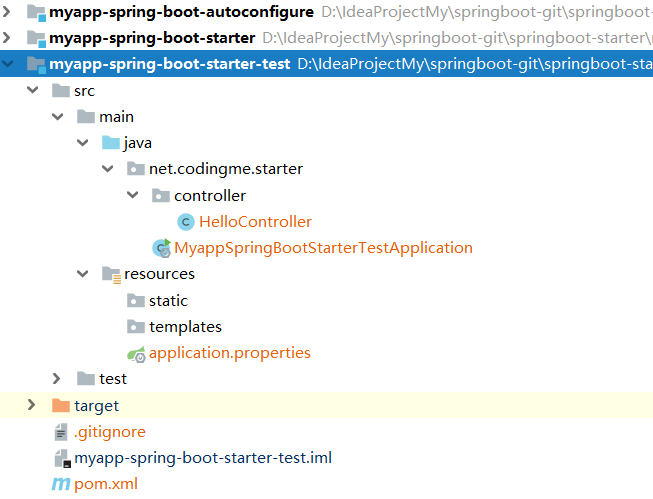
引入 web 依赖,引入自己编写的 myapp-spring-boot-starter .
<dependency>
    <groupId>org.springframework.boot</groupId>
    <artifactId>spring-boot-starter-web</artifactId>
</dependency>

<!-- 引入自己的 starter -->
<dependency>
    <groupId>net.codingme.starter</groupId>
    <artifactId>myapp-spring-boot-starter</artifactId>
    <version>1.0-SNAPSHOT</version>
</dependency>
编写一个 HelloController 注入自动配置里的 HelloService 用于测试。
@RestController
public class HelloController {

    @Autowired
    HelloService helloService;

    @GetMapping("/hello")
    public String sayHello(String name) {
        return helloService.sayHello(name);
    }
}
由于 autoConfigure 项目中定义了 sayHello 方法会输出“Hello”+传入的 name + 配置的 hello.suffix ,所以我们在 springboot 配置文件中配置这个属性。
myapp.hello.suffix=早上好
运行测试项目,访问 /hello 路径传入一个 name 看看自动配置有没有生效。

从测试结果可以看到自动配置的早上好已经生效了。到这里自己编写的 starter 也已经完工。
项目已经传到 Github .
https://github.com/niumoo/springboot/tree/master/springboot-starter
- 本文标签: 安装 REST 端口 文章 2019 GitHub spring final servlet Master map XML 测试 http https EnableAutoConfiguration IDE 开发 jetty IO cat App web src git springboot UI dependencies pom bean description CTO apache schema ip Spring Boot 配置 mybatis maven Service tar 代码 java Uber tomcat id
- 版权声明: 本文为互联网转载文章,出处已在文章中说明(部分除外)。如果侵权,请联系本站长删除,谢谢。
- 本文海报: 生成海报一 生成海报二


![[HBLOG]公众号](https://www.liuhaihua.cn/img/qrcode_gzh.jpg)

