Spring Boot从零入门5_五脏俱全的RESTful Web Service构建
本文属于原创,转载注明出处,欢迎关注微信小程序 小白AI博客 微信公众号 小白AI 或者网站 https://xiaobaiai.net

[TOC]
1 前言
这一节我们正式进入 Spring Boot 的WEB服务开发,在WEB服务中,不可缺少的我们需要去提供API出来,那么就少不了设计API,而当前流行的一套API设计风格就是REST API ,接下来我们会介绍什么是RESTful API以及它的特点和如何去设计。完成设计后,我们会使用Spring Boot + MVC架构去实现一个RESTful Web Service。本文的所有内容都是经过多方面考察和参考官方资料,本着严谨的态度为自己也为一起学习的同学们负责,由浅入深,层层展开,让自己有不一样的收获。一起加油吧!
2 名词术语
| 名词术语 | 释义 |
|---|---|
| RESTful | RESTFUL是一种网络应用程序的设计风格和开发方式,是目前流行的 API 设计规范,用于 Web 数据接口的设计。通过使用事先定义好的接口与不同的服务联系起来,浏览器使用POST,DELETE,PUT和GET四种主要请求方式分别对指定的URL资源进行增删改查操作。因此,RESTful是通过URI实现对资源的管理及访问,具有扩展性强、结构清晰的特点。 |
3 一分钟了解RESTful API
RESTful 是目前流行的 API 设计规范,用于 Web 数据接口的设计。
RESTful 对 URL 或者 API 的设计总的原则就是将所有操作对象都看作一个资源,操作这个(些)资源(名词)的方法通过 HTTP的方法类型(动词)去实现:
# GET, HEAD, POST, PUT, PATCH, DELETE, OPTIONS, TRACE
GET:读取(Read)资源信息
POST:新建(Create)资源
PUT:更新(Update)资源
PATCH:更新(Update)资源,通常是部分更新
DELETE:删除(Delete)资源
通过对于上述概念的理解,我们举一些常用示例来判断设计是否符合RESTful规范。
POST /api/v1/users/login             # 否,具体分析见后面
POST /api/v1/users                   # 是,创建一个新用户
GET  /api/v1/users/:username         # 是,获取所有用户信息或者指定用户名的信息
DELETE /api/v1/users/:username       # 是,删除所有用户或者删除指定用户
GET /api/v1/getUserInfo              # 否,本身就是利用HTTP的方法做动词,无需另外添加
更多的 RESTful API 示例可以参考主流网站的开发API,如码云( https://gitee.com/api/v5/swagger )
特例讲述:用户登录和登出的 RESTful API 怎么设计呢?
-
登录(login)和登出(logout)是两个动作,本身也是两个动词,因此从表面上看我们是无法设计成RESTful API的
- POST
/api/v1/users/loginbody参数为username和password,这样既不安全也不是RESTful API
- POST
- 登录和登出本质上就是获取一个具有时间限定的会话(session),其中保持这个会话的枢纽就是token,而REST中是没有session的,RESTful架构中的原则就是无状态,本身的释义就是状态转移。
- 实际在 API 上还有通过
OAuth来实现授权操作
因为,这里的结论就是登录登出仅作为URL设计,并不作为 RESTful API 设计。
注意:一些HTTP方法,例如HEAD,GET,OPTIONS和TRACE被定义为安全的,这意味着它们仅用于信息获取,而没有更改服务器的状态。而POST、PUT、DELETE就不是定义为安全的,因为会更新信息状态。
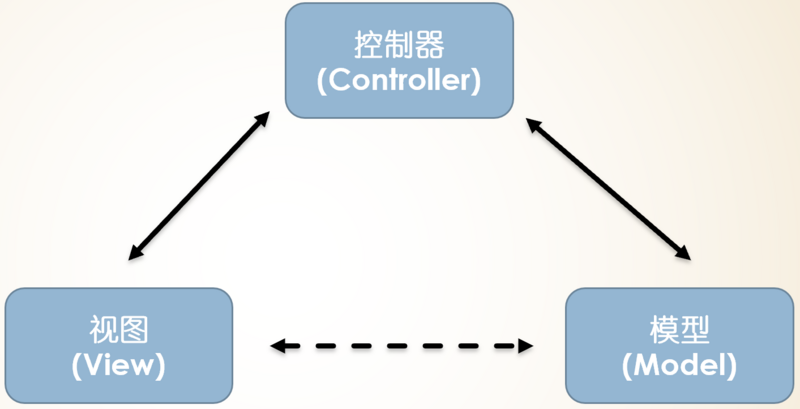
4 MVC/Model 2
在MVC/Model 2 中, 将Web 应用划分为模型、视图与控制器三个部分:
-
控制器(Controller)的职责,桥梁
- 接受请求
- 验证请求
- 判断要转发请求给哪个模型
- 判断要转发请求给哪个视图
-
模型(Model)的职责
- 保存应用程式状态
- 执行应用程序业务逻辑(Business logic)
-
视图(View)的职责
- 提取模型状态
- 执行呈现回应画面
下图框架是 Model2 的结构。MVC框架有两个版本,一个是 Model1 ,也就是MVC的第一个版本,它的视图中存在着大量的流程控制和代码开发,也就是控制器和视图还具有部分的耦合。
那 MVC/Model2 跟我这一篇的讲述有什么关联呢?因为使用 Spring Boot 构建WEB应用依赖的就是 spring-boot-starter-web ,而这个依赖项里就是使用的 spring-webmvc ,采用MVC结构。接下来我们就讲述如何去创建WEB服务。分两部分来讲述,一部分就是只有控制器和视图的简单 RESTful WEB Service ,另一部分利用 @Service Spring Boot 应用中完整的呈现MVC结构。
5 简单 RESTful Web Service 构建
5.1 功能和API设计
我们实现的功能就是对用户实现简单的管理,如查询,新增,删除,更新操作。设计的API如下:
# 获取所有用户信息
GET /api/v1/users
# 新增一个用户
POST /api/v1/users
# 删除指定用户
DELETE /api/v1/users/{id}
# 更新指定用户信息
PUT /api/v1/users/{id}
5.2 项目实现
同样地,我们建立一个 Spring Starter Project 项目,将 Spring Boot Starter Web 依赖项添加到构建配置文件pom.xml(使用Marven构建)中:
<dependency>
    <groupId>org.springframework.boot</groupId>
    <artifactId>spring-boot-starter-web</artifactId>
</dependency>
添加用户属性类 User.java :
package com.xiaobaiai;

public class User {
    private String id;
    private String name;

    public String getId() {
        return id;
    }

    public void setId(String id) {
        this.id = id;
    }

    public String getName() {
        return name;
    }

    public void setName(String name) {
        this.name = name;
    }
}
添加控制器类 UserServiceController.java :
package com.xiaobaiai;

import java.util.HashMap;
import java.util.Map;

import org.springframework.http.HttpStatus;
import org.springframework.http.ResponseEntity;
import org.springframework.web.bind.annotation.GetMapping;
import org.springframework.web.bind.annotation.PathVariable;
import org.springframework.web.bind.annotation.RequestBody;
import org.springframework.web.bind.annotation.RequestMapping;
import org.springframework.web.bind.annotation.RequestMethod;
import org.springframework.web.bind.annotation.RestController;

@RestController
@RequestMapping("/api/v1")
public class UserServiceController {
    private static Map<String, User> userRepo = new HashMap<>();
    static {
        User ethan = new User();
        ethan.setId("1");
        ethan.setName("Ethan");
        userRepo.put(ethan.getId(), ethan);

        User xiaoming = new User();
        xiaoming.setId("2");
        xiaoming.setName("Xiaoming");
        userRepo.put(xiaoming.getId(), xiaoming);
    }

    @RequestMapping(value = "/users/{id}", method = RequestMethod.DELETE)
    public ResponseEntity<Object> delete(@PathVariable("id") String id) {
        userRepo.remove(id);
        return new ResponseEntity<>("User is deleted successsfully", HttpStatus.OK);
    }

    @RequestMapping(value = "/users/{id}", method = RequestMethod.PUT)
    public ResponseEntity<Object> updateProduct(@PathVariable("id") String id, @RequestBody User user) {
        userRepo.remove(id);
        user.setId(id);
        userRepo.put(id, user);
        return new ResponseEntity<>("User is updated successsfully", HttpStatus.OK);
    }

    @RequestMapping(value = "/users", method = RequestMethod.POST)
    public ResponseEntity<Object> createProduct(@RequestBody User user) {
        userRepo.put(user.getId(), user);
        return new ResponseEntity<>("User is created successfully", HttpStatus.CREATED);
    }

    @GetMapping(value = "/users")
    public ResponseEntity<Object> getProduct() {
        return new ResponseEntity<>(userRepo.values(), HttpStatus.OK);
    }
}
添加应用类 Test05HelloworldApplication.java :
package com.xiaobaiai;

import org.springframework.boot.SpringApplication;
import org.springframework.boot.autoconfigure.SpringBootApplication;

@SpringBootApplication
public class Test05HelloworldApplication {

    public static void main(String[] args) {
        SpringApplication.run(Test05HelloworldApplication.class, args);
    }

}
5.3 编译测试
编译启动,应用实际 RESTful API 有:
# 获取所有用户信息
GET http://localhost:8080/api/v1/users
# 新增一个用户,参数通过body传递
POST http://localhost:8080/api/v1/users
# 更新一个用户信息
PUT http://localhost:8080/api/v1/users/{id}
# 删除指定用户
DELETE http://localhost:8080/api/v1/users/{id}
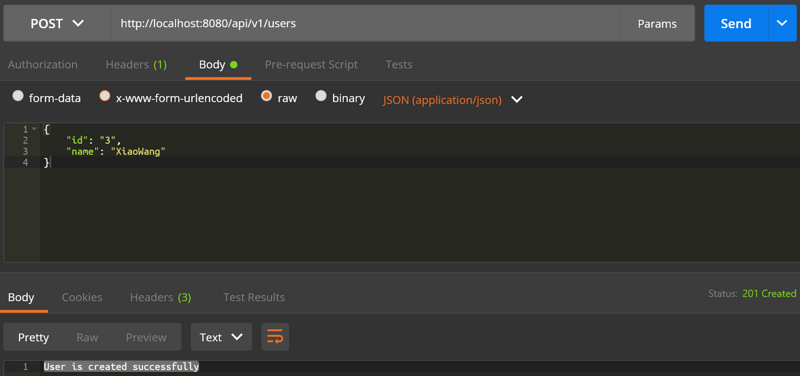
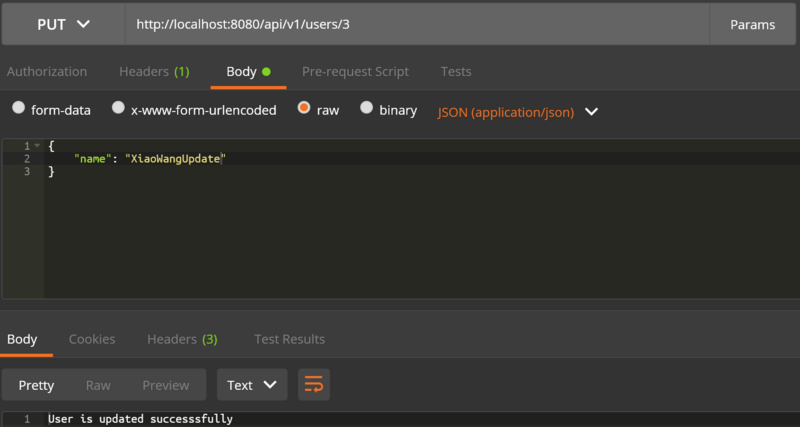
利用POSTMAN可以测试接口的功能运转:
5.4 代码分析
在《Spring Boot从零入门3_创建Hello World及项目剖析》我们就分析过代码,我们这里还是回顾下,我们知道 @SpringBootApplication = @Configuration + @ComponentScan + @EnableAutoConfiguration , @ComponentScan 扫描所有类Component,如Controller,Service,Repository。而 @EnableAutoConfiguration 将自动解析视图(views),视图解析器(view resolvers)等。 @RestController 是Spring4之后加入的注解,原来在 @Controller 中返回 json 需要 @ResponseBody 来配合,如果直接用 @RestController 替代 @Controller 就不需要再配置 @ResponseBody ,默认返回 json 格式。 @RequestMapping 用来配置url映射,现在更多的也会直接用以Http Method直接关联的映射注解来定义,比如: GetMapping 、 PostMapping 、 DeleteMapping 、 PutMapping 等, @RequestMapping 可以映射到整个类或特定的处理方法上,通常,类级别的注解将特定的请求路径(或路径模式)映射到表单控制器上,其他 方法级别 的注解作用特定的HTTP请求方法。
在控制器代码里,通过 @RequestMapping 将 /api/v1 映射到整个 User 控制器上,User控制器里具体的方法则由 @RequestMapping 作用到指定的HTTP请求方法上,即用户的增删查改。具体的 @RequestMapping 参数设置就不展开了,后面博文会专门讲述常用注解的作用和使用。
6 五脏俱全的 RESTful WEB Service 构建
6.1 工程实现
上面的简单RESTful WEB Service构建,直接通过Controller去访问和操作数据的,对于MVC结构,显然缺少了Model专门来处理数据,对业务的逻辑处理隔离度也不够,简单的WEB服务需求缺少 Model 也是可以的,毕竟这样设计不是很复杂,不过业务大了,我们需要尽量降低业务逻辑与上层视图的耦合度,增加模块的可重用性。下面我们来实现MVC结构。
首先我们创建一个业务操作接口 UserService.java 包括对用户的增删查改 :
package com.xiaobaiai;

import java.util.Collection;

public interface UserService {
    public abstract void createUser(User user);
    public abstract void updateUser(String id, User user);
    public abstract void deleteUser(String id);
    public abstract Collection<User> getUsers();
}
通过 @Service 创建一个组件,用于在与 @RestController 类文件分开的不同层中编写业务逻辑,即对用户的增删查改的业务逻辑实现:
package com.xiaobaiai;

import java.util.Collection;
import java.util.HashMap;
import java.util.Map;

import org.springframework.stereotype.Service;

@Service
public class UserServiceImpl implements UserService {
    private static Map<String, User> userRepo = new HashMap<>();
    static {
        User ethan = new User();
        ethan.setId("1");
        ethan.setName("Ethan");
        userRepo.put(ethan.getId(), ethan);

        User xiaoming = new User();
        xiaoming.setId("2");
        xiaoming.setName("Xiaoming");
        userRepo.put(xiaoming.getId(), xiaoming);
    }

    @Override
    public void createUser(User user) {
        // TODO Auto-generated method stub
        userRepo.put(user.getId(), user);
    }

    @Override
    public void updateUser(String id, User user) {
        // TODO Auto-generated method stub
        userRepo.remove(id);
        user.setId(id);
        userRepo.put(id, user);
    }

    @Override
    public void deleteUser(String id) {
        // TODO Auto-generated method stub
        userRepo.remove(id);
    }

    @Override
    public Collection<User> getUsers() {
        // TODO Auto-generated method stub
        return userRepo.values();
    }
}
最后在控制器类里使用 @Autowired 将Service接口与实现组装起来。
package com.xiaobaiai;

import org.springframework.beans.factory.annotation.Autowired;
import org.springframework.http.HttpStatus;
import org.springframework.http.ResponseEntity;
import org.springframework.web.bind.annotation.GetMapping;
import org.springframework.web.bind.annotation.PathVariable;
import org.springframework.web.bind.annotation.RequestBody;
import org.springframework.web.bind.annotation.RequestMapping;
import org.springframework.web.bind.annotation.RequestMethod;
import org.springframework.web.bind.annotation.RestController;

@RestController
@RequestMapping("/api/v1")
public class UserServiceController {
    @Autowired
    UserService userService;

    @RequestMapping(value = "/users/{id}", method = RequestMethod.DELETE)
    public ResponseEntity<Object> delete(@PathVariable("id") String id) {
        userService.deleteUser(id);
        return new ResponseEntity<>("User is deleted successsfully", HttpStatus.OK);
    }

    @RequestMapping(value = "/users/{id}", method = RequestMethod.PUT)
    public ResponseEntity<Object> updateProduct(@PathVariable("id") String id, @RequestBody User user) {
        userService.updateUser(id, user);
        return new ResponseEntity<>("User is updated successsfully", HttpStatus.OK);
    }

    @RequestMapping(value = "/users", method = RequestMethod.POST)
    public ResponseEntity<Object> createProduct(@RequestBody User user) {
        userService.createUser(user);
        return new ResponseEntity<>("User is created successfully", HttpStatus.CREATED);
    }

    @GetMapping(value = "/users")
    public ResponseEntity<Object> getProduct() {
        return new ResponseEntity<>(userService.getUsers(), HttpStatus.OK);
    }
}
6.2 代码分析
相对只有控制器的WEB服务,这里加入了 @Service 实现的Model层,而UserService接口的实体是通过 @Autowired 连接起来的,即:
@Autowired
UserService userService;
当然我们还有一种主流写法就是通过构造函数的形式,最后达到的效果是一样的:
UserService userService;;

@Autowired
public UserServiceController(UserService userService) {
    this.userService = userService;
}
如果UserService有多个实体类,这个时候@Autowired如何去绑定实体类的呢?
这个时候需要用到 @Qualifier 来指定实体类的名称:
@Service
// 指定UserServiceImpl名称为a
@Qualifier("a")
public class UserServiceImpl implements UserService { }
@Service
@Qualifier("b")
public class UserServiceImpl1_1 implements UserService { }
最后在控制器里自动组装的时候指定具体的实体类名称就可以了:
// 写法1
@Autowired
@Qualifier("a")
UserService userService;

// 写法2
UserService userService;

@Autowired
public UserServiceController(@Qualifier("a") UserService userService) {
    this.userService = userService;
}
6.3 延伸
@Resource 也能够实现自动装配Bean的功能,那 @Autowired 与 @Resource 有什么区别呢?
- @Autowired与@Resource都可以用来装配bean. 都可以写在字段上,或写在setter方法上
- @Autowired默认按类型装配,是spring支持的注解,默认情况下必须要求依赖实体类必须存在,如果要允许null值,可以设置它的required属性为false
- 想使用名称装配可以结合@Qualifier注解进行使用
- @Resource 是JDK1.6支持的注解,默认按照名称进行装配,名称可以通过name属性进行指定,如果没有指定name属性,当注解写在字段上时,默认取字段名,按照名称查找,如果注解写在setter方法上默认取属性名进行装配。当找不到与名称匹配的bean时才按照类型进行装配。如果name属性一旦指定,就只会按照名称进行装配
有了比较完善的控制器和Model,那么对于View层有什么专用模板引擎吗?
Thymeleaf 是基于Java用于创建Web应用程序的的模板引擎。它为在Web应用程序中提供XHTML / HTML5提供了良好的支持。类似的还有 Apache FreeMarker 、 Mustache 、 Groovy Templates 。后面博文会详解介绍。
7 总结
通过对RESTful API的介绍以及结合实例工程,我们基本了解了一个 RESTful WEB Service 在 Spring Boot 框架下是怎么实现的。通过对工程代码的分析,让我们对 @Autowired 、 @Resource 、 Qualifier 等注解也有了实质了解。感觉现在正式步入JAVA WEB的开发。接下来,继续!
8 参考资料
- http://www.ruanyifeng.com/blo...
- https://stackoverflow.com/que...
- https://stackoverflow.com/que...
- https://stackoverflow.com/que...
- https://stackoverflow.com/que...
- https://stackoverflow.com/que...
- https://stackoverflow.com/que...
本文属于原创,转载注明出处,欢迎关注CSDN freeape 或微信小程序 小白AI博客 微信公众号 小白AI 或者网站 https://xiaobaiai.net
正文到此结束
- 本文标签: cat 博客 RESTful id session update HTML 总结 配置 Freemarker 本质 代码 ldap XML tar 删除 管理 Collection HashMap java App pom 开发 map 微信公众号 HTML5 模型 服务器 json js http IDE IO EnableAutoConfiguration spring CTO tab 参数 安全 ACE SDN springboot web 实例 https entity 数据 bean bus 云 时间 测试 REST 网站 Word API Spring Boot Qualifier apache 解析 git src UI Service token logo 需求 编译 value
- 版权声明: 本文为互联网转载文章,出处已在文章中说明(部分除外)。如果侵权,请联系本站长删除,谢谢。
- 本文海报: 生成海报一 生成海报二
热门推荐


相关文章

近期评论
-
ws0132613@gmail.comhttps://getmacos.com/gopanel/william smith
-
谢谢
-
https://www.newcmy.com/register?aff=HBVX建议您试试草莓云机场,可以流畅观看youtube和tiktok,上reddit/x也没有问题,还有各种ai优化节点。
-
-
-
想购买您这个站,我的联系方式QQ741756694微信同步 能卖联系
-
-
-
-
Loading...
![[HBLOG]公众号](https://www.liuhaihua.cn/img/qrcode_gzh.jpg)

