如何在 Spring/Spring Boot 中做参数校验?你需要了解的都在这里!
本文为作者原创,如需转载请在文首著名地址,公众号转载请申请开白。
springboot-guide : 适合新手入门以及有经验的开发人员查阅的 Spring Boot 教程(业余时间维护中,欢迎一起维护)。
数据的校验的重要性就不用说了,即使在前端对数据进行校验的情况下,我们还是要对传入后端的数据再进行一遍校验,避免用户绕过浏览器直接通过一些 HTTP 工具直接向后端请求一些违法数据。
本文结合自己在项目中的实际使用经验,可以说 文章介绍的内容很实用,不了解的朋友可以学习一下,后面可以立马实践到项目上去。
下面我会通过实例程序演示如何在 Java 程序中尤其是 Spring 程序中优雅地的进行参数验证。
基础设施搭建
相关依赖
如果开发普通 Java 程序的的话,你需要可能需要像下面这样依赖:
<dependency>
            <groupId>org.hibernate.validator</groupId>
            <artifactId>hibernate-validator</artifactId>
            <version>6.0.9.Final</version>
   </dependency>
   <dependency>
             <groupId>javax.el</groupId>
             <artifactId>javax.el-api</artifactId>
             <version>3.0.0</version>
     </dependency>
     <dependency>
            <groupId>org.glassfish.web</groupId>
            <artifactId>javax.el</artifactId>
            <version>2.2.6</version>
     </dependency>
使用 Spring Boot 程序的话只需要 spring-boot-starter-web 就够了,它的子依赖包含了我们所需要的东西。除了这个依赖,下面的演示还用到了 lombok ,所以不要忘记添加上相关依赖。
<dependencies>
        <dependency>
            <groupId>org.springframework.boot</groupId>
            <artifactId>spring-boot-starter-web</artifactId>
        </dependency>
        <dependency>
            <groupId>org.projectlombok</groupId>
            <artifactId>lombok</artifactId>
            <optional>true</optional>
        </dependency>
        <dependency>
            <groupId>org.springframework.boot</groupId>
            <artifactId>spring-boot-starter-test</artifactId>
            <scope>test</scope>
        </dependency>
    </dependencies>
实体类
下面这个是示例用到的实体类。
@Data
@AllArgsConstructor
@NoArgsConstructor
public class Person {

    @NotNull(message = "classId 不能为空")
    private String classId;

    @Size(max = 33)
    @NotNull(message = "name 不能为空")
    private String name;

    @Pattern(regexp = "((^Man$|^Woman$|^UGM$))", message = "sex 值不在可选范围")
    @NotNull(message = "sex 不能为空")
    private String sex;

    @Email(message = "email 格式不正确")
    @NotNull(message = "email 不能为空")
    private String email;

}
正则表达式说明:
- ^string : 匹配以 string 开头的字符串
- string$ :匹配以 string 结尾的字符串
- ^string$ :精确匹配 string 字符串
- ((^Man$|^Woman$|^UGM$)) : 值只能在 Man,Woman,UGM 这三个值中选择
下面这部分校验注解说明内容参考自:https://www.cnkirito.moe/spring-validation/ ,感谢@ 徐靖峰 。
JSR提供的校验注解:
-
@Null被注释的元素必须为 null -
@NotNull被注释的元素必须不为 null -
@AssertTrue被注释的元素必须为 true -
@AssertFalse被注释的元素必须为 false -
@Min(value)被注释的元素必须是一个数字,其值必须大于等于指定的最小值 -
@Max(value)被注释的元素必须是一个数字,其值必须小于等于指定的最大值 -
@DecimalMin(value)被注释的元素必须是一个数字,其值必须大于等于指定的最小值 -
@DecimalMax(value)被注释的元素必须是一个数字,其值必须小于等于指定的最大值 -
@Size(max=, min=)被注释的元素的大小必须在指定的范围内 -
@Digits (integer, fraction)被注释的元素必须是一个数字,其值必须在可接受的范围内 -
@Past被注释的元素必须是一个过去的日期 -
@Future被注释的元素必须是一个将来的日期 -
@Pattern(regex=,flag=)被注释的元素必须符合指定的正则表达式
Hibernate Validator提供的校验注解:
@NotBlank(message =)
@Email
@Length(min=,max=)
@NotEmpty
@Range(min=,max=,message=)
验证Controller的输入
验证请求体(RequestBody)
Controller:
我们在需要验证的参数上加上了 @Valid 注解,如果验证失败,它将抛出 MethodArgumentNotValidException 。默认情况下,Spring会将此异常转换为HTTP Status 400(错误请求)。
@RestController
@RequestMapping("/api")
public class PersonController {

    @PostMapping("/person")
    public ResponseEntity<Person> getPerson(@RequestBody @Valid Person person) {
        return ResponseEntity.ok().body(person);
    }
}
ExceptionHandler:
自定义异常处理器可以帮助我们捕获异常,并进行一些简单的处理。如果对于下面的处理异常的代码不太理解的话,可以查看这篇文章 《SpringBoot 处理异常的几种常见姿势》 。
@ControllerAdvice(assignableTypes = {PersonController.class})
public class GlobalExceptionHandler {
    @ExceptionHandler(MethodArgumentNotValidException.class)
    public ResponseEntity<Map<String, String>> handleValidationExceptions(
            MethodArgumentNotValidException ex) {
        Map<String, String> errors = new HashMap<>();
        ex.getBindingResult().getAllErrors().forEach((error) -> {
            String fieldName = ((FieldError) error).getField();
            String errorMessage = error.getDefaultMessage();
            errors.put(fieldName, errorMessage);
        });
        return ResponseEntity.status(HttpStatus.BAD_REQUEST).body(errors);
    }
}
通过测试验证:
下面我通过 MockMvc 模拟请求 Controller 的方式来验证是否生效,当然你也可以通过 Postman 这种工具来验证。
我们试一下所有参数输入正确的情况。
@RunWith(SpringRunner.class)
@SpringBootTest
@AutoConfigureMockMvc
public class PersonControllerTest {
    @Autowired
    private MockMvc mockMvc;

    @Autowired
    private ObjectMapper objectMapper;

    @Test
    public void should_get_person_correctly() throws Exception {
        Person person = new Person();
        person.setName("SnailClimb");
        person.setSex("Man");
        person.setClassId("82938390");
        person.setEmail("Snailclimb@qq.com");

        mockMvc.perform(post("/api/person")
                .contentType(MediaType.APPLICATION_JSON_UTF8)
                .content(objectMapper.writeValueAsString(person)))
                .andExpect(MockMvcResultMatchers.jsonPath("name").value("SnailClimb"))
                .andExpect(MockMvcResultMatchers.jsonPath("classId").value("82938390"))
                .andExpect(MockMvcResultMatchers.jsonPath("sex").value("Man"))
                .andExpect(MockMvcResultMatchers.jsonPath("email").value("Snailclimb@qq.com"));
    }
}
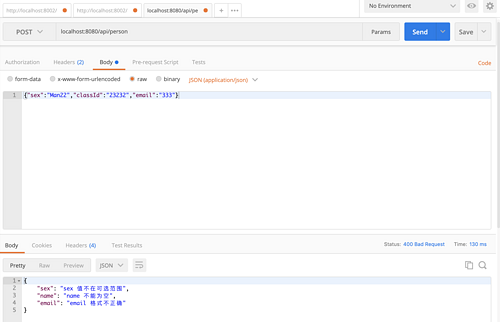
验证出现参数不合法的情况抛出异常并且可以正确被捕获。
@Test
    public void should_check_person_value() throws Exception {
        Person person = new Person();
        person.setSex("Man22");
        person.setClassId("82938390");
        person.setEmail("SnailClimb");

        mockMvc.perform(post("/api/person")
                .contentType(MediaType.APPLICATION_JSON_UTF8)
                .content(objectMapper.writeValueAsString(person)))
                .andExpect(MockMvcResultMatchers.jsonPath("sex").value("sex 值不在可选范围"))
                .andExpect(MockMvcResultMatchers.jsonPath("name").value("name 不能为空"))
                .andExpect(MockMvcResultMatchers.jsonPath("email").value("email 格式不正确"));
    }
使用 Postman 验证结果如下:

验证请求参数(Path Variables 和 Request Parameters)
Controller:
一定一定不要忘记在类上加上 Validated 注解了,这个参数可以告诉 Spring 去校验方法参数。
@RestController
@RequestMapping("/api")
@Validated
public class PersonController {

    @GetMapping("/person/{id}")
    public ResponseEntity<Integer> getPersonByID(@Valid @PathVariable("id") @Max(value = 5,message = "超过 id 的范围了") Integer id) {
        return ResponseEntity.ok().body(id);
    }

    @PutMapping("/person")
    public ResponseEntity<String> getPersonByName(@Valid @RequestParam("name") @Size(max = 6,message = "超过 name 的范围了") String name) {
        return ResponseEntity.ok().body(name);
    }
}
ExceptionHandler:
@ExceptionHandler(ConstraintViolationException.class)
    ResponseEntity<String> handleConstraintViolationException(ConstraintViolationException e) {
        return ResponseEntity.status(HttpStatus.BAD_REQUEST).body(e.getMessage());
    }
通过测试验证:
@Test
    public void should_check_param_value() throws Exception {

        mockMvc.perform(get("/api/person/6")
                .contentType(MediaType.APPLICATION_JSON_UTF8))
                .andExpect(status().isBadRequest())
                .andExpect(content().string("getPersonByID.id: 超过 id 的范围了"));
    }

    @Test
    public void should_check_param_value2() throws Exception {

        mockMvc.perform(put("/api/person")
                .param("name","snailclimbsnailclimb")
                .contentType(MediaType.APPLICATION_JSON_UTF8))
                .andExpect(status().isBadRequest())
                .andExpect(content().string("getPersonByName.name: 超过 name 的范围了"));
    }
验证 Service 中的方法
我们还可以验证任何Spring组件的输入,而不是验证控制器级别的输入,我们可以使用 @Validated 和 @Valid 注释的组合来实现这一需求。
一定一定不要忘记在类上加上 Validated 注解了,这个参数可以告诉 Spring 去校验方法参数。
@Service
@Validated
public class PersonService {

    public void validatePerson(@Valid Person person){
        // do something
    }
}
通过测试验证:
@RunWith(SpringRunner.class)
@SpringBootTest
@AutoConfigureMockMvc
public class PersonServiceTest {
    @Autowired
    private PersonService service;

    @Test(expected = ConstraintViolationException.class)
    public void should_throw_exception_when_person_is_not_valid() {
        Person person = new Person();
        person.setSex("Man22");
        person.setClassId("82938390");
        person.setEmail("SnailClimb");
        service.validatePerson(person);
    }

}
Validator 编程方式手动进行参数验证
某些场景下可能会需要我们手动校验并获得校验结果。
@Test
    public void check_person_manually() {

        ValidatorFactory factory = Validation.buildDefaultValidatorFactory();
        Validator validator = factory.getValidator();
        Person person = new Person();
        person.setSex("Man22");
        person.setClassId("82938390");
        person.setEmail("SnailClimb");
        Set<ConstraintViolation<Person>> violations = validator.validate(person);
        //output:
        //email 格式不正确
        //name 不能为空
        //sex 值不在可选范围
        for (ConstraintViolation<Person> constraintViolation : violations) {
            System.out.println(constraintViolation.getMessage());
        }
    }
上面我们是通过 Validator 工厂类获得的 Validator 示例,当然你也可以通过 @Autowired 直接注入的方式。但是在非 Spring Component 类中使用这种方式的话,只能通过工厂类来获得 Validator 。
@Autowired
Validator validate
自定以 Validator(实用)
如果自带的校验注解无法满足你的需求的话,你还可以自定义实现注解。
案例一:校验特定字段的值是否在可选范围
比如我们现在多了这样一个需求:Person类多了一个 region 字段,region 字段只能是 China 、 China-Taiwan 、 China-HongKong 这三个中的一个。
第一步你需要创建一个注解:
@Target({FIELD})
@Retention(RUNTIME)
@Constraint(validatedBy = RegionValidator.class)
@Documented
public @interface Region {

    String message() default "Region 值不在可选范围内";

    Class<?>[] groups() default {};

    Class<? extends Payload>[] payload() default {};
}
第二步你需要实现 ConstraintValidator 接口,并重写 isValid 方法:
import javax.validation.ConstraintValidator;
import javax.validation.ConstraintValidatorContext;
import java.util.HashSet;

public class RegionValidator implements ConstraintValidator<Region, String> {

    @Override
    public boolean isValid(String value, ConstraintValidatorContext context) {
        HashSet<Object> regions = new HashSet<>();
        regions.add("China");
        regions.add("China-Taiwan");
        regions.add("China-HongKong");
        return regions.contains(value);
    }
}
现在你就可以使用这个注解:
@Region
    private String region;
案例二:校验电话号码
校验我们的电话号码是否合法,这个可以通过正则表达式来做,相关的正则表达式都可以在网上搜到,你甚至可以搜索到针对特定运营商电话号码段的正则表达式。
PhoneNumber.java
import javax.validation.Constraint;
import java.lang.annotation.Documented;
import java.lang.annotation.Retention;
import java.lang.annotation.Target;

import static java.lang.annotation.ElementType.FIELD;
import static java.lang.annotation.ElementType.PARAMETER;
import static java.lang.annotation.RetentionPolicy.RUNTIME;

@Documented
@Constraint(validatedBy = PhoneNumberValidator.class)
@Target({FIELD, PARAMETER})
@Retention(RUNTIME)
public @interface PhoneNumber {
    String message() default "Invalid phone number";
    Class[] groups() default {};
    Class[] payload() default {};
}
PhoneNumberValidator.java
import javax.validation.ConstraintValidator;
import javax.validation.ConstraintValidatorContext;

public class PhoneNumberValidator implements ConstraintValidator<PhoneNumber,String> {

    @Override
    public boolean isValid(String phoneField, ConstraintValidatorContext context) {
        if (phoneField == null) {
            // can be null
            return true;
        }
        return phoneField.matches("^1(3[0-9]|4[57]|5[0-35-9]|8[0-9]|70)//d{8}$") && phoneField.length() > 8 && phoneField.length() < 14;
    }
}
搞定,我们现在就可以使用这个注解了。
@PhoneNumber(message = "phoneNumber 格式不正确")
@NotNull(message = "phoneNumber 不能为空")
private String phoneNumber;
使用验证组
某些场景下我们需要使用到验证组,这样说可能不太清楚,说简单点就是对对象操作的不同方法有不同的验证规则,示例如下(这个就我目前经历的项目来说使用的比较少,因为本身这个在代码层面理解起来是比较麻烦的,然后写起来也比较麻烦)。
先创建两个接口:
public interface AddPersonGroup {
}
public interface DeletePersonGroup {
}
我们可以这样去使用验证组
@NotNull(groups = DeletePersonGroup.class)
@Null(groups = AddPersonGroup.class)
private String group;
@Service
@Validated
public class PersonService {

    public void validatePerson(@Valid Person person) {
        // do something
    }

    @Validated(AddPersonGroup.class)
    public void validatePersonGroupForAdd(@Valid Person person) {
        // do something
    }

    @Validated(DeletePersonGroup.class)
    public void validatePersonGroupForDelete(@Valid Person person) {
        // do something
    }

}
通过测试验证:
@Test(expected = ConstraintViolationException.class)
    public void should_check_person_with_groups() {
        Person person = new Person();
        person.setSex("Man22");
        person.setClassId("82938390");
        person.setEmail("SnailClimb");
        person.setGroup("group1");
        service.validatePersonGroupForAdd(person);
    }

    @Test(expected = ConstraintViolationException.class)
    public void should_check_person_with_groups2() {
        Person person = new Person();
        person.setSex("Man22");
        person.setClassId("82938390");
        person.setEmail("SnailClimb");
        service.validatePersonGroupForDelete(person);
    }
使用验证组这种方式的时候一定要小心,这是一种反模式,还会造成代码逻辑性变差。
代码地址:https://github.com/Snailclimb/springboot-guide/tree/master/source-code/advanced/bean-validation-demo
@NotNull vs @Column(nullable = false) (重要)
在使用 JPA 操作数据的时候会经常碰到 @Column(nullable = false) 这种类型的约束,那么它和 @NotNull 有何区别呢?搞清楚这个还是很重要的!
@NotNull
@Column(nullable = false)
总结来说就是即前者用于验证,而后者则用于指示数据库创建表的时候对表的约束。
TODO
- [ ] 原理分析
参考
- https://reflectoring.io/bean-validation-with-spring-boot/
- https://www.cnkirito.moe/spring-validation//
开源项目推荐
作者的其他开源项目推荐:
- JavaGuide :【Java学习+面试指南】 一份涵盖大部分Java程序员所需要掌握的核心知识。
- springboot-guide : 适合新手入门以及有经验的开发人员查阅的 Spring Boot 教程(业余时间维护中,欢迎一起维护)。
- programmer-advancement : 我觉得技术人员应该有的一些好习惯!
- spring-security-jwt-guide :从零入门 !Spring Security With JWT(含权限验证)后端部分代码。
- 本文标签: REST HashSet web entity tar API Action HTML Spring Security final struct Region 文章 时间 mapper value HashMap java src 开源项目 处理器 程序员 Spring Boot 开发 mail map ACE 需求 ORM json 原理分析 spring build js IDE Security App id dependencies db cat http 代码 bean 实例 springboot 正则表达式 开源 https 数据 message CTO Master 参数 测试 数据库 运营 GitHub Service Document validator 总结 git UI JPA 注释 IO
- 版权声明: 本文为互联网转载文章,出处已在文章中说明(部分除外)。如果侵权,请联系本站长删除,谢谢。
- 本文海报: 生成海报一 生成海报二


![[HBLOG]公众号](https://www.liuhaihua.cn/img/qrcode_gzh.jpg)

