OKHttp 3.14.X源码架构学习(一)
这里以非Kotlin版本介绍
- 首先在
build.gradle中添加组件:
implementation 'com.squareup.okhttp3:okhttp:3.14.2'
复制代码
- 在MainActivity中调用OkHttp的API:
//注意这里,一般我们用单例,Okhttp官方描述如果不用单例,线程管理等都失效了,浪费开销
/*Http performs best when you create a single {@code OkHttpClient} instance and reuse it for
 * all of your HTTP calls. This is because each client holds its own connection pool and thread
 * pools. Reusing connections and threads reduces latency and saves memory. Conversely, creating a
 * client for each request wastes resources on idle pools.
 */
OkHttpClient client = new OkHttpClient();

String run(String url) throws IOException {
  Request request = new Request.Builder()
      .url(url)
      .build();

  Response response = client.newCall(request).execute();
  return response.body().string();
}
复制代码
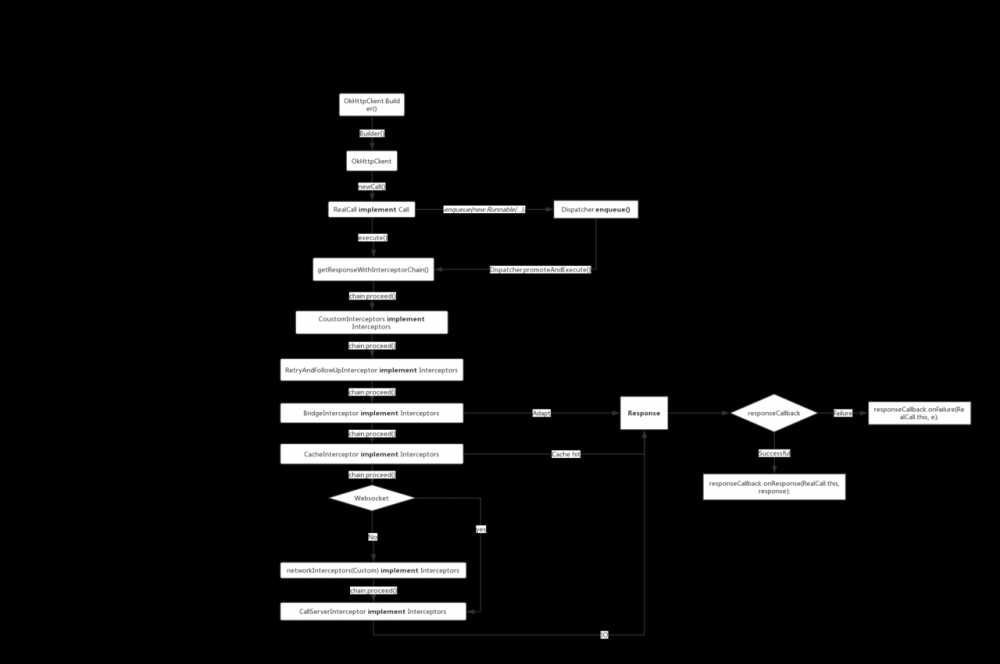
OKHttp工作流程图

OKHttpClient的创建
通过okhttp源码分析,直接创建的 OkHttpClient对象并且默认构造builder对象进行初始化
public class OkHttpClient implements Cloneable, Call.Factory, WebSocket.Factory {
  public OkHttpClient() {
       this(new Builder());
  }
  OkHttpClient(Builder builder) {
    this.dispatcher = builder.dispatcher;
    this.proxy = builder.proxy;
    this.protocols = builder.protocols;
    this.connectionSpecs = builder.connectionSpecs;
    this.interceptors = Util.immutableList(builder.interceptors);
    this.networkInterceptors = Util.immutableList(builder.networkInterceptors);
    this.eventListenerFactory = builder.eventListenerFactory;
    this.proxySelector = builder.proxySelector;
    this.cookieJar = builder.cookieJar;
    this.cache = builder.cache;
    this.internalCache = builder.internalCache;
    this.socketFactory = builder.socketFactory;

    ...

    this.hostnameVerifier = builder.hostnameVerifier;
    this.certificatePinner = builder.certificatePinner.withCertificateChainCleaner(
        certificateChainCleaner);
    this.proxyAuthenticator = builder.proxyAuthenticator;
    this.authenticator = builder.authenticator;
    this.connectionPool = builder.connectionPool;
    this.dns = builder.dns;
    this.followSslRedirects = builder.followSslRedirects;
    this.followRedirects = builder.followRedirects;
    this.retryOnConnectionFailure = builder.retryOnConnectionFailure;
    this.connectTimeout = builder.connectTimeout;
    this.readTimeout = builder.readTimeout;
    this.writeTimeout = builder.writeTimeout;
    this.pingInterval = builder.pingInterval;
  }
}
复制代码
Request的发出
一般如下:
Request request = new Request.Builder().url("url").build();
okHttpClient.newCall(request).enqueue(new Callback() {
  @Override
  public void onFailure(Call call, IOException e) {

 }

 @Override
 public void onResponse(Call call, Response response) throws IOException {

 }
});
复制代码
初始化构建者模式和请求对象,并且用URL替换Web套接字URL。
public final class Request {
    public Builder() {
      this.method = "GET";
      this.headers = new Headers.Builder();
    }
    public Builder url(String url) {
      ......

      // Silently replace web socket URLs with HTTP URLs.
      if (url.regionMatches(true, 0, "ws:", 0, 3)) {
        url = "http:" + url.substring(3);
      } else if (url.regionMatches(true, 0, "wss:", 0, 4)) {
        url = "https:" + url.substring(4);
      }

      HttpUrl parsed = HttpUrl.parse(url);
      ......
      return url(parsed);
    }
    public Request build() {
      ......
      return new Request(this);
    }
}
复制代码
主里主要是调用了 newCall 方法,我们跟进去看看:
public class OkHttpClient implements Cloneable, Call.Factory, WebSocket.Factory {
   @Override
   public Call newCall(Request request) {
    return new RealCall(this, request, false /* for web socket */);
   }
}
复制代码
发现去 new RealCall 了,我们跟到 RealCall 看看:
private RealCall(OkHttpClient client, Request originalRequest, boolean forWebSocket) {
    this.client = client;
    this.originalRequest = originalRequest;
    this.forWebSocket = forWebSocket;
  }
复制代码
可以看到只是初始化一些成员变量,真正的调用是 RealCall 里面的 enqueue(添加到队列)/execute(立即执行) 方法,我们看看:
void enqueue(AsyncCall call) {
    synchronized (this) {
       /** Ready async calls in the order they'll be run. */
  	   //private final Deque<AsyncCall> readyAsyncCalls = new ArrayDeque<>();
  	   // readyAsyncCalls是一个双端队列,把该call加入到准备的队列里
      readyAsyncCalls.add(call);

      // Mutate the AsyncCall so that it shares the AtomicInteger of an existing running call to
      // the same host.
      if (!call.get().forWebSocket) {
        AsyncCall existingCall = findExistingCallWithHost(call.host());
        if (existingCall != null) call.reuseCallsPerHostFrom(existingCall);
      }
    }
    promoteAndExecute();
  }
复制代码
上面不难发现最终调用了 promoteAndExecute() ,我们跟进去看看:
/**
   * Promotes eligible calls from {@link #readyAsyncCalls} to {@link #runningAsyncCalls} and runs
   * them on the executor service. Must not be called with synchronization because executing calls
   * can call into user code.
   *
   * @return true if the dispatcher is currently running calls.
   */
  private boolean promoteAndExecute() {
    assert (!Thread.holdsLock(this));

    List<AsyncCall> executableCalls = new ArrayList<>();
    boolean isRunning;
    synchronized (this) {
      for (Iterator<AsyncCall> i = readyAsyncCalls.iterator(); i.hasNext(); ) {
        AsyncCall asyncCall = i.next();

        if (runningAsyncCalls.size() >= maxRequests) break; // Max capacity. // 最大的线程请求的时候,不再添加, maxRequests默认值是:64
        if (asyncCall.callsPerHost().get() >= maxRequestsPerHost) continue; // Host max capacity. // 最大的DNS解析为:5

        i.remove();
        asyncCall.callsPerHost().incrementAndGet();
        executableCalls.add(asyncCall);
        runningAsyncCalls.add(asyncCall);
      }
      isRunning = runningCallsCount() > 0;
    }
    // 循环执行
    for (int i = 0, size = executableCalls.size(); i < size; i++) {
      AsyncCall asyncCall = executableCalls.get(i);
      asyncCall.executeOn(executorService());
    }

    return isRunning;
  }
复制代码
有一个问题, enqueue 是拿到Reponse的? 它和 execute 区别?
带着问题,我们可以在 RealCall 中可以发现 final class AsyncCall extends NamedRunnable
这个 NamedRunnable 是什么?
/**
 * Runnable implementation which always sets its thread name.
 */
public abstract class NamedRunnable implements Runnable {
  protected final String name;

  public NamedRunnable(String format, Object... args) {
    this.name = Util.format(format, args);
  }

  @Override public final void run() {
    String oldName = Thread.currentThread().getName();
    Thread.currentThread().setName(name);
    try {
      execute();
    } finally {
      Thread.currentThread().setName(oldName);
    }
  }

  protected abstract void execute();
}
复制代码
根据源码发现它原来是一个 runable ,并且抽象了 execute ,所以 execute 就是 enqueue 去执行的核心方法,那么我就可以看到 execute 方法的实现:
@Override protected void execute() {
      boolean signalledCallback = false;
      transmitter.timeoutEnter();
      try {
        Response response = getResponseWithInterceptorChain();
        signalledCallback = true;
        responseCallback.onResponse(RealCall.this, response);
      } catch (IOException e) {
        if (signalledCallback) {
          // Do not signal the callback twice!
          Platform.get().log(INFO, "Callback failure for " + toLoggableString(), e);
        } else {
          responseCallback.onFailure(RealCall.this, e);
        }
      } finally {
        client.dispatcher().finished(this);
      }
    }
复制代码
实际上跟 execute 方法一样,都是调用了 getResponseWithInterceptorChain ,跟进去看看:
Response getResponseWithInterceptorChain() throws IOException {
    // Build a full stack of interceptors.
    List<Interceptor> interceptors = new ArrayList<>();
    interceptors.addAll(client.interceptors());// 1.添加自定义的拦截器
    interceptors.add(new RetryAndFollowUpInterceptor(client));// 2.重试拦截
    interceptors.add(new BridgeInterceptor(client.cookieJar())); // 3.Build一个适配的Request
    interceptors.add(new CacheInterceptor(client.internalCache()));// 4.添加缓存拦截器
    interceptors.add(new ConnectInterceptor(client)); // 5.ConnectInterceptor验证Get请求
    if (!forWebSocket) {
      interceptors.addAll(client.networkInterceptors()); // 6.非Websocket下创建的自定义网络拦截器
    }
    interceptors.add(new CallServerInterceptor(forWebSocket)); // 7. 真实的IO访问,使用了OKIO库去实现的

    Interceptor.Chain chain = new RealInterceptorChain(interceptors, transmitter, null, 0,
        originalRequest, this, client.connectTimeoutMillis(),
        client.readTimeoutMillis(), client.writeTimeoutMillis());

    .....
      return response;
  }
复制代码
从上面的设计模式可以看出来OKHttp使用了 责任链 的设计模式. 至此流程已经完毕. 下面学习一些优秀的细节.
正文到此结束
- 本文标签: Connection Atom 源码 UI Proxy parse ECS executor 代码 final queue ssl Region synchronized 解析 src cache DNS API list FAQ web ArrayList cat CTO client ORM https 管理 retry URLs ACE id 线程 设计模式 build Service tab IDE 缓存 Select http IO find Full Stack
- 版权声明: 本文为互联网转载文章,出处已在文章中说明(部分除外)。如果侵权,请联系本站长删除,谢谢。
- 本文海报: 生成海报一 生成海报二
热门推荐
相关文章
Loading...


![[HBLOG]公众号](https://www.liuhaihua.cn/img/qrcode_gzh.jpg)

