Spring Boot2 系列教程(三十四)Spring Security 添加验证码
登录添加验证码是一个非常常见的需求,网上也有非常成熟的解决方案,其实,要是自己自定义登录实现这个并不难,但是如果需要在 Spring Security 框架中实现这个功能,还得稍费一点功夫,本文就和小伙伴来分享下在 Spring Security 框架中如何添加验证码。
关于 Spring Security 基本配置,这里就不再多说,小伙伴有不懂的可以参考 http://springboot.javaboy.org/,本文主要来看如何加入验证码功能。
准备验证码
要有验证码,首先得先准备好验证码,本文采用 Java 自画的验证码,代码如下:
/**
 * 生成验证码的工具类
 */
public class VerifyCode {

	private int width = 100;// 生成验证码图片的宽度
	private int height = 50;// 生成验证码图片的高度
	private String[] fontNames = { "宋体", "楷体", "隶书", "微软雅黑" };
	private Color bgColor = new Color(255, 255, 255);// 定义验证码图片的背景颜色为白色
	private Random random = new Random();
	private String codes = "0123456789abcdefghijklmnopqrstuvwxyzABCDEFGHIJKLMNOPQRSTUVWXYZ";
	private String text;// 记录随机字符串

	/**
	 * 获取一个随意颜色
	 *
	 * @return
	 */
	private Color randomColor() {
		int red = random.nextInt(150);
		int green = random.nextInt(150);
		int blue = random.nextInt(150);
		return new Color(red, green, blue);
	}

	/**
	 * 获取一个随机字体
	 *
	 * @return
	 */
	private Font randomFont() {
		String name = fontNames[random.nextInt(fontNames.length)];
		int style = random.nextInt(4);
		int size = random.nextInt(5) + 24;
		return new Font(name, style, size);
	}

	/**
	 * 获取一个随机字符
	 *
	 * @return
	 */
	private char randomChar() {
		return codes.charAt(random.nextInt(codes.length()));
	}

	/**
	 * 创建一个空白的BufferedImage对象
	 *
	 * @return
	 */
	private BufferedImage createImage() {
		BufferedImage image = new BufferedImage(width, height, BufferedImage.TYPE_INT_RGB);
		Graphics2D g2 = (Graphics2D) image.getGraphics();
		g2.setColor(bgColor);// 设置验证码图片的背景颜色
		g2.fillRect(0, 0, width, height);
		return image;
	}

	public BufferedImage getImage() {
		BufferedImage image = createImage();
		Graphics2D g2 = (Graphics2D) image.getGraphics();
		StringBuffer sb = new StringBuffer();
		for (int i = 0; i < 4; i++) {
			String s = randomChar() + "";
			sb.append(s);
			g2.setColor(randomColor());
			g2.setFont(randomFont());
			float x = i * width * 1.0f / 4;
			g2.drawString(s, x, height - 15);
		}
		this.text = sb.toString();
		drawLine(image);
		return image;
	}

	/**
	 * 绘制干扰线
	 *
	 * @param image
	 */
	private void drawLine(BufferedImage image) {
		Graphics2D g2 = (Graphics2D) image.getGraphics();
		int num = 5;
		for (int i = 0; i < num; i++) {
			int x1 = random.nextInt(width);
			int y1 = random.nextInt(height);
			int x2 = random.nextInt(width);
			int y2 = random.nextInt(height);
			g2.setColor(randomColor());
			g2.setStroke(new BasicStroke(1.5f));
			g2.drawLine(x1, y1, x2, y2);
		}
	}

	public String getText() {
		return text;
	}

	public static void output(BufferedImage image, OutputStream out) throws IOException {
		ImageIO.write(image, "JPEG", out);
	}
}
这个工具类很常见,网上也有很多,就是画一个简单的验证码,通过流将验证码写到前端页面,提供验证码的 Controller 如下:
@RestController
public class VerifyCodeController {
    @GetMapping("/vercode")
    public void code(HttpServletRequest req, HttpServletResponse resp) throws IOException {
        VerifyCode vc = new VerifyCode();
        BufferedImage image = vc.getImage();
        String text = vc.getText();
        HttpSession session = req.getSession();
        session.setAttribute("index_code", text);
        VerifyCode.output(image, resp.getOutputStream());
    }
}
这里创建了一个 VerifyCode 对象,将生成的验证码字符保存到 session 中,然后通过流将图片写到前端,img 标签如下:
<img src="/vercode" alt="">
展示效果如下:

自定义过滤器
在登陆页展示验证码这个就不需要我多说了,接下来我们来看看如何自定义验证码处理器:
@Component
public class VerifyCodeFilter extends GenericFilterBean {
    private String defaultFilterProcessUrl = "/doLogin";

    @Override
    public void doFilter(ServletRequest req, ServletResponse res, FilterChain chain)
            throws IOException, ServletException {
        HttpServletRequest request = (HttpServletRequest) req;
        HttpServletResponse response = (HttpServletResponse) res;
        if ("POST".equalsIgnoreCase(request.getMethod()) && defaultFilterProcessUrl.equals(request.getServletPath())) {
            // 验证码验证
            String requestCaptcha = request.getParameter("code");
            String genCaptcha = (String) request.getSession().getAttribute("index_code");
            if (StringUtils.isEmpty(requestCaptcha))
                throw new AuthenticationServiceException("验证码不能为空!");
            if (!genCaptcha.toLowerCase().equals(requestCaptcha.toLowerCase())) {
                throw new AuthenticationServiceException("验证码错误!");
            }
        }
        chain.doFilter(request, response);
    }
}
自定义过滤器继承自 GenericFilterBean,并实现其中的 doFilter 方法,在 doFilter 方法中,当请求方法是 POST,并且请求地址是 /doLogin 时,获取参数中的 code 字段值,该字段保存了用户从前端页面传来的验证码,然后获取 session 中保存的验证码,如果用户没有传来验证码,则抛出验证码不能为空异常,如果用户传入了验证码,则判断验证码是否正确,如果不正确则抛出异常,否则执行 chain.doFilter(request, response); 使请求继续向下走。
配置
最后在 Spring Security 的配置中,配置过滤器,如下:
@Configuration
public class SecurityConfig extends WebSecurityConfigurerAdapter {

    @Autowired
    VerifyCodeFilter verifyCodeFilter;
    ...
    ...
    @Override
    protected void configure(HttpSecurity http) throws Exception {
        http.addFilterBefore(verifyCodeFilter, UsernamePasswordAuthenticationFilter.class);
        http.authorizeRequests()
                .antMatchers("/admin/**").hasRole("admin")
                ...
                ...
                .permitAll()
                .and()
                .csrf().disable();
    }
}
这里只贴出了部分核心代码,即 http.addFilterBefore(verifyCodeFilter, UsernamePasswordAuthenticationFilter.class); ,如此之后,整个配置就算完成了。
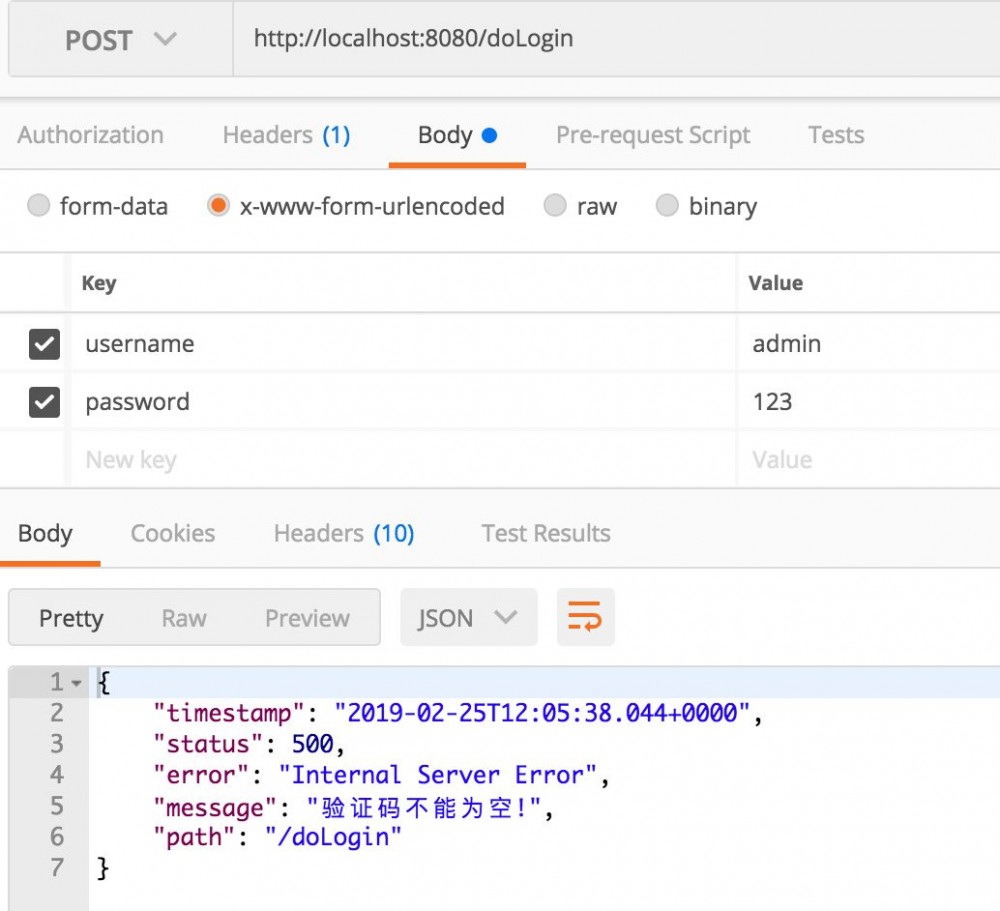
接下来在登录中,就需要传入验证码了,如果不传或者传错,都会抛出异常,例如不传的话,抛出如下异常:

本文案例,我已经上传到 GitHub ,欢迎大家 star:https://github.com/lenve/javaboy-code-samples
好了,本文就先说到这里,有问题欢迎留言讨论。


1 、 Spring Boot2 系列教程(一)纯 Java 搭建 SSM 项目
2、 Spring Boot2 系列教程(二)创建 Spring Boot 项目的三种方式
3、 Spring Boot2 系列教程(三)理解 spring-boot-starter-parent
4、 Spring Boot2 系列教程(四)理解配置文件 application.properties !
5、 Spring Boot2 系列教程(五)Spring Boot中的 yaml 配置
6、 Spring Boot2 系列教程(六)自定义 Spring Boot 中的 starter
7、 Spring Boot2 系列教程(七)理解自动化配置的原理
14、 Spring Boot2 系列教程(十四)CORS 解决跨域问题
16、 Spring Boot2 系列教程(十六)定时任务的两种实现方式
21、 Spring Boot2 系列教程(二十一)整合 MyBatis
23、 Spring Boot2 系列教程(二十三)理解 Spring Data Jpa
27、 Spring Boot2 系列教程(二十七)Nginx 极简扫盲入门
33、 Spring Boot2 系列教程(三十三)整合 Spring Security

喜欢就点个 "在看" 呗^_^
- 本文标签: http id 自动化 map tk DOM 处理器 rmi session https 微软 src IO Nginx 功夫 CST App Security springboot git IDE 参数 图片 web cat stream 需求 JPA Spring Security servlet UI mybatis bean java 文案 zab 代码 Word Spring Boot 配置 rand REST Service spring tar equals GitHub
- 版权声明: 本文为互联网转载文章,出处已在文章中说明(部分除外)。如果侵权,请联系本站长删除,谢谢。
- 本文海报: 生成海报一 生成海报二


![[HBLOG]公众号](https://www.liuhaihua.cn/img/qrcode_gzh.jpg)

