【SpringBoot-In-Action】一、Spring Boot快速入门
Spring Boot 用来简化 Spring 应用开发,约定大于配置,删繁就简,just run 就能创建一个独立的、产品级的应用
-
出现背景:
J2EE(例如 Spring ) 笨重的开发、繁多的配置、低下的开发效率、负责的部署流程和第三方技术集成难度大。
-
解决方案:
“Spring 全家桶” 时代:
Spring Boot → J2EE 一站式解决方案
Spring Cloud → 分布式整体解决方案
-
优点:
快速创建独立运行的 Spring 项目以及与主流框架集成
使用嵌入式的 Servlet 容器,应用无需打成 war包
starters 自动依赖于版本控制
大量的自动配置,简化开发,也可以修改默认属性值
开箱即用,无需配置 xml,无代码生成
生产环境的运行时应用监控
与云计算天然集成
总结:
- 简化Spring应用开发的一个框架;
- 整个Spring技术栈的一个大整合;
- J2EE开发的一站式解决方案;

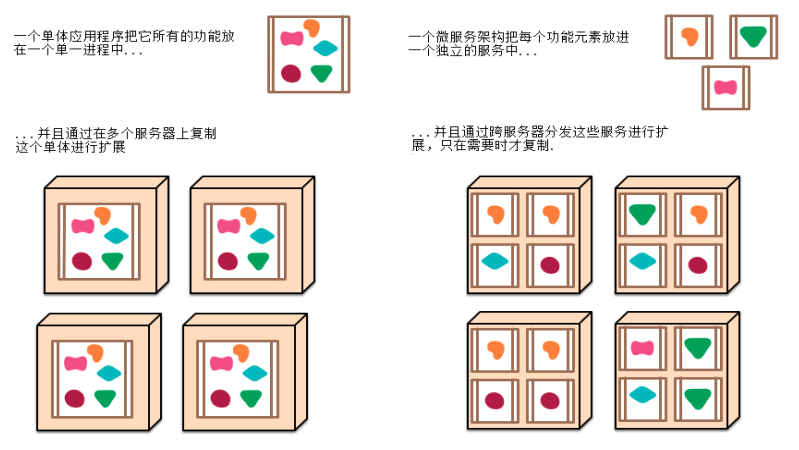
2、微服务
- 2014由martin fowler提出
- 微服务:架构风格(服务微化)
- 一个应用应该是一组小型服务;可以通过HTTP的方式进行互通;
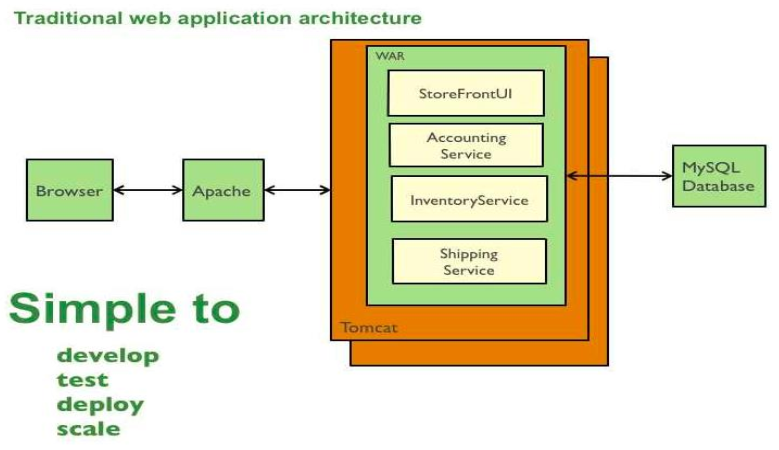
- 单体应用:ALL IN ONE
- 微服务:每一个功能元素最终都是一个可独立替换和独立升级的软件单元;
- 详细参照微服务文档
单体应用:
微服务:
3、环境准备
开发环境:
- jdk1.8:Spring Boot 推荐jdk1.7及以上;java version "1.8.0_221"
- maven3.x:maven 3.3以上版本;apache-maven-3.6.1
- IntelliJIDEA2019:IntelliJ IDEA 2019.1.3 x64
- SpringBoot 2.2.1.RELEASE:2.2.1;
开发配置:
1、MAVEN设置:
给 maven 的 settings.xml 配置文件的 profiles 标签添加下面的配置,设置 maven 的创建项目时的默认编译版本使用 jdk8
<profile>
<id>jdk-1.8</id>
<activation>
<activeByDefault>true</activeByDefault>
<jdk>1.8</jdk>
</activation>
<properties>
<maven.compiler.source>1.8</maven.compiler.source>
<maven.compiler.target>1.8</maven.compiler.target>
<maven.compiler.compilerVersion>1.8</maven.compiler.compilerVersion>
</properties>
</profile>
复制代码
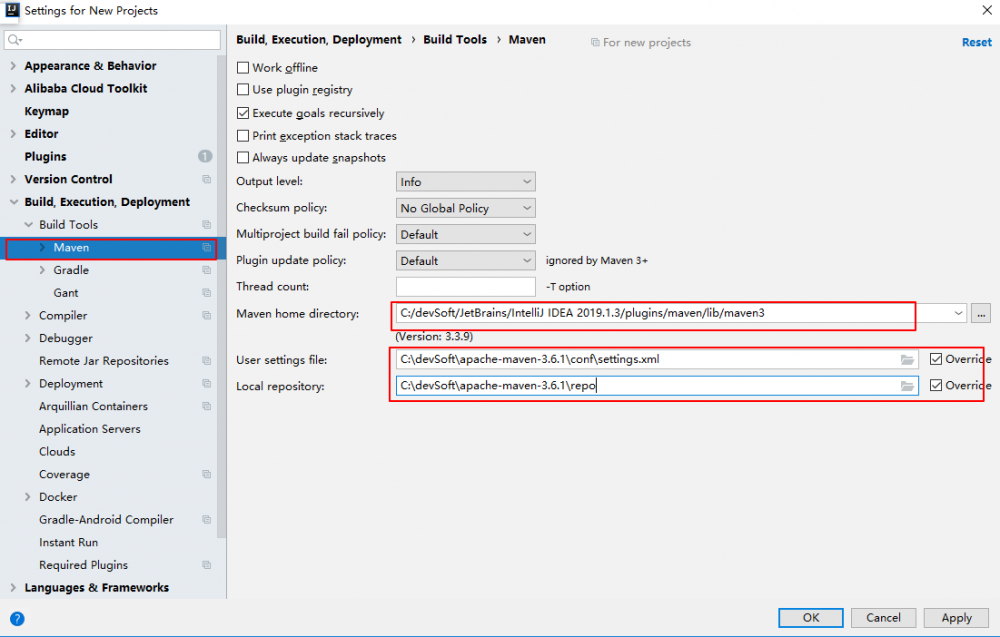
2、IDEA设置:
Idea 整合 Maven:
4、创建 Spring Boot HelloWorld
1、快速开始
首先我们先创建一个统一的 maven 工程,用来管理我们之后学习中所有的项目:
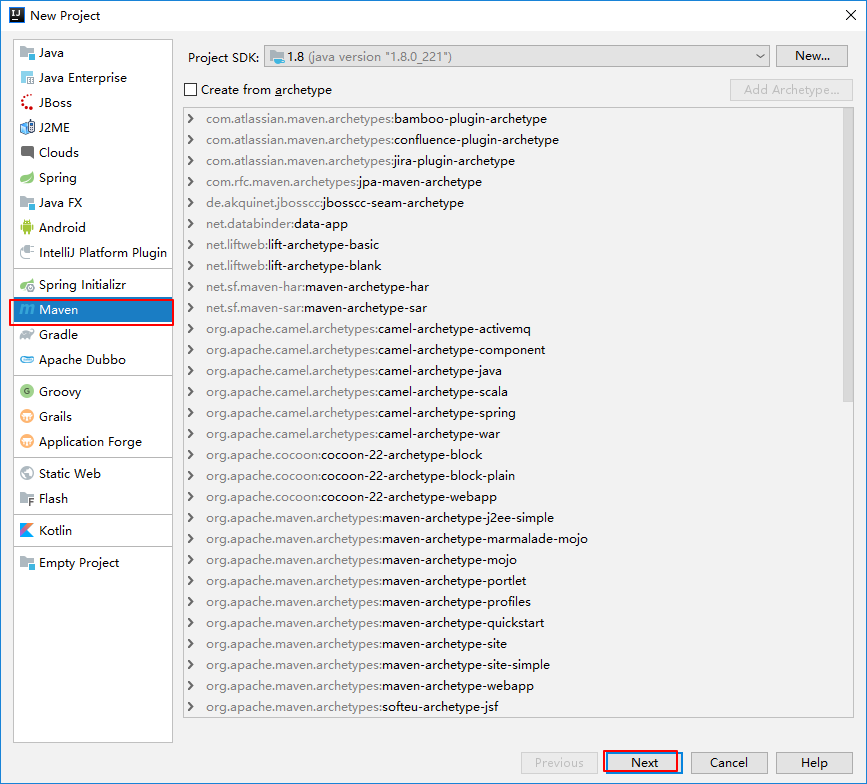
1、新建项目

2、选择Maven项目
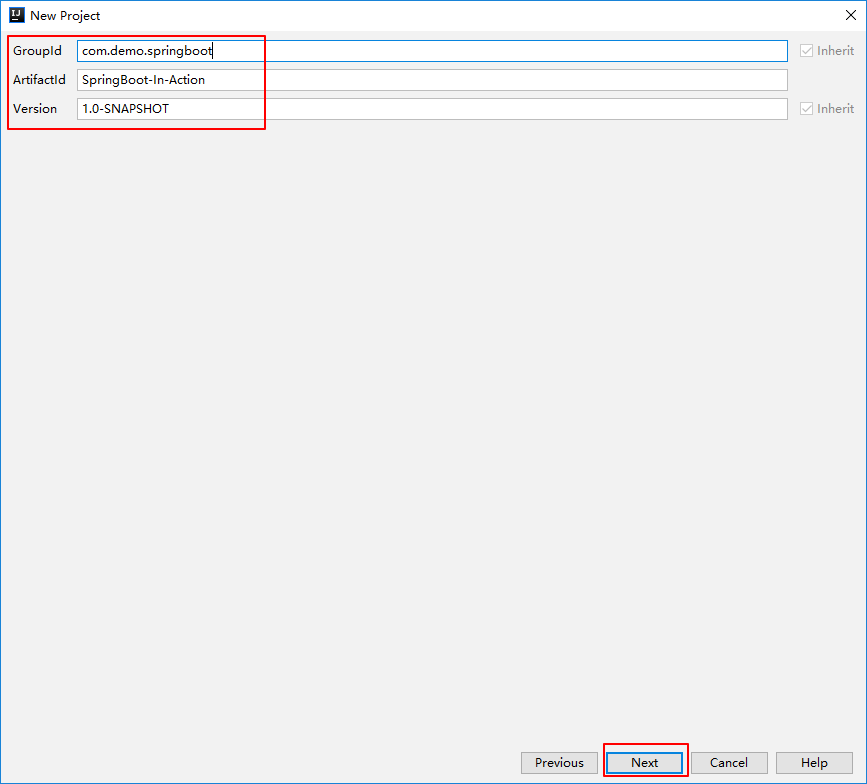
3、填写GroupId、ArtifactId
GroupId: com.demo.springboot
ArtifactId: SpringBoot-In-Action
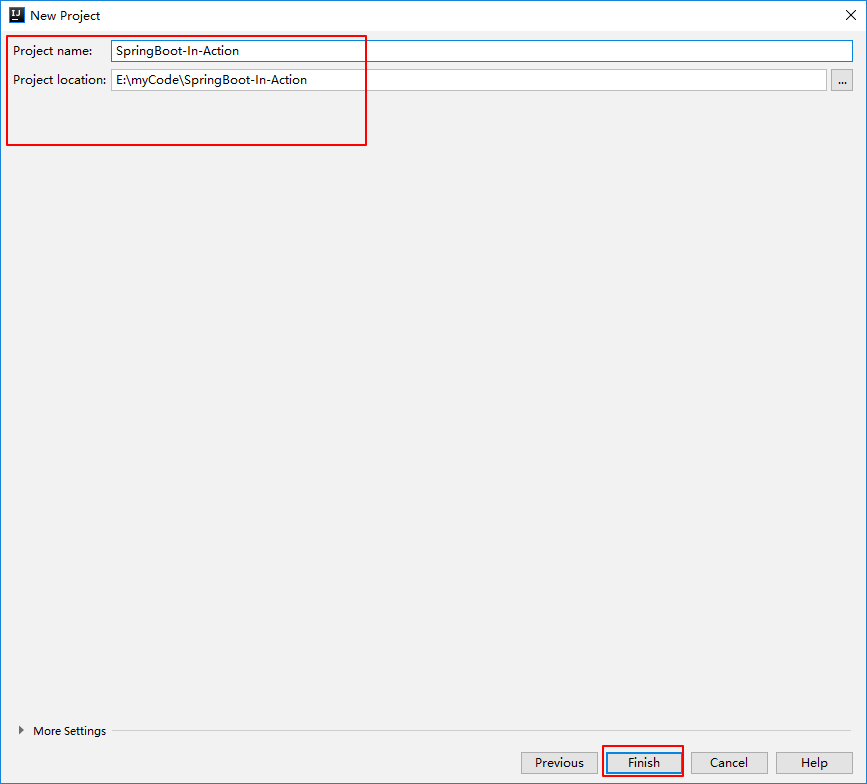
5、填写项目名和项目路径
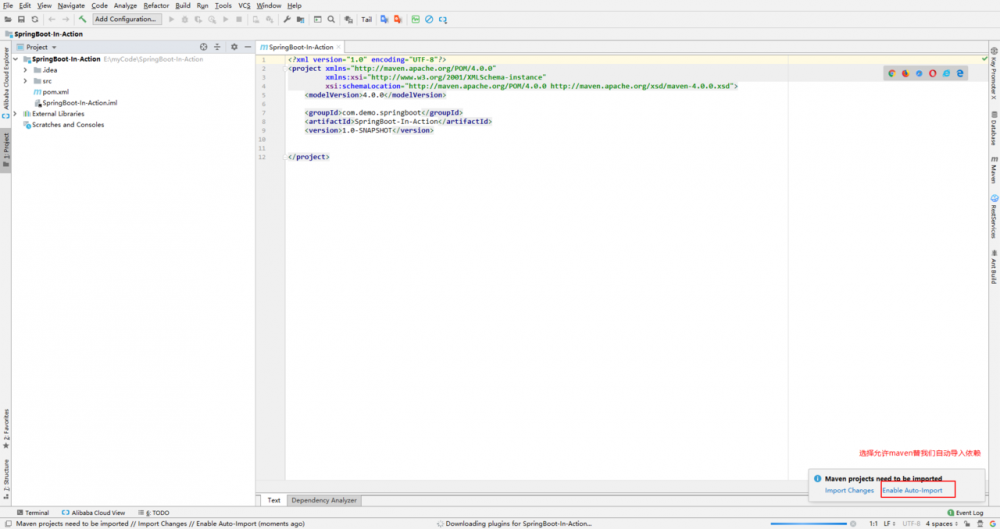
6、创建一个空的maven项目完成,选择允许自动导入
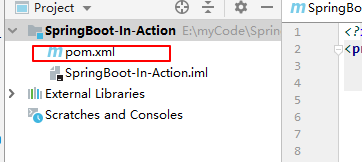
7、删除多余的目录
只保留一个pom.xml文件即可,同时在pom文件中添加springboot依赖和打包类型
<parent>
    <groupId>org.springframework.boot</groupId>
    <artifactId>spring-boot-starter-parent</artifactId>
    <version>2.2.1.RELEASE</version>
</parent>
<packaging>pom</packaging>
复制代码
2、现在开始我们的 Spring Boot HelloWorld 项目:
一个功能:浏览器发送hello请求,服务器接受请求并处理,响应Hello World字符串 ;
1、创建一个maven工程;(jar)
在SpringBoot-In-Action项目中新建一个module,选择maven工程,命名为 spring-boot-01-helloworld

2、导入spring boot相关的依赖
因为springboot的依赖已经在父pom中导入
<parent>
    <groupId>org.springframework.boot</groupId>
    <artifactId>spring-boot-starter-parent</artifactId>
    <version>2.2.1.RELEASE</version>
</parent>
复制代码
所以在当前的pom中只需要导入spring-boot-starter-web的依赖即可:
<dependencies>
    <dependency>
        <groupId>org.springframework.boot</groupId>
        <artifactId>spring-boot-starter-web</artifactId>
    </dependency>
</dependencies>
复制代码
完整 pom 文件如下:
<?xml version="1.0" encoding="UTF-8"?>
<project xmlns="http://maven.apache.org/POM/4.0.0"
         xmlns:xsi="http://www.w3.org/2001/XMLSchema-instance"
         xsi:schemaLocation="http://maven.apache.org/POM/4.0.0 http://maven.apache.org/xsd/maven-4.0.0.xsd">
    <parent>
        <artifactId>SpringBoot-In-Action</artifactId>
        <groupId>com.demo.springboot</groupId>
        <version>1.0-SNAPSHOT</version>
    </parent>
    <modelVersion>4.0.0</modelVersion>

    <artifactId>spring-boot-01-helloworld</artifactId>

    <dependencies>
        <dependency>
            <groupId>org.springframework.boot</groupId>
            <artifactId>spring-boot-starter-web</artifactId>
        </dependency>
    </dependencies>

</project>
复制代码
3、编写一个主程序;启动Spring Boot应用
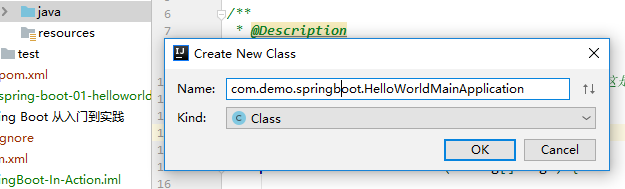
/**
 * @SpringBootApplication 来标注一个主程序类,说明这是一个Spring Boot应用
 */
@SpringBootApplication
public class HelloWorldMainApplication {
    public static void main(String[] args) {
        // Spring应用启动起来
        SpringApplication.run(HelloWorldMainApplication.class, args);
    }
}
复制代码
4、编写相关的Controller、Service
为了演示,我在这里只创建了 Controller 类,省略了 Service
@Controller
public class HelloController {

    @ResponseBody
    @RequestMapping("/hello")
    public String hello() {
        return "Hello World!";
    }
}
复制代码
5、运行主程序测试效果
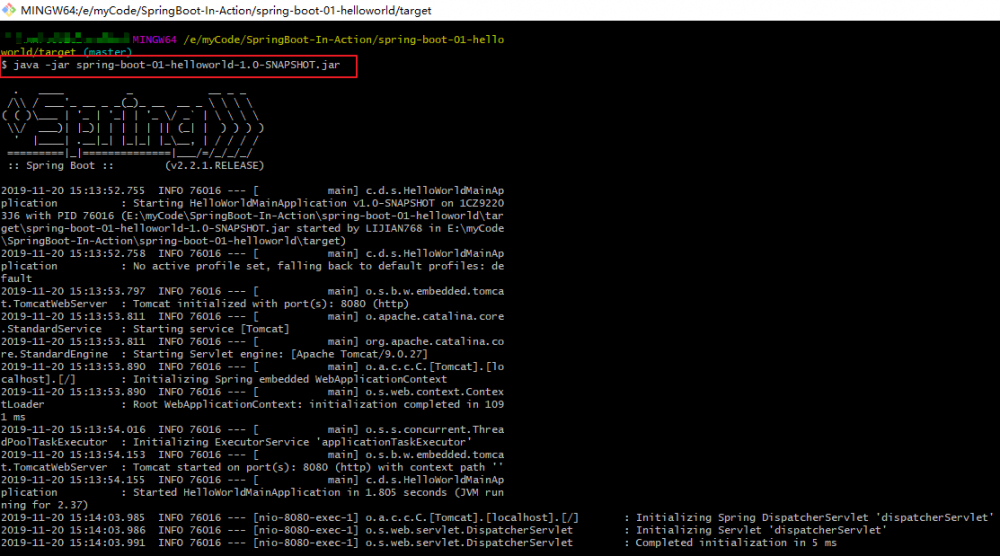
选中 HelloWorldMainApplication 右键单击选择 Run ... ,或者打开 HelloWorldMainApplication 按下快捷键 Ctrl+Shift+F10 运行程序,可以看到项目在 8080 端口启动:
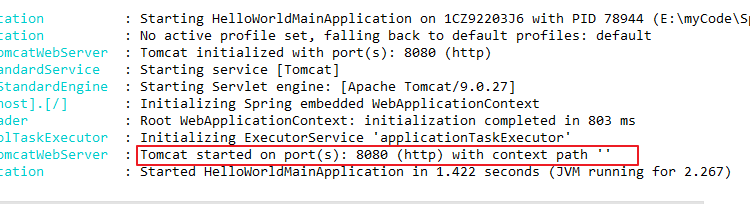
在浏览器中访问 http://localhost:8080/hello 可以看到正常返回了 Hello World 。

至此,我们的第一个 Spring Boot 项目算是创建完了。
6、补充:简化部署
在当前项目,即 spring-boot-01-helloworld 的 pom 文件中添加下面的配置
<!-- 这个插件,可以将应用打包成一个可执行的jar包;-->
<build>
    <plugins>
        <plugin>
            <groupId>org.springframework.boot</groupId>
            <artifactId>spring-boot-maven-plugin</artifactId>
        </plugin>
    </plugins>
</build>
复制代码
然后选中当前 pom 文件,右键单击,选择 Run Maven → package ,将这个应用打成 jar 包,可以看到 target 文件夹下生成一个名为 spring-boot-01-helloworld-1.0-SNAPSHOT.jar 的 jar 文件,我们可以直接在命令行使用 java -jar xxx.jar 命令进行执行,启动后在浏览器中访问 http://localhost:8080/hello 可以看到正常返回了 Hello World 。若要结束程序,关闭命令行窗口即可。
思考:为什么我们打包后的程序可以直接在命令行使用 java jar 命令就可以部署?
带着疑问我们来分析一下 spring-boot-01-helloworld-1.0-SNAPSHOT.jar ,我们使用压缩文件打开 spring-boot-01-helloworld-1.0-SNAPSHOT.jar ,可以看到如下所示的目录结构:
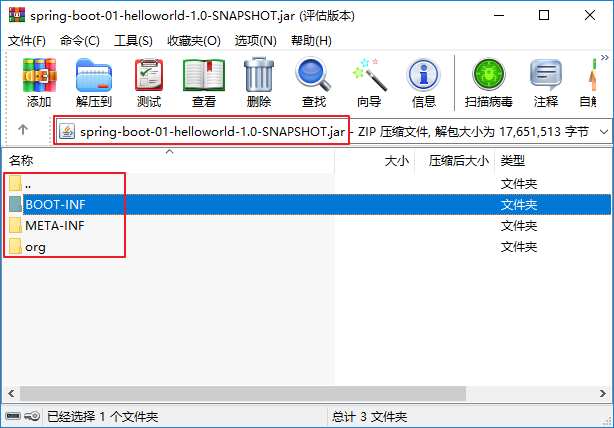
我们打开 BOOT-INF 文件夹看到有 classes 和 lib 两个文件夹,我们写的代码的二进制字节码就在 classes 目录下,而 lib 下可以看到是我们项目依赖的所有 jar 包,最关键的,我们的项目是一个 web 项目,可以看到所依赖的内嵌的 tomcat jar包,这是我们项目能独立部署的关键:
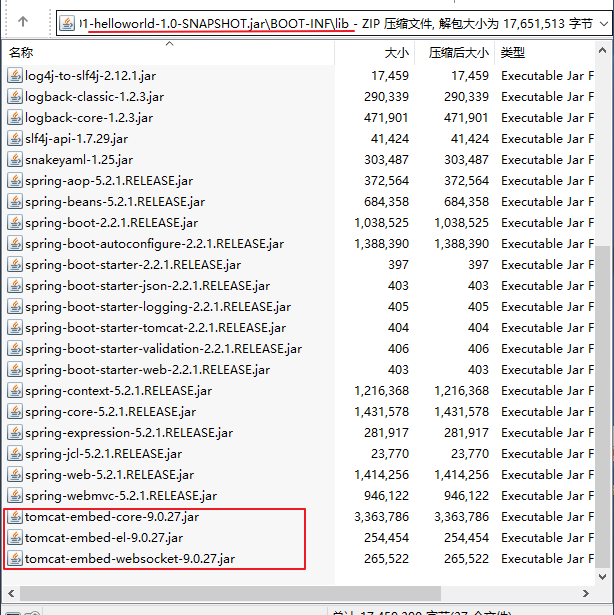
其他目录 META-INF 存放项目的 pom 文件, org 目录下存放的是 springframework 相关代码。
5、Hello World 探究
1、POM文件
1、父项目
依赖路径入下图所示:
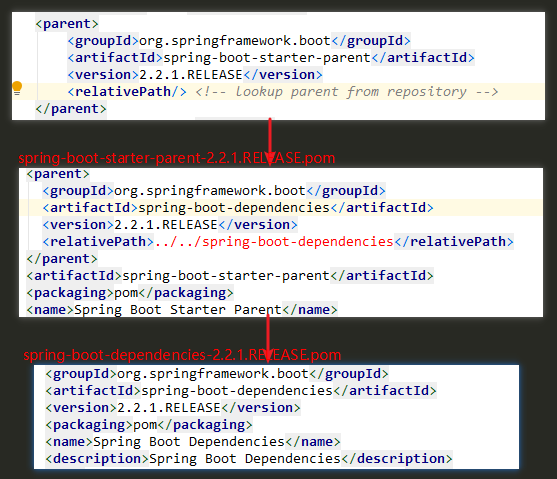
spring-boot-01-helloworld 的 pom:
<parent>
    <artifactId>SpringBoot-In-Action</artifactId>
    <groupId>com.demo.springboot</groupId>
    <version>1.0-SNAPSHOT</version>
</parent>
复制代码
它的父项目是 SpringBoot-In-Action 中的 pom:
<parent>
    <groupId>org.springframework.boot</groupId>
    <artifactId>spring-boot-starter-parent</artifactId>
    <version>2.2.1.RELEASE</version>
</parent>

<packaging>pom</packaging>

<groupId>com.demo.springboot</groupId>
<artifactId>SpringBoot-In-Action</artifactId>
<version>1.0-SNAPSHOT</version>

<modules>
    <module>spring-boot-01-helloworld</module>
</modules>
复制代码
而
<parent>
    <groupId>org.springframework.boot</groupId>
    <artifactId>spring-boot-starter-parent</artifactId>
    <version>2.2.1.RELEASE</version>
</parent>
复制代码
的父 pom 是 spring-boot-starter-parent-2.2.1.RELEASE.pom :
<parent>
    <groupId>org.springframework.boot</groupId>
    <artifactId>spring-boot-dependencies</artifactId>
    <version>2.2.1.RELEASE</version>
    <relativePath>../../spring-boot-dependencies</relativePath>
</parent>
<artifactId>spring-boot-starter-parent</artifactId>
复制代码
而它的父 pom 是 spring-boot-dependencies-2.2.1.RELEASE.pom :
<groupId>org.springframework.boot</groupId>
<artifactId>spring-boot-dependencies</artifactId>
<version>2.2.1.RELEASE</version>
<packaging>pom</packaging>

在这个pom里边可以看到,它是用来真正管理Spring Boot应用里面的所有依赖版本,定义了每一个依赖的版本;
复制代码

spring-boot-dependencies-2.x.RELEASE.pom 可以成称为 Spring Boot的版本仲裁中心 ;
以后我们导入其他依赖默认是不需要写版本;(当然没有在dependencies里面管理的依赖自然需要声明版本号)
2、导入的其他依赖
<dependency>
    <groupId>org.springframework.boot</groupId>
    <artifactId>spring-boot-starter-web</artifactId>
</dependency>
复制代码
spring-boot-starter- web :我们可以将其拆分为 spring-boot-starter 和 web 两部分
- spring-boot-starter:spring-boot 场景启动器;spring-boot-starter-web 帮我们导入了 web 模块正常运行所依赖的组件。
我们按下 Ctrl 点击 spring-boot-starter-web 进入 spring-boot-starter-web-2.2.1.RELEASE.pom ,可以看到它导入了很多 web 模块正常运行需要的相关依赖:
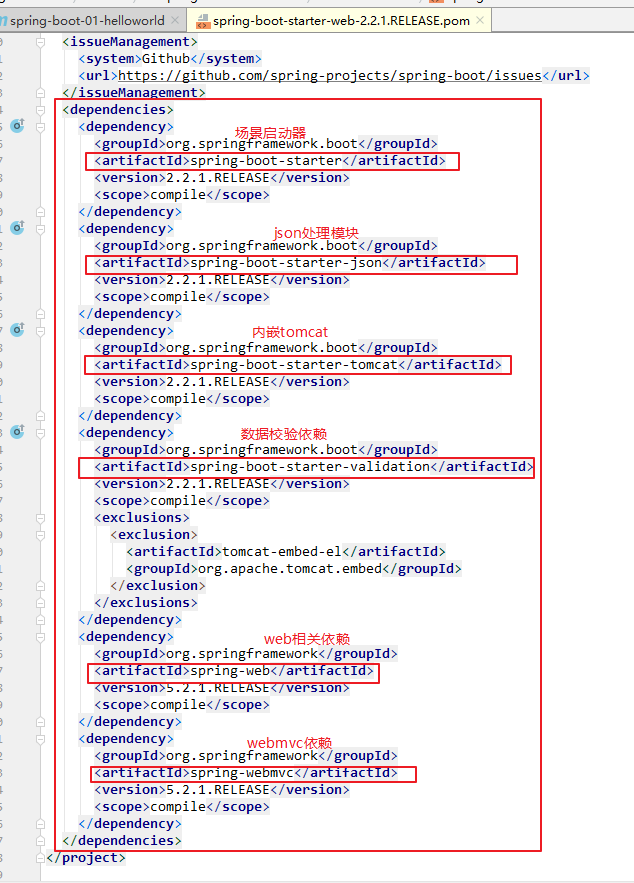
Spring Boot 为我们提供了简化企业级开发的绝大多数场景的 starter pom(启动器),只要引入了相应场景的 starter pom ,相关技术的绝大部分配置将会消除(即自动配置),从而简化我们的开发。很多业务场景中我们就会使用到 Spring Boot 为我们自动配置的 bean,同时 Spring Boot 对这些场景依赖的 jar 也做了严格的测试与版本控制,我们可以不必担心 jar 版本的适配问题。
在 Spring Boot 中还有很多这样的启动器,我们打开 官方文档 可以看到关于启动器的描述:
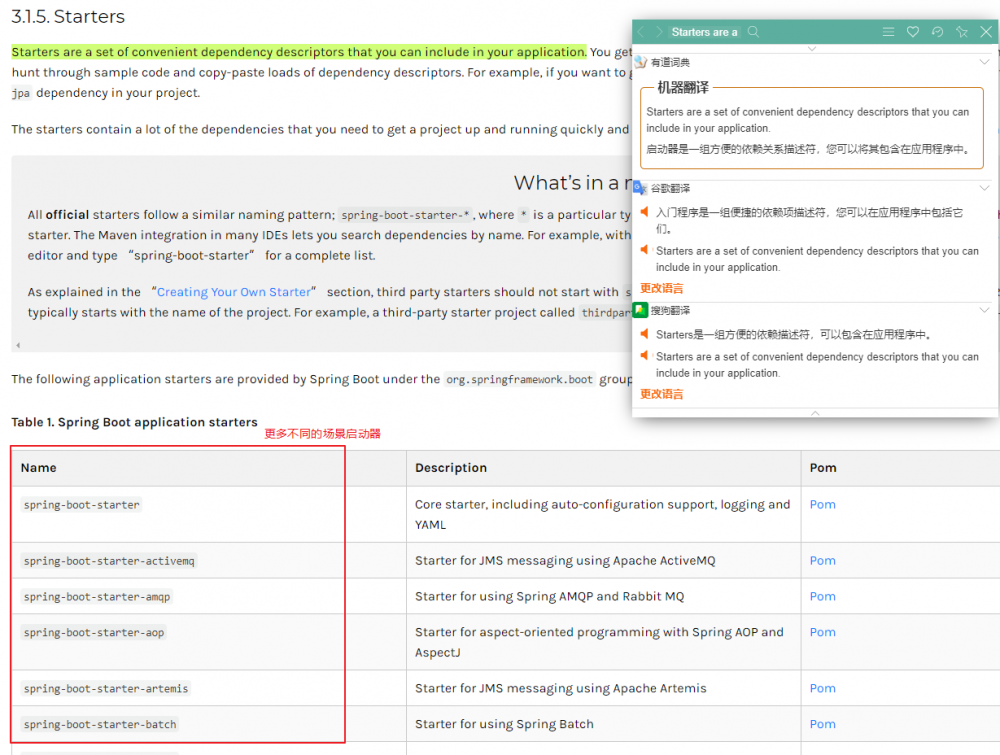
Spring Boot 将所有的功能场景都抽取出来,做成一个个的 starters(启动器),只需要在项目里面引入这些starter 相关场景的所有依赖都会导入进来。要用什么功能就导入什么场景的启动器。而我们一般的开发也是围绕着这些 starter 来展开。
2、主程序类(主入口类)
/**
 *  @SpringBootApplication 来标注一个主程序类,说明这是一个Spring Boot应用,没有这个注解项目无法启动
 */
@SpringBootApplication
public class HelloWorldMainApplication {

    public static void main(String[] args) {

        // Spring应用启动起来
        SpringApplication.run(HelloWorldMainApplication.class, args);
    }
}
复制代码
1、@SpringBootApplication
@ SpringBootApplication : Spring Boot应用 标注在某个类上说明这个类是SpringBoot的主配置类,SpringBoot 就运行这个类的 main 方法来启动 SpringBoot 应用;
进入 @SpringBootApplication 注解内部,可以看到它实际上是一个复合注解:
@Target({ElementType.TYPE})
@Retention(RetentionPolicy.RUNTIME)
@Documented
@Inherited
@SpringBootConfiguration
@EnableAutoConfiguration
@ComponentScan(
    excludeFilters = {@Filter(
    type = FilterType.CUSTOM,
    classes = {TypeExcludeFilter.class}
), @Filter(
    type = FilterType.CUSTOM,
    classes = {AutoConfigurationExcludeFilter.class}
)}
)
public @interface SpringBootApplication {
复制代码
2、@SpringBootConfiguration
@ SpringBootConfiguration :Spring Boot 的配置类;
作用 :标注在某个类上,表示这是一个Spring Boot 的配置类;
进入 @SpringBootConfiguration 内部可以看到,它被 Spring 的 @Configuration 注解所注解:
@Configuration
public @interface SpringBootConfiguration {
复制代码
@ Configuration :配置类上来标注这个注解;配置类 === 配置文件;
进入 @Configuration 内部可以看到,它被 Spring 的 @Component 注解所注解;配置类其实也是容器中的一个组件。
@Component
public @interface Configuration {
复制代码
3、@EnableAutoConfiguration
@ EnableAutoConfiguration :开启自动配置功能
以前在 Spring 中我们需要配置的东西,现在 Spring Boot 帮我们自动配置;@ EnableAutoConfiguration 告诉SpringBoot 开启自动配置功能,这样自动配置才能生效;
进入 @EnableAutoConfiguration 内部可以看到下面的代码:
@AutoConfigurationPackage
@Import({AutoConfigurationImportSelector.class})
public @interface EnableAutoConfiguration {
复制代码
@ AutoConfigurationPackage :自动配置包,将主配置类( @SpringBootApplication 标注的类)的所在包及下面所有子包里面的所有组件扫描到 Spring 容器
进入 @Configuration 内部可以看到它被 @Import 注解所注解。Spring 的底层注解 @Import,给容器中导入一个组件;导入的组件由 Registrar.class 指定;
@Import({Registrar.class})
public @interface AutoConfigurationPackage {
复制代码
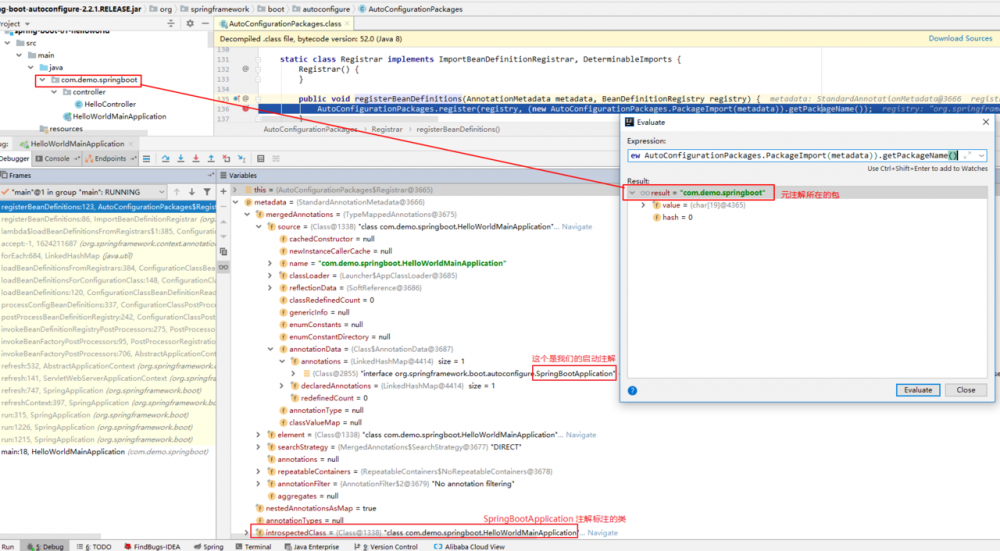
进入 Registrar 静态内部类可以看到如下代码:
static class Registrar implements ImportBeanDefinitionRegistrar, DeterminableImports {
    Registrar() {
    }
	// 注册一些 Bean 定义信息,进行组件的导入工作;metadata:注解的元信息
    public void registerBeanDefinitions(AnnotationMetadata metadata, BeanDefinitionRegistry registry) {
        AutoConfigurationPackages.register(registry, (new AutoConfigurationPackages.PackageImport(metadata)).getPackageName());
    }

    public Set<Object> determineImports(AnnotationMetadata metadata) {
        return Collections.singleton(new AutoConfigurationPackages.PackageImport(metadata));
    }
}
复制代码
我们在代码中打上断点来看一下:
@ Import({AutoConfigurationImportSelector.class}) :给容器中导入组件xxx
AutoConfigurationImportSelector:导入哪些组件的选择器;
我们进入 AutoConfigurationImportSelector 中可以看到如下代码:
// 将所有需要导入的组件以全类名的方式返回;这些组件就会被添加到容器中
protected AutoConfigurationImportSelector.AutoConfigurationEntry getAutoConfigurationEntry(AutoConfigurationMetadata autoConfigurationMetadata, AnnotationMetadata annotationMetadata) {
    if (!this.isEnabled(annotationMetadata)) {
        return EMPTY_ENTRY;
    } else {
        AnnotationAttributes attributes = this.getAttributes(annotationMetadata);
        List<String> configurations = this.getCandidateConfigurations(annotationMetadata, attributes);
        configurations = this.removeDuplicates(configurations);
        Set<String> exclusions = this.getExclusions(annotationMetadata, attributes);
        this.checkExcludedClasses(configurations, exclusions);
        configurations.removeAll(exclusions);
        configurations = this.filter(configurations, autoConfigurationMetadata);
        this.fireAutoConfigurationImportEvents(configurations, exclusions);
        return new AutoConfigurationImportSelector.AutoConfigurationEntry(configurations, exclusions);
    }
}
复制代码
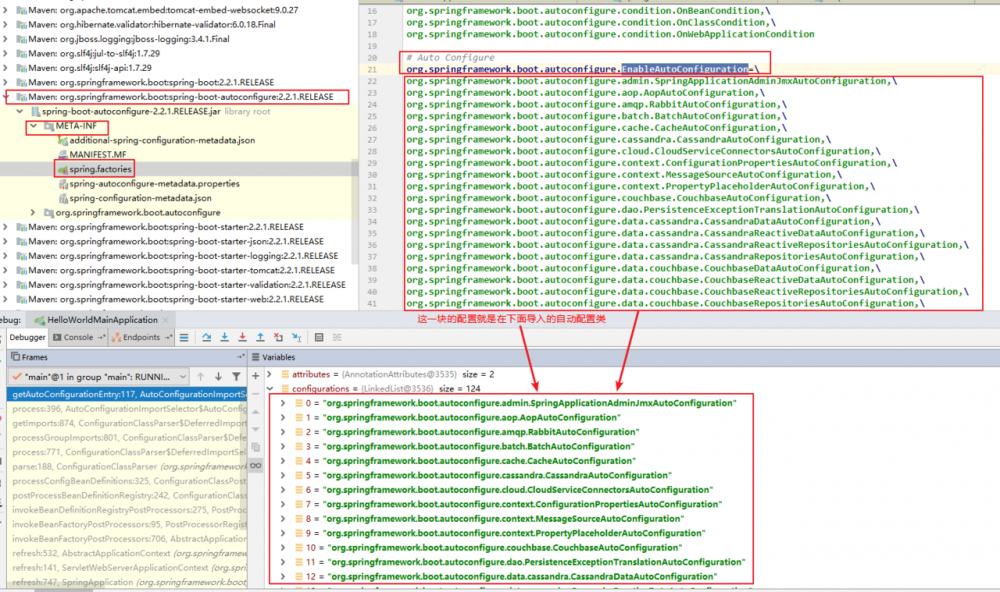
将所有需要导入的组件以全类名的方式返回;这些组件就会被添加到容器中。即 AutoConfigurationImportSelector 会给容器中导入非常多的自动配置类(xxxAutoConfiguration);就是给容器中导入这个场景需要的所有组件,并配置好这些组件。
我们在代码中打断点可以看到如下的结果:
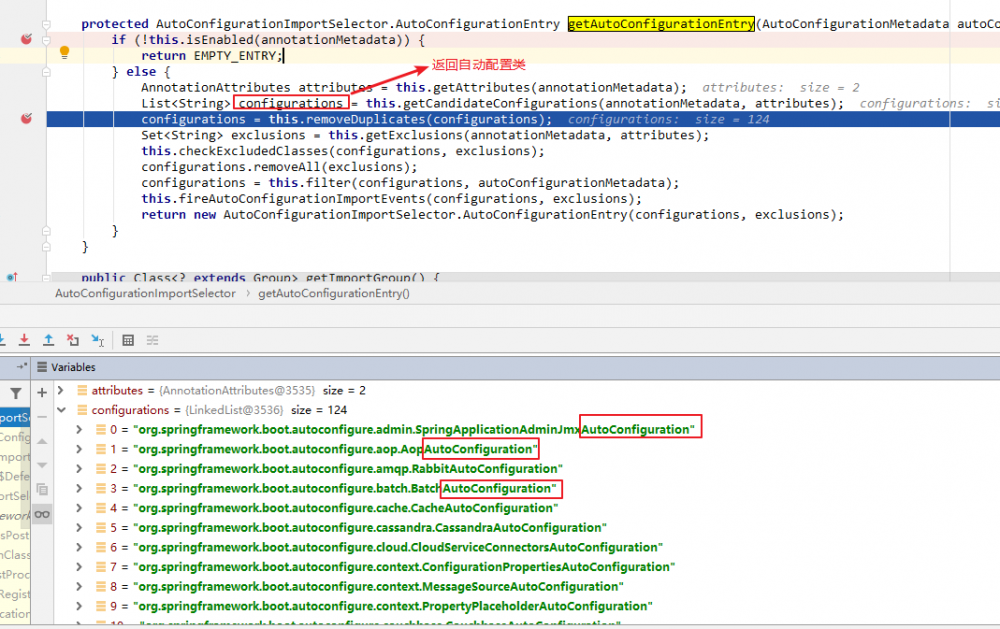
有了自动配置类,就免去了我们手动编写配置注入功能组件等的工作。
进入上面代码中的 getCandidateConfigurations 方法,可以看到如下代码:
// 获取候选配置
protected List<String> getCandidateConfigurations(AnnotationMetadata metadata, AnnotationAttributes attributes) {
    List<String> configurations = SpringFactoriesLoader.loadFactoryNames(this.getSpringFactoriesLoaderFactoryClass(), this.getBeanClassLoader());
    Assert.notEmpty(configurations, "No auto configuration classes found in META-INF/spring.factories. If you are using a custom packaging, make sure that file is correct.");
    return configurations;
}
复制代码
上面代码中调用了 SpringFactoriesLoader.loadFactoryNames(EnableAutoConfiguration.class, ClassLoader) 方法,我们在这个进入这个方法可以看下面的代码:
public static List<String> loadFactoryNames(Class<?> factoryType, @Nullable ClassLoader classLoader) {
    // 获取工厂名
    String factoryTypeName = factoryType.getName();
    return (List)loadSpringFactories(classLoader).getOrDefault(factoryTypeName, Collections.emptyList());
}

private static Map<String, List<String>> loadSpringFactories(@Nullable ClassLoader classLoader) {
    MultiValueMap<String, String> result = (MultiValueMap)cache.get(classLoader);
    if (result != null) {
        return result;
    } else {
        try {
            // 用类加载器从类路径 "META-INF/spring.factories" 中获取资源
            Enumeration<URL> urls = classLoader != null ? classLoader.getResources("META-INF/spring.factories") : ClassLoader.getSystemResources("META-INF/spring.factories");
            LinkedMultiValueMap result = new LinkedMultiValueMap();

            while(urls.hasMoreElements()) {
                URL url = (URL)urls.nextElement();
                UrlResource resource = new UrlResource(url);
                // 从获取的资源中拿出 properties 配置文件,把获取的资源当作 properties 配置文件
                Properties properties = PropertiesLoaderUtils.loadProperties(resource);
                Iterator var6 = properties.entrySet().iterator();

                while(var6.hasNext()) {
                    Entry<?, ?> entry = (Entry)var6.next();
                    // 从 properties 文件中拿到 factoryTypeName
                    String factoryTypeName = ((String)entry.getKey()).trim();
                    String[] var9 = StringUtils.commaDelimitedListToStringArray((String)entry.getValue());
                    int var10 = var9.length;

                    for(int var11 = 0; var11 < var10; ++var11) {
                        String factoryImplementationName = var9[var11];
                        result.add(factoryTypeName, factoryImplementationName.trim());
                    }
                }
            }

            cache.put(classLoader, result);
            return result;
        } catch (IOException var13) {
            throw new IllegalArgumentException("Unable to load factories from location [META-INF/spring.factories]", var13);
        }
    }
}
复制代码
所以根据上面的分析我的得知: Spring Boot 在启动的时候从类路径下的 META-INF/spring.factories 中获取 EnableAutoConfiguration 指定的值,将这些值作为自动配置类导入到容器中,自动配置类就生效,帮我们进行自动配置工作 。以前我们在 Spring 中需要自己配置的东西,在 Spring Boot 中自动配置类都帮我们配了。
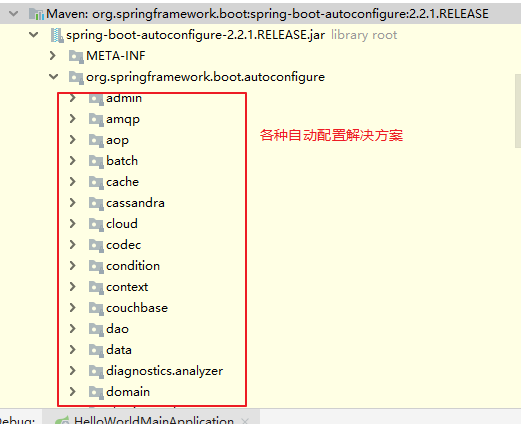
综上,J2EE 的整体整合解决方案和自动配置都在 spring-boot-autoconfigure-2.2.1.RELEASE.jar (spring-boot-autoconfigure-x.x.x.RELEASE.jar )中:
6、使用 Spring Initializer 快速创建 Spring Boot项目
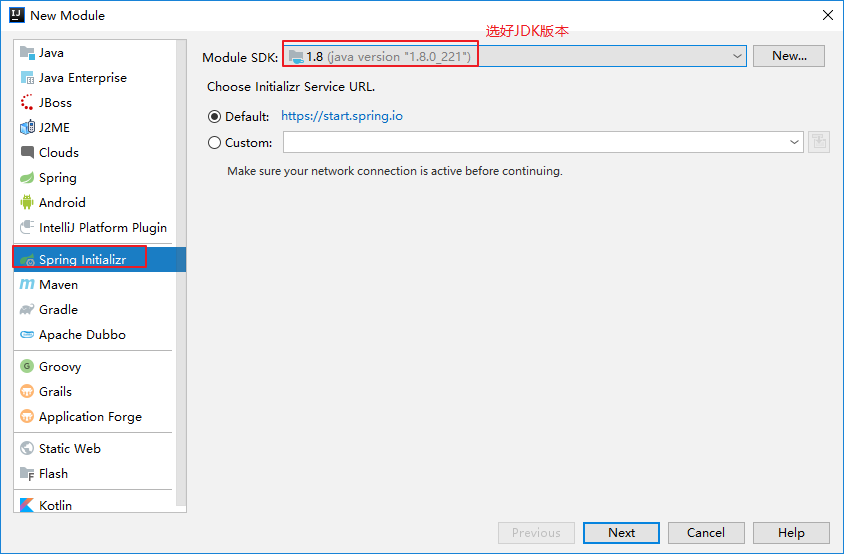
1、IDEA:使用 Spring Initializer快速创建项目
所有的 IDE 都支持使用 Spring 的项目创建向导快速创建一个 Spring Boot 项目,下面我们来看一下如何在 idea 中快速创建一个 Spring Boot 项目。
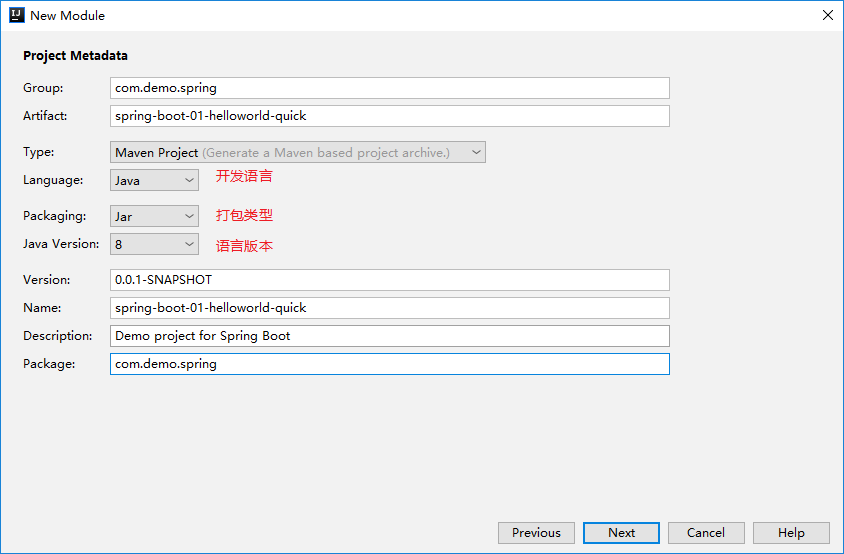
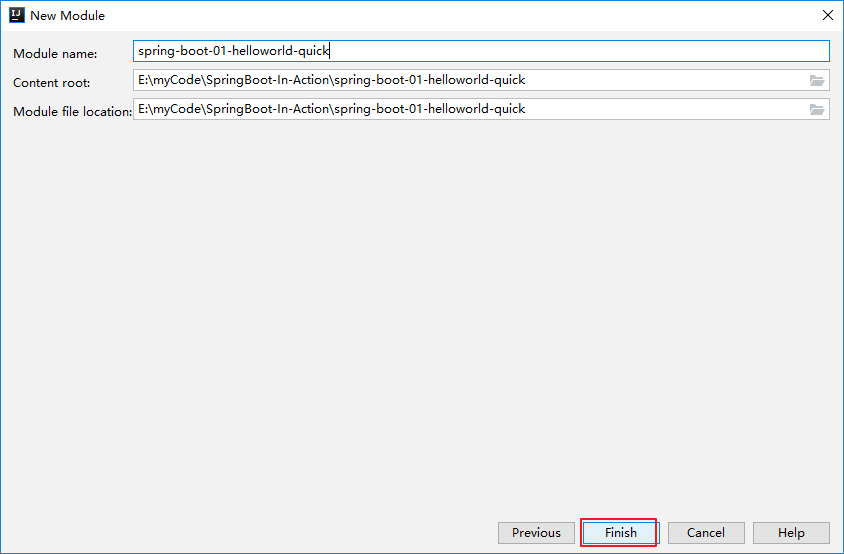
1、选择 File → New → Project 或是在一个已经存在的工程中选中工程名然后 New → Module :
2、填写基本信息 GroupID 、 ArtifactID
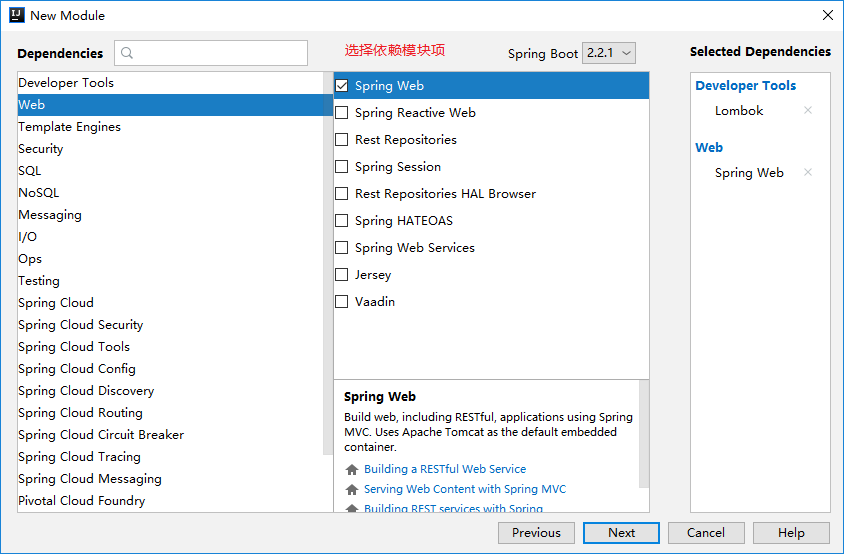
3、选择我们需要依赖的模块
4、点击 Finish ,接下来向导会联网创建 Spring Boot 项目
查看默认生成的 Spring Boot 项目,我们可以看到:
- 主程序已经生成好了,我们只需要写我们自己的逻辑
-
resources文件夹中目录结构:-
static:保存所有的静态资源: js、css、 images等; -
templates:保存所有的模板页面(Spring Boot 默认 jar 包使用嵌入式的 Tomcat,默认不支持 JSP 页面),可以使用模板引擎(freemarker、thymeleaf等); -
application.properties:Spring Boot 应用的配置文件;可以修改一些默认设置,比如端口等
-
我们在 com.demo.spring.controller 包下新见一个 HelloController 来测试一下我们新建的项目
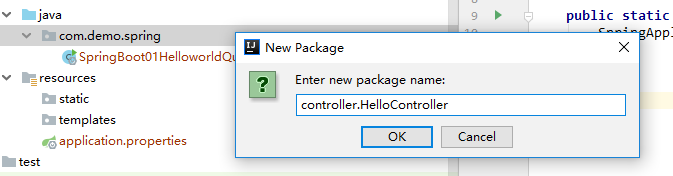
HelloController 代码如下:
//这个类的所有方法返回的数据直接写给浏览器,(如果是对象转为json数据)
//@ResponseBody
//@Controller
//  上面两行一般多用在 Spring 项目中
@RestController // 在 Spring Boot 和 Spring4.2.x 之后使用这个来简化开发,返回 RESTAPI 规范的接口
public class HelloController {
    @RequestMapping("/hello")
    public String hello(){
        return "hello world quick!";
    }
}
复制代码
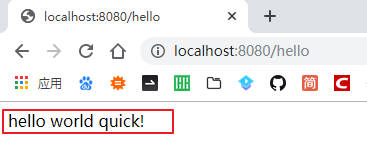
在浏览器中访问 http://localhost:8080/hello 可以得到下面的返回效果:
2、通过浏览器访问https://start.spring.io/快速创建项目
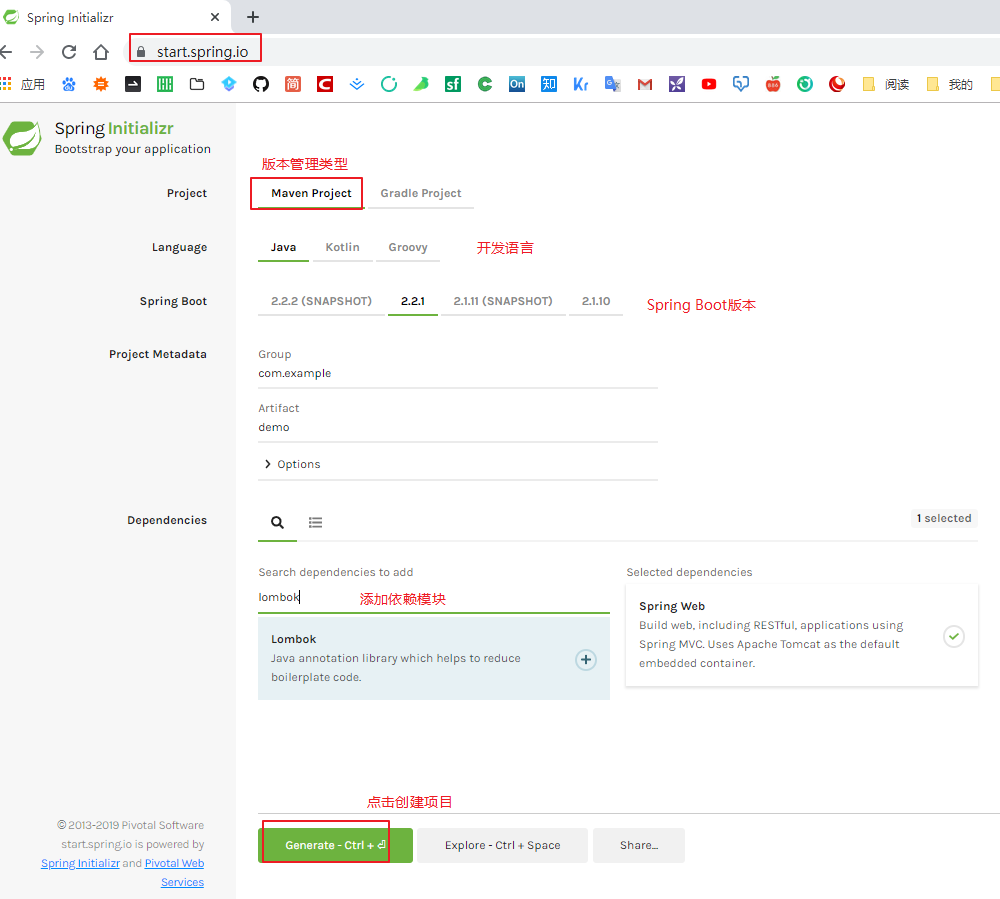
执行完上面的操作后,浏览器会自动下载一个创建好的项目,我们使用idea打开即可。
以上,就是我们 Spring Boot 快速入门的全部内容,更多详细内容请查看源代码了解。
正文到此结束
- 本文标签: schema BeanDefinition CSS URLs id apache REST tk mina http map 代码 plugin 云 key Spring cloud 编译 企业 js Freemarker IDE Select MQ java 软件 微服务 pom src cat bean NFV XML springboot ssl 总结 https 下载 数据 Document Collection spring 插件 类加载器 maven lib 产品 Service API Collections 分布式 服务器 开发 2019 tomcat ACE UI App IO rmi list 字节码 端口 build tar Action 管理 json Spring Boot web dependencies 部署 servlet 删除 配置 CTO cache 目录 value EnableAutoConfiguration 测试
- 版权声明: 本文为互联网转载文章,出处已在文章中说明(部分除外)。如果侵权,请联系本站长删除,谢谢。
- 本文海报: 生成海报一 生成海报二
热门推荐


相关文章

近期评论
-
ws0132613@gmail.comhttps://getmacos.com/gopanel/william smith
-
谢谢
-
https://www.newcmy.com/register?aff=HBVX建议您试试草莓云机场,可以流畅观看youtube和tiktok,上reddit/x也没有问题,还有各种ai优化节点。
-
-
-
想购买您这个站,我的联系方式QQ741756694微信同步 能卖联系
-
-
-
-
Loading...
![[HBLOG]公众号](https://www.liuhaihua.cn/img/qrcode_gzh.jpg)

