OkHttp4.2.2-使用示例及源码简析
OkHttp是适用于Android,Kotlin和Java的HTTP客户端,且OkHttp4已用Kotlin重写。在Android中大多使用Retrofit配合Rxjava或者协程进行网络请求,而Retrofit也是基于OkHttp封装。
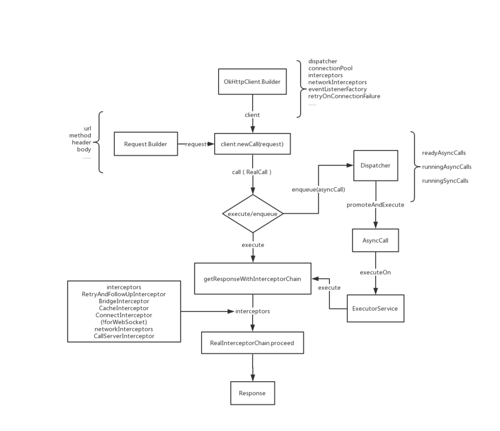
一、流程图

二、简单使用
- 添加依赖
implementation("com.squareup.okhttp3:okhttp:4.2.2")
复制代码
- 同步请求(execute)
private val client = OkHttpClient()

  val formBody = FormBody.Builder()
      .add("search", "Jurassic Park")
      .build()
  val request = Request.Builder()
      .url("https://en.wikipedia.org/w/index.php")
      .post(formBody)
      .build()

  client.newCall(request).execute().use { response ->
    if (!response.isSuccessful) throw IOException("Unexpected code $response")

    println(response.body!!.string())
  }
复制代码
- 异步请求(enqueue)
private val client = OkHttpClient()

  val request = Request.Builder()
      .url("http://publicobject.com/helloworld.txt")
      .build()

  client.newCall(request).enqueue(object : Callback {
    override fun onFailure(call: Call, e: IOException) {
      e.printStackTrace()
    }

    override fun onResponse(call: Call, response: Response) {
      response.use {
        if (!response.isSuccessful) throw IOException("Unexpected code $response")

        for ((name, value) in response.headers) {
          println("$name: $value")
        }

        println(response.body!!.string())
      }
    }
  })
复制代码
三、源码简析
通过上面简单使用不难知道,OkHttp网络请求大致可以分为创建 构建client、构建request、执行请求几步。
构建对象
- OkHttpClient
OkHttpClient可以通过如下2种方式构建:
// 直接 new
val client = OkHttpClient()

// 建造者模式
val client = OkHttpClient.Builder().build()
复制代码
构建出来的 client 包含以下属性,主要是调度器、链接池、拦截器等等
internal var dispatcher: Dispatcher = Dispatcher()
internal var connectionPool: ConnectionPool = ConnectionPool()
internal val interceptors: MutableList<Interceptor> = mutableListOf()
internal val networkInterceptors: MutableList<Interceptor> = mutableListOf()
internal var eventListenerFactory: EventListener.Factory = EventListener.NONE.asFactory()
internal var retryOnConnectionFailure = true
internal var authenticator: Authenticator = Authenticator.NONE
internal var followRedirects = true
internal var followSslRedirects = true
internal var cookieJar: CookieJar = CookieJar.NO_COOKIES
internal var cache: Cache? = null
internal var dns: Dns = Dns.SYSTEM
internal var proxy: Proxy? = null
internal var proxySelector: ProxySelector? = null
internal var proxyAuthenticator: Authenticator = Authenticator.NONE
internal var socketFactory: SocketFactory = SocketFactory.getDefault()
internal var sslSocketFactoryOrNull: SSLSocketFactory? = null
internal var x509TrustManagerOrNull: X509TrustManager? = null
internal var connectionSpecs: List<ConnectionSpec> = DEFAULT_CONNECTION_SPECS
internal var protocols: List<Protocol> = DEFAULT_PROTOCOLS
internal var hostnameVerifier: HostnameVerifier = OkHostnameVerifier
internal var certificatePinner: CertificatePinner = CertificatePinner.DEFAULT
internal var certificateChainCleaner: CertificateChainCleaner? = null
internal var callTimeout = 0
internal var connectTimeout = 10_000
internal var readTimeout = 10_000
internal var writeTimeout = 10_000
internal var pingInterval = 0
复制代码
Dispatcher:
- 包含了2个异步双端队列和1个双端队列,异步 readyAsyncCalls(准备执行)、异步 runningAsyncCalls(执行中)、同步 runningSyncCalls(执行中)和一个线程池executorService。
- maxRequests 最大并发数64
- maxRequestsPerHost 单个HOST最大并发数5
- Request 通过Request.Builder构建请求信息,包括url、请求方式、请求头、body等等
val formBody = FormBody.Builder()
      .add("search", "Jurassic Park")
      .build()
  val request = Request.Builder()
      .url("https://en.wikipedia.org/w/index.php")
      .post(formBody)
      .build()
复制代码
internal var url: HttpUrl? = null
internal var method: String
internal var headers: Headers.Builder
internal var body: RequestBody? = null

/** A mutable map of tags, or an immutable empty map if we don't have any. */
internal var tags: MutableMap<Class<*>, Any> = mutableMapOf()
复制代码
请求流程
构建好client和request后,通过newCall方法得到Call对象,调用execute或enqueue发起网络请求。
/** Prepares the [request] to be executed at some point in the future. */
override fun newCall(request: Request): Call {
  return RealCall.newRealCall(this, request, forWebSocket = false)
}

companion object {
  fun newRealCall(
    client: OkHttpClient,
    originalRequest: Request,
    forWebSocket: Boolean
  ): RealCall {
    // Safely publish the Call instance to the EventListener.
    return RealCall(client, originalRequest, forWebSocket).apply {
      // 发射器
      transmitter = Transmitter(client, this)
    }
  }
}
复制代码
Transmitter:OkHttp的应用程序和网络层之间的桥梁。可以对call进行处理,也包含了事件监听和connect的一些操作。
execute流程
通过 client.newCall.execute 即可发起同步请求,此方法会返回 Response(响应结果)
- execute
override fun execute(): Response {
  synchronized(this) {
    // 检查是否在执行,在执行抛出 IllegalStateException
    check(!executed) { "Already Executed" }
    executed = true
  }
  transmitter.timeoutEnter()
  transmitter.callStart()
  try {
    // 开始调度, 加入runningSyncCalls队列
    client.dispatcher.executed(this)
    // 通过拦截器链获取响应结果
    return getResponseWithInterceptorChain()
  } finally {
    // 完成调度
    client.dispatcher.finished(this)
  }
}
复制代码
- getResponseWithInterceptorChain
@Throws(IOException::class)
fun getResponseWithInterceptorChain(): Response {
  // 把所有拦截器都添加到interceptors.
  val interceptors = mutableListOf<Interceptor>()
  // 自定义拦截器,所有请求
  interceptors += client.interceptors
  // 重试重定向拦截器:主要负责失败重连工作,根据状态码等判断是否重连
  interceptors += RetryAndFollowUpInterceptor(client)
  // 桥接拦截器:处理请求头信息,cookie、gzip等,构建真正的Request
  interceptors += BridgeInterceptor(client.cookieJar)
  // 缓存拦截器:有缓存且符合条件就是用缓存
  interceptors += CacheInterceptor(client.cache)
  // 连接服务拦截器:打开一个到目标服务器的connection并调用下一个拦截器
  interceptors += ConnectInterceptor
  if (!forWebSocket) {
    // 非WebSocket请求,添加的自定义连接器
    interceptors += client.networkInterceptors
  }
  // 调用服务器拦截器:发起真正的请求
  interceptors += CallServerInterceptor(forWebSocket)

  // 构建连接器链(责任链模式)
  // 0 为开始执行的index
  val chain = RealInterceptorChain(interceptors, transmitter, null, 0, originalRequest, this,
      client.connectTimeoutMillis, client.readTimeoutMillis, client.writeTimeoutMillis)

  var calledNoMoreExchanges = false
  try {
    // 执行拦截器链
    val response = chain.proceed(originalRequest)
    if (transmitter.isCanceled) {
      response.closeQuietly()
      throw IOException("Canceled")
    }
    return response
  } catch (e: IOException) {
    calledNoMoreExchanges = true
    throw transmitter.noMoreExchanges(e) as Throwable
  } finally {
    if (!calledNoMoreExchanges) {
      transmitter.noMoreExchanges(null)
    }
  }
}
复制代码
- proceed
@Throws(IOException::class)
fun proceed(request: Request, transmitter: Transmitter, exchange: Exchange?): Response {
  if (index >= interceptors.size) throw AssertionError()

  calls++

  // If we already have a stream, confirm that the incoming request will use it.
  check(this.exchange == null || this.exchange.connection()!!.supportsUrl(request.url)) {
    "network interceptor ${interceptors[index - 1]} must retain the same host and port"
  }

  // If we already have a stream, confirm that this is the only call to chain.proceed().
  check(this.exchange == null || calls <= 1) {
    "network interceptor ${interceptors[index - 1]} must call proceed() exactly once"
  }

  // Call the next interceptor in the chain.
  // 调用链中的下一个拦截器  index + 1
  val next = RealInterceptorChain(interceptors, transmitter, exchange,
      index + 1, request, call, connectTimeout, readTimeout, writeTimeout)
  val interceptor = interceptors[index]

  // 拦截
  @Suppress("USELESS_ELVIS")
  val response = interceptor.intercept(next) ?: throw NullPointerException(
      "interceptor $interceptor returned null")

  // Confirm that the next interceptor made its required call to chain.proceed().
  check(exchange == null || index + 1 >= interceptors.size || next.calls == 1) {
    "network interceptor $interceptor must call proceed() exactly once"
  }

  check(response.body != null) { "interceptor $interceptor returned a response with no body" }

  return response
}
复制代码
可以看出execute流程还是挺简单的,就是加入Dispatcher的runningSyncCalls队列然后通过一系列拦截器操作得到Response,至此execute流程就分析完毕。
enqueue流程
通过 client.newCall.enqueue(callback) 即可发起异步请求,通过callback回调方法会返回结果。
- enqueue
override fun enqueue(responseCallback: Callback) {
  // 检查是否在执行,在执行抛出 IllegalStateException
  synchronized(this) {
    check(!executed) { "Already Executed" }
    executed = true
  }
  transmitter.callStart()
  // 构建AsyncCall并调度入队
  client.dispatcher.enqueue(AsyncCall(responseCallback))
}
复制代码
- enqueue 传入AsyncCall放入readyAsyncCalls准备队列,执行下一步操作。
internal fun enqueue(call: AsyncCall) {
  synchronized(this) {
    // 加入异步等待队列
    readyAsyncCalls.add(call)

    // Mutate the AsyncCall so that it shares the AtomicInteger of an existing running call to
    // the same host.
    if (!call.get().forWebSocket) {
      val existingCall = findExistingCallWithHost(call.host())
      if (existingCall != null) call.reuseCallsPerHostFrom(existingCall)
    }
  }
  // 实际推动和执行
  promoteAndExecute()
}
复制代码
- promoteAndExecute
/**
 * Promotes eligible calls from [readyAsyncCalls] to [runningAsyncCalls] and runs them on the
 * executor service. Must not be called with synchronization because executing calls can call
 * into user code.
 *
 * @return true if the dispatcher is currently running calls.
 */
private fun promoteAndExecute(): Boolean {
  this.assertThreadDoesntHoldLock()

  // 可执行的call集合
  val executableCalls = mutableListOf<AsyncCall>()
  val isRunning: Boolean
  synchronized(this) {
    val i = readyAsyncCalls.iterator()
    while (i.hasNext()) {
      val asyncCall = i.next()

      // 判断调度器中的2个最大限制
      if (runningAsyncCalls.size >= this.maxRequests) break // Max capacity.
      if (asyncCall.callsPerHost().get() >= this.maxRequestsPerHost) continue // Host max capacity.

      i.remove()
      asyncCall.callsPerHost().incrementAndGet()
      executableCalls.add(asyncCall)
      runningAsyncCalls.add(asyncCall)
    }
    isRunning = runningCallsCount() > 0
  }

  for (i in 0 until executableCalls.size) {
    val asyncCall = executableCalls[i]
    // 通过AsyncCall.executeOn执行
    asyncCall.executeOn(executorService)
  }

  return isRunning
}
复制代码
- AsyncCall AsyncCall 实现 Runnable,promoteAndExecute中调用 executeOn 执行 这个 call。
internal inner class AsyncCall(
  private val responseCallback: Callback
) : Runnable {
  @Volatile private var callsPerHost = AtomicInteger(0)

  ...

  /**
   * Attempt to enqueue this async call on [executorService]. This will attempt to clean up
   * if the executor has been shut down by reporting the call as failed.
   */
  fun executeOn(executorService: ExecutorService) {
    client.dispatcher.assertThreadDoesntHoldLock()

    var success = false
    try {
      // 线程池执行这个Runnable
      executorService.execute(this)
      success = true
    } catch (e: RejectedExecutionException) {
      val ioException = InterruptedIOException("executor rejected")
      ioException.initCause(e)
      transmitter.noMoreExchanges(ioException)
      // 通过callback回调失败
      responseCallback.onFailure(this@RealCall, ioException)
    } finally {
      if (!success) {
        // 调度完成
        client.dispatcher.finished(this) // This call is no longer running!
      }
    }
  }

  override fun run() {
    threadName("OkHttp ${redactedUrl()}") {
      var signalledCallback = false
      transmitter.timeoutEnter()
      try {
         // 从此和同步请求一样,通过拦截器链获取响应结果
        val response = getResponseWithInterceptorChain()
        signalledCallback = true
        // 通过callback回调成功
        responseCallback.onResponse(this@RealCall, response)
      } catch (e: IOException) {
        if (signalledCallback) {
          // Do not signal the callback twice!
          Platform.get().log("Callback failure for ${toLoggableString()}", INFO, e)
        } else {
          // 通过callback回调失败
          responseCallback.onFailure(this@RealCall, e)
        }
      } catch (t: Throwable) {
        cancel()
        if (!signalledCallback) {
          val canceledException = IOException("canceled due to $t")
          canceledException.addSuppressed(t)
          // 通过callback回调失败
          responseCallback.onFailure(this@RealCall, canceledException)
        }
        throw t
      } finally {
        // 调度完成
        client.dispatcher.finished(this)
      }
    }
  }
}
复制代码
可以看出enqueue流程相比较,enqueue是转换为AysncCall,先加入Dispatcher的readyAsyncCalls队列,然后通过xx判断获取出可执行的call并放入runningAsyncCalls,然后通过线程池执行,最后通过一系列拦截器操作得到Response,至此enqueue流程就分析完毕。
拦截器
上面把 OkHttp 同步和异步请求的流程大致梳理了,然而我们并没有看到是怎么发起请求的,其实这一切都在interceptors之中。
在getResponseWithInterceptorChain中我们看到interceptors 的添加顺序,可以知道先添加的先执行。如果没有networkInterceptors或者是WebSocket,基本最后执行的是自带的5个拦截器RetryAndFollowUpInterceptor、BridgeInterceptor、CacheInterceptor、ConnectInterceptor、CallServerInterceptor。
ConnectInterceptor
object ConnectInterceptor : Interceptor {

  @Throws(IOException::class)
  override fun intercept(chain: Interceptor.Chain): Response {
    val realChain = chain as RealInterceptorChain
    val request = realChain.request()
    val transmitter = realChain.transmitter()

    // We need the network to satisfy this request. Possibly for validating a conditional GET.
    val doExtensiveHealthChecks = request.method != "GET"
    // 通过Transmitter获取一个新的Exchange
    val exchange = transmitter.newExchange(chain, doExtensiveHealthChecks)
    // 执行proceed
    return realChain.proceed(request, transmitter, exchange)
  }
}
复制代码
跟踪newExchange -> find -> findHealthyConnection -> findConnection 获取真实的RealConnection
/**
 * Returns a connection to host a new stream. This prefers the existing connection if it exists,
 * then the pool, finally building a new connection.
 */
@Throws(IOException::class)
private fun findConnection(
  connectTimeout: Int,
  readTimeout: Int,
  writeTimeout: Int,
  pingIntervalMillis: Int,
  connectionRetryEnabled: Boolean
): RealConnection {
  var foundPooledConnection = false
  var result: RealConnection? = null
  var selectedRoute: Route? = null
  var releasedConnection: RealConnection?
  val toClose: Socket?
  synchronized(connectionPool) {
    if (transmitter.isCanceled) throw IOException("Canceled")
    hasStreamFailure = false // This is a fresh attempt.

    releasedConnection = transmitter.connection
    toClose = if (transmitter.connection != null && transmitter.connection!!.noNewExchanges) {
      transmitter.releaseConnectionNoEvents()
    } else {
      null
    }

    if (transmitter.connection != null) {
      // We had an already-allocated connection and it's good.
      // 已经有一个分配好的connection,复用
      result = transmitter.connection
      releasedConnection = null
    }

    if (result == null) {
      // Attempt to get a connection from the pool.
      if (connectionPool.transmitterAcquirePooledConnection(address, transmitter, null, false)) {
        foundPooledConnection = true
        result = transmitter.connection
      } else if (nextRouteToTry != null) {
        selectedRoute = nextRouteToTry
        nextRouteToTry = null
      } else if (retryCurrentRoute()) {
        selectedRoute = transmitter.connection!!.route()
      }
    }
  }
  toClose?.closeQuietly()

  if (releasedConnection != null) {
    eventListener.connectionReleased(call, releasedConnection!!)
  }
  if (foundPooledConnection) {
    eventListener.connectionAcquired(call, result!!)
  }
  if (result != null) {
    // If we found an already-allocated or pooled connection, we're done.
    // connection 不为null, 直接返回
    return result!!
  }

  // If we need a route selection, make one. This is a blocking operation.
  var newRouteSelection = false
  if (selectedRoute == null && (routeSelection == null || !routeSelection!!.hasNext())) {
    newRouteSelection = true
    routeSelection = routeSelector.next()
  }

  var routes: List<Route>? = null
  synchronized(connectionPool) {
    if (transmitter.isCanceled) throw IOException("Canceled")

    if (newRouteSelection) {
      // Now that we have a set of IP addresses, make another attempt at getting a connection from
      // the pool. This could match due to connection coalescing.
      routes = routeSelection!!.routes
      if (connectionPool.transmitterAcquirePooledConnection(
              address, transmitter, routes, false)) {
        foundPooledConnection = true
        result = transmitter.connection
      }
    }

    if (!foundPooledConnection) {
      if (selectedRoute == null) {
        selectedRoute = routeSelection!!.next()
      }

      // Create a connection and assign it to this allocation immediately. This makes it possible
      // for an asynchronous cancel() to interrupt the handshake we're about to do.
      // 创建一个 RealConnection
      result = RealConnection(connectionPool, selectedRoute!!)
      connectingrouteSelection = result
    }
  }

  // If we found a pooled connection on the 2nd time around, we're done.
  if (foundPooledConnection) {
    eventListener.connectionAcquired(call, result!!)
    // 如果在routeSelection中找到了connection,直接返回
    return result!!
  }

  // Do TCP + TLS handshakes. This is a blocking operation.
  // 做 TCP + TLS 握手,这是一个阻塞操作
  result!!.connect(
      connectTimeout,
      readTimeout,
      writeTimeout,
      pingIntervalMillis,
      connectionRetryEnabled,
      call,
      eventListener
  )
  connectionPool.routeDatabase.connected(result!!.route())

  var socket: Socket? = null
  synchronized(connectionPool) {
    connectingConnection = null
    // Last attempt at connection coalescing, which only occurs if we attempted multiple
    // concurrent connections to the same host.
    if (connectionPool.transmitterAcquirePooledConnection(address, transmitter, routes, true)) {
      // We lost the race! Close the connection we created and return the pooled connection.
      result!!.noNewExchanges = true
      socket = result!!.socket()
      result = transmitter.connection

      // It's possible for us to obtain a coalesced connection that is immediately unhealthy. In
      // that case we will retry the route we just successfully connected with.
      nextRouteToTry = selectedRoute
    } else {
      //放入连接池
      connectionPool.put(result!!)
      transmitter.acquireConnectionNoEvents(result!!)
    }
  }
  socket?.closeQuietly()

  eventListener.connectionAcquired(call, result!!)
  return result!!
}
复制代码
通过 result!!.connect -> Platform.get().connectSocket 根据平台发起Socket连接
/** Does all the work necessary to build a full HTTP or HTTPS connection on a raw socket. */
@Throws(IOException::class)
private fun connectSocket(
  connectTimeout: Int,
  readTimeout: Int,
  call: Call,
  eventListener: EventListener
) {
  val proxy = route.proxy
  val address = route.address

  val rawSocket = when (proxy.type()) {
    Proxy.Type.DIRECT, Proxy.Type.HTTP -> address.socketFactory.createSocket()!!
    else -> Socket(proxy)
  }
  this.rawSocket = rawSocket

  eventListener.connectStart(call, route.socketAddress, proxy)
  rawSocket.soTimeout = readTimeout
  try {
    // 根据平台进行连接,下面附上相关平台图
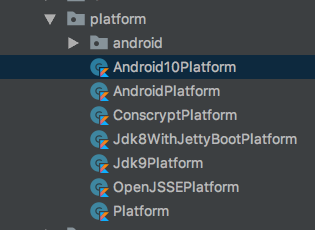
    Platform.get().connectSocket(rawSocket, route.socketAddress, connectTimeout)
  } catch (e: ConnectException) {
    throw ConnectException("Failed to connect to ${route.socketAddress}").apply {
      initCause(e)
    }
  }

  // The following try/catch block is a pseudo hacky way to get around a crash on Android 7.0
  // More details:
  // https://github.com/square/okhttp/issues/3245
  // https://android-review.googlesource.com/#/c/271775/
  try {
    source = rawSocket.source().buffer()
    sink = rawSocket.sink().buffer()
  } catch (npe: NullPointerException) {
    if (npe.message == NPE_THROW_WITH_NULL) {
      throw IOException(npe)
    }
  }
}
复制代码

至此 ConnectInterceptor 所做的连接操作完成,然后通过 ConnectInterceptor 发送真正的网络请求,构建Resposne.Builder对象,然后构建Response并返回。
个人理解拦截器处理是一个U型结构,一个接一个处理,然后返回给上一个上一个直到返回Response。大概就是下面这样:

四、总结
整个流程简单描述就是,首先获取OkHttpClient对象,通过newCall获取到真正的Call,然后根据需要发起同步或异步请求,然后通过getResponseWithInterceptorChain进行一系列的拦截器操作,获取到响应Response数据。
本人对比了OkHttp3.14和OkHttp4.2.2的流程相同,OkHttp简单流程分析就结束了!
- 本文标签: DNS 调度器 NIO IDE stream Select 源码 client Atom 线程 synchronized 代码 zip final https ACE executor 数据 retry Android ssl build queue find cookies GitHub java volatile git http cache UI 缓存 App 服务器 Connection message tar id Google tag list ip ECS ORM map Proxy CTO PHP 同步 线程池 IO FIT 并发 value tab src Service cat 连接池 TCP web 总结
- 版权声明: 本文为互联网转载文章,出处已在文章中说明(部分除外)。如果侵权,请联系本站长删除,谢谢。
- 本文海报: 生成海报一 生成海报二


![[HBLOG]公众号](https://www.liuhaihua.cn/img/qrcode_gzh.jpg)

