微服务ServiceComb入门案例

喜欢就点关注吧!

作者 | zengdongwen
本文转载自:
https://blog.csdn.net/zengdongwen/article/details/93486257
最近在学习中,接触到了ServiceComb,第一看到这个有点陌生,因为之前所了解的有关微服务的最多的就是Spring Boot+Spring Cloud了。下面简单的介绍一下ServiceComb:
ServiceComb是华为2017年开源的微服务框架,ServiceComb在华为内部的实践中沉淀了丰富的企业级应用开发经验,该项目已于2017年12月进入Apache孵化器。注意:ServiceComb是华为开源的,华为确实很厉害啊。华为把他贡献给了Apache,现在已经成为了Apache的顶级项目。Apache ServiceComb的官网地址: http://servicecomb.apache.org/cn/ (注意:官网提供中文版哦,对于英语不好的朋友,这是一个福音,毕竟是咱中国人自己开发的啊)。
微服务开发的方式主要有以下三种:
-
dubbo+zookeeper
-
spring boot+spring cloud
-
ServiceComb
那么,ServiceComb和Spring cloud相比有什么优点呢?
主要的优点有以下几点:
-
ServiceComb支持的通信协议比SpringCloud多。ServiceComb支持多种通信协议, Rest、Highway(RPC)等
SpringCloud仅支持Rest。
-
相比SpringCloud的Rest协议,Highway(RPC)协议性能更高,Highway是基于二进制的序列化方式传输数
据,采用二进制编码的系统的性能远高于采用文本的HTTP协议。
-
ServiceComb的商业版本CSE相比SpringCloud不仅提供了微服务开发框架,还提供了微服务云部署,管理、治
理等一站式解决方案。
-
还有这是中国人开发的,官网都提供了中文文档,对于我们学习者来说这也是一大好处啊。
下面我们就通过一个简单的入门案例来学习ServiceComb:
为了能够使开发者可以快速构建ServiceComb应用程序,为我们提供了一套脚手架,这样能够方便学习者及应用开发者快速入门,同时极大的提高了效率。
访问快速开发引导页: http://start.servicecomb.io/
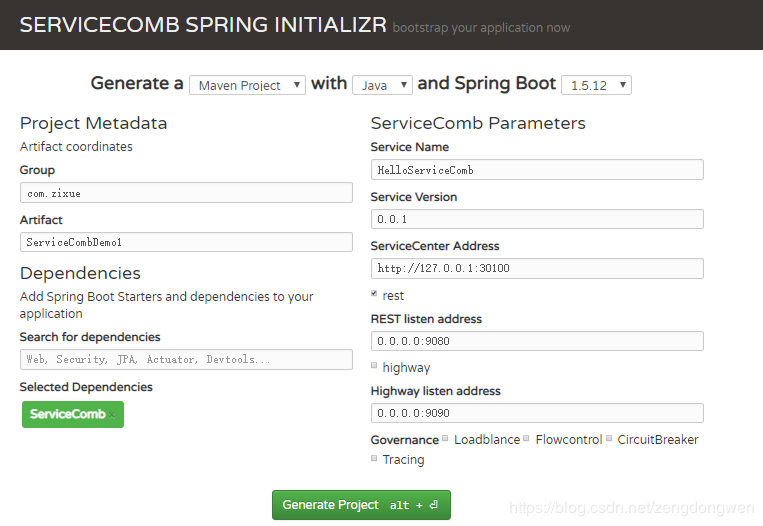
后面我们就可以填写工程相关内容,最后就可以生成代码了。
解压工程,导入到Idea工具中,然后编写自己的业务代码就可以了。
上面的方式更快速,更简单的创建一个ServiceComb的案例,但是我觉得要更好的了解,就应该从零开始,一步一步的去搭建工程,编写代码,所以下面就开始一步一步的来实现:
开发环境:
-
IDEA
-
JDK1.8以上
-
maven 3.3.0以上
首先我们需要下载官网提供的注册中心,下载地址:
http://servicecomb.apache.org/cn/release/ ,下载如下:
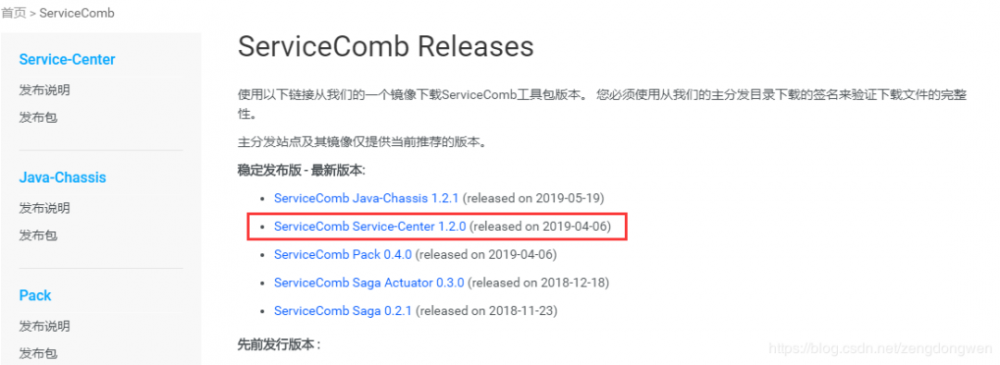
下载到本地后,解压(不要解压到中文目录下),目录结构如下:
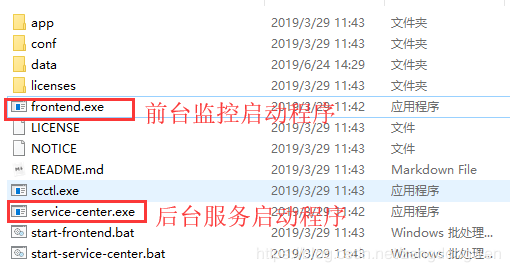
建议每次都启动这两个程序。
前台访问地址:http://127.0.0.1:30103
后台地址是:http://127.0.0.1:30100
下面进行工程的创建:
1、创建父工程HelloWorldDemo
1.1在IDEA开发工具中,点击file -> new -> project
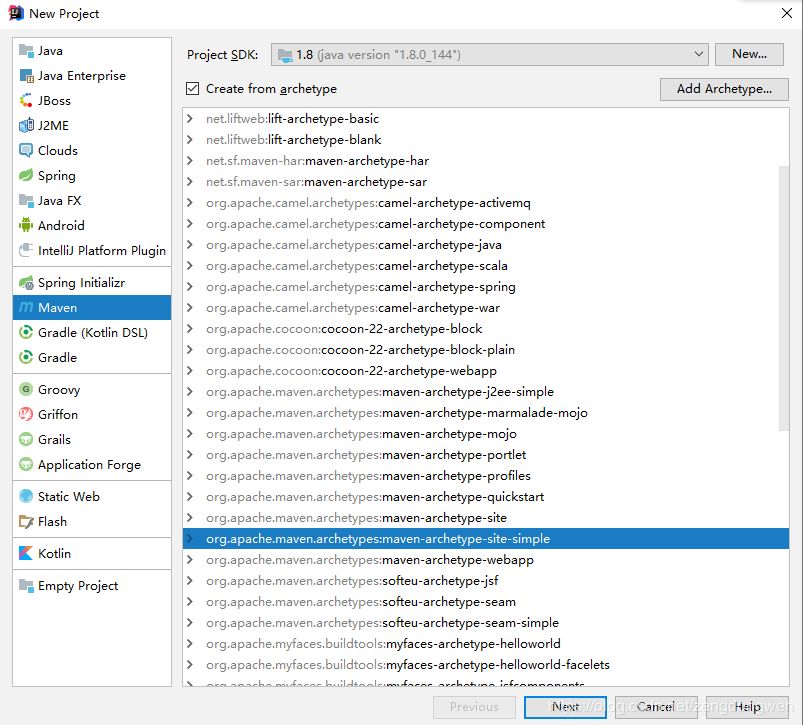
1.2 点击next进入下一步,填写好GroupId和ArtifactId,继续点击next进入下一步,进入maven的配置:

1.3 配置好自己的maven,然后点击next,直到finish即可。我这里只讲了重要的部分,其他的创建我相信大家都知道,如果不清楚的自行查找资料。
在pom.xml文件中添加如下的依赖:
<parent>
<groupId>org.springframework.boot</groupId>
<artifactId>spring-boot-starter-parent</artifactId>
<version>1.5.12.RELEASE</version>
<relativePath/> <!-- lookup parent from repository -->
</parent>
<properties>
<project.build.sourceEncoding>UTF-8</project.build.sourceEncoding>
<project.reporting.outputEncoding>UTF-8</project.reporting.outputEncoding>
<java.version>1.8</java.version>
</properties>
<!--1.实现pom文件导入-->
<dependencyManagement>
<dependencies>
<dependency>
<groupId>org.apache.servicecomb</groupId>
<artifactId>java-chassis-dependencies</artifactId>
<version>1.0.0-m2</version>
<type>pom</type>
<scope>import</scope>
</dependency>
</dependencies>
</dependencyManagement>
<build>
<plugins>
<plugin>
<groupId>org.springframework.boot</groupId>
<artifactId>spring-boot-maven-plugin</artifactId>
</plugin>
</plugins>
</build>
2、创建api接口模块
2.1 我们在父工程的基础上,创建一个api的接口工程,步骤如下:
选择父工程的基础上,点击file -> new -> module,选择maven,直接点击next(不需要选择骨架),然后填写ArtifactId:hello-world-api,点击next,直到finish即可。工程结构如下:
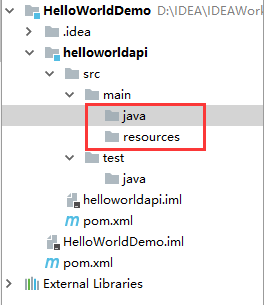
这个时候的java和resources没有表明是源代码和配置文件资源目录,我们需要手动转一下,右击java,会出现如下列表:
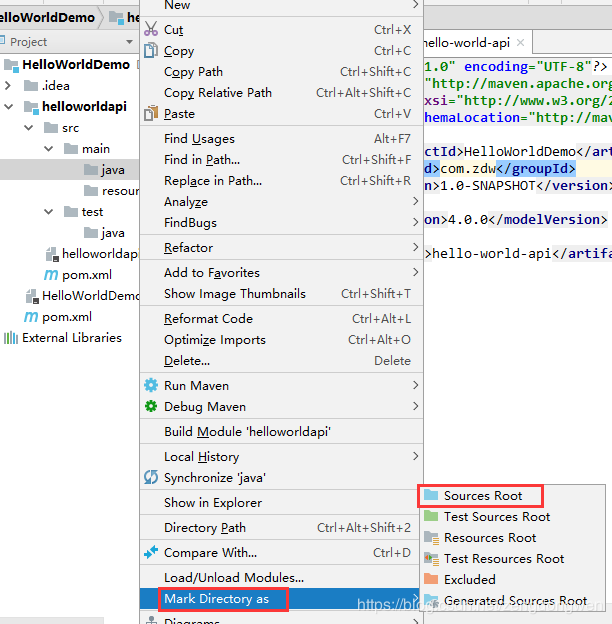
我们选择第一个Sources Root,同理,resources目录也是右击,然后选择Resouces Root,操作完成之后,目录变化如下:
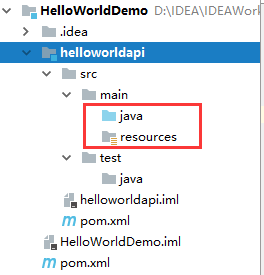
注意:之后我们创建的其他工程,都需要进行这一步操作,需要自行去操作完成,不再赘述步骤。
2.2 然后,我们就在api工程中添加一个接口:
创建一个包:com.zdw.helloworld.api
创建一个接口:HelloWorldInterfaces,内容如下:
package com.zdw.helloworld.api;
/**
* Create By zdw on 2019/6/24
*/
public interface HelloWorldInterfaces {
String sayHello(String name);
}
我们要把api工程执行install,安装到本地,因为接下来我们的其他工程要依赖这个工程的。
注意,执行install命令的时候,我们先把父工程的pom文件中的<build> 部分注释掉,否则会失败,执行完install之后再放开。
3、创建服务提供者模块provider
3.1 跟上面的一样,在父工程创建一个模块: hello-world-provider
3.2 在模块的pom.xml文件中,添加如下依赖:
<dependencies>
<!--hibernate校验规则-->
<dependency>
<groupId>org.hibernate</groupId>
<artifactId>hibernate-validator</artifactId>
</dependency>
<!--rest支持-->
<dependency>
<groupId>org.springframework.boot</groupId>
<artifactId>spring-boot-starter-data-rest</artifactId>
</dependency>
<!--ServiceComb提供的支持-->
<dependency>
<groupId>org.apache.servicecomb</groupId>
<artifactId>spring-boot-starter-provider</artifactId>
</dependency>
<!--springboot与web整合-->
<dependency>
<groupId>org.springframework.boot</groupId>
<artifactId>spring-boot-starter-web</artifactId>
</dependency>
<dependency>
<groupId>com.zdw</groupId>
<artifactId>hello-world-api</artifactId>
<version>1.0-SNAPSHOT</version>
</dependency>
</dependencies>
3.3 在resources目录下面创建microservice.yaml配置文件,里面的内容如下:
APPLICATION_ID: helloworlddemo
service_description:
name: demo-provider
version: 1.0.0
servicecomb:
rest:
address: 0.0.0.0:9000
service:
registry:
address: http://127.0.0.1:30100
3.4 创建启动类:
package com.zdw.helloworld;
import org.apache.servicecomb.springboot.starter.provider.EnableServiceComb;
import org.springframework.boot.SpringApplication;
import org.springframework.boot.autoconfigure.SpringBootApplication;
/**
* Create By zdw on 2019/6/24
*/
@SpringBootApplication
@EnableServiceComb
public class ProviderApplication {
public static void main(String[] args) {
SpringApplication.run(ProviderApplication.class,args);
}
}
我们会发现,这个启动类比以前我们接触的SpringBoot的启动类多了一个注解:@EnableServiceComb,这个注解的作用就是表明这是ServiceComb应用,启用java.chassis核心功能。很重要的一个注解。
3.5 创建业务类:
package com.zdw.helloworld.controller;
import com.zdw.helloworld.api.HelloWorldInterfaces;
import org.apache.servicecomb.provider.rest.common.RestSchema;
import org.springframework.web.bind.annotation.GetMapping;
import org.springframework.web.bind.annotation.RequestMapping;
/**
* Create By zdw on 2019/6/24
*/
@RequestMapping("/")
@RestSchema(schemaId = "providerController")
public class ProviderController implements HelloWorldInterfaces {
@GetMapping("hello")
@Override
public String sayHello(String name) {
System.out.println("名称是:"+name);
return "请求成功,返回名称:"+name;
}
}
注意:@RestSchema这个注解是为了表明该应用使用的rest协议,还有一种是RPC协议,对应的注解是:@RpcSchema,这个里面的schemaId保证唯一即可。
此时,我们已经可以启动服务提供者,在浏览器上进行测试了。不过我们要先启动本地注册中心。
4、创建消费者工程
4.1 在父工程的基础上创建消费者模块: hello-world-consumer
4.2 pom.xml文件添加如下依赖:
<dependencies>
<!--hibernate校验规则-->
<dependency>
<groupId>org.hibernate</groupId>
<artifactId>hibernate-validator</artifactId>
</dependency>
<!--rest支持-->
<dependency>
<groupId>org.springframework.boot</groupId>
<artifactId>spring-boot-starter-data-rest</artifactId>
</dependency>
<!--ServiceComb提供的支持-->
<dependency>
<groupId>org.apache.servicecomb</groupId>
<artifactId>spring-boot-starter-provider</artifactId>
</dependency>
<!--springboot与web整合-->
<dependency>
<groupId>org.springframework.boot</groupId>
<artifactId>spring-boot-starter-web</artifactId>
</dependency>
<dependency>
<groupId>com.zdw</groupId>
<artifactId>hello-world-api</artifactId>
<version>1.0-SNAPSHOT</version>
</dependency>
</dependencies>
4.3 在resources目录下创建配置文件microservice.yaml,内容如下:
APPLICATION_ID: helloworlddemo
service_description:
name: demo-consumer
version: 1.0.0
servicecomb:
rest:
address: 0.0.0.0:9001
service:
registry:
address: http://127.0.0.1:30100 #本地注册中心的地址
4.4 创建启动类:
package com.zdw.helloworld;
import org.apache.servicecomb.springboot.starter.provider.EnableServiceComb;
import org.springframework.boot.SpringApplication;
import org.springframework.boot.autoconfigure.SpringBootApplication;
/**
* Create By zdw on 2019/6/24
*/
@SpringBootApplication
@EnableServiceComb
public class ConsumerApplication {
public static void main(String[] args) {
SpringApplication.run(ConsumerApplication.class,args);
}
}
4.5 创建业务代码类:
这里有两种方式:第一种是通过rest方式来调用服务提供者的服务,第二种是通过rpc方式来调用服务提供者的服务。这里也说明了ServiceComb的强大之处,我们知道,在服务提供者提供端,我们声明的Rest协议的,但是我们调用的时候,并不仅限于Rest协议,同样可以使用rpc协议来调用,下面依次讲解:
4.5.1 Rest协议调用服务
package com.zdw.helloworld.controller;
import org.apache.servicecomb.provider.rest.common.RestSchema;
import org.apache.servicecomb.provider.springmvc.reference.RestTemplateBuilder;
import org.springframework.web.bind.annotation.GetMapping;
import org.springframework.web.bind.annotation.RequestMapping;
import org.springframework.web.client.RestTemplate;
/**
* Create By zdw on 2019/6/24
*/
@RestSchema(schemaId = "consumerController")
@RequestMapping("/")
public class ConsumerController {
//定义远程访问的RestTemplate
private final RestTemplate restTemplate = RestTemplateBuilder.create();
@GetMapping("request")
public String sayHello(String name){
//service url is : cse://serviceName/operation
// provider是 serviceprovider项目中的microservice.yaml 里面的name 微服务名称
String serviceName = "demo-provider";
String result = restTemplate.getForObject("cse://" + serviceName + "/hello?name=" + name, String.class);
return result;
}
}
测试:启动本地注册中心,启动服务者,启动消费者,访问地址:http://localhost:9001/request?name=aa
我们还可以通过前台控制页面查看:http://127.0.0.1:30103

4.5.2 Rpc协议调用
我们重新定义一个新的业务代码类:RpcConsumerController
package com.zdw.helloworld.controller;
import com.zdw.helloworld.api.HelloWorldInterfaces;
import org.apache.servicecomb.provider.pojo.RpcReference;
import org.apache.servicecomb.provider.pojo.RpcSchema;
import org.apache.servicecomb.provider.rest.common.RestSchema;
import org.springframework.web.bind.annotation.GetMapping;
import org.springframework.web.bind.annotation.RequestMapping;
/**
* Create By zdw on 2019/6/24
*/
@RpcSchema(schemaId = "rpcConsumerController")
@RequestMapping("/rpc")
public class RpcConsumerController {
//通过Rpc协议远程调用rest协议的接口,
// microserviceName是微服务提供者的名称,在服务提供者的microservice.yaml文件中配置的service_description:name
// schemaId是微服务提供者的schemaId,在服务提供者的controller定义的时候有
@RpcReference(microserviceName = "demo-provider",schemaId = "providerController")
HelloWorldInterfaces helloWorldInterfaces;
@GetMapping("/request")
public String sayHello(String name){
String hello = helloWorldInterfaces.sayHello(name);
return hello;
}
}
当我们再次启动消费者工程的时候,发现启动报错了,主要错误如下:
Caused by: java.lang.IllegalStateException: There is a schema only existing in local microservice: [rpcConsumerController], which means there are interfaces changed. You need to increment microservice version before deploying, or you can configure service_description.environment=development to work in development environment and ignore this error
这说明我们之前已经注册过该服务到注册中心,现在服务有了变动,需要我们去处理。最简单的方式就是,我们到本地注册中心的目录下,删除data文件夹,然后重新启动本地注册中心。然后我们再次启动服务提供者和消费者,发现启动成功。
此时我们访问地址:http://localhost:9001/rpc/request?name=aa也可以得到正确的结果。
同时之前的访问地址:http://localhost:9001/request?name=aa也是可以的。
入门案例到这里就告一段落了,是不是觉得很简单啊,哈哈。不过我还遇到过一个坑,这里也简单说明一下。当我们在microservice.yaml文件中配置:rest: address: 0.0.0.0:9000 的时候,一定要保证端口是不被占用的,如果是占用话,会出现以下错误:此时我配置的是8080
Caused by: org.apache.servicecomb.foundation.common.exceptions.ServiceCombException: all transport named rest refused to init.
所以如果出现了上述的错误,我们就要看看是不是端口被占用了。

对开源开发、微服务感兴趣的小伙伴
欢迎扫左边二维码
联系ServiceComb小助手
咱们一起做点有意思的事情~

在看点一下 BUG少一个


戳原文,了解更多ServiceComb小知识!
- 本文标签: web https 配置 注释 开发 build Service bug apache ip 安装 代码 dependencies schema Transport springboot 远程访问 pom map SDN REST 企业 下载 validator 2019 java maven zookeeper API 二维码 consumer ACE Spring Boot 部署 spring 端口 cat 管理 SpringMVC provider 删除 id 微服务 目录 测试 description IDE XML dubbo http HTTP协议 注册中心 云 协议 tar 开发者 HTML 开源 src IO Spring cloud root UI App final client plugin springcloud
- 版权声明: 本文为互联网转载文章,出处已在文章中说明(部分除外)。如果侵权,请联系本站长删除,谢谢。
- 本文海报: 生成海报一 生成海报二


![[HBLOG]公众号](https://www.liuhaihua.cn/img/qrcode_gzh.jpg)

