Spring Boot自动装配原理和源码分析
该篇的主要内容
- Spring Boot的自动装配原理【有案例模拟】
- Spring Boot自动装配源码分析
SpringBoot中的自动装载原理
SpringBoot具备开箱即用的特点,它默默的帮我们做了很多事情【自动创建和装配很多对象】
自动装配的实现
主要是通过ImportSelector接口完成的自动装配
ImportSelector
ImportSelector接口是Spring导入外部配置的核心接口,在SpringBoot的自动化配置和@EnableXXX(功能性注解)中起到了决定性的作用。当在@Configuration标注的Class上使用@Import引入了一个 ImportSelector实现类后,会把实现类中返回的Class名称都定义为bean。
package org.springframework.context.annotation;

import org.springframework.core.type.AnnotationMetadata;

public interface ImportSelector {

	/**
	 * Select and return the names of which class(es) should be imported based on
	 * the {@link AnnotationMetadata} of the importing @{@link Configuration} class.
	 */
	String[] selectImports(AnnotationMetadata importingClassMetadata);

} 复制代码
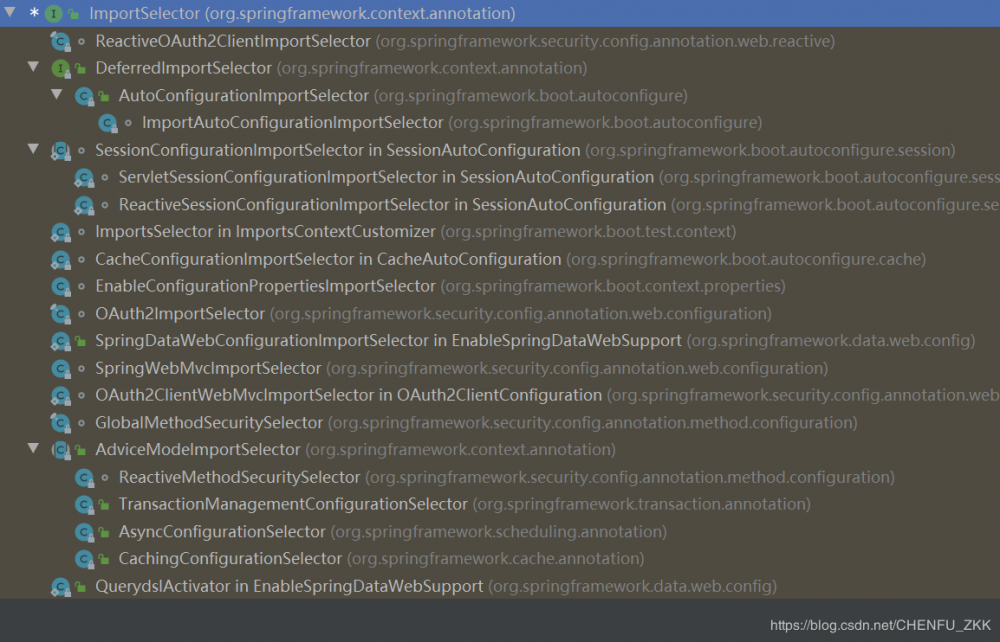
该接口的继承关系图

DeferredImportSelector
由上图可知DeferredImportSelector接口继承自ImportSelector,它和ImportSelector的区别在于装载bean的时机上, DeferredImportSelector需要等所有的@Configuration都执行完毕后才会进行装载 。
Spring Boot自动装配案例
项目案例传送门: autoConfig
案例主要代码
- 创建一个生产Bean的配置类,但是我们并不使用@Configuration注解来声明它。
public class MyConfig {
    @Bean(value = "chenfu", name = "chenfu")
    public Map<Object, Object> getMap() {
        HashMap<Object, Object> map = new HashMap<>();
        map.put("code", 200);
        map.put("msg", "success");
        String nowDate = LocalDateTime.now().format(DateTimeFormatter.ISO_LOCAL_DATE_TIME);
        map.put("data", nowDate);
        return map;
    }
} 复制代码
2.实现ImportSelector接口,返回我们上边的配置类名
public class MyConfigImportSelector implements ImportSelector {
    @Override
    public String[] selectImports(AnnotationMetadata annotationMetadata) {
//        返回配置名称
        return new String[]{MyConfig.class.getName()};
    }
} 复制代码
3.运行测试
@SpringBootApplication
@Import(value = MyConfigImportSelector.class)
public class AutoConfigApp {
    public static void main(String[] args) {
        ConfigurableApplicationContext app = SpringApplication.run(AutoConfigApp.class, args);
        Object chenfu = app.getBean("chenfu");
        System.out.println(chenfu);
    }
}

复制代码
案例大体内容如上,通过案例可知经过Spring Boot自动装配的对象并没有使用Spring的对象创建注解声明 (@Controller,@Service,@Repostiroty),而是使用编程的方式动态的载入bean。在Spring Boor中对这些对象的解析步骤主要是在ConfigurationClassParser类的processImports方法内进行的
ImportSelector的解析过程
ConfigurationClassParser
ConfigurationClassParser类的源码
private void processImports(ConfigurationClass configClass, SourceClass currentSourceClass,
		Collection<SourceClass> importCandidates, boolean checkForCircularImports) {
	if (importCandidates.isEmpty()) {
		return;
	}
	if (checkForCircularImports && isChainedImportOnStack(configClass)) {
		this.problemReporter.error(new CircularImportProblem(configClass, this.importStack));
	}
	else {
		this.importStack.push(configClass);
		try {
			for (SourceClass candidate : importCandidates) {
				//对ImportSelector类型的类进行处理
				if (candidate.isAssignable(ImportSelector.class)) {
					// Candidate class is an ImportSelector -> delegate to it to determine imports
					Class<?> candidateClass = candidate.loadClass();
					ImportSelector selector = BeanUtils.instantiateClass(candidateClass, ImportSelector.class);
					ParserStrategyUtils.invokeAwareMethods(
							selector, this.environment, this.resourceLoader, this.registry);
 					//上边我们说过的另外一种Selector类型,可以理解为延迟加载
					if (selector instanceof DeferredImportSelector) {
						//该方法内部会将该Selector保存到一个集合【deferredImportSelectors】中
						this.deferredImportSelectorHandler.handle(
								configClass, (DeferredImportSelector) selector);
					} else {
						String[] importClassNames = selector.selectImports(currentSourceClass.getMetadata());
						Collection<SourceClass> importSourceClasses = asSourceClasses(importClassNames);
						processImports(configClass, currentSourceClass, importSourceClasses, false);
					}
				} else if (candidate.isAssignable(ImportBeanDefinitionRegistrar.class)) {
					// Candidate class is an ImportBeanDefinitionRegistrar ->
					// delegate to it to register additional bean definitions
					Class<?> candidateClass = candidate.loadClass();
					ImportBeanDefinitionRegistrar registrar =
							BeanUtils.instantiateClass(candidateClass, ImportBeanDefinitionRegistrar.class);
					ParserStrategyUtils.invokeAwareMethods(
							registrar, this.environment, this.resourceLoader, this.registry);
					configClass.addImportBeanDefinitionRegistrar(registrar, currentSourceClass.getMetadata());
				} else {
					// Candidate class not an ImportSelector or ImportBeanDefinitionRegistrar ->
					// process it as an @Configuration class
					// 直接把上边的官方英文注释硬翻译了,当前类不是ImportSelector或ImportBeanDefinitionRegistrar类型,直接让其走@Configuration类的处理流程
					this.importStack.registerImport(
							currentSourceClass.getMetadata(), candidate.getMetadata().getClassName());
					processConfigurationClass(candidate.asConfigClass(configClass));
				}
			}
		} catch (BeanDefinitionStoreException ex) {
			throw ex;
		} catch (Throwable ex) {
			throw new BeanDefinitionStoreException(
					"Failed to process import candidates for configuration class [" +
					configClass.getMetadata().getClassName() + "]", ex);
		} finally {
			this.importStack.pop();
		}
	}
}

复制代码
综上,大致流程就是ImportSelector接口的返回值会递归进行解析,然后把解析到的类全名最终按照 @Configuration进行处理。
ImportSelector总结
SpringBoot开箱即用的特点,很大程度上归功于ImportSelector。
Spring Boot源码分析
Spring Boot在Spring的基础上做了一些扩展。
- 在SpringBoot的SpringBootApplication注解中声明了一个 @EnableAutoConfiguration注解
@SpringBootConfiguration
@EnableAutoConfiguration
@ComponentScan(
    excludeFilters = {@Filter(
    type = FilterType.CUSTOM,
    classes = {TypeExcludeFilter.class}
), @Filter(
    type = FilterType.CUSTOM,
    classes = {AutoConfigurationExcludeFilter.class}
)}
)
public @interface SpringBootApplication { 复制代码
2.@EnableAutoConfiguration中通过Import引入了SpringBoot定义的@Import({AutoConfigurationImportSelector.class})
@Import({AutoConfigurationImportSelector.class})
public @interface EnableAutoConfiguration { 复制代码
接下来开始对AutoConfigurationImportSelector进行源码分析
AutoConfigurationImportSelector
AutoConfigurationImportSelector是selectImports的实现类,我们来看selectImports方法
selectImports
public String[] selectImports(AnnotationMetadata annotationMetadata) {
    if (!this.isEnabled(annotationMetadata)) {
        return NO_IMPORTS;
    } else {
        AutoConfigurationMetadata autoConfigurationMetadata = AutoConfigurationMetadataLoader.loadMetadata(this.beanClassLoader);
        AutoConfigurationImportSelector.AutoConfigurationEntry autoConfigurationEntry = this.getAutoConfigurationEntry(autoConfigurationMetadata, annotationMetadata);
        return StringUtils.toStringArray(autoConfigurationEntry.getConfigurations());
    }
}

复制代码
该方法的主要逻辑都在getAutoConfigurationEntry方法内
getAutoConfigurationEntry
protected AutoConfigurationImportSelector.AutoConfigurationEntry getAutoConfigurationEntry(AutoConfigurationMetadata autoConfigurationMetadata, AnnotationMetadata annotationMetadata) {
    if (!this.isEnabled(annotationMetadata)) {
        return EMPTY_ENTRY;
    } else {
        AnnotationAttributes attributes = this.getAttributes(annotationMetadata);
        // 2.1通过getCandidateConfigurations方法获取所有需要加载的bean
        List<String> configurations = this.getCandidateConfigurations(annotationMetadata, attributes);
        // 去重
        configurations = this.removeDuplicates(configurations);
        // 获取不需要加载的bean,我们可以通过spring.autoconfigure.exclude配置
        Set<String> exclusions = this.getExclusions(annotationMetadata, attributes);
        this.checkExcludedClasses(configurations, exclusions);
        configurations.removeAll(exclusions);
        configurations = this.filter(configurations, autoConfigurationMetadata);
        // 发送事件,通知所有的AutoConfigurationImportListener进行监听
        this.fireAutoConfigurationImportEvents(configurations, exclusions);
        return new AutoConfigurationImportSelector.AutoConfigurationEntry(configurations, exclusions);
    }
} 复制代码
接下来再看一下上边源码中调用的getCandidateConfigurations方法
getCandidateConfigurations
protected List<String> getCandidateConfigurations(AnnotationMetadata metadata, AnnotationAttributes attributes) {
	// 这里的getSpringFactoriesLoaderFactoryClass()最终返回的是EnableAutoConfiguration.class
    List<String> configurations = SpringFactoriesLoader.loadFactoryNames(this.getSpringFactoriesLoaderFactoryClass(), this.getBeanClassLoader());
    Assert.notEmpty(configurations, "No auto configuration classes found in META-INF/spring.factories. If you are using a custom packaging, make sure that file is correct.");
    return configurations;
}

复制代码
从上面的逻辑可以看出,终获取bean的渠道在SpringFactoriesLoader.loadFactoryNames内SpringFactoriesLoader.loadFactoryNames(this.getSpringFactoriesLoaderFactoryClass(), this.getBeanClassLoader());
SpringFactoriesLoader
loadFactoryNames
public static List<String> loadFactoryNames(Class<?> factoryClass, @Nullable ClassLoader classLoader) {
	// 通过factoryClassName获取相应的bean全称
    String factoryClassName = factoryClass.getName();
    return (List)loadSpringFactories(classLoader).getOrDefault(factoryClassName, Collections.emptyList());
}

复制代码
loadSpringFactories
private static Map<String, List<String>> loadSpringFactories(@Nullable ClassLoader classLoader) {
    MultiValueMap<String, String> result = (MultiValueMap)cache.get(classLoader);
    if (result != null) {
        return result;
    } else {
        try {
        	// 获取项目中所有META-INF/spring.factories文件,将其组装成Map
            Enumeration<URL> urls = classLoader != null ? classLoader.getResources("META-INF/spring.factories") : ClassLoader.getSystemResources("META-INF/spring.factories");
            LinkedMultiValueMap result = new LinkedMultiValueMap();

            while(urls.hasMoreElements()) {
                URL url = (URL)urls.nextElement();
                UrlResource resource = new UrlResource(url);
                Properties properties = PropertiesLoaderUtils.loadProperties(resource);
                Iterator var6 = properties.entrySet().iterator();

                while(var6.hasNext()) {
                    Entry<?, ?> entry = (Entry)var6.next();
                    String factoryClassName = ((String)entry.getKey()).trim();
                    String[] var9 = StringUtils.commaDelimitedListToStringArray((String)entry.getValue());
                    int var10 = var9.length;

                    for(int var11 = 0; var11 < var10; ++var11) {
                        String factoryName = var9[var11];
                        result.add(factoryClassName, factoryName.trim());
                    }
                }
            }

            cache.put(classLoader, result);
            return result;
        } catch (IOException var13) {
            throw new IllegalArgumentException("Unable to load factories from location [META-INF/spring.factories]", var13);
        }
    }
}

复制代码
每个jar包都可以定义自己的META-INF/spring.factories,在该jar被加载的同时 spring.factories里面定义的 bean就会被自动加载。我们可以来看一下Spring Boot的该配置文件内容【只拿出部分内容】
# Auto Configuration Import Filters
org.springframework.boot.autoconfigure.AutoConfigurationImportFilter=/
org.springframework.boot.autoconfigure.condition.OnBeanCondition,/
org.springframework.boot.autoconfigure.condition.OnClassCondition,/
org.springframework.boot.autoconfigure.condition.OnWebApplicationCondition

# Auto Configure
org.springframework.boot.autoconfigure.EnableAutoConfiguration=/
org.springframework.boot.autoconfigure.admin.SpringApplicationAdminJmxAutoConfiguration,/
org.springframework.boot.autoconfigure.aop.AopAutoConfiguration,/
org.springframework.boot.autoconfigure.amqp.RabbitAutoConfiguration,/ 复制代码
故,我们可以对上边的案例进行改造,在resouces目录下创建该文件,然后添加如下内容
org.springframework.boot.autoconfigure.EnableAutoConfiguration=/
top.chenfu.auto.config.MyConfig   复制代码
去掉启动类中的@import或者自定义@EnableXXX注解

更多精彩文章,可关注微信公众号:Java程序员聚集地

- 本文标签: AOP UI parse tk 总结 rmi bean https CEO springboot key ACE ssl Collection 配置 解析 递归 final 目录 Service 自动化 注释 Spring Boot Collections http web IO map 程序员 HashMap BeanUtils BeanDefinition 源码 id 代码 URLs core java cache cat App EnableAutoConfiguration list 微信公众号 测试 MQ IDE Select src spring ORM CTO amqp value 文章 翻译
- 版权声明: 本文为互联网转载文章,出处已在文章中说明(部分除外)。如果侵权,请联系本站长删除,谢谢。
- 本文海报: 生成海报一 生成海报二


![[HBLOG]公众号](https://www.liuhaihua.cn/img/qrcode_gzh.jpg)

