再谈Spring(二):AOP面向切面编程 - Aspect & 拦截器
本小节对Spring中的AOP技术进行相应的总结与介绍。
Spring是一个轻量级的IOC和AOP容器框架。是为Java应用程序提供基础性服务的一套框架,目的是用于简化企业应用程序的开发,它使得开发者只需要关心业务需求。
AOP:
面向切面编程,指扩展功能不修改源代码,将功能代码从业务逻辑代码中分离出来。
主要功能:
日志记录,性能统计,安全控制,事务处理,异常处理等等。
主要意图:
将日志记录,性能统计,安全控制,事务处理,异常处理等代码从业务逻辑代码中划分出来,通过对这些行为的分离,我们希望可以将它们独立到非指导业务逻辑的方法中,进而改变这些行为的时候不影响业务逻辑的代码。
AOP的特点:
采用横向抽取机制,取代了传统纵向继承体系重复性代码。
AOP操作术语:
- Joinpoint(连接点) : 类里面可以被增强的方法,这些方法称为连接点
- Pointcut(切入点) :所谓切入点是指我们要对哪些Joinpoint进行拦截的定义
- Advice(通知/增强) :所谓通知是指拦截到Joinpoint之后所要做的事情就是通知.通知分为前置通知,后置通知,异常通知,最终通知,环绕通知(切面要完成的功能)
- Aspect(切面) :是切入点和通知(引介)的结合
- Introduction(引介) :引介是一种特殊的通知在不修改类代码的前提下, Introduction可以在运行期为类动态地添加一些方法或Field.
- Target(目标对象) :代理的目标对象(要增强的类)
- Weaving(织入) :是把增强应用到目标的过程,把advice 应用到 target的过程
- Proxy(代理) :一个类被AOP织入增强后,就产生一个结果代理类
其实我们只需要这么简单记忆即可:
切入点就是在类里边可以有很多方法被增强,比如实际操作中,只是增强了个别方法,则定义实际被增强的某个方法为切入点。
通知/增强就是指增强的逻辑,比如扩展日志功能,这个日志功能称为增强。
切面就是把增强应用到具体方法上面的过程称为切面。
AOP实现方式:
Spring的AOP技术底层使用了动态代理来实现,在SpringBoot中,针对AOP技术的实现有 Aspect,拦截器和过滤器 。本篇博文,我们主要介绍常用的Aspect和拦截器实现方式。
在 再谈Spring(一):Bean的作用域 文章中我们搭建了一个简单的SpringBoot项目,这里我们继续复用该项目来进行AOP技术的演示。
Aspect
在上一小节的SpringBoot项目中,我们首先是添加aop所需的依赖:
<dependency>
      <groupId>org.springframework.boot</groupId>
      <artifactId>spring-boot-starter-aop</artifactId>
 </dependency>
复制代码
然后创建一个切面类,如下所示:
WebAcpect:
package com.ywq.interceptor;

import org.aspectj.lang.JoinPoint;
import org.aspectj.lang.annotation.AfterReturning;
import org.aspectj.lang.annotation.Aspect;
import org.aspectj.lang.annotation.Before;
import org.aspectj.lang.annotation.Pointcut;
import org.springframework.stereotype.Component;
import org.springframework.web.context.request.RequestContextHolder;
import org.springframework.web.context.request.ServletRequestAttributes;

import javax.servlet.http.HttpServletRequest;
import java.util.Arrays;

/**
 * created by yanwenqiang on 2019-11-30
 * 定义一个切面类
 */
@Aspect
@Component
public class WebAcpect {

    /**
     * 定义切入点,切入点为com.ywq.controller.TestController下的所有函数
     */
    @Pointcut("execution(* com.ywq.controller.TestController.*(..))")
    public void acpectMethod(){}

    /**
     * 前置通知:在连接点之前执行的通知
     * @param joinPoint
     * @throws Throwable
     */
    @Before("acpectMethod()")
    public void doBefore(JoinPoint joinPoint) throws Throwable {
        // 接收到请求,记录请求内容
        ServletRequestAttributes attributes = (ServletRequestAttributes) RequestContextHolder.getRequestAttributes();
        HttpServletRequest request = attributes.getRequest();

        // 记录下请求内容
        System.out.println("URL:" + request.getRequestURL().toString());
        System.out.println("方法:" + request.getMethod());
        System.out.println("类方法 : " + joinPoint.getSignature().getDeclaringTypeName() + "." + joinPoint.getSignature().getName());
        System.out.println("参数 : " + Arrays.toString(joinPoint.getArgs()));
    }

}

复制代码
在切面类中,我们需要通过注解@Aspect来标注这是一个切面类,然后通过注解@Component来表明这是一个Bean,然后我们需要配置切入点。配置方式如下:
使用表达式配置切入点,常用的表达式:execution(<访问修饰符>?<返回类型><方法名>(<参数>)<异常>)
- execution(* com.ywq.controller.TestController.add(..)) 表示当前路径下的add方法
- execution(* com.ywq.controller.TestController.*(..)) :表示当前路径下的所有方法
- execution(* . (..)) :表示所有方法
比如说,匹配所有save开头的方法可以这么配置 execution(* save*(..))
本例中,我们仅仅展示前置通知,其余通知也是一样的。
然后来看下TestController:
package com.ywq.controller;

import org.springframework.web.bind.annotation.RequestMapping;
import org.springframework.web.bind.annotation.RequestMethod;
import org.springframework.web.bind.annotation.RequestParam;
import org.springframework.web.bind.annotation.RestController;

import javax.servlet.http.HttpServletRequest;

/**
 * created by yangwenqiang on 2019-11-30
 */
@RequestMapping("/test")
@RestController
public class TestController {

    @RequestMapping(value = "/scopeTest", method = RequestMethod.GET)
    public String testScope(HttpServletRequest request,
                            @RequestParam(value = "name") String name) {

        return "Hello, " + name;
    }

}

复制代码
接下来,我们启动SpringBoot服务,如下所示:

结果如下:

这样,我们就使用Aspect来完成了面向切面编程,在业务逻辑之外增加了一些功能模块逻辑。
但是,使用Aspect来实现AOP,尤其是对Controller层的接口进行拦截,看起来有点怪怪的。其实,在SpringBoot中,我们一般使用拦截器Interceptor来实现面向接口编程,实现拦截请求,增加相应的功能模块。
拦截器
SpringBoot中的拦截器可以通过继承抽象类HandlerInterceptorAdapter 或者实现接口HandlerInterceptor 来实现。
在抽象类和接口中,有如下的三个方法:
- preHandle :拦截于请求刚进入时,进行判断,需要boolean返回值,如果返回true将继续执行,如果返回false,将不进行执行。一般用于登录校验。
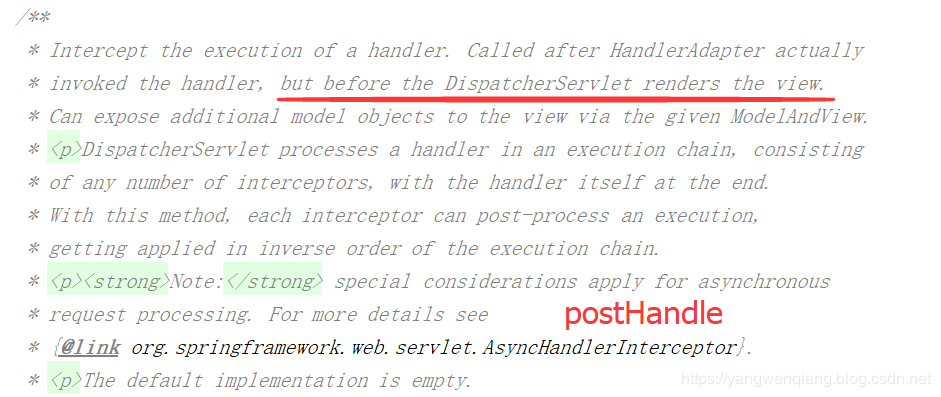
- postHandle :拦截于方法成功返回后,视图渲染前,可以对modelAndView进行操作。
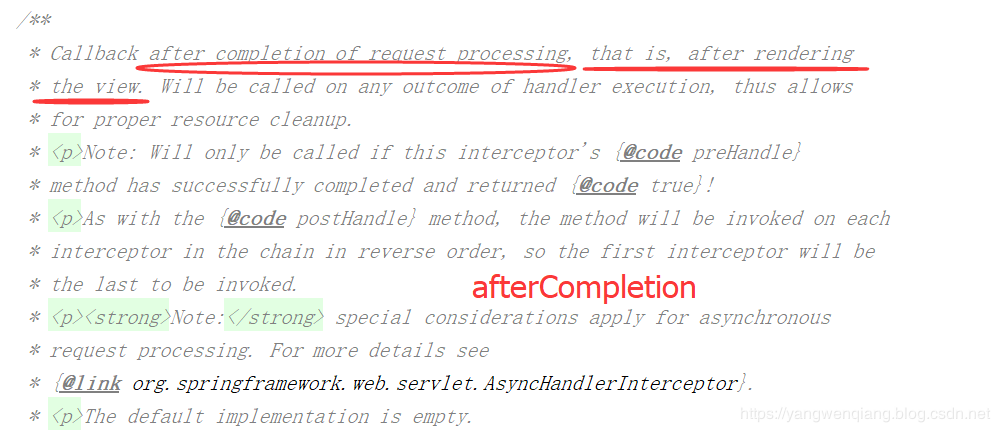
- afterCompletion :拦截于方法成功返回后,视图渲染后,可以进行成功返回的日志记录。
接下来,我们看下JDK中HandlerInterceptor 的介绍:


接下里,我们首先看使用抽象类 HandlerInterceptorAdapter 来实现拦截器:
AuthInterceptor:
package com.ywq.interceptor;

import org.springframework.stereotype.Component;
import org.springframework.web.servlet.handler.HandlerInterceptorAdapter;

import javax.servlet.http.HttpServletRequest;
import javax.servlet.http.HttpServletResponse;

/**
 * created by yangwenqiang on 2019-11-30
 * 继承抽象类 HandlerInterceptorAdapter 实现拦截器
 */
@Component
public class AuthInterceptor extends HandlerInterceptorAdapter {

    @Override
    public boolean preHandle(HttpServletRequest request, HttpServletResponse response, Object handler) {
        // 接口执行前先执行该方法,false表示拦截,true表示放行
        String name = request.getParameter("name");
        System.out.println("参数中的名字:" + name);

        return true;
    }

}
复制代码
然后还需要一个配置类 AuthConfig 如下:
package com.ywq.config;

import com.ywq.interceptor.AuthInterceptor;
import org.springframework.beans.factory.annotation.Autowired;
import org.springframework.context.annotation.Configuration;
import org.springframework.web.servlet.config.annotation.InterceptorRegistry;
import org.springframework.web.servlet.config.annotation.WebMvcConfigurer;

@Configuration
public class AuthConfig implements WebMvcConfigurer {

    // 注入拦截器
    @Autowired
    private AuthInterceptor authInterceptor;

    @Override
    public void addInterceptors(InterceptorRegistry registry) {
        // 注册拦截器
        registry.addInterceptor(authInterceptor).addPathPatterns("/test/scopeTest");
    }

}
复制代码
这样,我们就使用 HandlerInterceptorAdapter 实现了一个拦截器,启动SpringBoot 服务,在浏览器中输入http://localhost:8632/test/scopeTest?name=ywq,就可以看到结果如下:

接下来,我们再来看下使用接口HandlerInterceptor来实现拦截器:
CheckInterceptor:
package com.ywq.interceptor;

import org.springframework.lang.Nullable;
import org.springframework.stereotype.Component;
import org.springframework.web.servlet.HandlerInterceptor;
import org.springframework.web.servlet.ModelAndView;

import javax.servlet.http.HttpServletRequest;
import javax.servlet.http.HttpServletResponse;

@Component
public class CheckInterceptor implements HandlerInterceptor {

    @Override
    public boolean preHandle(HttpServletRequest request, HttpServletResponse response, Object handler) {
        // 接口执行前先执行该方法,false表示拦截,true表示放行
        String name = request.getParameter("name");
        System.out.println("[CheckInterceptor] - 参数中的名字:" + name);
        return true;
    }

    @Override
    public void postHandle(HttpServletRequest request, HttpServletResponse response, Object handler, @Nullable ModelAndView modelAndView) throws Exception {
    }

    @Override
    public void afterCompletion(HttpServletRequest request, HttpServletResponse response, Object handler, @Nullable Exception ex) throws Exception {
    }
}
复制代码
CheckConfig配置类如下:
package com.ywq.config;

import com.ywq.interceptor.CheckInterceptor;
import org.springframework.beans.factory.annotation.Autowired;
import org.springframework.context.annotation.Configuration;
import org.springframework.web.servlet.config.annotation.InterceptorRegistry;
import org.springframework.web.servlet.config.annotation.WebMvcConfigurationSupport;

/**
 * *
 *  * created by yangwenqiang on 2019-11-30
 *  * 这是一个配置类
 */
 @Configuration
public class CheckConfig extends WebMvcConfigurationSupport {

    // 注入拦截器
    @Autowired
    private CheckInterceptor checkInterceptor;

    @Override
    public void addInterceptors(InterceptorRegistry registry) {
        // 注册拦截器
        registry.addInterceptor(checkInterceptor);
        super.addInterceptors(registry);
    }

}
复制代码
启动SpringBoot 服务,在浏览器中输入http://localhost:8632/test/scopeTest?name=yangwenqiang,就可以看到结果如下:


一般情况下,我们会首选抽象类 HandlerInterceptorAdapter 来实现拦截器,因为可以按需进行方法的覆盖。如上我们就完成了拦截器的创建,当然如果你嫌弃AuthConfig和CheckConfig比较麻烦的话,可以在启动类上完成拦截器的注册,如下所示:
package com.ywq;

import com.ywq.interceptor.AuthInterceptor;
import org.springframework.beans.factory.annotation.Autowired;
import org.springframework.boot.SpringApplication;
import org.springframework.boot.autoconfigure.SpringBootApplication;
import org.springframework.boot.web.servlet.ServletComponentScan;
import org.springframework.web.servlet.config.annotation.InterceptorRegistry;
import org.springframework.web.servlet.config.annotation.WebMvcConfigurer;

/**
 * created by yangwenqiang on 2019-11-30
 */

@SpringBootApplication
@ServletComponentScan
public class StartApplication implements WebMvcConfigurer {

    @Autowired
    private AuthInterceptor authInterceptor;

    // SpringBoot服务的启动入口
    public static void main(String[] args) {
        SpringApplication.run(StartApplication.class,args);
    }

    @Override
    public void addInterceptors(InterceptorRegistry registry) {
        // 注册拦截器
        registry.addInterceptor(authInterceptor).addPathPatterns("/test/scopeTest");
    }
}
复制代码
总结:
本小节中,我们主要阐述了AOP面向切面编程的思想以及其具体实现方式。总结下来就是 Aspect方式 实现的AOP一般用在 给Service方法或者业务逻辑方法 上进行相应的增加; 拦截器主要是对Web层Controller接口 进行拦截。
本小节涉及到的 完整项目代码 详见: 我的GitHub
在后续的章节中,我会持续更新在使用Spring过程中使用到的一些小知识点,希望大家可以关注~
如果对你有帮助,记得点赞哈,欢迎大家关注我的博客,关注公众号(文强的技术小屋),学习更多技术知识,一起遨游知识海洋~ 


![[HBLOG]公众号](https://www.liuhaihua.cn/img/qrcode_gzh.jpg)

