Netty之缓冲区ByteBuf解读(一)

Netty 在数据传输过程中,会使用缓冲区设计来提高传输效率。虽然,Java 在 NIO 编程中已提供 ByteBuffer 类进行使用,但是在使用过程中,其编码方式相对来说不太友好,也存在一定的不足。所以高性能的 Netty 框架实现了一套更加强大,完善的 ByteBuf,其设计理念也是堪称一绝。
ByteBuffer 分析
在分析 ByteBuf 之前,先简单讲下 ByteBuffer 类的操作。便于更好理解 ByteBuf 。
ByteBuffer 的读写操作共用一个位置指针,读写过程通过以下代码案例分析:
// 分配一个缓冲区,并指定大小
ByteBuffer buffer = ByteBuffer.allocate(100);
// 设置当前最大缓存区大小限制
buffer.limit(15);
System.out.println(String.format("allocate: pos=%s lim=%s cap=%s", buffer.position(), buffer.limit(), buffer.capacity()));

String content = "ytao公众号";
// 向缓冲区写入数据
buffer.put(content.getBytes());
System.out.println(String.format("put: pos=%s lim=%s cap=%s", buffer.position(), buffer.limit(), buffer.capacity()));
其中打印了缓冲区三个参数,分别是:
- position 读写指针位置
- limit 当前缓存区大小限制
- capacity 缓冲区大小
打印结果:

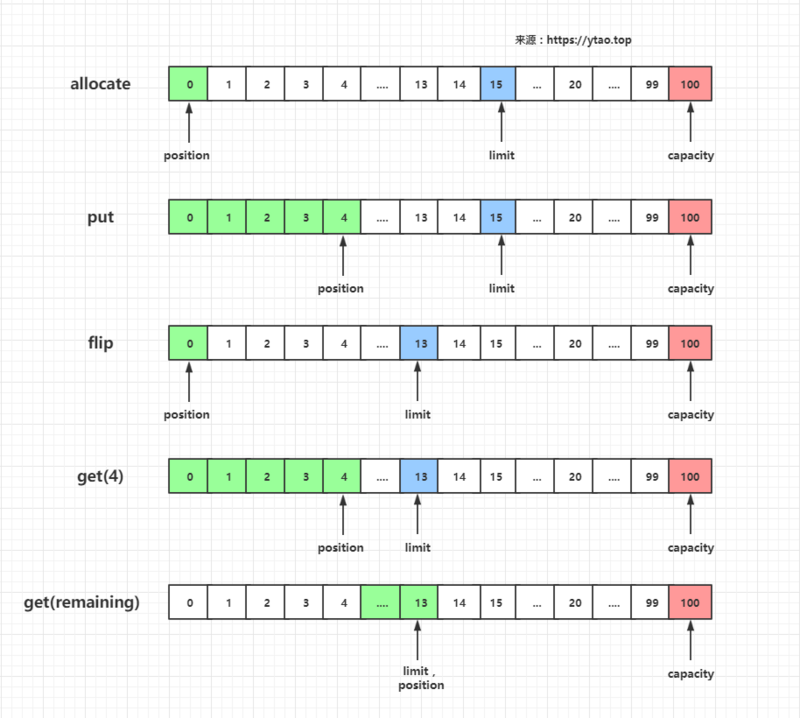
当我们写入内容后,读写指针值为 13, ytao公众号 英文字符占 1 个 byte,每个中文占 4 个 byte,刚好 13,小于设置的当前缓冲区大小 15。
接下来,读取内容里的 ytao 数据:
buffer.flip();
System.out.println(String.format("flip: pos=%s lim=%s cap=%s", buffer.position(), buffer.limit(), buffer.capacity()));

byte[] readBytes = new byte[4];
buffer.get(readBytes);
System.out.println(String.format("get(4): pos=%s lim=%s cap=%s", buffer.position(), buffer.limit(), buffer.capacity()));

String readContent = new String(readBytes);
System.out.println("readContent:"+readContent);
读取内容需要创建个 byte 数组来接收,并制定接收的数据大小。
在写入数据后再读取内容,必须主动调用 ByteBuffer#flip 或 ByteBuffer#clear 。
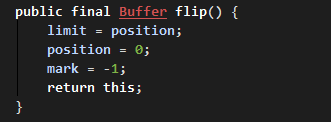
ByteBuffer#flip 它会将写入数据后的指针位置值作为当前缓冲区大小,再将指针位置归零。会使写入数据的缓冲区改为待取数据的缓冲区,也就是说,读取数据会从刚写入的数据第一个索引作为读取数据的起始索引。
ByteBuffer#flip 相关源码:
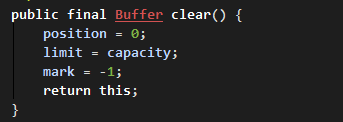
ByteBuffer#clear 则会重置 limit 为默认值,与 capacity 大小相同。
接下读取剩余部分内容:
第二次读取的时候,可使用 buffer#remaining 来获取大于或等于剩下的内容的字节大小,该函数实现为 limit - position ,所以当前缓冲区域一定在这个值范围内。
readBytes = new byte[buffer.remaining()];
buffer.get(readBytes);
System.out.println(String.format("get(remaining): pos=%s lim=%s cap=%s", buffer.position(), buffer.limit(), buffer.capacity()));
打印结果:

以上操作过程中,索引变化如图:
ByteBuf 读写操作
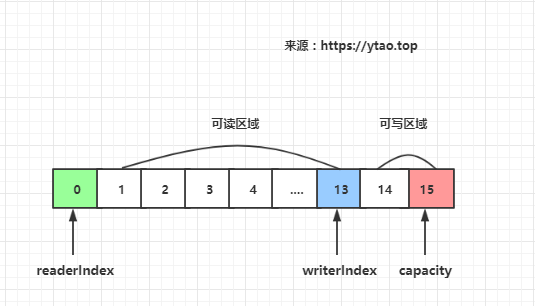
ByteBuf 有读写指针是分开的,分别是 buf#readerIndex 和 buf#writerIndex ,当前缓冲器大小 buf#capacity 。
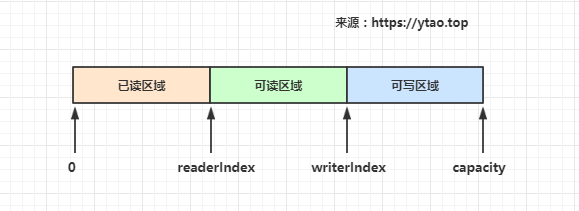
这里缓冲区被两个指针索引和容量划分为三个区域:
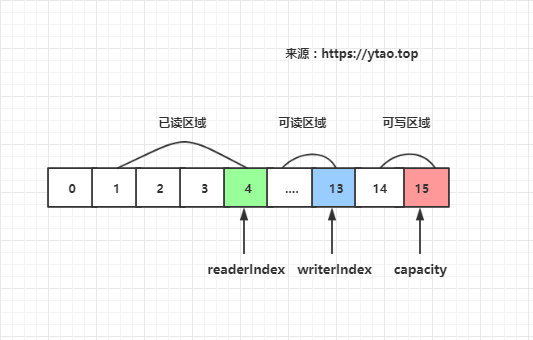
- 0 -> readerIndex 为已读缓冲区域,已读区域可重用节约内存,readerIndex 值大于或等于 0
- readerIndex -> writerIndex 为可读缓冲区域,writerIndex 值大于或等于 readerIndex
- writerIndex -> capacity 为可写缓冲区域,capacity 值大于或等于 writerIndex
如下图所示:
分配缓冲区
ByteBuf 分配一个缓冲区,仅仅给定一个初始值就可以。默认是 256。初始值不像 ByteBuffer 一样是最大值,ByteBuf 的最大值是 Integer.MAX_VALUE
ByteBuf buf = Unpooled.buffer(13);
System.out.println(String.format("init: ridx=%s widx=%s cap=%s", buf.readerIndex(), buf.writerIndex(), buf.capacity()));
打印结果:

写操作
ByteBuf 写操作和 ByteBuffer 类似,只是写指针是单独记录的,ByteBuf 的写操作支持多种类型,有以下多个API:
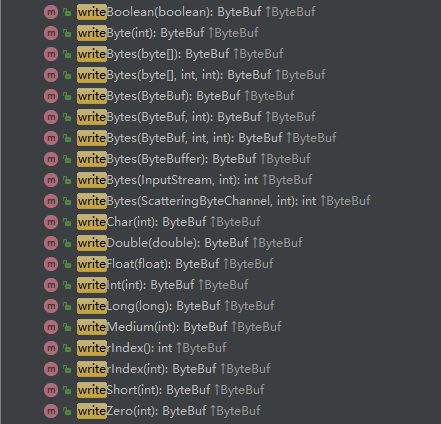
写入字节数组类型:
String content = "ytao公众号";
buf.writeBytes(content.getBytes());
System.out.println(String.format("write: ridx=%s widx=%s cap=%s", buf.readerIndex(), buf.writerIndex(), buf.capacity()));
打印结果:

索引示意图:
读操作
一样的,ByteBuf 写操作和 ByteBuffer 类似,只是写指针是单独记录的,ByteBuf 的读操作支持多种类型,有以下多个API:
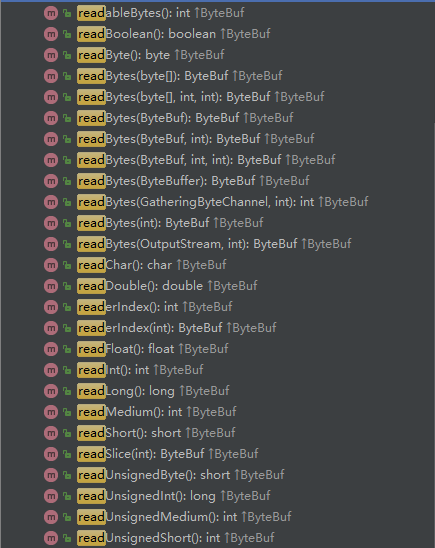
从当前 readerIndex 位置读取四个字节内容:
byte[] dst = new byte[4];
buf.readBytes(dst);
System.out.println(new String(dst));
System.out.println(String.format("read(4): ridx=%s widx=%s cap=%s", buf.readerIndex(), buf.writerIndex(), buf.capacity()));
打印结果:

索引示意图:
ByteBuf 动态扩容
通过上面的 ByteBuffer 分配缓冲区例子,向里面添加 [ytao公众号ytao公众号] 内容,使写入的内容大于 limit 的值。
ByteBuffer buffer = ByteBuffer.allocate(100);
buffer.limit(15);

String content = "ytao公众号ytao公众号";
buffer.put(content.getBytes());
运行结果异常:

内容字节大小超过了 limit 的值时,缓冲区溢出异常,所以我们每次写入数据前,得检查缓区大小是否有足够空间,这样对编码上来说,不是一个好的体验。
使用 ByteBuf 添加同样的内容,给定同样的初始容器大小。
ByteBuf buf = Unpooled.buffer(15);
String content = "ytao公众号ytao公众号";
buf.writeBytes(content.getBytes());
System.out.println(String.format("write: ridx=%s widx=%s cap=%s", buf.readerIndex(), buf.writerIndex(), buf.capacity()));
打印运行结果:

通过上面打印信息,可以看到 cap 从设置的 15 变为了 64,当我们容器大小不够时,就是进行扩容,接下来我们分析扩容过程中是如何做的。
进入 writeBytes 里面:

校验写入内容长度:

在可写区域检查里:
- 如果写入内容为空,抛出非法参数异常。
- 如果写入内容大小小于或等于可写区域大小,则返回当前缓冲区,当中的
writableBytes()函数为可写区域大小capacity - writerIndex - 如果写入内容大小大于最大可写区域大小,则抛出索引越界异常。
- 最后剩下条件的就是写入内容大小大于可写区域,小于最大区域大小,则分配一个新的缓冲区域。
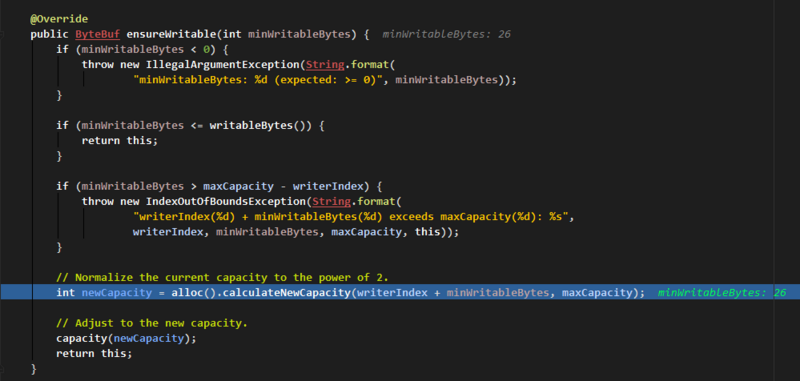
在容量不足,重新分配缓冲区的里面,以 4M 为阀门:
- 如果待写内容刚好为 4M, 那么就分配 4M 的缓冲区。
- 如果待写内容超过这个阀门且与阀门值之和不大于最大容量值,就分配(阀门值+内容大小值)的缓冲区;如果超过这个阀门且与阀门值之和大于最大容量值,则分配最大容量的缓冲区。
- 如果待写内容不超过阀门值且大于 64,那么待分配缓冲区大小就以 64 的大小进行倍增,直到相等或大于待写内容。
- 如果待写内容不超过阀门值且不大于 64,则返回待分配缓冲区大小为 64。
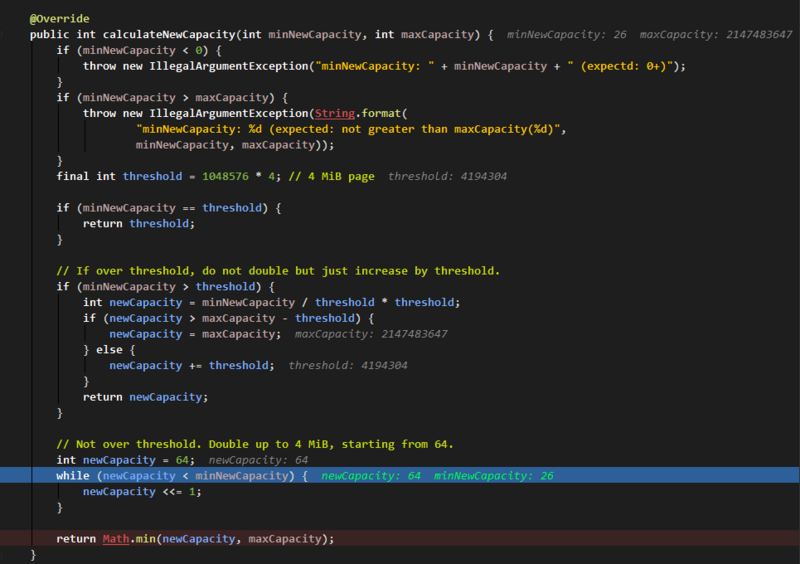
最后
Netty 实现的缓冲区,八个基本类型中,除了布尔类型,其他7种都有自己对应的 Buffer,但是实际使用过程中, ByteBuf 才是我们尝试用的,它可兼容任何类型。ByteBuf 在 Netty 体系中是最基础也是最重要的一员,要想更好掌握和使用 Netty,先理解并掌握 ByteBuf 是必需条件之一。
个人博客: https://ytao.top
关注公众号 【ytao】,更多原创好文


![[HBLOG]公众号](https://www.liuhaihua.cn/img/qrcode_gzh.jpg)

