【ZooKeeper系列】3.ZooKeeper源码环境搭建
在系列的前两篇文章中,介绍了ZooKeeper环境的搭建(包括单机版、伪集群和集群),对创建、删除、修改节点等场景用命令行的方式进行了测试,让大家对ZooKeeper环境搭建及常用命令行有初步的认识,也为搭建ZooKeeper的开发环境、生产环境起到了抛砖引玉的作用。也介绍了用Java来实现API的调用,包括节点的增、删、改、查。通过对这两篇的学习,让大家对ZooKeeper的使用有了初步认识,也可用于实现系列后面篇章要介绍的命名服务、集群管理、分布式锁、负载均衡、分布式队列等。
在前两篇中,强调了阅读英文文档的重要性,也带领大家解读了部分官方文档,想传达出的理念是ZooKeeper没有想象中的那么难,阅读官方文档也没那么难。后面的篇章中,结合官方文档,在实战演练和解读源码的基础上加深理解。
上联:说你行你就行不行也行
下联:说不行就不行行也不行
横批:不服不行
阅读源码就跟这个对联一模一样,就看你选上联,还是下联了!
这一篇开始源码环境的搭建, here we go !
很多老铁留言说很想研读些github上的开源项目,但代码clone下来后总出现这样或那样奇奇怪怪的问题,很影响学习的积极性。学习ZooKeeper的源码尤其如此,很多人clone代码后,报各种错,提示少各种包。问了下度娘ZooKeeper源码环境,搜出来的文章真的差强人意,有些文章错的竟然非常离谱。这里我重新搭建了一遍,也会介绍遇到的一些坑。
很多老铁上来一堆猛操作,从github上下载了ZooKeeper源码后,按常规方式导入IDEA,最后发现少各种包。起初我也是这样弄的,以为ZooKeeper是用Maven来构建的,仔细去了解了下ZooKeeper的版本历史,其实是用的Ant。如今一般用的Maven或Gradle,很少见到Ant的项目了,这里不对Ant多做介绍。
1 Ant环境搭建
Ant官网地址: https://ant.apache.org/bindownload.cgi
下载解压后,跟配置jdk一样配置几个环境变量:
//修改为自己本地安装的目录
ANT_HOMT=D:/apache-ant-1.10.7
PATH=%ANT_HOME%/bin
CLASSPATH=%ANT_HOME%/lib
配置好后,测试下Ant是否安装成功。 ant -version ,得到如下信息则代表安装成功:
Apache Ant(TM) version 1.10.7 compiled on September 1 2019
Ant的安装跟JDK的安装和配置非常相似,这里不做过多介绍。
2 下载ZooKeeper源码
源码地址: https://github.com/apache/zookeeper
猿人谷在写本篇文章时,releases列表里的最新版本为 release-3.5.6 ,我们以此版本来进行源码环境的搭建。
3 编译ZooKeeper源码
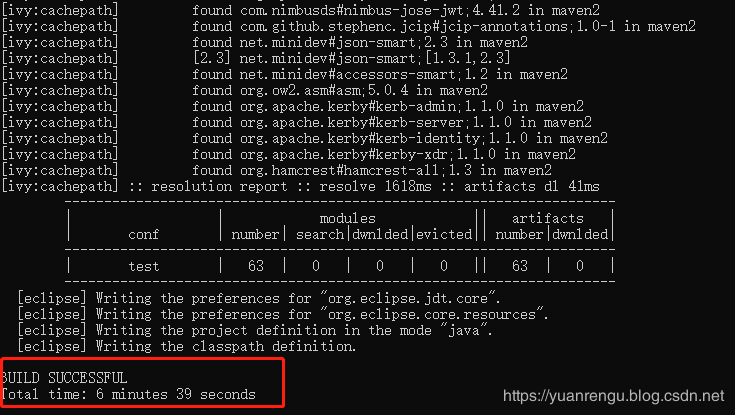
切换到源码所在目录,运行 ant eclipse 将项目编译并转成eclipse的项目结构。

这个编译过程会比较长,差不多等了7分钟。如果编译成功,会出现如下结果:
4 导入IDEA
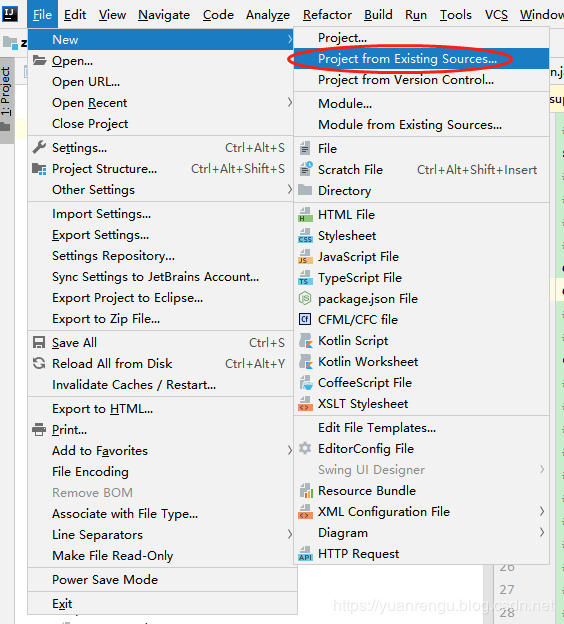
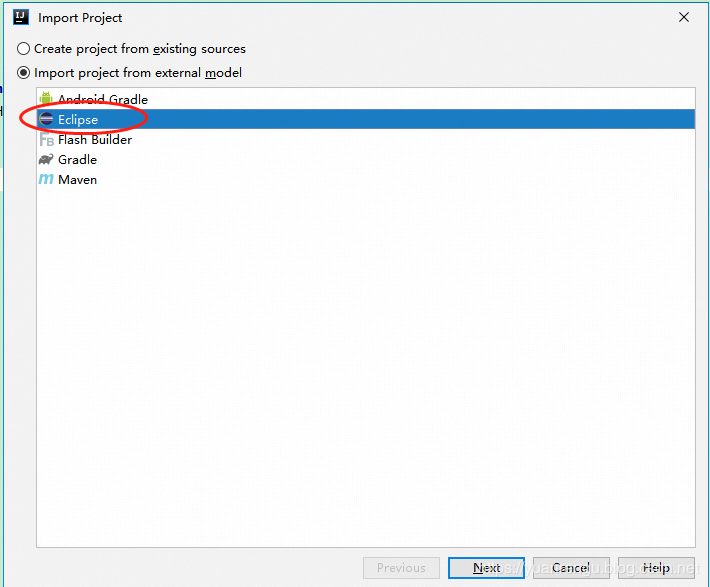
上面已经将项目编译并转成eclipse的项目结构,按eclipse的形式导入项目。
5 特别说明
将源码导入IDEA后在 org.apache.zookeeper.Version 中发现很多红色警告,很明显少了 org.apache.zookeeper.version.Info 类。

查询源码得知是用来发布的时候生成版本用的,我们只是研读源码,又不发布版本所以直接写死就ok了。
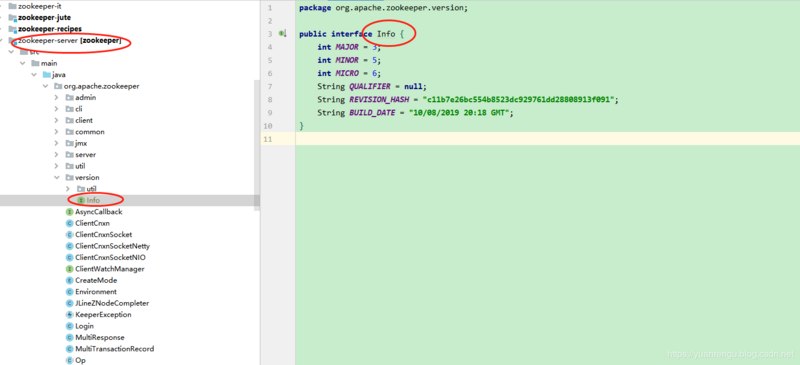
即新增Info类:
package org.apache.zookeeper.version;

public interface Info {
    int MAJOR = 3;
    int MINOR = 5;
    int MICRO = 6;
    String QUALIFIER = null;
    String REVISION_HASH = "c11b7e26bc554b8523dc929761dd28808913f091";
    String BUILD_DATE = "10/08/2019 20:18 GMT";
}
6 启动zookeeper
针对单机版本和集群版本,分别对应两个启动类:
- 单机:ZooKeeperServerMain
- 集群:QuorumPeerMain
这里我们只做单机版的测试。
在conf目录里有个zoo_sample.cfg,复制一份重命名为zoo.cfg。
zoo.cfg里的内容做点修改(也可以不做修改),方便日志查询。dataDir和dataLogDir根据自己的情况设定。
dataDir=E://02private//1opensource//zk//zookeeper//dataDir
dataLogDir=E://02private//1opensource//zk//zookeeper//dataLogDir
运行主类 org.apache.zookeeper.server.ZooKeeperServerMain ,将zoo.cfg的完整路径配置在Program arguments。
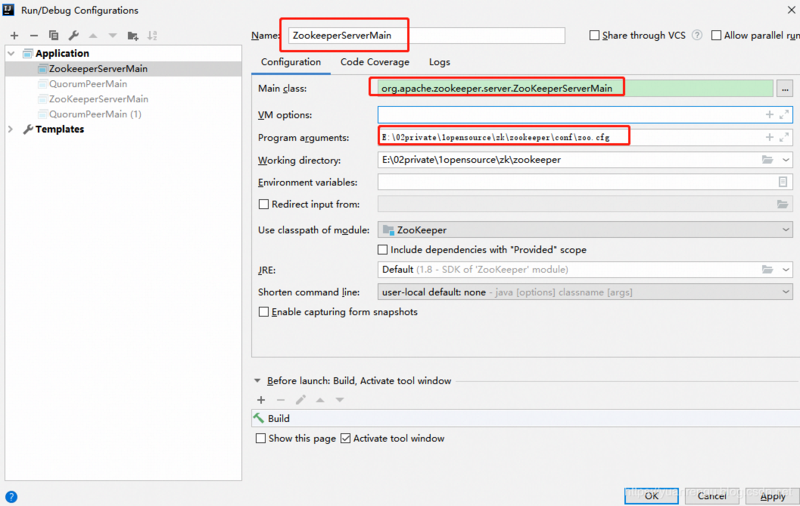
运行 ZooKeeperServerMain ,得到的结果如下:
Connected to the target VM, address: '127.0.0.1:0', transport: 'socket'
log4j:WARN No appenders could be found for logger (org.apache.zookeeper.jmx.ManagedUtil).
log4j:WARN Please initialize the log4j system properly.
log4j:WARN See http://logging.apache.org/log4j/1.2/faq.html#noconfig for more info.
告知日志无法输出,日志文件配置有误。这里需要指定日志文件log4j.properties。

在VM options配置,即指定到conf目录下的log4j.properties:
-Dlog4j.configuration=file:E:/02private/1opensource/zk/zookeeper/conf/log4j.properties
配置后重新运行 ZooKeeperServerMain ,输出日志如下,
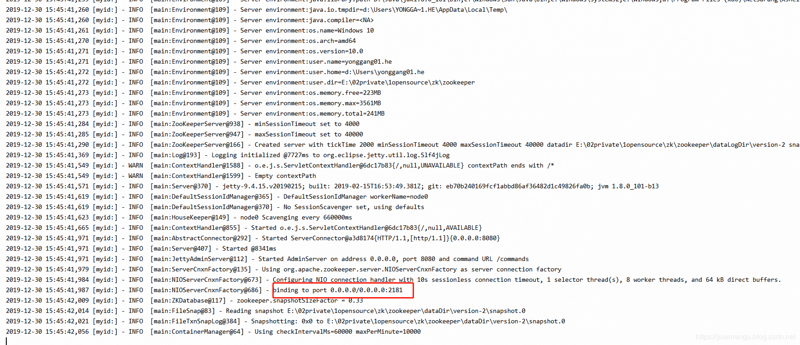
可以得知单机版启动成功,单机版服务端地址为127.0.0.1:2181。
7 启动客户端
通过运行 ZooKeeperServerMain 得到的日志,可以得知ZooKeeper服务端已经启动,服务的地址为 127.0.0.1:2181 。启动客户端来进行连接测试。
客户端的启动类为 org.apache.zookeeper.ZooKeeperMain ,进行如下配置:
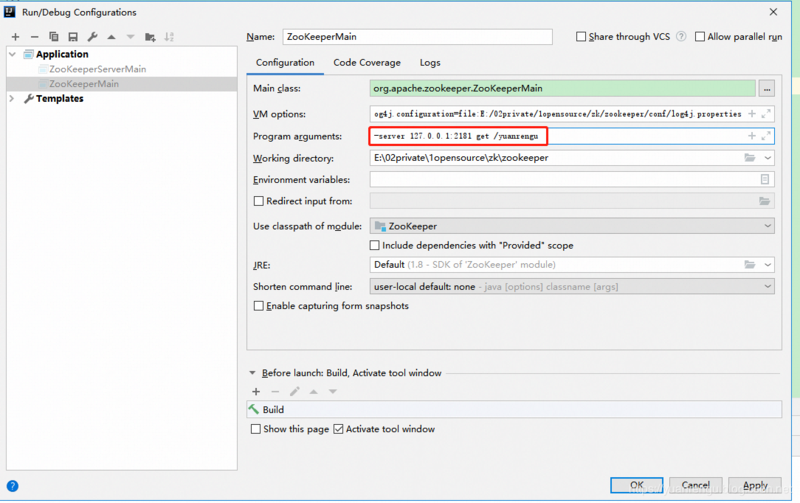
即客户端连接127.0.0.1:2181,获取节点 /yuanrengu 的信息。
下面带领大家一起看看客户端启动的源码( org.apache.zookeeper.ZooKeeperMain )。 这里要给大家说下我阅读源码的习惯,很多老铁以为阅读源码就是顺着代码看,这样也没啥不对,只是很多开源项目代码量惊人,这么个干看法,容易注意力分散也容易看花眼。我一般是基于某个功能点,从入口开始debug跑一遍,弄清这个功能的“代码线”,就像跑马圈块地儿一样,弄清楚功能有关的代码,了解参数传递的过程,这样看代码时就更有针对性,也能排除很多干扰代码。
7.1 main
main里就两行代码,通过debug得知args里包含的信息就是上面我们配置在 Program arguments 里的信息:

7.1.1 ZooKeeperMain
public ZooKeeperMain(String args[]) throws IOException, InterruptedException {
        // 用于解析参数里的命令行的
        cl.parseOptions(args);
        System.out.println("Connecting to " + cl.getOption("server"));
        // 用于连接ZooKeeper服务端
        connectToZK(cl.getOption("server"));
    }
通过下图可以看出,解析参数后,就尝试连接127.0.0.1:2181,即ZooKeeper服务端。cl.getOption("server")得到的就是127.0.0.1:2181。

7.1.2 parseOptions
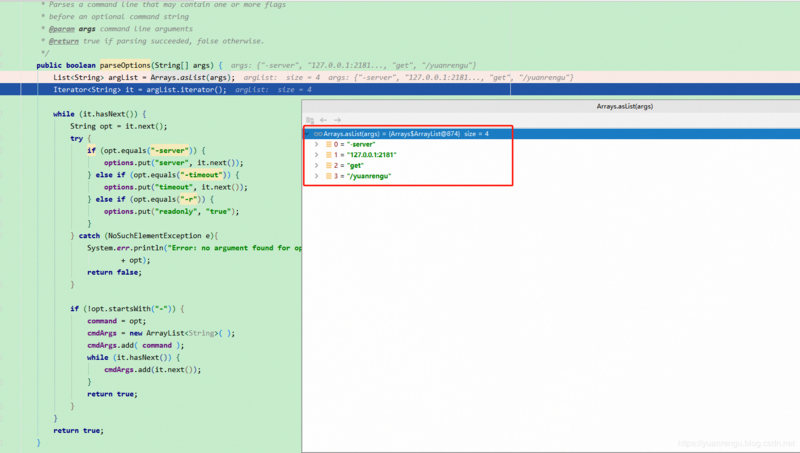
可以很清楚的得知解析args的过程,主要从"-server","-timeout","-r","-"这几个维度来进行解析。
7.1.3 connectToZK
protected void connectToZK(String newHost) throws InterruptedException, IOException {
        // 用于判断现在ZooKeeper连接是否还有效
        // zk.getState().isAlive() 注意这个会话是否有效的判断,客户端与 Zookeeper连接断开不一定会话失效
        if (zk != null && zk.getState().isAlive()) {
            zk.close();
        }

        // 此时newHost为127.0.0.1:2181
        host = newHost;
        // 判断是否为只读模式,关于只读模式的概念在前一篇文章中有介绍
        boolean readOnly = cl.getOption("readonly") != null;
        // 用于判断是否建立安全连接
        if (cl.getOption("secure") != null) {
            System.setProperty(ZKClientConfig.SECURE_CLIENT, "true");
            System.out.println("Secure connection is enabled");
        }
        zk = new ZooKeeperAdmin(host, Integer.parseInt(cl.getOption("timeout")), new MyWatcher(), readOnly);
    }
ZKClientConfig.SECURE_CLIENT 已经被标注为deprecation了:
/**
     * Setting this to "true" will enable encrypted client-server communication.
     */
    @SuppressWarnings("deprecation")
    public static final String SECURE_CLIENT = ZooKeeper.SECURE_CLIENT;
debug查看关键点处的信息,可以得知这是建立一个ZooKeeper连接的过程(【ZooKeeper系列】2.用Java实现ZooKeeper API的调用,这篇文章里详细介绍过ZooKeeper建立连接的过程)
下图看看几处关键信息:

Integer.parseInt(cl.getOption("timeout"))为30000。
至此完成了ZooKeeperMain main = new ZooKeeperMain(args);的整个过程。简短点说就是:
- 解析Program arguments里的参数
- 连接ZooKeeper服务端
7.2 main.run()
敲黑板,重头戏来了哦!
一起来看下run()的代码:
void run() throws CliException, IOException, InterruptedException {
        // cl.getCommand()得到的是 “get”,就是上文传进来的
        if (cl.getCommand() == null) {
            System.out.println("Welcome to ZooKeeper!");

            boolean jlinemissing = false;
            // only use jline if it's in the classpath
            try {
                Class<?> consoleC = Class.forName("jline.console.ConsoleReader");
                Class<?> completorC =
                    Class.forName("org.apache.zookeeper.JLineZNodeCompleter");

                System.out.println("JLine support is enabled");

                Object console =
                    consoleC.getConstructor().newInstance();

                Object completor =
                    completorC.getConstructor(ZooKeeper.class).newInstance(zk);
                Method addCompletor = consoleC.getMethod("addCompleter",
                        Class.forName("jline.console.completer.Completer"));
                addCompletor.invoke(console, completor);

                String line;
                Method readLine = consoleC.getMethod("readLine", String.class);
                while ((line = (String)readLine.invoke(console, getPrompt())) != null) {
                    executeLine(line);
                }
            } catch (ClassNotFoundException e) {
                LOG.debug("Unable to start jline", e);
                jlinemissing = true;
            } catch (NoSuchMethodException e) {
                LOG.debug("Unable to start jline", e);
                jlinemissing = true;
            } catch (InvocationTargetException e) {
                LOG.debug("Unable to start jline", e);
                jlinemissing = true;
            } catch (IllegalAccessException e) {
                LOG.debug("Unable to start jline", e);
                jlinemissing = true;
            } catch (InstantiationException e) {
                LOG.debug("Unable to start jline", e);
                jlinemissing = true;
            }

            if (jlinemissing) {
                System.out.println("JLine support is disabled");
                BufferedReader br =
                    new BufferedReader(new InputStreamReader(System.in));

                String line;
                while ((line = br.readLine()) != null) {
                    executeLine(line);
                }
            }
        } else {
            // 处理传进来的参数
            processCmd(cl);
        }
        System.exit(exitCode);
    }
通过下图可以看出 processCmd(cl); 里 cl 包含的信息:
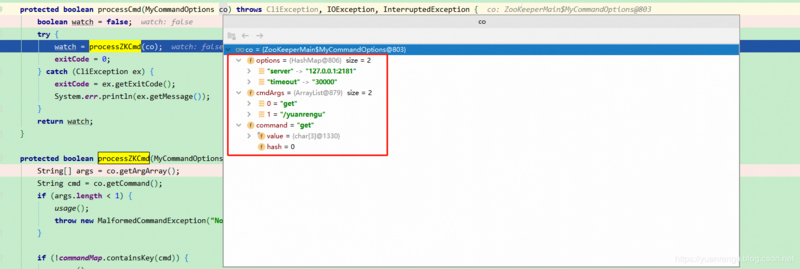
debug到 processCmd(MyCommandOptions co) 就到了决战时刻。里面的 processZKCmd(MyCommandOptions co) 就是核心了,代码太长,只说下processZKCmd里的重点代码,获取节点/yuanrengu的信息:

因为我之前没有创建过/yuanrengu节点,会抛异常 org.apache.zookeeper.KeeperException$NoNodeException: KeeperErrorCode = NoNode for /yuanrengu , 如下图所示:

经过上面的步骤后exitCode为1,执行System.exit(exitCode);退出。
至此带领大家dubug了一遍org.apache.zookeeper.ZooKeeperMain,上面我说过,阅读源码干看效果很小,只有debug才能有助于梳理流程和思路,也能清楚参数传递的过程发生了什么变化。
温馨提示
上面我们介绍了源码环境的搭建过程,运行运行主类 org.apache.zookeeper.server.ZooKeeperServerMain 启动ZooKeeper服务端,运行 org.apache.zookeeper.ZooKeeperMain 连接服务端。
阅读源码最好能动起来(debug)读,这样代码才是活的,干看的话代码如死水一样,容易让人索然无味!
每个人操作的方式不一样,有可能遇到的问题也不一样,搭建过程中遇到什么问题,大家可以在评论区留言。
- 本文标签: IDE id 解析 apache ip client 安全 FAQ GitHub Qualifier 源码 锁 负载均衡 删除 UI 服务端 HTML 2019 java eclipse build 集群 Logging API 分布式锁 classpath 开发 https http 配置 IO App GMT 目录 maven Connection cat 下载 管理 bug 参数 测试 git src 安装 Property CTO stream node 开源 tar 文章 开源项目 分布式 parse 编译 struct lib zookeeper Transport 代码 Watcher cmd final ACE
- 版权声明: 本文为互联网转载文章,出处已在文章中说明(部分除外)。如果侵权,请联系本站长删除,谢谢。
- 本文海报: 生成海报一 生成海报二


![[HBLOG]公众号](https://www.liuhaihua.cn/img/qrcode_gzh.jpg)

