实现增删改查(SpringBoot、MyBatis-Plus与Thymeleaf)
show me the code and talk to me,做的出来更要说的明白
1 引入
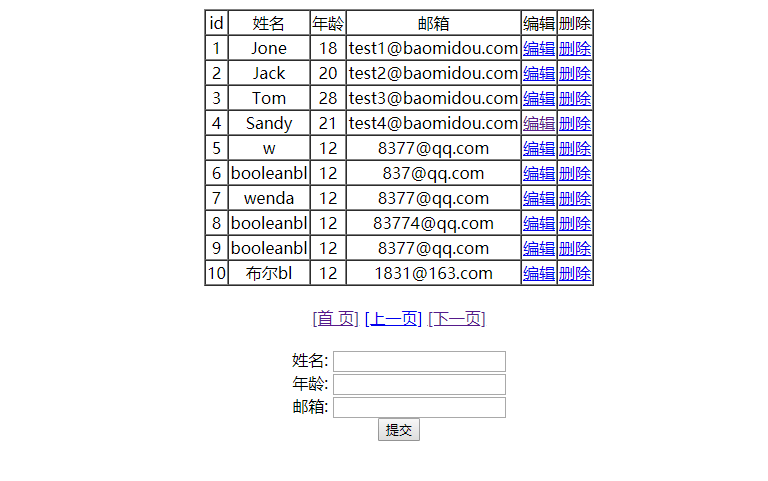
使用 MyBatis-Plus 以及 thymeleaf 实现增删查改。效果图在最后。
2 Mybatis-Plus
MyBatis-Plus(简称 MP)是一个 MyBatis 的增强工具,在 MyBatis 的基础上只做增强不做改变,为简化开发、提高效率而生。
3 thymeleaf
一个模板语言,为后端 Springboot 的开发而生。
4 Lombok
Lombok 可以通过注解简化代码,他会在编译的时候自动生成代码,我们在源代码是看不到他的。需要引入 maven 依赖以及安装插件。
4.1 用途:
- @Date注解生成getter方法、setter方法、无参构造器、重写equal方法、hashcode方法。一般应用这个注解即可。
- @NoArgsConstructor 生成无参构造器
- @AllArgsConstructor 生成包含所有参数的构造器
- @Sj4j 可以用来打印日志
以上都是类注解。
5 maven 引入
<dependency>
    <groupId>com.baomidou</groupId>
    <artifactId>mybatis-plus-boot-starter</artifactId>
    <version>3.3.0</version>
</dependency>
<dependency>
    <groupId>org.springframework.boot</groupId>
    <artifactId>spring-boot-starter-thymeleaf</artifactId>
</dependency>
<dependency>
    <groupId>org.projectlombok</groupId>
    <artifactId>lombok</artifactId>
    <optional>true</optional>
</dependency>
6 造一些数据
DROP TABLE IF EXISTS `user`;
CREATE TABLE `user` (
  `id` bigint(20) NOT NULL AUTO_INCREMENT COMMENT '主键ID',
  `name` varchar(30) DEFAULT NULL COMMENT '姓名',
  `age` int(11) DEFAULT NULL COMMENT '年龄',
  `email` varchar(50) DEFAULT NULL COMMENT '邮箱',
  PRIMARY KEY (`id`)
) ENGINE=InnoDB AUTO_INCREMENT=13 DEFAULT CHARSET=utf8mb4;

INSERT INTO `user` VALUES ('1', 'Jone', '18', 'test1@baomidou.com');
INSERT INTO `user` VALUES ('2', 'Jack', '20', 'test2@baomidou.com');
INSERT INTO `user` VALUES ('3', 'Tom', '28', 'test3@baomidou.com');
INSERT INTO `user` VALUES ('4', 'Sandy', '21', 'test4@baomidou.com');
INSERT INTO `user` VALUES ('5', 'w', '12', '8377@qq.com');
INSERT INTO `user` VALUES ('6', 'booleanbl', '12', '837@qq.com');
INSERT INTO `user` VALUES ('7', 'wenda', '12', '8377@qq.com');
INSERT INTO `user` VALUES ('8', 'booleanbl', '12', '83774@qq.com');
INSERT INTO `user` VALUES ('9', 'booleanbl', '12', '8377@qq.com');
INSERT INTO `user` VALUES ('10', '布尔bl', '12', '1831@163.com');
INSERT INTO `user` VALUES ('11', '布尔bl', '12', 'du@qq.com');
INSERT INTO `user` VALUES ('12', '布尔bl', '22', '8@qq.com');
7 项目结构
├─java
│  └─com
│      └─example
│          └─crud
│              ├─controller
│              ├─entity
│              ├─mapper
│              ├─service
│              │  └─impl
│              └─util
└─resources
    └─templates
8 生成代码
通过代码将sql语句变成项目的基础代码。基础代码有实体类、控制层代码、服务层代码等等,减少机械操作。实现代码后我们只需要输入表明即可生成需要代码。
public class CodeGenerator {

    /**
     * <p>
     * 读取控制台内容
     * </p>
     */
    public static String scanner(String tip) {
        Scanner scanner = new Scanner(System.in);
        StringBuilder help = new StringBuilder();
        help.append("请输入" + tip + ":");
        System.out.println(help.toString());
        if (scanner.hasNext()) {
            String ipt = scanner.next();
            if (StringUtils.isNotEmpty(ipt)) {
                return ipt;
            }
        }
        throw new MybatisPlusException("请输入正确的" + tip + "!");
    }

    public static void main(String[] args) {
        // 代码生成器
        AutoGenerator mpg = new AutoGenerator();

        // 全局配置
        GlobalConfig gc = new GlobalConfig();
        String projectPath = System.getProperty("user.dir");
        gc.setOutputDir(projectPath + "/src/main/java");
        gc.setAuthor("jobob");
        gc.setOpen(false);
        // gc.setSwagger2(true); 实体属性 Swagger2 注解
        mpg.setGlobalConfig(gc);

        // 数据源配置
        DataSourceConfig dsc = new DataSourceConfig();
        // 填写数据库名称
        dsc.setUrl("jdbc:mysql://数据库地址:3306/dev?useUnicode=true&useSSL=false&characterEncoding=utf8");
        // dsc.setSchemaName("public");
        dsc.setDriverName("com.mysql.jdbc.Driver");
        dsc.setUsername("root");
        dsc.setPassword("123456");
        mpg.setDataSource(dsc);

        // 包配置
        PackageConfig pc = new PackageConfig();
        //包名
        pc.setParent("com.example.crud");
        mpg.setPackageInfo(pc);

        // 自定义配置
        InjectionConfig cfg = new InjectionConfig() {
            @Override
            public void initMap() {
                // to do nothing
            }
        };

        // 如果模板引擎是 freemarker
//        String templatePath = "/templates/mapper.xml.ftl";
        // 如果模板引擎是 velocity
         String templatePath = "/templates/mapper.xml.vm";

        // 自定义输出配置
        List<FileOutConfig> focList = new ArrayList<>();
        // 自定义配置会被优先输出
        focList.add(new FileOutConfig(templatePath) {
            @Override
            public String outputFile(TableInfo tableInfo) {
                // 自定义输出文件名 , 如果你 Entity 设置了前后缀、此处注意 xml 的名称会跟着发生变化!!
                return projectPath + "/src/main/java/com/example/crud/mapper/" + tableInfo.getEntityName() + "Mapper" + StringPool.DOT_XML;
            }
        });

        cfg.setFileOutConfigList(focList);
        mpg.setCfg(cfg);

        // 配置模板
        TemplateConfig templateConfig = new TemplateConfig();

        templateConfig.setXml(null);
        mpg.setTemplate(templateConfig);

        // 策略配置
        StrategyConfig strategy = new StrategyConfig();
        strategy.setNaming(NamingStrategy.underline_to_camel);
        strategy.setColumnNaming(NamingStrategy.underline_to_camel);
        strategy.setEntityLombokModel(true);
        strategy.setRestControllerStyle(true);
        strategy.setInclude(scanner("表名,多个英文逗号分割").split(","));
        strategy.setControllerMappingHyphenStyle(true);
        strategy.setTablePrefix(pc.getModuleName() + "_");
        mpg.setStrategy(strategy);
        mpg.setTemplateEngine(new VelocityTemplateEngine());
        mpg.execute();
    }

}
9 application.yml
编写 application.yml 文件,实现数据库连接以及 一些 thymeleaf 的必要配置。
spring:
  datasource:
    url: jdbc:mysql://IP/数据库名
    username: 用户名
    password: 密码
    driver-class-name: com.mysql.jdbc.Driver
  thymeleaf:
    cache: false
    prefix: classpath:/templates/
    check-template-location: true
    suffix: .html
    encoding: utf-8
    servlet:
      content-type: text/html
    mode: HTML5
logging:
  level:
    com.example.crud.mapper: trace # 改成你的mapper文件所在包路径
10 主要后端代码
我们使用 mybatis-plus 不需要编写 xml 就可以快速实现单表查询。所以省略很多代码。其中的分页代码可以在运行时自动加载,不需要我们编写分页代码,这点给 mybatis-plus 点赞。
10.1 控制代码
package com.example.crud.controller;


import com.baomidou.mybatisplus.core.metadata.IPage;
import com.baomidou.mybatisplus.extension.plugins.pagination.Page;
import com.example.crud.entity.User;
import com.example.crud.service.IUserService;
import org.springframework.beans.factory.annotation.Autowired;
import org.springframework.stereotype.Controller;
import org.springframework.ui.Model;
import org.springframework.web.bind.annotation.*;

import javax.servlet.http.HttpServletRequest;
import java.io.Serializable;
import java.util.ArrayList;
import java.util.List;

/**
 * <p>
 *  前端控制器
 * </p>
 *
 * @author jobob
 * @since 2019-12-06
 */
@Controller
@RequestMapping("/crud/user")
public class UserController {
    @Autowired
    private IUserService userService;

    @RequestMapping("/update")
    public String update(User user){
        userService.updateById(user);
        return "redirect:list";
    }

    @RequestMapping("/edit")
    public String edit(Model model, Integer id){
        User user = userService.getById(id);
        model.addAttribute("user", user);
        return "edit";
    }

    @RequestMapping("/delect")
    public String delect(Integer id){
        userService.removeById(id);
        return "redirect:list";
    }

    @RequestMapping("/add")
    public String add(@ModelAttribute User user){
        userService.save(user);
        return "redirect:list";
    }

    @RequestMapping("/list")
    public String hello(Model model, @RequestParam(value = "current", required = false, defaultValue = "1") long current) {
        Page<User> curPage = new Page<>();
        curPage.setCurrent(current); // 当前页
        Page<User> page = userService.page(curPage);
        model.addAttribute("page", page);
        return "list";
    }
}
10.2 分页配置代码
如果我们需要使用 ,mybatisplus 分页插件,需要手动配置。
package com.example.crud.util;

import com.baomidou.mybatisplus.extension.plugins.PaginationInterceptor;
import org.springframework.context.annotation.Bean;
import org.springframework.context.annotation.Configuration;
import org.springframework.transaction.annotation.EnableTransactionManagement;

/**
 * @Description: 配置 mybatisplus 的分页
 * @Author: boolean
 * @Date: 2020/1/6 0:07
 */
@EnableTransactionManagement
@Configuration
public class Config {
    @Bean
    public PaginationInterceptor paginationInterceptor() {
        PaginationInterceptor paginationInterceptor = new PaginationInterceptor();
        // 设置请求的页面大于最大页后操作, true调回到首页,false 继续请求  默认false
        // paginationInterceptor.setOverflow(false);
        // 设置最大单页限制数量,默认 500 条,-1 不受限制
        // paginationInterceptor.setLimit(500);
        return paginationInterceptor;
    }
}
11 主要前端代码
我们利用 thymeleaf 编写前端代码,可以快速解决数据前后端数据传输问题。
11.1 list.html
<!DOCTYPE HTML>
<html xmlns:th="http://www.thymeleaf.org">
<head>
    <title>hello</title>
    <meta http-equiv="Content-Type" content="text/html; charset=UTF-8" />
</head>
<body>

<div style="width:500px;margin:20px auto;text-align: center">
    <table align='center' border='1' cellspacing='0'>
        <tr>
            <td>id</td>
            <td>姓名</td>
            <td>年龄</td>
            <td>邮箱</td>
            <td>编辑</td>
            <td>删除</td>
        </tr>
        <tr th:each="c:${page.records}">
            <td th:text="${c.id}"></td>
            <td th:text="${c.name}"></td>
            <td th:text="${c.age}"></td>
            <td th:text="${c.email}"></td>
            <td><a th:href="@{/crud/user/edit(id=${c.id})}">编辑</a></td>
            <td><a th:href="@{/crud/user/delect(id=${c.id})}">删除</a></td>
        </tr>
    </table>
    <br/>
    <div>
        <a th:href="@{/crud/user/list(current=1)}">[首  页]</a>
        <a th:href="@{/crud/user/list(current=${page.current-1})}">[上一页]</a>
        <a th:href="@{/crud/user/list(current=${page.current+1})}">[下一页]</a>
    </div>
    <br/>
    <form action="add" method="post">
        姓名: <input name="name"/> <br/>
        年龄: <input name="age"/> <br/>
        邮箱: <input name="email"/> <br/>
        <button type="submit">提交</button>

    </form>
</div>

</body>
</html>
11.2 edit.html
<!DOCTYPE HTML>
<html xmlns:th="http://www.thymeleaf.org">
<head>
    <title>hello</title>
    <meta http-equiv="Content-Type" content="text/html; charset=UTF-8" />
</head>
<body>
<div style="margin:0px auto; width:500px">

    <form action="update" method="post">

        姓名: <input name="name" th:value="${user.name}"/> <br/>
        年龄: <input name="age" th:value="${user.age}"/> <br/>
        邮箱: <input name="email" th:value="${user.email}"/> <br/>

        <input name="id" type="hidden" th:value="${user.id}"/>
        <button type="submit">提交</button>

    </form>
</div>
</body>

</html>
12 源码
https://github.com/buerbl/lea...
13 效果

关注微信公众号,随时移动端阅读

正文到此结束
- 本文标签: REST build Job bean springboot update db https 配置 CTO 插件 example ACE Service id java tab git 安装 代码 list schema Word Action IO spring 源码 struct map HTML5 value dataSource 删除 Property cache 2019 mysql classpath ip sql GitHub key 开发 http Freemarker 自动生成 UTC 编译 servlet cat NSA XML 参数 core 代码生成器 plugin zab ssl 数据库 IDE HTML 分页 entity 微信公众号 mapper JDBC root mail description 数据 App mybatis src Logging ORM ArrayList web maven tar UI
- 版权声明: 本文为互联网转载文章,出处已在文章中说明(部分除外)。如果侵权,请联系本站长删除,谢谢。
- 本文海报: 生成海报一 生成海报二
热门推荐
相关文章
Loading...


![[HBLOG]公众号](https://www.liuhaihua.cn/img/qrcode_gzh.jpg)

