SpringBoot连接多RabbitMQ源

在实际开发中,很多场景需要异步处理,这时就需要用到RabbitMQ,而且随着场景的增多程序可能需要连接多个RabbitMQ。SpringBoot本身提供了默认的配置可以快速配置连接RabbitMQ,但是只能连接一个RabbitMQ,当需要连接多个RabbitMQ时,默认的配置就不太适用了,需要单独编写每个连接。
在SpringBoot框架中,我们常用的两个类一般是:
RabbitTemplate
RabbitAdmin
所以我们连接多个RabbitMQ就需要重新建立连接、重新实现这两个类。
代码如下:
配置
application.properties 配置文件需要配置两个连接:
server.port=8080

# rabbitmq
v2.spring.rabbitmq.host=host
v2.spring.rabbitmq.port=5672
v2.spring.rabbitmq.username=username
v2.spring.rabbitmq.password=password
v2.spring.rabbitmq.virtual-host=virtual-host
#consume 手动 ack
v2.spring.rabbitmq.listener.simple.acknowledge-mode=manual
#1.当mandatory标志位设置为true时,
#   如果exchange根据自身类型和消息routingKey无法找到一个合适的queue存储消息,
#   那么broker会调用basic.return方法将消息返还给生产者;
#2.当mandatory设置为false时,出现上述情况broker会直接将消息丢弃;通俗的讲,
#   mandatory标志告诉broker代理服务器至少将消息route到一个队列中,
#   否则就将消息return给发送者;
v2.spring.rabbitmq.template.mandatory=true
#publisher confirms 发送确认
v2.spring.rabbitmq.publisher-confirms=true
#returns callback :
#   1.未送达exchange
#   2.送达exchange却未送道queue的消息 回调returnCallback.(注意)出现2情况时,publisher-confirms 回调的是true
v2.spring.rabbitmq.publisher-returns=true
v2.spring.rabbitmq.listener.simple.prefetch=5

# rabbitmq
v1.spring.rabbitmq.host=host
v1.spring.rabbitmq.port=5672
v1.spring.rabbitmq.username=username
v1.spring.rabbitmq.password=password
v1.spring.rabbitmq.virtual-host=virtual-host
#consume 手动 ack
v1.spring.rabbitmq.listener.simple.acknowledge-mode=manual
#1.当mandatory标志位设置为true时,
#   如果exchange根据自身类型和消息routingKey无法找到一个合适的queue存储消息,
#   那么broker会调用basic.return方法将消息返还给生产者;
#2.当mandatory设置为false时,出现上述情况broker会直接将消息丢弃;通俗的讲,
#   mandatory标志告诉broker代理服务器至少将消息route到一个队列中,
#   否则就将消息return给发送者;
v1.spring.rabbitmq.template.mandatory=true
#publisher confirms 发送确认
v1.spring.rabbitmq.publisher-confirms=true
#returns callback :
#   1.未送达exchange
#   2.送达exchange却未送道queue的消息 回调returnCallback.(注意)出现2情况时,publisher-confirms 回调的是true
v1.spring.rabbitmq.publisher-returns=true
v1.spring.rabbitmq.listener.simple.prefetch=5
重写连接工厂
需要注意的是,在多源的情况下,需要在某个连接加上 @Primary 注解,表示主连接,默认使用这个连接
package com.example.config.rabbitmq;

import com.alibaba.fastjson.JSON;
import org.springframework.amqp.core.AcknowledgeMode;
import org.springframework.amqp.core.Message;
import org.springframework.amqp.rabbit.config.SimpleRabbitListenerContainerFactory;
import org.springframework.amqp.rabbit.connection.CachingConnectionFactory;
import org.springframework.amqp.rabbit.connection.ConnectionFactory;
import org.springframework.amqp.rabbit.connection.CorrelationData;
import org.springframework.amqp.rabbit.core.RabbitAdmin;
import org.springframework.amqp.rabbit.core.RabbitTemplate;
import org.springframework.beans.factory.annotation.Autowired;
import org.springframework.beans.factory.annotation.Qualifier;
import org.springframework.beans.factory.annotation.Value;
import org.springframework.boot.autoconfigure.amqp.SimpleRabbitListenerContainerFactoryConfigurer;
import org.springframework.context.annotation.Bean;
import org.springframework.context.annotation.Configuration;
import org.springframework.context.annotation.Primary;

/**
 * Created by shuai on 2019/4/23.
 */
@Configuration
public class MultipleRabbitMQConfig {

    @Bean(name = "v2ConnectionFactory")
    public CachingConnectionFactory hospSyncConnectionFactory(
            @Value("${v2.spring.rabbitmq.host}") String host,
            @Value("${v2.spring.rabbitmq.port}") int port,
            @Value("${v2.spring.rabbitmq.username}") String username,
            @Value("${v2.spring.rabbitmq.password}") String password,
            @Value("${v2.spring.rabbitmq.virtual-host}") String virtualHost,
            @Value("${v2.spring.rabbitmq.publisher-confirms}") Boolean publisherConfirms,
            @Value("${v2.spring.rabbitmq.publisher-returns}") Boolean publisherReturns) {
        CachingConnectionFactory connectionFactory = new CachingConnectionFactory();
        connectionFactory.setHost(host);
        connectionFactory.setPort(port);
        connectionFactory.setUsername(username);
        connectionFactory.setPassword(password);
        connectionFactory.setVirtualHost(virtualHost);
        connectionFactory.setPublisherConfirms(publisherConfirms);
        connectionFactory.setPublisherReturns(publisherReturns);
        return connectionFactory;
    }

    @Bean(name = "v2RabbitTemplate")
    public RabbitTemplate firstRabbitTemplate(
            @Qualifier("v2ConnectionFactory") ConnectionFactory connectionFactory,
            @Value("${v2.spring.rabbitmq.template.mandatory}") Boolean mandatory) {
        RabbitTemplate v2RabbitTemplate = new RabbitTemplate(connectionFactory);
        v2RabbitTemplate.setMandatory(mandatory);
        v2RabbitTemplate.setConfirmCallback((correlationData, ack, s) -> {
            if (!ack) {
//                    LOGGER.info("{} 发送RabbitMQ消息 ack确认 失败: [{}]", this.name, JSON.toJSONString(object));
            } else {
//                    LOGGER.info("{} 发送RabbitMQ消息 ack确认 成功: [{}]", this.name, JSON.toJSONString(object));
            }
        });
        v2RabbitTemplate.setReturnCallback((message, code, s, exchange, routingKey) -> {
//                LOGGER.error("{} 发送RabbitMQ消息returnedMessage,出现异常,Exchange不存在或发送至Exchange却没有发送到Queue中,message:[{}], code[{}], s[{}], exchange[{}], routingKey[{}]", new Object[]{this.name, JSON.toJSONString(message), JSON.toJSONString(code), JSON.toJSONString(s), JSON.toJSONString(exchange), JSON.toJSONString(routingKey)});
        });
        return v2RabbitTemplate;
    }

    @Bean(name = "v2ContainerFactory")
    public SimpleRabbitListenerContainerFactory hospSyncFactory(
            @Qualifier("v2ConnectionFactory") ConnectionFactory connectionFactory,
            @Value("${v2.spring.rabbitmq.listener.simple.acknowledge-mode}") String acknowledge,
            @Value("${v2.spring.rabbitmq.listener.simple.prefetch}") Integer prefetch
    ) {
        SimpleRabbitListenerContainerFactory factory = new SimpleRabbitListenerContainerFactory();
        factory.setConnectionFactory(connectionFactory);
        factory.setAcknowledgeMode(AcknowledgeMode.valueOf(acknowledge.toUpperCase()));
        factory.setPrefetchCount(prefetch);
        return factory;
    }

    @Bean(name = "v2RabbitAdmin")
    public RabbitAdmin iqianzhanRabbitAdmin(
            @Qualifier("v2ConnectionFactory") ConnectionFactory connectionFactory) {
        RabbitAdmin rabbitAdmin = new RabbitAdmin(connectionFactory);
        rabbitAdmin.setAutoStartup(true);
        return rabbitAdmin;
    }


    // mq主连接
    @Bean(name = "v1ConnectionFactory")
    @Primary
    public CachingConnectionFactory publicConnectionFactory(
            @Value("${v1.spring.rabbitmq.host}") String host,
            @Value("${v1.spring.rabbitmq.port}") int port,
            @Value("${v1.spring.rabbitmq.username}") String username,
            @Value("${v1.spring.rabbitmq.password}") String password,
            @Value("${v1.spring.rabbitmq.virtual-host}") String virtualHost,
            @Value("${v1.spring.rabbitmq.publisher-confirms}") Boolean publisherConfirms,
            @Value("${v1.spring.rabbitmq.publisher-returns}") Boolean publisherReturns) {
        CachingConnectionFactory connectionFactory = new CachingConnectionFactory();
        connectionFactory.setHost(host);
        connectionFactory.setPort(port);
        connectionFactory.setUsername(username);
        connectionFactory.setPassword(password);
        connectionFactory.setVirtualHost(virtualHost);
        connectionFactory.setPublisherConfirms(publisherConfirms);
        connectionFactory.setPublisherReturns(publisherReturns);
        return connectionFactory;
    }

    @Bean(name = "v1RabbitTemplate")
    @Primary
    public RabbitTemplate publicRabbitTemplate(
            @Qualifier("v1ConnectionFactory") ConnectionFactory connectionFactory,
            @Value("${v1.spring.rabbitmq.template.mandatory}") Boolean mandatory) {
        RabbitTemplate v1RabbitTemplate = new RabbitTemplate(connectionFactory);
        v1RabbitTemplate.setMandatory(mandatory);
        v1RabbitTemplate.setConfirmCallback((correlationData, ack, s) -> {
            if (!ack) {
//                    LOGGER.info("{} 发送RabbitMQ消息 ack确认 失败: [{}]", this.name, JSON.toJSONString(object));
            } else {
//                    LOGGER.info("{} 发送RabbitMQ消息 ack确认 成功: [{}]", this.name, JSON.toJSONString(object));
            }
        });
        v1RabbitTemplate.setReturnCallback((message, code, s, exchange, routingKey) -> {
//                LOGGER.error("{} 发送RabbitMQ消息returnedMessage,出现异常,Exchange不存在或发送至Exchange却没有发送到Queue中,message:[{}], code[{}], s[{}], exchange[{}], routingKey[{}]", new Object[]{this.name, JSON.toJSONString(message), JSON.toJSONString(code), JSON.toJSONString(s), JSON.toJSONString(exchange), JSON.toJSONString(routingKey)});
        });
        return v1RabbitTemplate;
    }

    @Bean(name = "v1ContainerFactory")
    @Primary
    public SimpleRabbitListenerContainerFactory insMessageListenerContainer(
            @Qualifier("v1ConnectionFactory") ConnectionFactory connectionFactory,
            @Value("${v1.spring.rabbitmq.listener.simple.acknowledge-mode}") String acknowledge,
            @Value("${v1.spring.rabbitmq.listener.simple.prefetch}") Integer prefetch) {
        SimpleRabbitListenerContainerFactory factory = new SimpleRabbitListenerContainerFactory();
        factory.setConnectionFactory(connectionFactory);
        factory.setAcknowledgeMode(AcknowledgeMode.valueOf(acknowledge.toUpperCase()));
        factory.setPrefetchCount(prefetch);
        return factory;
    }

    @Bean(name = "v1RabbitAdmin")
    @Primary
    public RabbitAdmin publicRabbitAdmin(
            @Qualifier("v1ConnectionFactory") ConnectionFactory connectionFactory) {
        RabbitAdmin rabbitAdmin = new RabbitAdmin(connectionFactory);
        rabbitAdmin.setAutoStartup(true);
        return rabbitAdmin;
    }
}
创建Exchange、Queue并绑定
再实现 RabbitAdmin 后,我们就需要根据 RabbitAdmin 创建对应的交换机和队列,并建立绑定关系
package com.example.config.rabbitmq;

import org.springframework.amqp.core.BindingBuilder;
import org.springframework.amqp.core.Queue;
import org.springframework.amqp.core.TopicExchange;
import org.springframework.amqp.rabbit.core.RabbitAdmin;
import org.springframework.context.annotation.Configuration;

import javax.annotation.PostConstruct;
import javax.annotation.Resource;

/**
 * 创建Queue、Exchange并建立绑定关系
 * Created by shuai on 2019/5/16.
 */
@Configuration
public class MyRabbitMQCreateConfig {

    @Resource(name = "v2RabbitAdmin")
    private RabbitAdmin v2RabbitAdmin;

    @Resource(name = "v1RabbitAdmin")
    private RabbitAdmin v1RabbitAdmin;

    @PostConstruct
    public void RabbitInit() {
        v2RabbitAdmin.declareExchange(new TopicExchange("exchange.topic.example.new", true, false));
        v2RabbitAdmin.declareQueue(new Queue("queue.example.topic.new", true));
        v2RabbitAdmin.declareBinding(
                BindingBuilder
                        .bind(new Queue("queue.example.topic.new", true))        //直接创建队列
                        .to(new TopicExchange("exchange.topic.example.new", true, false))    //直接创建交换机 建立关联关系
                        .with("routing.key.example.new"));    //指定路由Key
    }
}
生产者
为了后续验证每个连接都建立成功,并且都能生产消息,生产者这里分别使用新生成的 RabbitTemplate 发送一条消息。
package com.example.topic;

import org.springframework.amqp.rabbit.core.RabbitTemplate;
import org.springframework.beans.factory.annotation.Autowired;
import org.springframework.stereotype.Component;

import javax.annotation.Resource;

@Component
public class TopicProducer {

    @Resource(name = "v1RabbitTemplate")
    private RabbitTemplate v1RabbitTemplate;

    @Resource(name = "v2RabbitTemplate")
    private RabbitTemplate v2RabbitTemplate;

    public void sendMessageByTopic() {
        String content1 = "This is a topic type of the RabbitMQ message example from v1RabbitTemplate";
        v1RabbitTemplate.convertAndSend(
                "exchange.topic.example.new",
                "routing.key.example.new",
                content1);

        String content2 = "This is a topic type of the RabbitMQ message example from v2RabbitTemplate";
        v2RabbitTemplate.convertAndSend(
                "exchange.topic.example.new",
                "routing.key.example.new",
                content2);
    }
}
消费者
这里需要注意在配置消费队列时,需要标识 ContainerFactory
package com.example.topic;

import org.springframework.amqp.rabbit.annotation.RabbitHandler;
import org.springframework.amqp.rabbit.annotation.RabbitListener;
import org.springframework.stereotype.Component;

@Component
@RabbitListener(queues = "queue.example.topic.new", containerFactory = "v2ContainerFactory")
public class TopicConsumer {

    @RabbitHandler
    public void consumer(String message) {
        System.out.println(message);
    }
}
这样就完成了SpringBoot连接多个RabbitMQ源的示例了,再写一段测试代码验证下。
测试验证
package com.example.test;

import com.example.topic.TopicProducer;
import org.junit.Test;
import org.junit.runner.RunWith;
import org.springframework.beans.factory.annotation.Autowired;
import org.springframework.boot.test.context.SpringBootTest;
import org.springframework.test.context.junit4.SpringRunner;

@RunWith(SpringRunner.class)
@SpringBootTest
public class RabbitMQMultipleTest {

    @Autowired
    private TopicProducer topicProducer;


    @Test
    public void topicProducerTest() {
        topicProducer.sendMessageByTopic();
    }
}
执行测试代码,验证结果为:
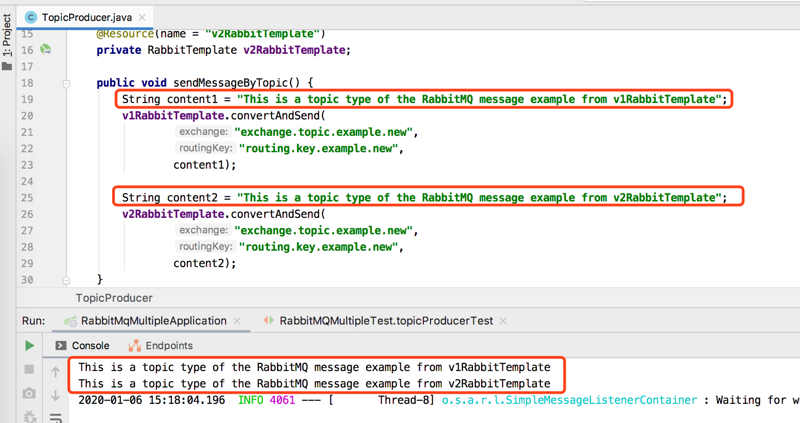
验证SpringBoot连接多RabbitMQ源成功!
github地址: Spring Boot 教程、技术栈、示例代码
联系我

正文到此结束
- 本文标签: src struct IO 2019 GitHub consumer java message springboot json lib ip bean junit UI 开发 spring Word js Spring Boot App build 测试 connectionFactory 配置 Qualifier list http https id CTO example 服务器 queue cat amqp value core git MQ 代码 Connection VirtualHost producer tar rabbitmq key
- 版权声明: 本文为互联网转载文章,出处已在文章中说明(部分除外)。如果侵权,请联系本站长删除,谢谢。
- 本文海报: 生成海报一 生成海报二
热门推荐


相关文章

近期评论
-
ws0132613@gmail.comhttps://getmacos.com/gopanel/william smith
-
谢谢
-
https://www.newcmy.com/register?aff=HBVX建议您试试草莓云机场,可以流畅观看youtube和tiktok,上reddit/x也没有问题,还有各种ai优化节点。
-
-
-
想购买您这个站,我的联系方式QQ741756694微信同步 能卖联系
-
-
-
-
Loading...
![[HBLOG]公众号](https://www.liuhaihua.cn/img/qrcode_gzh.jpg)

