SpringBoot中SpringMVC的自动配置以及扩展
一、问题引入
我们在SSM中使用SpringMVC的时候,需要由我们自己写SpringMVC的配置文件,需要用到什么就要自己配什么,配置起来也特别的麻烦。我们使用SpringBoot的时候没有进行配置,直接就能进行使用,这是为什么呢?
这是因为SpringBoot为我们自动配置好了SpringMVC
1)、我们首先参照官网来看一下关于SpringMVC的自动配置
https://docs.spring.io/spring-boot/docs/2.2.1.RELEASE/reference/htmlsingle/#boot-features-developing-web-applications
Spring MVC Auto-configuration
Spring Boot provides auto-configuration for Spring MVC that works well with most applications.
The auto-configuration adds the following features on top of Spring’s defaults:
-
Inclusion of ContentNegotiatingViewResolver and BeanNameViewResolver beans.
-
- 自动配置了ViewResolver(视图解析器:根据方法的返回值得到视图对象(View),视图对象决定如何渲染(转发?重定向?))
- ContentNegotiatingViewResolver:组合所有的视图解析器的;
-
- ==如何定制:我们可以自己给容器中添加一个视图解析器;自动的将其组合进来
-
Support for serving static resources, including support for WebJars (covered later in this document )).
静态资源文件夹路径.webjars
- Automatic registration of Converter, GenericConverter, and Formatter beans.
自动注册了Converter, GenericConverter, and Formatter等
-
- **Converter:转换器,**比如也面提交的是一个数字,但是页面的数字是文本类型的,通过转换器,就能转换成Integer类型
- Formatter :格式化器,2020-1-1===Date;
-
Support for HttpMessageConverters (covered later in this document ).
-
- HttpMessageConverter:SpringMVC用来转换Http请求和响应的;
- HttpMessageConverter是从容器中确定;获取所有的HttpMessageConverter;
自己给容器中添加HttpMessageConverter,只需要将自己的组件注册容器中(@Bean,@Component)
- Automatic registration of MessageCodesResolver (covered later in this document ).
定义错误代码生成规则
- Static index.html support.静态首页访问
- Custom Favicon support (covered later in this document ).
- Automatic use of a ConfigurableWebBindingInitializer bean (covered later in this document ).
我们可以配置一个ConfigurableWebBindingInitializer来替换默认的;(添加到容器)
初始化WebDataBinder;
请求数据=====JavaBean;
If you want to keep Spring Boot MVC features and you want to add additional MVC configuration (interceptors, formatters, view controllers, and other features), you can add your own @Configuration class of type WebMvcConfigurer but without @EnableWebMvc. If you wish to provide custom instances of RequestMappingHandlerMapping, RequestMappingHandlerAdapter, or ExceptionHandlerExceptionResolver, you can declare a WebMvcRegistrationsAdapter instance to provide such components.
2、扩展SpringMVC
编写一个配置类(@Configuration),是WebMvcConfigurerAdapter类型;不能标注@EnableWebMvc;

If you want to take complete control of Spring MVC, you can add your own @Configuration annotated with @EnableWebMvc
3.全面接管SpringMVC
为什么@EnableWebMvc自动配置就失效了?
1)@EnableWebMvc的核心
@Import(DelegatingWebMvcConfiguration.class)
public @interface EnableWebMvc {
2)、
@Configuration
public class DelegatingWebMvcConfiguration extends WebMvcConfigurationSupport {
3)、
@Configuration
@ConditionalOnWebApplication
@ConditionalOnClass({ Servlet.class, DispatcherServlet.class,
WebMvcConfigurerAdapter.class })
//容器中没有这个组件的时候,这个自动配置类才生效
@ConditionalOnMissingBean(WebMvcConfigurationSupport.class)
@AutoConfigureOrder(Ordered.HIGHEST_PRECEDENCE + 10)
@AutoConfigureAfter({ DispatcherServletAutoConfiguration.class,
ValidationAutoConfiguration.class })
public class WebMvcAutoConfiguration {
4)、@EnableWebMvc将WebMvcConfigurationSupport组件导入进来;
5)、导入的WebMvcConfigurationSupport只是SpringMVC最基本的功能;
4.原理
关于ContentNegotiatingViewResolver

我们点进这个ContentNegotiatingViewResolver ,在下面有一个resolveViewName方法

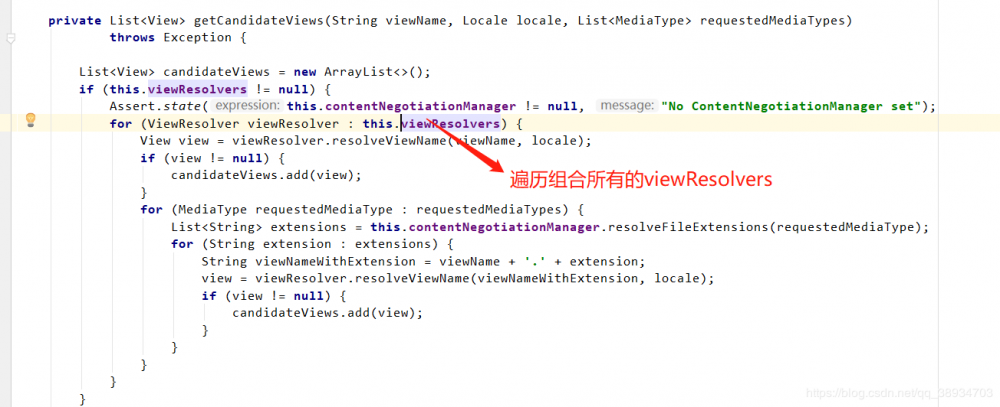
那么是怎么样获取候选的视图对象的呢?
我们点进getCandidateViews这个方法

那么这个组合逻辑又是什么呢?
返回到我们这里
 看到首先是new了一个ContentNegotiatingViewResolver对象
我们点进去,

我们所需要的ViewResolvers是从哪里拿到的呢?
我们接着往下边看

我们看到,这里有个初始化方法,里边利用BeanFactoryUtils工具,从容器中获取所有的视图解析器,把这些视图解析器就作为要组合的所有视图解析器。
那么如何定制我们自己的视图解析器呢,通过上面的讲解,就是:我们只需要自己给容器中添加一个视图解析器;然后ContentNegotiatingViewResolver就会将其
组合进来。
我们下面举个简单的例子给大家演示一下
为了方便,我们就在在SpringBoot的启动类中创建一个ViewResolver并将其添加到容器中

那么我们怎么判断是否其作用了呢,我们知道,视图解析器都会被DisPatcherServlet所扫描到,所有的请求都会被DisPatcherServlet类中的doDispatch方法所拦截
在doDispatch方法上打一个断点,debug运行,随便访问一个url,就能看到结果如下。


结果我们发现,我们自己加入的ViewResovler确实生效了
二.总结
1.假如我们需要扩展SpringMVC,只需要 编写一个配置类(@Configuration), 是WebMvcConfigurerAdapter类型;不标注@EnableWebMvc即可,这个时候我们 既保留了所有的自动配置,也能用我们扩展的配置;


![[HBLOG]公众号](https://www.liuhaihua.cn/img/qrcode_gzh.jpg)

