spring boot 使用maven和fat jar/war运行应用程序的对比
使用maven和fat jar/war运行应用程序的对比
简介
上篇文章我们介绍了Spring boot的fat jar/war包,jar/war包都可以使用 java -jar 命令来运行,而maven也提供了mvn spring-boot:run 命令来运行应用程序,下面我们看看两者有什么不同。
Spring Boot Maven Plugin
上篇文章我们提到了Spring Boot Maven Plugin,通过使用该插件,可以有效的提高部署效率,并打包成为fat jar/war包。
在打包成fat jar/war包的时候,背后实际上做了如下的事情:
- 管理了classpath的配置,这样我们在运行java -jar的时候不用手动指定-cp 。
- 使用了自定义的ClassLoader来加载和定位所有的外部jar包依赖。并且所有的依赖jar包已经被包含在这个fat包里面了。
- 通过manifest自动查找main() ,这样我们就不需要在java -jar中手动指定main方法。
使用Maven命令来运行应用程序
要使用maven命令来运行应用程序可以在程序的根目录下面执行:
mvn spring-boot:run
它会自动下载所需要的依赖,并运行,运行日志如下:
mvn spring-boot:run
[INFO] Scanning for projects...
[INFO]
[INFO] -------------------< com.flydean:springboot-fatjar >--------------------
[INFO] Building springboot-fatjar 0.0.1-SNAPSHOT
[INFO] --------------------------------[ jar ]---------------------------------
[INFO]
[INFO] >>> spring-boot-maven-plugin:2.2.2.RELEASE:run (default-cli) > test-compile @ springboot-fatjar >>>
[INFO]
[INFO] --- maven-resources-plugin:3.1.0:resources (default-resources) @ springboot-fatjar ---
[INFO] Using 'UTF-8' encoding to copy filtered resources.
[INFO] Copying 0 resource
[INFO] Copying 0 resource
[INFO]
[INFO] --- maven-compiler-plugin:3.8.1:compile (default-compile) @ springboot-fatjar ---
[INFO] Nothing to compile - all classes are up to date
[INFO]
[INFO] --- maven-resources-plugin:3.1.0:testResources (default-testResources) @ springboot-fatjar ---
[INFO] Using 'UTF-8' encoding to copy filtered resources.

[INFO]
[INFO] --- maven-compiler-plugin:3.8.1:testCompile (default-testCompile) @ springboot-fatjar ---
[INFO] Nothing to compile - all classes are up to date
[INFO]
[INFO] <<< spring-boot-maven-plugin:2.2.2.RELEASE:run (default-cli) < test-compile @ springboot-fatjar <<<
[INFO]
[INFO]
[INFO] --- spring-boot-maven-plugin:2.2.2.RELEASE:run (default-cli) @ springboot-fatjar ---
[INFO] Attaching agents: []
作为fat jar/war包运行应用程序
如果想打包成fat jar/war, 需要使用Maven Spring Boot plugin,如下所示,否则打包出来的jar包并不包含外部依赖:
<build>
    <plugins>
        ...
        <plugin>
            <groupId>org.springframework.boot</groupId>
            <artifactId>spring-boot-maven-plugin</artifactId>
        </plugin>
        ...
    </plugins>
</build>
如果我们的代码包含了多个main class, 需要手动指定具体使用哪一个, 有两种设置方式:
<plugin>
    <groupId>org.springframework.boot</groupId>
    <artifactId>spring-boot-maven-plugin</artifactId>
    <executions>
        <execution>
            <configuration>
                <mainClass>com.flydean.FatJarApp</mainClass>
            </configuration>
        </execution>
    </executions>
</plugin>
或者设置star-class属性:
<properties>
    <start-class>com.flydean.FatJarApp</start-class>
</properties>
使用 mvn clean package 即可打包程序,然后使用java -jar target/springboot-fatwar-0.0.1-SNAPSHOT.war
即可运行。
详解War文件
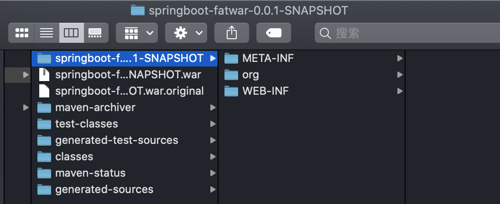
将打包好的war文件解压,我们看下War文件的结构:

里面有三部分:
- META-INF, 里面包含有自动生成的MANIFEST.MF
- WEB-INF/classes, 包含了编译好的class文件
- WEB-INF/lib,包含了war的依赖jar包和嵌入的Tomcat jar包。
- WEB-INF/lib-provided,包含了embedded模式运行所需要但是在部署模式不需要的额外的依赖包。
- org/springframework/boot/loader,里面是Spring boot自定义的类加载器,这些类加载器负责加载外部依赖,并且使他们在运行时可用。
我们再看下MANIFEST.MF文件的内容:
Manifest-Version: 1.0
Implementation-Title: springboot-fatwar
Implementation-Version: 0.0.1-SNAPSHOT
Start-Class: com.flydean.FatWarApp
Spring-Boot-Classes: WEB-INF/classes/
Spring-Boot-Lib: WEB-INF/lib/
Build-Jdk-Spec: 1.8
Spring-Boot-Version: 2.2.2.RELEASE
Created-By: Maven Archiver 3.4.0
Main-Class: org.springframework.boot.loader.WarLauncher
主要关注两行:
Start-Class: com.flydean.FatWarApp
Main-Class: org.springframework.boot.loader.WarLauncher
一个是启动类就是我们自己写的,一个是main类这个是Spring boot自带的。
详解jar文件
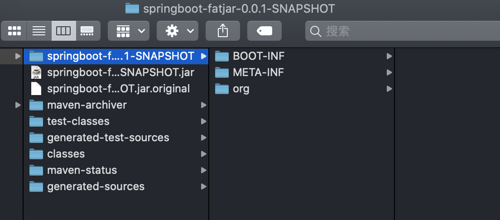
我们再来看下jar文件:

jar文件和war文件有一点不同,没有WEB-INF,改成了BOOT-INF。
- 我们所有的自己的class都在BOOT-INF/classes下面。
- 外部依赖在BOOT-INF/lib下。
我们再看下MANIFEST.MF文件有什么不同:
Manifest-Version: 1.0
Implementation-Title: springboot-fatjar
Implementation-Version: 0.0.1-SNAPSHOT
Start-Class: com.flydean.FatJarApp
Spring-Boot-Classes: BOOT-INF/classes/
Spring-Boot-Lib: BOOT-INF/lib/
Build-Jdk-Spec: 1.8
Spring-Boot-Version: 2.2.2.RELEASE
Created-By: Maven Archiver 3.4.0
Main-Class: org.springframework.boot.loader.PropertiesLauncher
我们可以看到Start-Class还是一样的,但是Main-Class是不一样的。
如何选择
既然有两种方式来运行应用程序,一种是使用mvn命令,一种是使用fat jar/war文件,那我们该怎么选择呢?
通常情况下,如果我们是在线下的开发环境,可以直接使用mvn命令,mvn命令需要依赖于源代码,我们可以不断的修改源代码,方便开发。
如果是在线上环境,那么我们就需要使用fat jar/war了,这样的外部依赖比较小,我们不需要在线上环境部署maven环境,也不需要源代码,只要一个java的运行时环境就可以了。
本文的代码请参考 https://github.com/ddean2009/learn-springboot2/tree/master/springboot-fatwar
更多教程请参考flydean的博客


![[HBLOG]公众号](https://www.liuhaihua.cn/img/qrcode_gzh.jpg)

