Spring Boot Actuator 模块 详解:健康检查,度量,指标收集和监控
前言
去年我们项目做了微服务1.0的架构转型,但是服务监控这块却没有跟上。这不,最近我就被分配了要将我们核心的微服务应用全部监控起来的任务。我们的微服务应用都是SpringBoot 应用,因此就自然而然的想到了借助Spring Boot 的Actuator 模块。(没吃过猪肉总听过猪叫见过猪跑吧 )。
本篇是我在完成这个工单之后,对Spring Boot Actuator模块 学习应用的总结。在本篇文章中,你可以学习到:
- Spring Boot Actuator 的快速使用入门
- Spring Boot Actuator 的一些重要的endpoints的介绍
- 如何通过Actuator 模块实时查看当前应用的线程 dump信息
- 如何通过Actuator 模块实时查看当前应用的堆信息
- 如何通过Actuator 模块实时修改当前应用的日志打印等级
- ...
之后我还会介绍:
- TODO:SpringBoot 微服务应用集成Prometheus + Grafana实现监控告警
一、什么是 Spring Boot Actuator
Spring Boot Actuator 模块提供了生产级别的功能,比如健康检查,审计,指标收集,HTTP 跟踪等,帮助我们监控和管理Spring Boot 应用。这个模块是一个采集应用内部信息暴露给外部的模块,上述的功能都可以通过HTTP 和 JMX 访问。
因为暴露内部信息的特性,Actuator 也可以和一些外部的应用监控系统整合( Prometheus , Graphite , DataDog , Influx , Wavefront , New Relic 等)。这些监控系统提供了出色的仪表板,图形,分析和警报,可帮助你通过一个统一友好的界面,监视和管理你的应用程序。
Actuator使用 Micrometer 与这些外部应用程序监视系统集成。这样一来,只需很少的配置即可轻松集成外部的监控系统。
对比 Slf4j 之于 Java Logger 中的定位。
二、快速开始,创建一个Spring Boot Actuator Demo
我们先创建一个demo应用。
- 你可以通过Spring Boot CLI 创建:
spring init -d=web,actuator -n=actuator-demo actuator-demo
- 或者通过 Spring Initializr 创建:
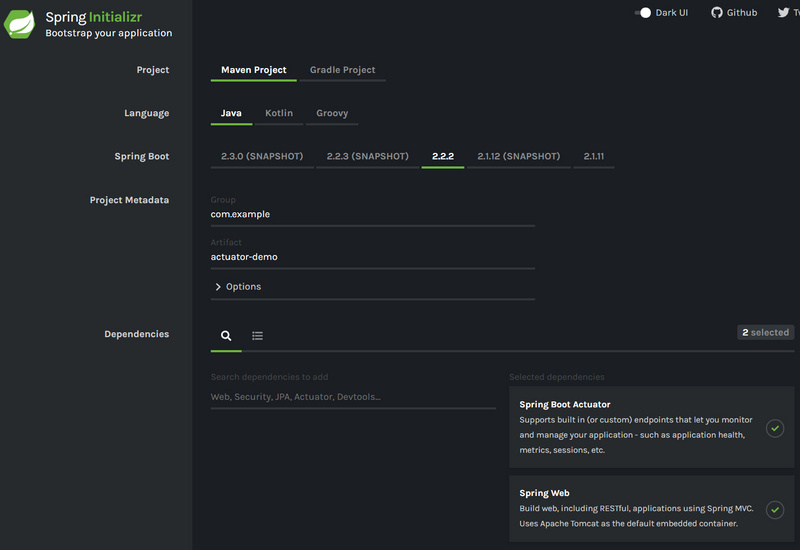
- 对应的maven依赖:
<dependencies>
    ...
    <dependency>
        <groupId>org.springframework.boot</groupId>
        <artifactId>spring-boot-starter-actuator</artifactId>
    </dependency>
    ...
</dependencies>
- 对应的Gradle 依赖:
dependencies {
    compile("org.springframework.boot:spring-boot-starter-actuator")
}
三、Endpoints 介绍
Spring Boot 提供了所谓的 endpoints (下文翻译为端点)给外部来与应用程序进行访问和交互。
打比方来说, /health 端点 提供了关于应用健康情况的一些基础信息。 metrics 端点提供了一些有用的应用程序指标(JVM 内存使用、系统CPU使用等)。
这些 Actuator 模块本来就有的端点我们称之为原生端点。根据端点的作用的话,我们大概可以分为三大类:
- 应用配置类:获取应用程序中加载的应用配置、环境变量、自动化配置报告等与Spring Boot应用密切相关的配置类信息。
- 度量指标类:获取应用程序运行过程中用于监控的度量指标,比如:内存信息、线程池信息、HTTP请求统计等。
- 操作控制类:提供了对应用的关闭等操作类功能。
详细的原生端点介绍,请以 官网 为准,这里就不赘述徒增篇幅。
需要注意的就是:
- 每一个端点都可以通过配置来单独禁用或者启动
- 不同于Actuator 1.x, Actuator 2.x 的大多数端点默认被禁掉 。 Actuator 2.x 中的默认端点增加了
/actuator前缀。默认暴露的两个端点为/actuator/health和/actuator/info
四、端点暴露配置
我们可以通过以下配置,来配置通过JMX 和 HTTP 暴露的端点。
| Property | Default |
|---|---|
management.endpoints.jmx.exposure.exclude |
|
management.endpoints.jmx.exposure.include |
* |
management.endpoints.web.exposure.exclude |
|
management.endpoints.web.exposure.include |
info, healt |
可以打开所有的监控点
management.endpoints.web.exposure.include=*
也可以选择打开部分,"*" 代表暴露所有的端点,如果指定多个端点,用","分开
management.endpoints.web.exposure.exclude=beans,trace
Actuator 默认所有的监控点路径都在 /actuator/* ,当然如果有需要这个路径也支持定制。
management.endpoints.web.base-path=/minitor
设置完重启后,再次访问地址就会变成 /minitor/* 。
现在我们按照如下配置:
# "*" 代表暴露所有的端点 如果指定多个端点,用","分开
management.endpoints.web.exposure.include=*
# 赋值规则同上
management.endpoints.web.exposure.exclude=
启动DEMO程序,访问 http://localhost:8080/actuator ,查看暴露出来的端点:
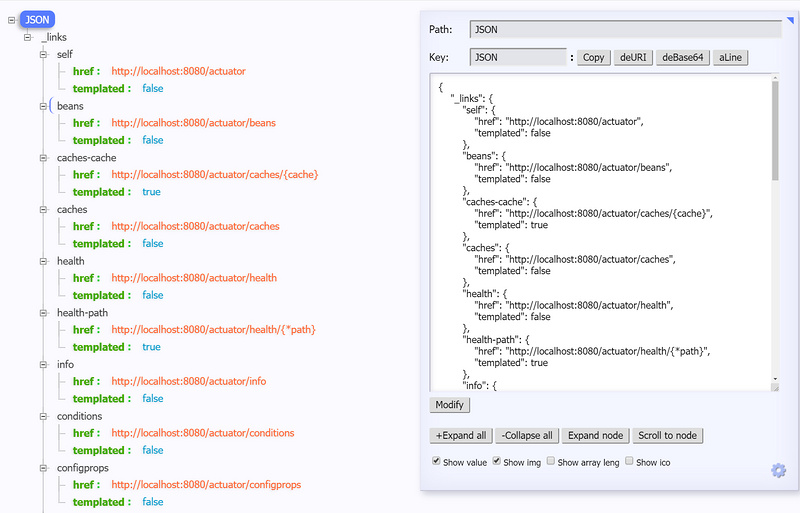
上面这样显示是因为chrome 浏览器安装了 JSON-handle 插件,实际上就是返回一大段json
下面,我会着重介绍几个比较重要的端点。
五、重要端点解析
5.1 /health 端点
/health 端点会聚合你程序的健康指标,来检查程序的健康情况。端点公开的应用健康信息取决于:
management.endpoint.health.show-details=always
该属性可以使用以下值之一进行配置:
| Name | Description |
|---|---|
never |
不展示详细信息,up或者down的状态,默认配置 |
when-authorized |
详细信息将会展示给通过认证的用户。授权的角色可以通过 management.endpoint.health.roles 配置 |
always |
对所有用户暴露详细信息 |
按照上述配置,配置成 always 之后,我们启动项目,访问 http://localhost:8080/actuator/health 端口,可以看到这样的信息:
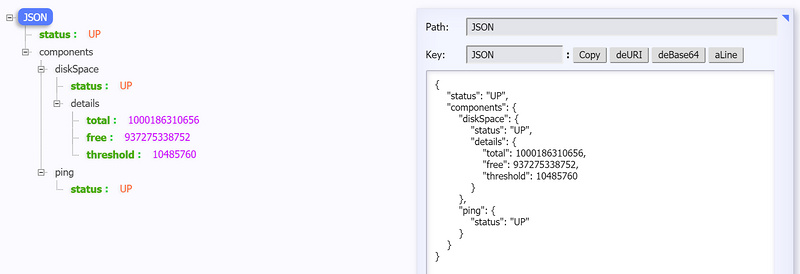
是不是感觉好像健康信息有点少?先别急,那是因为我们创建的是一个最基础的Demo项目,没有依赖很多的组件。
/health 端点有很多自动配置的健康指示器:如redis、rabbitmq、db等组件。当你的项目有依赖对应组件的时候,这些健康指示器就会被自动装配,继而采集对应的信息。如上面的 diskSpace 节点信息就是 DiskSpaceHealthIndicator 在起作用。
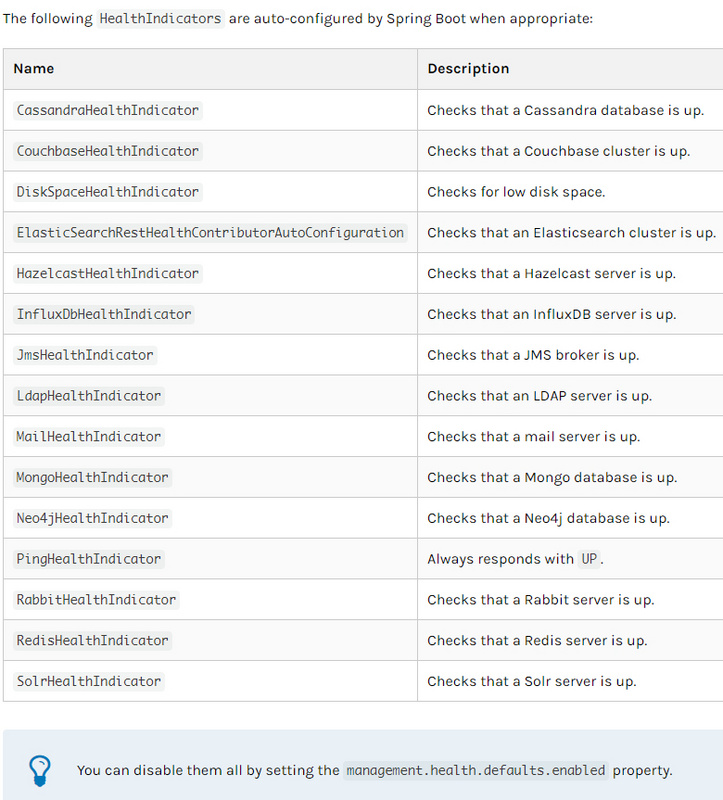
上述截图取自 官方文档
这是我另一个项目的 /health 端点信息。
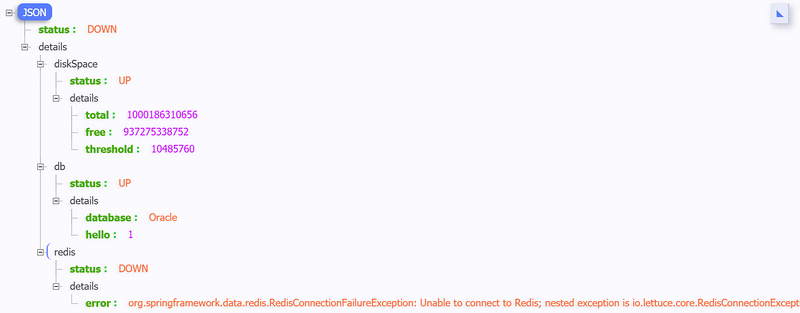
当如上的组件有一个状态异常,应用服务的整体状态即为down。我们也可以通过配置禁用某个组件的健康监测。
management.health.mongo.enabled: false
或者禁用所有自动配置的健康指示器:
management.health.defaults.enabled: false
:star:自定义 Health Indicator
当然你也可以自定义一个Health Indicator,只需要实现 HealthIndicator 接口或者继承 AbstractHealthIndicator 类。
/**
 * @author Richard_yyf
 * @version 1.0 2020/1/16
 */
@Component
public class CustomHealthIndicator extends AbstractHealthIndicator {

    @Override
    protected void doHealthCheck(Health.Builder builder) throws Exception {
        // 使用 builder 来创建健康状态信息
        // 如果你throw 了一个 exception,那么status 就会被置为DOWN,异常信息会被记录下来
        builder.up()
                .withDetail("app", "这个项目很健康")
                .withDetail("error", "Nothing, I'm very good");
    }
}
最终效果:
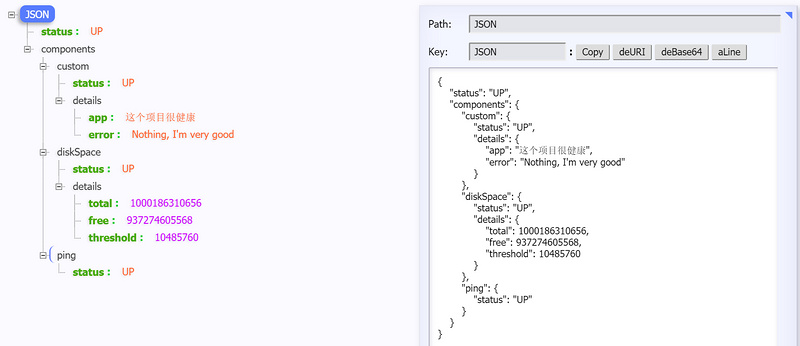
5.2 /metrics 端点
/metrics 端点用来返回当前应用的各类重要度量指标,比如:内存信息、线程信息、垃圾回收信息、tomcat、数据库连接池等。
{
    "names": [
        "tomcat.threads.busy",
        "jvm.threads.states",
        "jdbc.connections.active",
        "jvm.gc.memory.promoted",
        "http.server.requests",
        "hikaricp.connections.max",
        "hikaricp.connections.min",
        "jvm.memory.used",
        "jvm.gc.max.data.size",
        "jdbc.connections.max",
         ....
    ]
}
不同于1.x,Actuator在这个界面看不到具体的指标信息,只是展示了一个指标列表。为了获取到某个指标的详细信息,我们可以请求具体的指标信息,像这样:
http://localhost:8080/actuator/metrics/{MetricName}
比如我访问 /actuator/metrics/jvm.memory.max ,返回信息如下:
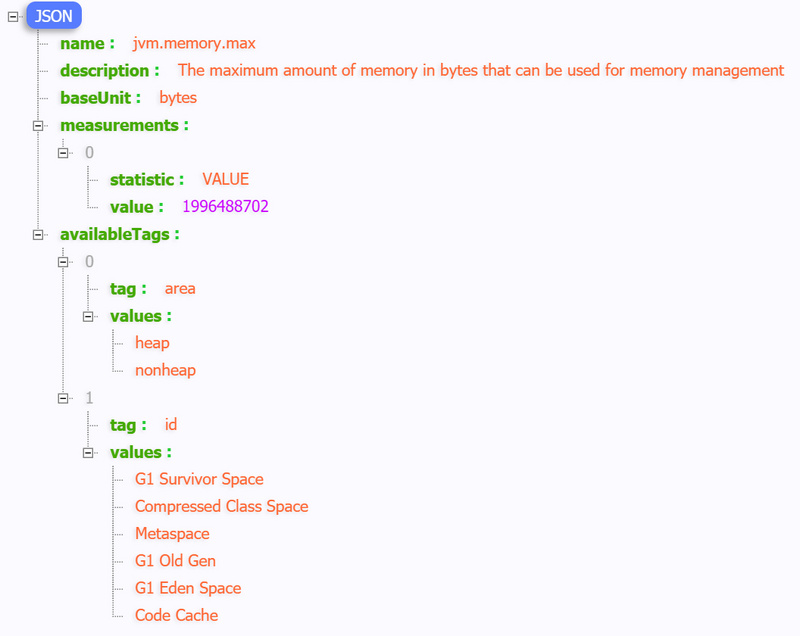
你也可以用query param的方式查看单独的一块区域。比如你可以访问 /actuator/metrics/jvm.memory.max?tag=id:Metaspace 。结果就是:

5.3 /loggers 端点
/loggers 端点暴露了我们程序内部配置的所有logger的信息。我们访问 /actuator/loggers 可以看到,
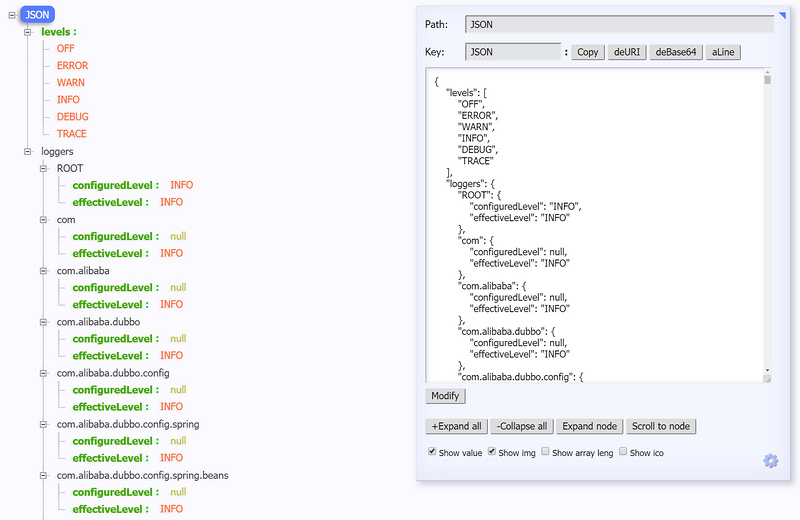
你也可以通过下述方式访问单独一个logger,
http://localhost:8080/actuator/loggers/{name}
比如我现在访问 root logger, http://localhost:8080/actuator/loggers/root
{
    "configuredLevel": "INFO",
    "effectiveLevel": "INFO"
}
:star:改变运行时的日志等级
/loggers 端点我最想提的就是这个功能,能够动态修改你的日志等级。
比如,我们可以通过下述方式来修改 root logger的日志等级。我们只需要发起一个URL 为 http://localhost:8080/actuator/loggers/root 的 POST 请求,POST报文如下:
{
   "configuredLevel": "DEBUG"
}

仔细想想,这个功能是不是非常有用。 如果在生产环境中,你想要你的应用输出一些Debug信息以便于你诊断一些异常情况,你你只需要按照上述方式就可以修改,而不需要重启应用。
如果想重置成默认值,把value 改成 null
5.4 /info 端点
/info 端点可以用来展示你程序的信息。我理解过来就是一些程序的基础信息。并且你可以按照自己的需求在配置文件 application.properties 中个性化配置(默认情况下,该端点只会返回一个空的json内容。):
info.app.name=actuator-test-demo
info.app.encoding=UTF-8
info.app.java.source=1.8
info.app.java.target=1.8
# 在 maven 项目中你可以直接用下列方式引用 maven properties的值
# info.app.encoding=@project.build.sourceEncoding@
# info.app.java.source=@java.version@
# info.app.java.target=@java.version@
启动项目,访问 http://localhost:8080/actuator/info :
{
    "app": {
        "encoding": "UTF-8",
        "java": {
            "source": "1.8.0_131",
            "target": "1.8.0_131"
        },
        "name": "actuator-test-demo"
    }
}
5.5 /beans 端点
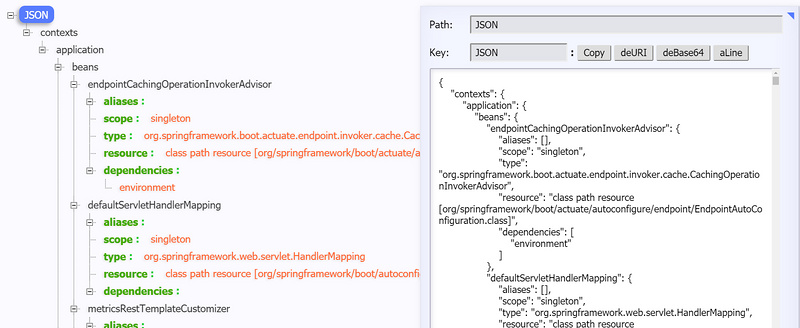
/beans 端点会返回Spring 容器中所有bean的别名、类型、是否单例、依赖等信息。
访问 http://localhost:8080/actuator/beans ,返回如下:
5.6 /heapdump 端点
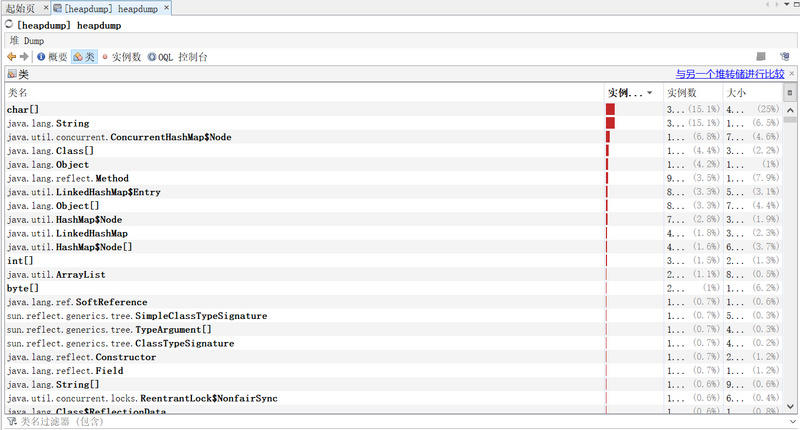
访问: http://localhost:8080/actuator/heapdump 会自动生成一个 Jvm 的堆文件 heapdump。我们可以使用 JDK 自带的 Jvm 监控工具 VisualVM 打开此文件查看内存快照。
5.7 /threaddump 端点
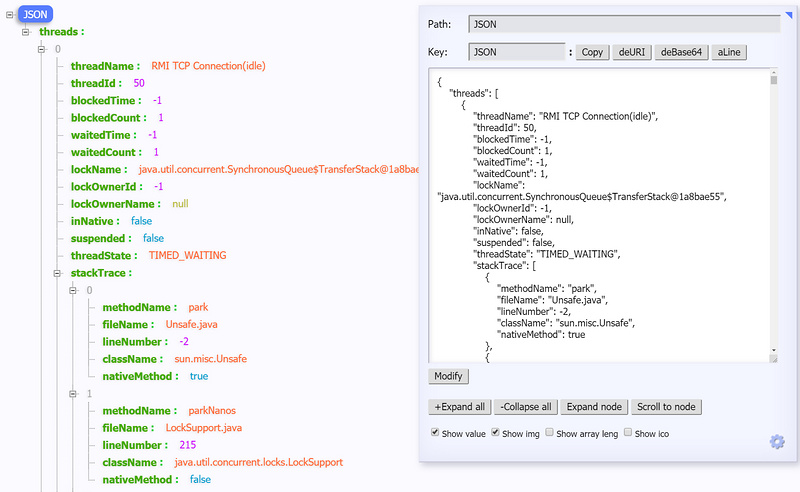
这个端点我个人觉得特别有用,方便我们在日常定位问题的时候查看线程的情况。 主要展示了线程名、线程ID、线程的状态、是否等待锁资源、线程堆栈等信息。就是可能查看起来不太直观。访问 http://localhost:8080/actuator/threaddump 返回如下:
5.8 /shutdown 端点
这个端点属于操作控制类端点,可以优雅关闭 Spring Boot 应用。要使用这个功能首先需要在配置文件中开启:
management.endpoint.shutdown.enabled=true
由于 shutdown 接口默认只支持 POST 请求 ,我们启动Demo项目,向 http://localhost:8080/actuator/shutdown 发起 POST 请求。返回信息:
{
    "message": "Shutting down, bye..."
}
然后应用程序被关闭。
由于开放关闭应用的操作本身是一件 非常危险 的事,所以真正在线上使用的时候,我们需要对其加入一定的保护机制,比如: 定制Actuator的端点路径、整合Spring Security进行安全校验 等。(不是特别必要的话,这个端点不用开)
六、整合Spring Security 对端点进行安全校验
由于端点的信息和产生的交互都是非常敏感的,必须防止未经授权的外部访问。如果您的应用程序中存在 Spring Security 的依赖,则默认情况下使用 基于表单的HTTP身份验证 来保护端点。
如果没有,只需要增加对应的依赖即可:
<dependency>
   <groupId>org.springframework.boot</groupId>
   <artifactId>spring-boot-starter-security</artifactId>
</dependency>
添加之后,我们需要定义安全校验规则,来覆盖Spring Security 的默认配置。
这里我给出了两个版本的模板配置:
import org.springframework.boot.actuate.autoconfigure.security.servlet.EndpointRequest;
import org.springframework.boot.actuate.context.ShutdownEndpoint;
import org.springframework.boot.autoconfigure.security.servlet.PathRequest;
import org.springframework.context.annotation.Configuration;
import org.springframework.security.config.annotation.web.builders.HttpSecurity;
import org.springframework.security.config.annotation.web.configuration.WebSecurityConfigurerAdapter;

/**
 * @author Richard_yyf
 */
@Configuration
public class ActuatorSecurityConfig extends WebSecurityConfigurerAdapter {

    /*
     * version1:
     * 1. 限制 '/shutdown'端点的访问,只允许ACTUATOR_ADMIN访问
     * 2. 允许外部访问其他的端点
     * 3. 允许外部访问静态资源
     * 4. 允许外部访问 '/'
     * 5. 其他的访问需要被校验
     * version2:
     * 1. 限制所有端点的访问,只允许ACTUATOR_ADMIN访问
     * 2. 允许外部访问静态资源
     * 3. 允许外部访问 '/'
     * 4. 其他的访问需要被校验
     */

    @Override
    protected void configure(HttpSecurity http) throws Exception {
        // version1
//        http
//                .authorizeRequests()
//                    .requestMatchers(EndpointRequest.to(ShutdownEndpoint.class))
//                        .hasRole("ACTUATOR_ADMIN")
//                .requestMatchers(EndpointRequest.toAnyEndpoint())
//                    .permitAll()
//                .requestMatchers(PathRequest.toStaticResources().atCommonLocations())
//                    .permitAll()
//                .antMatchers("/")
//                    .permitAll()
//                .antMatchers("/**")
//                    .authenticated()
//                .and()
//                .httpBasic();

        // version2
        http
                .authorizeRequests()
                .requestMatchers(EndpointRequest.toAnyEndpoint())
                    .hasRole("ACTUATOR_ADMIN")
                .requestMatchers(PathRequest.toStaticResources().atCommonLocations())
                    .permitAll()
                .antMatchers("/")
                    .permitAll()
                .antMatchers("/**")
                    .authenticated()
                .and()
                .httpBasic();
    }
}
application.properties 的相关配置如下:
# Spring Security Default user name and password
spring.security.user.name=actuator
spring.security.user.password=actuator
spring.security.user.roles=ACTUATOR_ADMIN
结语
本篇文章内容就到这里。
对应的源码可以 Github 上看到。
如果本文有帮助到你,希望能点个赞,这是对我的最大动力 。
参考
- https://docs.spring.io/spring...
- http://www.ityouknow.com/spri...
- 本文标签: 管理 Spring Security java dependencies 微服务 端口 https ACE 配置 垃圾回收 解析 mongo 定制 build 数据库 Security IDE Spring Boot spring 插件 JDBC tab git Word 安装 IO App bug 翻译 maven Connection description message redis id rmi Chrome 连接池 authenticate ip http 安全 自动生成 需求 rabbitmq root 自动化 总结 tar 线程池 数据 希望 value JVM 认证 tomcat 统计 cat bean GitHub springboot web 锁 tag db js 文章 UI MQ json bus 源码 servlet src 线程 Property
- 版权声明: 本文为互联网转载文章,出处已在文章中说明(部分除外)。如果侵权,请联系本站长删除,谢谢。
- 本文海报: 生成海报一 生成海报二


![[HBLOG]公众号](https://www.liuhaihua.cn/img/qrcode_gzh.jpg)

