mybatis深入之动态查询和连接池介绍
mybatis深入之动态查询和连接池介绍
一、mybatis条件查询
在mybatis前述案例中,我们的查询条件都是确定的。但在实际使用的时候,我们的查询条件有可能是动态变化的。例如,查询参数为一个user对象,要根据这个user对象进行查询,有可能要根据name属性进行查询,有可能是id属性进行查询,也有可能是根据id和name进行查询。这个时候我们就要用到一些标签,进行判断。我们依旧以一开始的mybatis入门案例来讲解如何实现动态查询。
1.if标签的使用
1.在dao接口文件IUserDao中,添加条件查询函数findUserByCondition。
/**
 * 根据传入的参数条件来查询
 * @param user 查询的条件:可能部分属性为空,也可能全部属性都不为空
 * @return
 */
List<User> findUserByCondition(User user);
2.接下来我们就要在映射配置文件IUserDao.xml中进行配置,如下:
<!-- 配置根据动态条件对象查询用户 -->
<select id="findUserByCondition" parameterType="domain.User" resultType="domain.User">
     select *  from user where 1 = 1
     <if test="username != null and username != ''">
         and username = #{username}
     </if>
     <if test="id != null">
         and id = #{id}
     </if>
     <if test="address != null and address != ''">
         and address = #{addresss}
     </if>
</select>
if标签中的test属性表示要判断的条件,如果为真,在sql语句中就加上if标签的内容。注意在sql语句中与运算用and表示。之所以要where之后要加上1=1,是为了保证当user所有属性均为null时,sql语句仍然正确。如果不加上,当user所有属性均为空时,sql语句为select * from user where,这显然是不正确的,当加上1=1之后,sql语句为select * from user where 1=1,这条sql语句此时就相当于select * from user。
3.测试函数及测试结果如下:
/**
 * 测试根据动态条件进行查询
 * @throws IOException
 */
@Test
public void testFindByCondition() throws IOException {
    QueryVo vo = new QueryVo();
    User user = new User();
    user.setUsername("老王");
    List<User> users = userDao.findUserByCondition(user);
    for (User u : users
    ) {
        System.out.println(u);
    }
}
查询结果为:
User{id=41, username='老王', address='北京', sex='男', birthday=Wed Feb 28 07:47:08 CST 2018}
User{id=46, username='老王', address='北京', sex='男', birthday=Thu Mar 08 07:37:26 CST 2018}
sql语句为:
Preparing: select * from user where 1 = 1 and username = ?
Parameters: 老王(String)
2.where标签的使用
在映射配置文件IUserDao.xml中进行配置时,可以不写where 1=1,而改用where标签如下:
<select id="findUserByCondition" parameterType="domain.User" resultType="domain.User">
     select *  from user
    <where>
      <if test="username != null and username != ''">
         and username = #{username}
     </if>
     <if test="id != null">
         and id = #{id}
     </if>
     <if test="address != null and address != ''">
         and address = #{addresss}
     </if>
    </where>
</select>
最后的结果和之前是一样的。
3.foreach标签的使用
除了动态条件查询,还有一种查询的特殊情况,就是集合查询。比如说,在根据id查询用户时,要查询的用户id可能不止一个,这个时候就可以使用foreach标签进行集合查询。
在dao接口文件IUserDao中,添加条件查询函数findUsersByIds,如下:
/**
 * 根据list中的id值,查询用户信息
 * @param list
 * @return
 */
List<User> findUsersByIds(List<Integer> list);
2.在映射配置文件IUserDao.xml中进行配置,如下:
<!-- 配置根据id集合查询用户 -->
<select id="findUsersByIds" parameterType="java.util.List" resultType="domain.User">
    select *  from user
    <where>
        <if test="list != null and list.size()>0">
            <foreach collection="list" open= " and id in (" close=")" item="uid" separator=",">
                #{uid}
            </foreach>
        </if>
    </where>
</select>
foreach标签中,collection属性指定的是集合对象,item是集合中的元素,它的值和#{}中的值要对应。open属性是foreach代码的开始符号,close属性是关闭符号,separator是分割符。关于foreach标签,可以参考 Mybatis 示例之 foreach 。
3.测试函数及测试结果如下:
/**
 * 测试集合中的id值进行查询
 * 直接传入list进行查询
 * @throws IOException
 */
@Test
public void testFindUsersByIds() throws IOException {
    List<Integer> ids = new ArrayList<>();
    ids.add(41);
    ids.add(42);
    ids.add(43);
    List<User> users = userDao.findUsersByIds(ids);
    for (User user : users
    ) {
        System.out.println(user);
    }
}
查询结果为:
User{id=41, username='老王', address='北京', sex='男', birthday=Wed Feb 28 07:47:08 CST 2018}
User{id=42, username='小二王', address='北京金燕龙', sex='女', birthday=Sat Mar 03 05:09:37 CST 2018}
User{id=43, username='小二王', address='北京金燕龙', sex='女', birthday=Mon Mar 05 01:34:34 CST 2018}
sql语句为:
Preparing: select * from user WHERE id in ( ? , ? , ? )
Parameters: 41(Integer), 42(Integer), 43(Integer)
4.使用sql标签抽取重复的sql语句
不难发现查询时都用到了select * from user这一sql语句,可以使用sql标签来抽取。在映射配置文件IUserDao.xml中添加:
<sql id = "default">
    select * from user
</sql>
这样就可以在配置中通过include标签引用了,例如:
<!-- 配置根据id集合查询用户 -->
<select id="findUsersByIds" parameterType="java.util.List" resultType="domain.User">
    <include refid = "default"></include>
    <where>
        <if test="list != null and list.size()>0">
            <foreach collection="list" open="and id in (" close=")" item="uid" separator=",">
                #{uid}
            </foreach>
        </if>
    </where>
</select>
最后测试运行的结果和之前都是一样的。
二、连接池介绍
1.什么是连接池
连接池是数据库中很常用的一种技术,可以将其简单地理解为一个存储连接(connection)的容器(集合对象),并且必须是线程安全的,不能让两个线程拿到同一个连接,该容器还应具有先进先出的特点。具体来说就是,当要需要获取连接时,不是立刻创建一个连接,而是从连接池中获取一个连接,当用完之后,再将该连接重新放回连接池。我们在实际开发中都会使用连接池,因为它可以减少我们获取连接所消耗的时间。
2.mybatis中连接池的分类
在mybatis中的主配置文件SqlMapConfig.xml中,datasource标签中的type属性就指定了连接池的方式。type属性有三种取值,分别是:
POOLED--->采用传统的javax.sql.DataSource规范中的连接池,mybatis中有针对规范的实现;
UNPOOLED--->采用传统的获取连接的方式,虽然也实现Javax.sql.DataSource接口,但是并没有使用池的思想。
JNDI--->用服务器提供的JNDI技术实现,来获取DataSource对象,不同的服务器所能拿到DataSource是不一样。
如果不是web或者maven的war工程,是不能使用的。本教程中使用的是tomcat服务器,采用连接池就是dbcp连接池。
相应地,MyBatis内部分别定义了实现了javax.sql.DataSource接口的UnpooledDataSource,PooledDataSource 类来表示 UNPOOLED、POOLED 类型的数据源。
3.UNPOOLED方式和POOLED方式
对于POOLED方式来说,是从连接池获取连接,用完后再返回连接池:

对于UNPOOLED方式来说,是直接创建连接,使用完毕后就关闭连接:
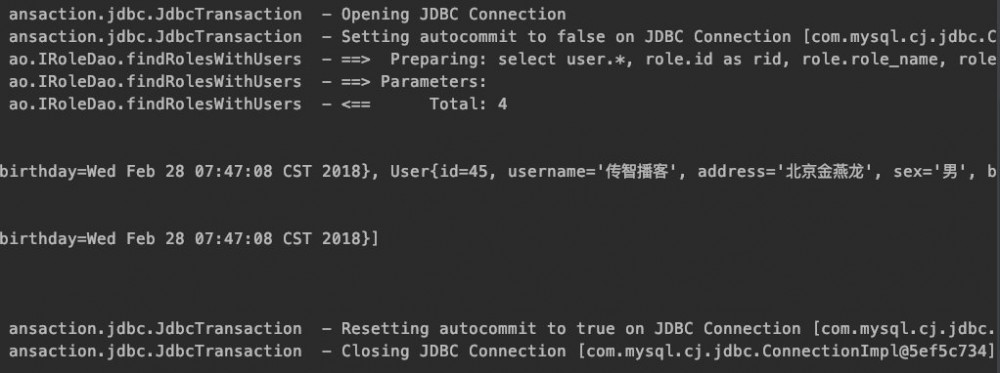
可以看到对于POOLED方式来说,在关闭连接之后,还需要返回连接。而对于UNPOOLED方式而言,是直接关闭连接,无需进行后续操作。
UNPOOLED方式调用层级:
package: org.apache.ibatis.datasource.unpooled:
class: UnpooledDataSource implements DataSource
method:
    public Connection getConnection() throws SQLException {
        return this.doGetConnection(this.username, this.password);
    }

    private Connection doGetConnection(String username, String password) throws SQLException         {
        Properties props = new Properties();
        if (this.driverProperties != null) {
            props.putAll(this.driverProperties);
        }

        if (username != null) {
            props.setProperty("user", username);
        }

        if (password != null) {
            props.setProperty("password", password);
        }

        return this.doGetConnection(props);
    }

    private Connection doGetConnection(Properties properties) throws SQLException {
        this.initializeDriver();
        Connection connection = DriverManager.getConnection(this.url, properties);
        this.configureConnection(connection);
        return connection;
    }
可以看到通过多次调用后,UNPOOLED方式最后还是会执行
Connection connection = DriverManager.getConnection(this.url, properties);
POOLED的方式比UNPOOLED方式稍微复杂一点:
POOLED方式调用层级:
package: org.apache.ibatis.datasource.pooled;
class:PooledDataSource implements DataSource
method:
    public Connection getConnection() throws SQLException {
        return this.popConnection(this.dataSource.getUsername(),    this.dataSource.getPassword()).getProxyConnection();
    }

    private PooledConnection popConnection(String username, String password) throws SQLException {
        boolean countedWait = false;
        PooledConnection conn = null;
        long t = System.currentTimeMillis();
        int localBadConnectionCount = 0;

        while(conn == null) {
            synchronized(this.state) {
                if (!this.state.idleConnections.isEmpty()) {
                    从空闲池中获取一个连接
                } else if (this.state.activeConnections.size() < this.poolMaximumActiveConnections) {
                    新建一个连接放入活动池
                } else {
                    取出活动池中最早建立的连接
                }
        }
        返回连接
    }
可以看到使用POOLED方式时,会优先从空闲池中获取。如果空闲池为空,就看活动池中连接数量是否少于设定的最大值。如果是,新建一个连接返回并将其放入活动池。如果不是,就取出活动池中最早建立的连接返回。
三、JNDI简述
1.JNDI简介
Java命名和目录接口(Java Naming and Directory Interface,缩写JNDI),是Java的一个目录服务应用程序接口(API),它提供一个目录系统,并将服务名称与对象关联起来,从而使得开发人员在开发过程中可以使用名称来访问对象。可以将其理解为一个map,由许多键值对组成。
2.JNDI实战
1.新建maven的webapp项目
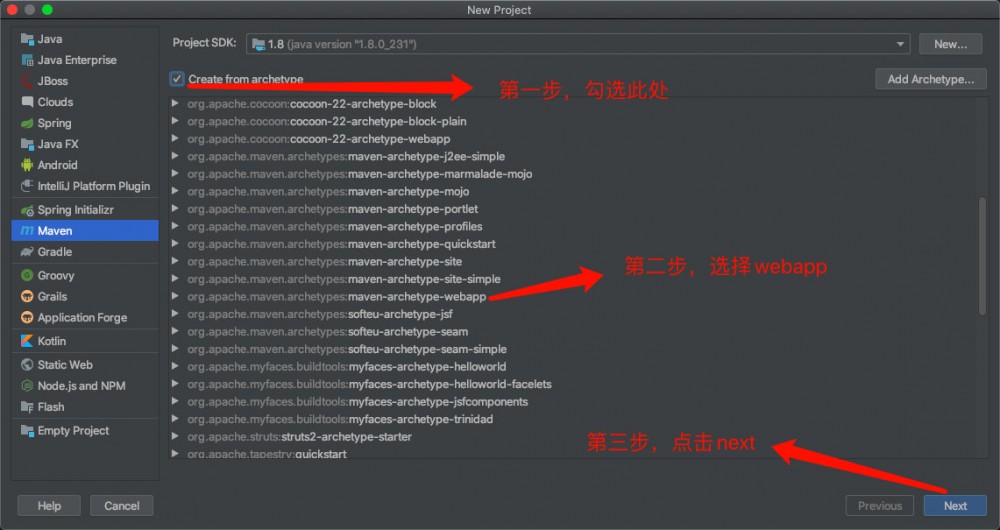
一路next之后,就创建好项目了。创建好项目之后,稍等一会,等maven导入一些必要的包之后,再去修改pom.xml文件。初始的pom.xml文件如下:
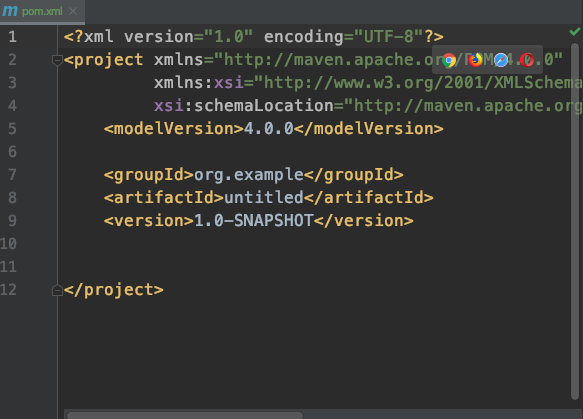
如果maven速度较慢,可以参考 mac下Intelij IDEA中修改maven国内镜像 ,将maven镜像换成国内阿里云。
加载完成之后,pom.xml文件应该如下:
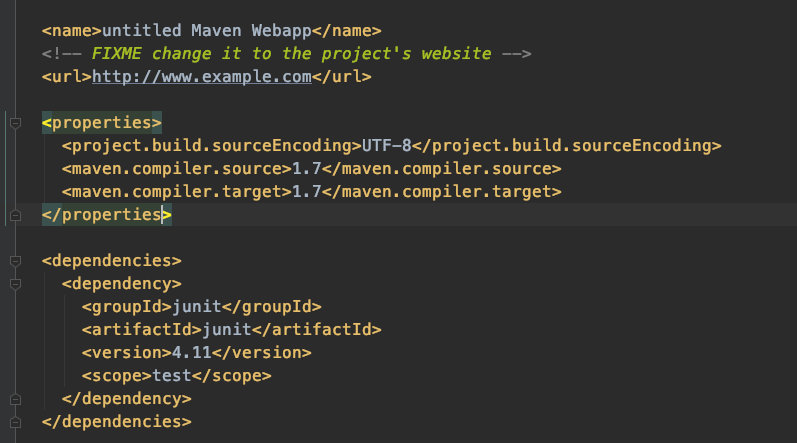
只需要更改dependencies标签即可:
<dependencies>
  <dependency>
    <groupId>org.mybatis</groupId>
    <artifactId>mybatis</artifactId>
    <version>3.4.6</version>
  </dependency>
  <dependency>
    <groupId>mysql</groupId>
    <artifactId>mysql-connector-java</artifactId>
    <version>8.0.18</version>
  </dependency>
  <dependency>
    <groupId>log4j</groupId>
    <artifactId>log4j</artifactId>
    <version>1.2.17</version>
  </dependency>
  <dependency>
    <groupId>junit</groupId>
    <artifactId>junit</artifactId>
    <version>4.13-rc-2</version>
    <scope>test</scope>
  </dependency>
  <dependency>
    <groupId>javax.servlet</groupId>
    <artifactId>servlet-api</artifactId>
    <version>3.0-alpha-1</version>
  </dependency>
  <dependency>
    <groupId>javax.servlet.jsp</groupId>
    <artifactId>jsp-api</artifactId>
    <version>2.2</version>
  </dependency>
</dependencies>
2.添加相应目录
初始的项目文件如下,可以看到src目录下只有一个main目录。main目录下只有一个webapp目录。
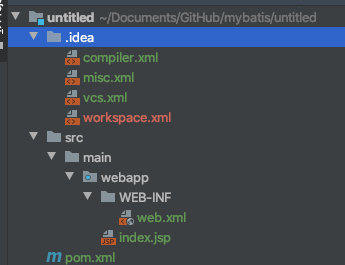
我们需要将入门案例中的main目录下面的java目录和resources目录拷贝到本项目的main目录中,将test目录拷贝到本项目的src目录下面。

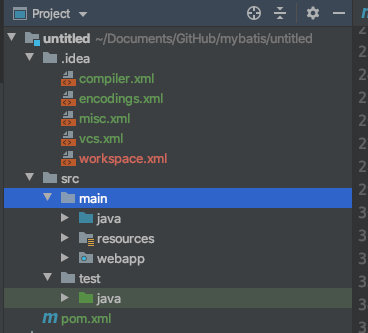
此时,我们只是把文件拷贝过来,还没有加载到项目中去,分别右键选中我们拷贝的目录,选择Mark Directory as,然后将java目录标记为Sources Root,resources目录标记为Resources Root,test目录标记为Test Sources Root。
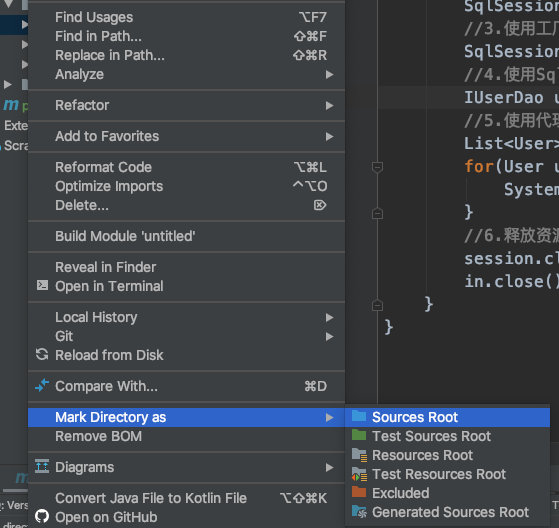
标记完成后,项目结构为如下,可以看到文件夹颜色的变化。
3.添加tomcat服务器配置
如果电脑没有下载tomcat的,可以先参考 Mac IDEA配置Tomcat(一)——下载安装 进行下载,然后参考 Mac IDEA配置Tomcat(二)—— IDEA配置 进行配置。
当idea配置好tomcat之后,我们就可以对项目进行配置了。点击右上角Add Configration,弹出如下界面:
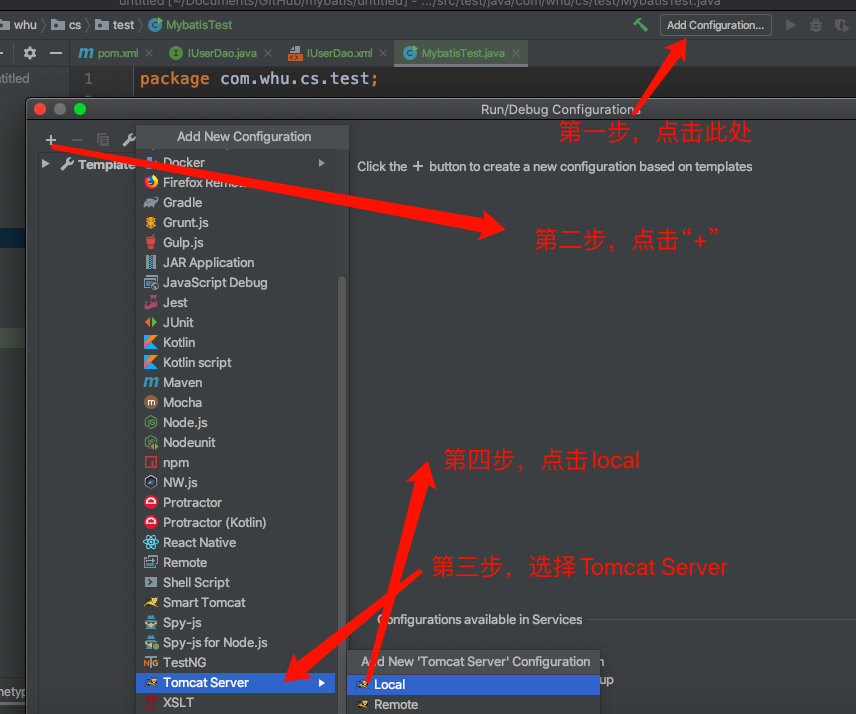
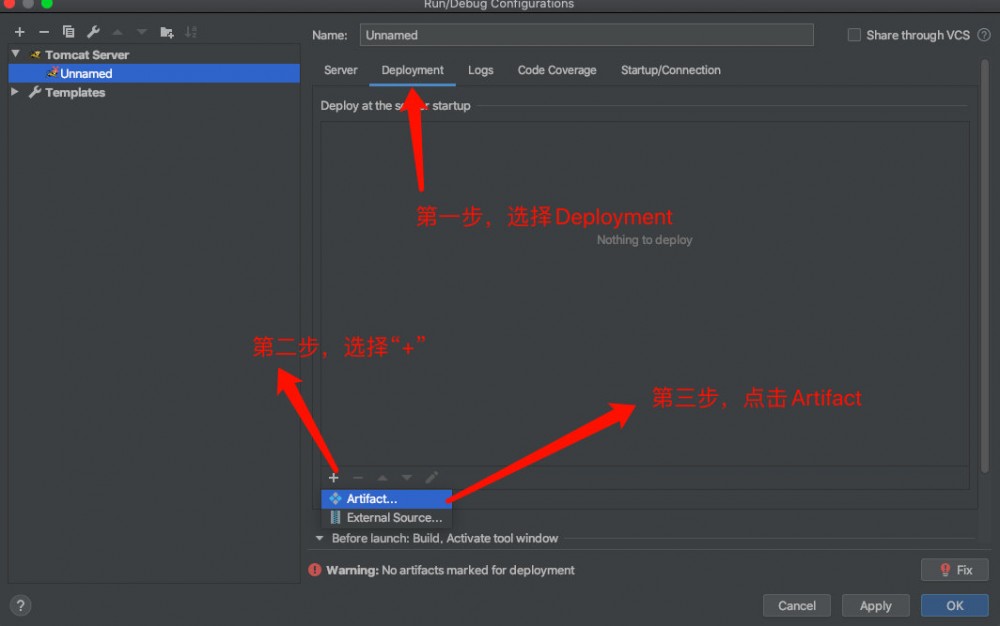
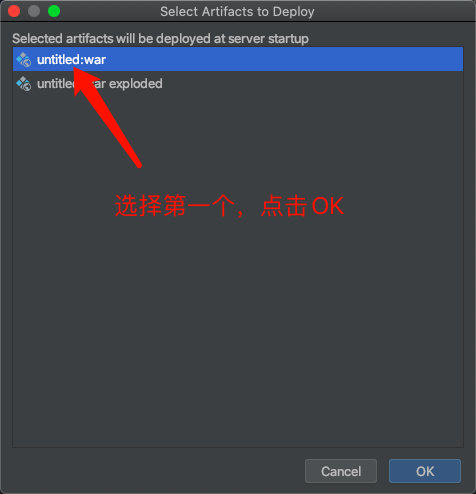
完成上述步骤后,点击OK。
4.添加contex.xml文件
在webapp目录下新建目录META_INF,在目录META_INF下新建context.xml文件:
<?xml version="1.0" encoding="UTF-8"?>
<Context>
<!--
<Resource
name="jdbc/mybatis"                           数据源的名称
type="javax.sql.DataSource"                   数据源类型
auth="Container"                                    数据源提供者
maxActive="20"                                      最大活动数
maxWait="10000"                                 最大等待时间
maxIdle="5"                                     最大空闲数
username="root"                                 用户名
password="1234"                                 密码
driverClassName="com.mysql.cj.jdbc.Driver"    驱动类
url="jdbc:mysql://localhost:3306/mybatis"     连接url字符串
/>
 -->
<Resource
name="jdbc/mybatis"
type="javax.sql.DataSource"
auth="Container"
maxActive="20"
maxWait="10000"
maxIdle="5"
username="root"
password="12345678"
driverClassName="com.mysql.cj.jdbc.Driver"
url="jdbc:mysql://localhost:3306/mybatis"
/>
</Context>
5.更改主配置文件SqlMapConfig.xml
将配置数据源的dataSource标签修改为:
<dataSource type="JNDI">
    <property name="data_source" value="java:comp/env/jdbc/mybatis"/>
</dataSource>
其中value值的前半部分"java:comp/env/"是固定的不可修改的,后半部分"jdbc/mybatis"就是context.xml文件中指定的数据源名称。
6.运行项目
此时运行项目,只会在浏览器中出现一个Hello World界面,因为此时运行的是webapp目录下的index.jsp文件。我们需要讲MybatisTest中的main函数代码内嵌到其中。如下:
<%@ page import="java.io.InputStream" %>
<%@ page import="org.apache.ibatis.io.Resources" %>
<%@ page import="org.apache.ibatis.session.SqlSessionFactoryBuilder" %>
<%@ page import="org.apache.ibatis.session.SqlSessionFactory" %>
<%@ page import="org.apache.ibatis.session.SqlSession" %>
<%@ page import="dao.IUserDao" %>
<%@ page import="domain.User" %>
<%@ page import="java.util.List" %>
<%@ page language="java" contentType="text/html; charset=UTF-8" pageEncoding="UTF-8"%>
<html>
<body>
<h2>Hello World!</h2>
<%
    //1.读取配置文件
    InputStream in = Resources.getResourceAsStream("SqlMapConfig.xml");
    //2.创建SqlSessionFactory工厂
    SqlSessionFactoryBuilder builder = new SqlSessionFactoryBuilder();
    SqlSessionFactory factory = builder.build(in);
    //3.使用工厂生产SqlSession对象
    SqlSession sqlSession = factory.openSession();
    //4.使用SqlSession创建Dao的代理对象
    IUserDao userDao = sqlSession.getMapper(IUserDao.class);
    //5.使用代理对象执行方法
    List<User> users = userDao.findAll();
    for(User user : users) {
        System.out.println(user);
    }
    //6.释放资源
    sqlSession.close();
    in.close();
%>
</body>
</html>
此时,再运行项目,就可以看到除了网页显示之外,控制台还输出了查询结果:
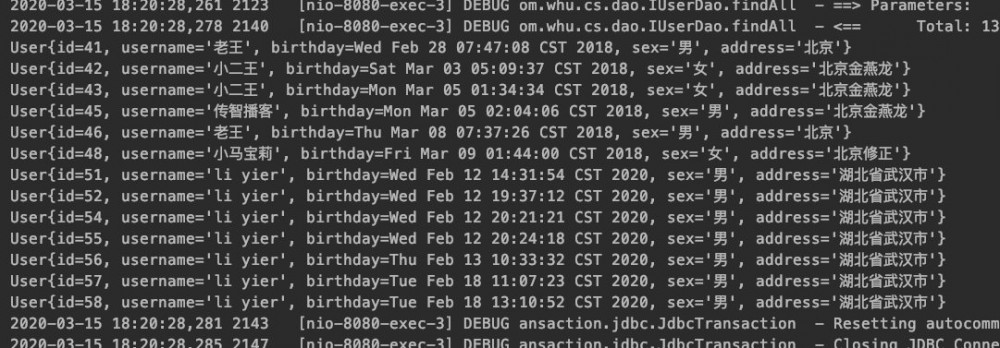
- 本文标签: SqlSessionFactoryBuilder map session mysql CTO mybatis db http 数据库 IO 数据 JDBC apache Select DBCP tomcat Property sql id 时间 阿里云 CST 测试 src find sqlsession UI 连接池 java DOM 开发 servlet 下载 安全 MQ 代码 stream 服务器 list build mapper 配置 synchronized 目录 HTML dependencies pom ACE cat iBATIS API junit root value Connection js SqlSessionFactory 安装 ArrayList 云 App 参数 maven Word 线程 Collection IDE Proxy web XML dataSource https
- 版权声明: 本文为互联网转载文章,出处已在文章中说明(部分除外)。如果侵权,请联系本站长删除,谢谢。
- 本文海报: 生成海报一 生成海报二


![[HBLOG]公众号](https://www.liuhaihua.cn/img/qrcode_gzh.jpg)

