13.SSM集成
缘由分析
对于我们现在的中大型项目于来说,用得最多的,应该就数我们的SSM,记Spring、SpringMvc、Mybatis,那么我们今天,就会来完成他们的集成。需要说明一下,本次集成我没有使用maven项目,如果需要maven项目的,可以直接讲jar包删除,在pom.xml中引入依赖即可,其他的内容都没有任何变化。
前期准备
1.jar包
这里的jar包有点多,我就直接截图出来,也会放一个某云的链接,有需要可以直接提取
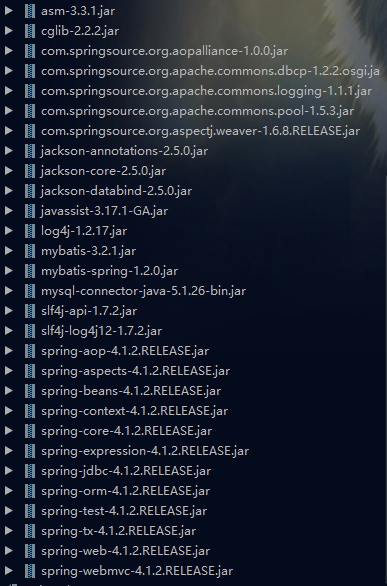
如有需要, 请点击 ,提取码4fy8
2.数据库
数据库的话,可以在里面创建一个user表,里面添加几条数据,目的是为了在部署到tomcat上面的时候测试链接数据库提取数据成功与否
3.开发工具
我所用的是idea1903版本的,像eclipse也同理
具体步骤
1.新建一个java web项目
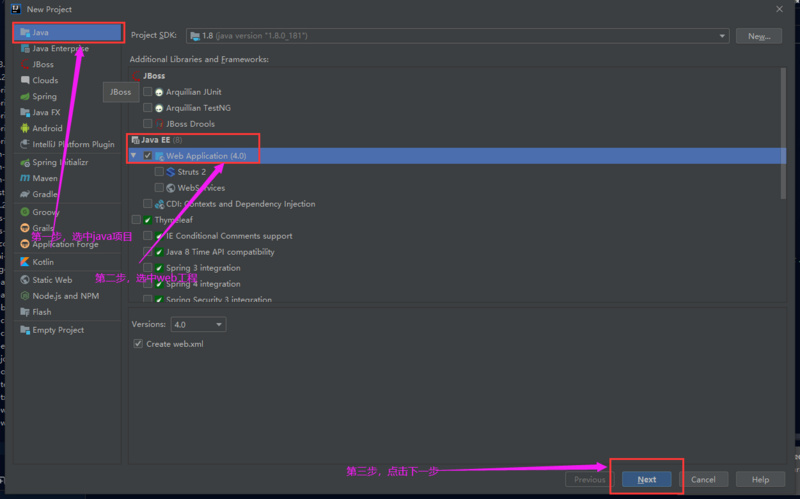
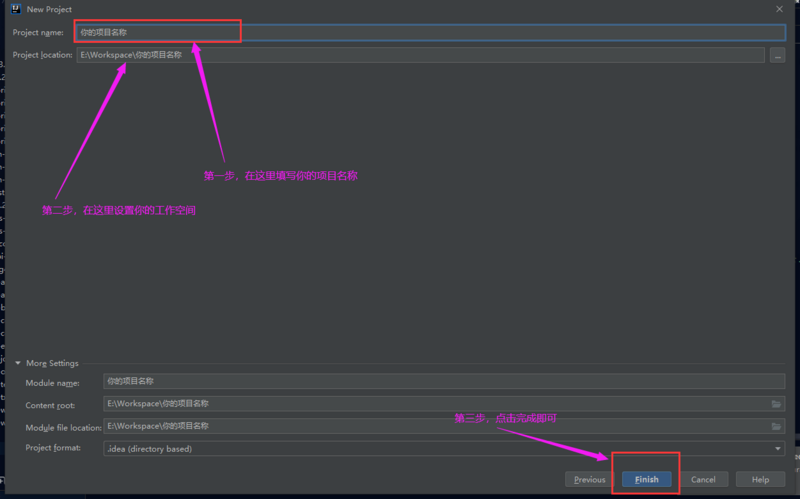
2.开始导入jar包
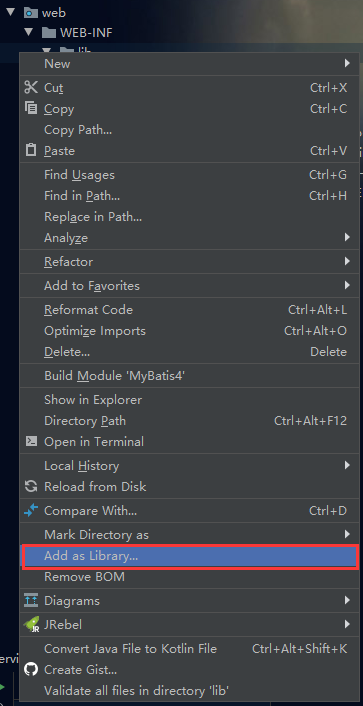
2.1在你的web/WEB-INF文件夹下面建一个名叫lib的文件夹,然后将所有的jar包复制进这个文件夹里面
2.2右键该文件夹,然后点击Add as Library,即完成导包操作
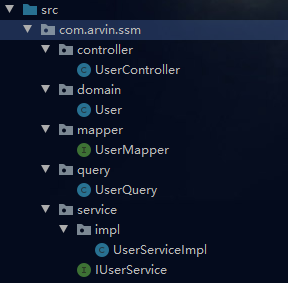
3.在src下面创建所需的包及类
下图是我创建好之后的样子
4.xml配置
4.1 Spring配置文件
这里的每一项都写了注释,就不多做解释,只是有一点需要注意的是,寡欲配置的事务即tx命名空间,如果我们直接在下面写而不先写上面的命名空间的话,会将tx前面的schema自动写为cache,从而我们后续在运行的时候,就会报一个 No bean named 'cacheManager' is defined 的错误,需要注意一下,所以特别提一下
<?xml version="1.0" encoding="UTF-8"?>
<beans xmlns="http://www.springframework.org/schema/beans"
   xmlns:xsi="http://www.w3.org/2001/XMLSchema-instance"
   xmlns:context="http://www.springframework.org/schema/context"
   xmlns:tx="http://www.springframework.org/schema/tx"
   xsi:schemaLocation="http://www.springframework.org/schema/beans
   http://www.springframework.org/schema/beans/spring-beans.xsd
   http://www.springframework.org/schema/context
   http://www.springframework.org/schema/context/spring-context.xsd
   http://www.springframework.org/schema/tx
   http://www.springframework.org/schema/tx/spring-tx.xsd">

<!--引入数据库连接配置文件-->
<context:property-placeholder location="classpath:jdbc.properties"/>

<!--数据库连接池-->
<bean id="dataSource" class="org.apache.commons.dbcp.BasicDataSource">
    <property name="driverClassName" value="${driverClassName}"/>
    <property name="url" value="${url}"/>
    <property name="username" value="${username}"/>
    <property name="password" value="${password}"/>
</bean>

<bean id="sqlSessionFactory" class="org.mybatis.spring.SqlSessionFactoryBean">
    <!--配置加载数据库路径-->
    <property name="dataSource" ref="dataSource"/>
    <!--配置加载mapper资源文件路径-->
    <property name="mapperLocations" value="classpath:com/arvin/ssm/mapper/*Mapper.xml"/>
<!--给对应包下面的domain或者类配置别名,配置完了默认为类名,一般建议类名首字母小写-->
    <property name="typeAliasesPackage">
        <value>
            com.arvin.ssm.domain
            com.arvin.ssm.query
        </value>
    </property>
</bean>

<!--配置扫描mapper的路径-->
<bean class="org.mybatis.spring.mapper.MapperScannerConfigurer">
    <property name="basePackage" value="com.arvin.ssm.mapper"></property>
</bean>

<!--事务配置-->
<bean id="transactionManager" class="org.springframework.jdbc.datasource.DataSourceTransactionManager">
    <property name="dataSource" ref="dataSource"/>
</bean>

<!--配置事务对注解的支持-->
<tx:annotation-driven/>

<!--扫描service包-->
<context:component-scan base-package="com.arvin.ssm.service"/>
</beans>
4.2 SpringMvc配置文件
这个配置文件相对简单,只是需要注意的是mvc命名空间前面的schema也存在上述的问题,需要大家注意一下,这个是idea自动代码提示生成的,目前我还没有更好的解决办法,只有看到了之后自己手动改为schema
<?xml version="1.0" encoding="UTF-8"?>
<beans xmlns="http://www.springframework.org/schema/beans"
   xmlns:xsi="http://www.w3.org/2001/XMLSchema-instance"
   xmlns:mvc="http://www.springframework.org/schema/mvc"
   xmlns:context="http://www.springframework.org/schema/context"
   xsi:schemaLocation="http://www.springframework.org/schema/beans
   http://www.springframework.org/schema/beans/spring-beans.xsd
   http://www.springframework.org/schema/mvc
   http://www.springframework.org/schema/mvc/spring-mvc.xsd
   http://www.springframework.org/schema/context
   http://www.springframework.org/schema/context/spring-context.xsd">


<!--Controller包扫描-->
<context:component-scan base-package="com.arvin.ssm.controller"/>
<!--静态资源放行-->
<mvc:default-servlet-handler/>
<!--开启注解支持-->
<mvc:annotation-driven/>
<!--视图解析器-->
<bean class="org.springframework.web.servlet.view.InternalResourceViewResolver">
    <property name="prefix" value="/WEB-INF/views"/>
    <property name="suffix" value=".jsp"/>
</bean>
</beans>
4.3 数据库连接池配置文件
这个很简单就不多做说明了
driverClassName=com.mysql.jdbc.Driver
    username=root
    password=123456
    url=jdbc:mysql:///mybatis
4.4 web.xml配置文件
这里也没有比较特殊的地方,就不多说了
<?xml version="1.0" encoding="UTF-8"?>
    <web-app xmlns="http://xmlns.jcp.org/xml/ns/javaee"
         xmlns:xsi="http://www.w3.org/2001/XMLSchema-instance"
         xsi:schemaLocation="http://xmlns.jcp.org/xml/ns/javaee http://xmlns.jcp.org/xml/ns/javaee/web-app_4_0.xsd"
         version="4.0">

    <!--前端控制器-->
    <servlet>
        <servlet-name>dispatcherServlet</servlet-name>
        <servlet-class>org.springframework.web.servlet.DispatcherServlet</servlet-class>
        <init-param>
            <param-name>contextConfigLocation</param-name>
            <!--加载mvc的配置文件-->
            <param-value>classpath:applicationContext-mvc.xml</param-value>
        </init-param>
        <!--在web应用程序启动的时候就加载这个servlet-->
        <load-on-startup>1</load-on-startup>
    </servlet>
    <servlet-mapping>
        <servlet-name>dispatcherServlet</servlet-name>
        <url-pattern>/</url-pattern>
    </servlet-mapping>

    <!--配置加载spring的配置文件-->
    <context-param>
        <param-name>contextConfigLocation</param-name>
        <param-value>classpath:applicationContext.xml</param-value>
    </context-param>

    <!--监听器-->
    <listener>
        <listener-class>org.springframework.web.context.ContextLoaderListener</listener-class>
    </listener>

    <!--字符编码集过滤-->
    <filter>
        <filter-name>EncodingFilter</filter-name>
        <filter-class>org.springframework.web.filter.CharacterEncodingFilter</filter-class>
        <init-param>
            <param-name>encoding</param-name>
            <param-value>utf-8</param-value>
        </init-param>
    </filter>
    <filter-mapping>
        <filter-name>EncodingFilter</filter-name>
        <url-pattern>/*</url-pattern>
    </filter-mapping>

</web-app>
4.5 关于mapper的配置
这里有需要注意的点了
4.5.1 建的位置必须要和对应mapper所在类的文件夹名相同
举例说明:我这里的UserMapper.xml所在位置为 /com/arvin/ssm/mapper ,那么我们写的配置文件也必须要和这个对应起来

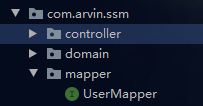
即做成如下图


4.5.2 别名的配置,都有写注释,可以参考
<?xml version="1.0" encoding="UTF-8"?>
<!DOCTYPE mapper PUBLIC "-//mybatis.org//DTD Mapper 3.0//EN"
        "http://mybatis.org/dtd/mybatis-3-mapper.dtd">

<!--这里的namesprace对应的为我们UserMapper接口的全限定名-->
<mapper namespace="com.arvin.ssm.mapper.UserMapper">
    <!--这里是我预先抽取的公共sql语句-->
    <sql id="showAll">
        select * from user
    </sql>
    <!--这里的id,对应的是UserMapper中的方法名-->
    <!--resultTpye可以写对应domain的全限定名,我这里写了类名首字母小写是因为我在前面配置了别名,
    具体可以看application.xml中的配置-->
    <select id="getAll" resultType="user">
        <!--这里是在引用上面抽取的公共sql语句,refid对应上面sql标签中的id-->
        <include refid="showAll"/>
    </select>
</mapper>
到这里,我们的配置就算完成了,可以在Controller里面先写一个请求测试!!
- 本文标签: JDBC 云 App maven 开发 ACE tar cache NSA web XML tomcat lib Service map 连接池 mysql CTO db mybatis Word sqlsession IDE apache Select servlet schema Action sql session 空间 classpath SpringMVC 删除 js mapper 数据 java DOM eclipse dataSource Property cat id 注释 测试 list http https SqlSessionFactory UI 部署 spring 解析 pom DBCP 监听器 数据库 IO 代码 root value ip src bean 配置
- 版权声明: 本文为互联网转载文章,出处已在文章中说明(部分除外)。如果侵权,请联系本站长删除,谢谢。
- 本文海报: 生成海报一 生成海报二


![[HBLOG]公众号](https://www.liuhaihua.cn/img/qrcode_gzh.jpg)

