文件上传transferTo一行代码的bug
本次的项目环境为 Running with Spring Boot v1.5.10.RELEASE, Spring v4.3.14.RELEASE, 服务器环境为CentOS7.0.
transferTo
我们在上传文件的时候会用到 transferTo 这个方法,
transferTo 是 package org.springframework.web.multipart; 帮我们已经封装好,所以我们上传文件的时候是很方便的,只需要一行代码。
Spring 大哥真的是强大。
今天我们上传的时候老是报错,错误提示
java.io.IOException: java.io.FileNotFoundException: /opt/xxxxxxx/xxx.png (Is a directory)
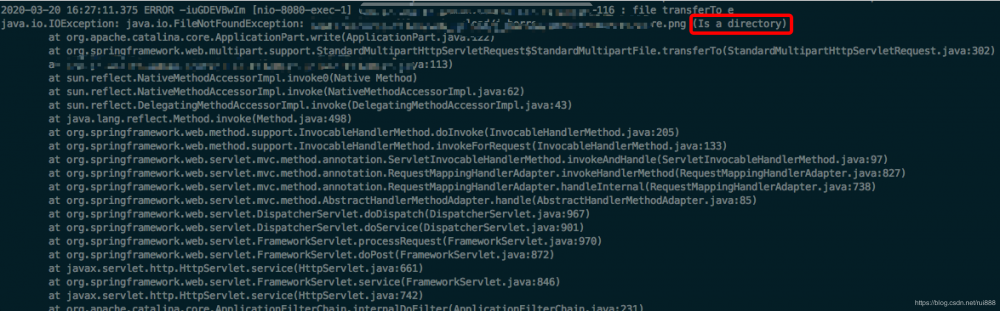
蹩脚的英文好好的翻译一下,xxx.png 是一个目录。
对的,看到这里大家大概就明吧了。
  String path = FILE_PATH + PATH_NAME + File.separator + dirName;
        String fileName = file.getOriginalFilename();
        ======>注意这里等下要讲的
        File targetFile = new File(path , fileName);
        if (!targetFile.exists()) {
            targetFile.mkdirs();
        }
        boolean upState = false;
        try {
            file.transferTo(targetFile);
            upState = true;
        } catch (IOException e) {
            log.error("file transferTo e", e);
            e.printStackTrace();
        }
分析下
其实这个这里上传文件只是一个方法,用到了 Spring 自己封装的 MultipartFile 类,上传只是用到了 transferTo ,参数是文件的路径。
好了,来一步步调试看源码。
- 第一步看 transferTo 中的源码
public void transferTo(File dest) throws IOException, IllegalStateException {
             ======>注意这里调用的是part 类中的write 方法,参数是File的路径
            this.part.write(dest.getPath());
            if (dest.isAbsolute() && !dest.exists()) {
                FileCopyUtils.copy(this.part.getInputStream(), new FileOutputStream(dest));
            }
        }
- 第二步看 ApplicationPart 中的write方法
public void write(String fileName) throws IOException {
        File file = new File(fileName);
        if (!file.isAbsolute()) {
            file = new File(this.location, fileName);
        }

        try {
            this.fileItem.write(file);
        } catch (Exception var4) {
            throw new IOException(var4);
        }
    }
大家注意看第二步中的 if (!file.isAbsolute()) ,是的问题就在这里。
这时候如果!file.isAbsolute()成立,也就是我们没有使用绝对路径,那么 file = new File(location,fileName);
这个时候会创建一个新的路径,看下面的代码
 public File(File parent, String child) {
        if (child == null) {
            throw new NullPointerException();
        }
        if (parent != null) {
            if (parent.path.equals("")) {
                this.path = fs.resolve(fs.getDefaultParent(),
                                       fs.normalize(child));
            } else {
                this.path = fs.resolve(parent.path,
                                       fs.normalize(child));
            }
        } else {
            this.path = fs.normalize(child);
        }
        this.prefixLength = fs.prefixLength(this.path);
    }
看到这里应该了解了 /opt/xxxxxxx/xxx.png ,这个图片被当成文件夹了,在这里创建了一个文件夹,而不是图片。
解决方法
- 代码注入,修改源码中的location
    @Bean
    MultipartConfigElement multipartConfigElement() {
        MultipartConfigFactory factory = new MultipartConfigFactory();
        factory.setLocation(你的上传路径path);
        return factory.createMultipartConfig();
    }
- 文件上传时候创建文件
    String path = FILE_PATH + PATH_NAME + File.separator + dirName;
        String fileName = file.getOriginalFilename();
         ======> 注意要先创建图片的目录mkdirs
        File sourceFile = new File(path);
        if (!sourceFile.exists()) {
            sourceFile.mkdirs();
        }

        File targetFile = new File(path + File.separator + fileName);

        boolean upState = false;
        try {
            file.transferTo(targetFile);
            upState = true;
        } catch (IOException e) {
            log.error("file transferTo e", e);
            e.printStackTrace();
        }
结论
这里其实就是 new File(path + File.separator + fileName) 的问题,因为Spring的源码中不会根据你给的路径自动创建图片的上一层路径。
写这个就是要说明,遇到问题的时候要多读源码,一步步的调试。
当你一步步接近真相的时候,你会感觉到很有成就感,就像爬过一座山头一样。
多读源码 ,不要只是拷贝,很多场景拷贝的时候细节问题不一样的。
正文到此结束
热门推荐


相关文章

近期评论
-
谢谢
-
https://www.newcmy.com/register?aff=HBVX建议您试试草莓云机场,可以流畅观看youtube和tiktok,上reddit/x也没有问题,还有各种ai优化节点。
-
-
-
想购买您这个站,我的联系方式QQ741756694微信同步 能卖联系
-
-
-
-
-
https://www.liuhaihua.cn/archives/40657.html 这篇博客中的图片打不开了
Loading...
![[HBLOG]公众号](https://www.liuhaihua.cn/img/qrcode_gzh.jpg)

