使用 Springboot 开发电商项目之 IDEA 创建项目 (二)
本博文是按照 how2j.cn 教程 Java天猫整站Springboot实战项目学习的,该教程是我目前见过最好、最完整、最系统的Java入门学习到实战的课程,作者列了完整的学习路线图,有大量的实战项目,由浅入深,很容易上手。
一、开发环境
- OS MacOS
- JDK 1.8
- SpringBoot 1.5.9
- IDEA IDEA 2019
二、新建项目
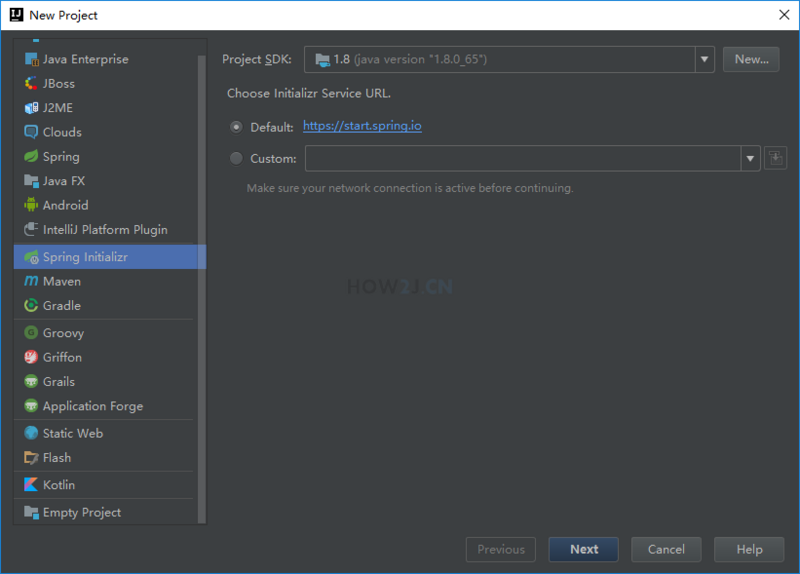
1、新建项目
使用 IDEA 新建项目,点击 Create New Project,选中maven webapp格式,然后next:
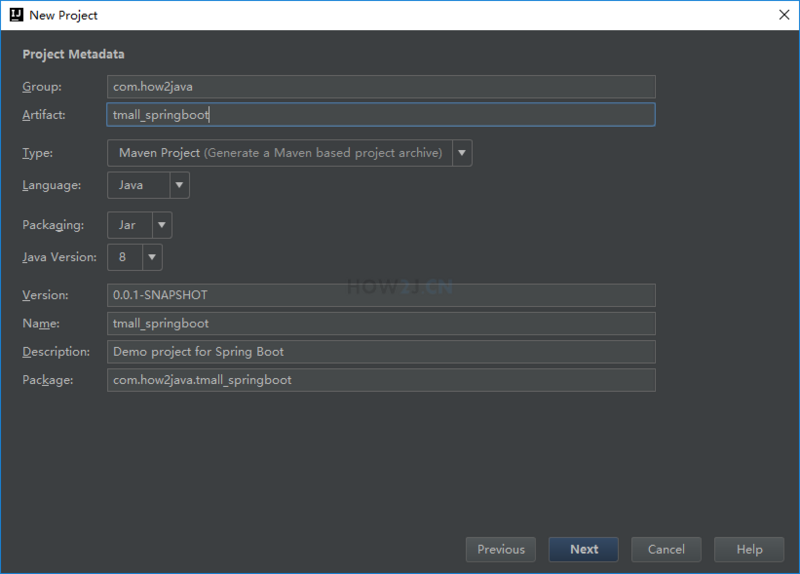
2、项目参数
GroupId: com.how2java.tmall
Artifact: tmall_springboot
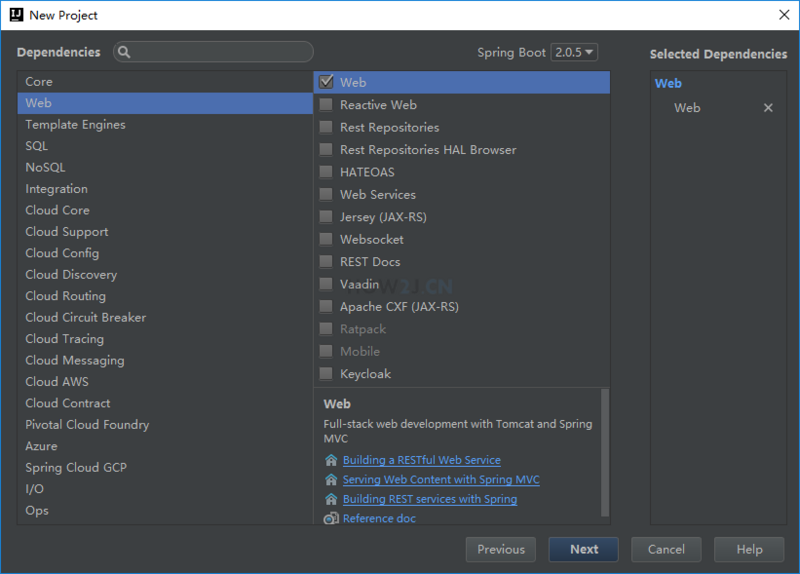
3、依赖
-
- 左边选中 Web
-
- 右边选中 Web
4、项目路径
项目路径选择:
e:/project/tmall_springboot
5、Maven仓库
Maven仓库配置可以参照我们上一篇博文:
使用 Springboot 开发电商项目之开发环境搭建 (一) 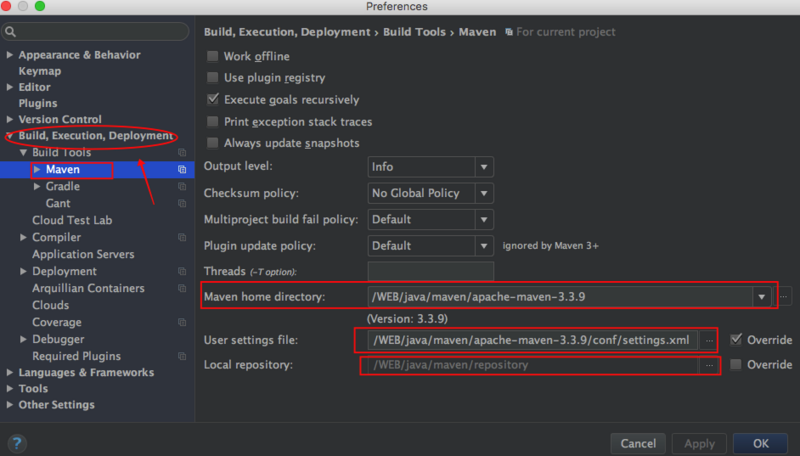
6、删除默认类
首先删除 TmallSpringbootApplication.java 这个自动创建的类,并且把其包也删除掉。
7、配置 pom.xml
复制如下内容到已经存在的pom里,如图所示,这个过程会导致idea去下载pom里声明的相关jar包,会花一定的时间,视网络和计算机性能而定。
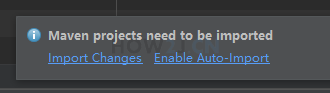
此时会弹出如图所示的提醒,为了避免每次修改 pom.xml 都出现这个对话框,点击 " Enable Auto-Import "
为了确保导入成功,右键点击pom.xml->Maven->Reimport
<project xmlns="http://maven.apache.org/POM/4.0.0" xmlns:xsi="http://www.w3.org/2001/XMLSchema-instance" xsi:schemaLocation="http://maven.apache.org/POM/4.0.0 http://maven.apache.org/xsd/maven-4.0.0.xsd">
  <modelVersion>4.0.0</modelVersion>
  <groupId>com.how2java.tmall</groupId>
  <artifactId>tmall_springboot</artifactId>
  <version>0.0.1-SNAPSHOT</version>
  <name>tmall_springboot</name>
  <description>tmall_springboot</description>
  <packaging>war</packaging>
    <parent>
        <groupId>org.springframework.boot</groupId>
        <artifactId>spring-boot-starter-parent</artifactId>
        <version>1.5.9.RELEASE</version>
    </parent>
    <dependencies>
        <!-- springboot web -->
        <dependency>
            <groupId>org.springframework.boot</groupId>
            <artifactId>spring-boot-starter-web</artifactId>
        </dependency>
        <!-- springboot tomcat 支持 -->
        <dependency>
            <groupId>org.springframework.boot</groupId>
            <artifactId>spring-boot-starter-tomcat</artifactId>
            <scope>provided</scope>
        </dependency>
        <!-- 热部署 -->
        <dependency>
            <groupId>org.springframework.boot</groupId>
            <artifactId>spring-boot-devtools</artifactId>
            <optional>true</optional>
        </dependency>
        <!-- jpa-->
        <dependency>
            <groupId>org.springframework.boot</groupId>
            <artifactId>spring-boot-starter-data-jpa</artifactId>
        </dependency>
        <!-- redis -->
        <dependency>
            <groupId>org.springframework.boot</groupId>
            <artifactId>spring-boot-starter-data-redis</artifactId>
        </dependency>
        <!-- springboot test -->
        <dependency>
            <groupId>org.springframework.boot</groupId>
            <artifactId>spring-boot-starter-test</artifactId>
            <scope>test</scope>
        </dependency>
        <!-- thymeleaf -->
        <dependency>
            <groupId>org.springframework.boot</groupId>
            <artifactId>spring-boot-starter-thymeleaf</artifactId>
        </dependency>
        <!-- elastic search -->
        <dependency>
            <groupId>org.springframework.boot</groupId>
            <artifactId>spring-boot-starter-data-elasticsearch</artifactId>
        </dependency>
        <!-- 用了 elasticsearch 就要加这么一个,不然要com.sun.jna.Native 错误 -->
        <dependency>
            <groupId>com.sun.jna</groupId>
            <artifactId>jna</artifactId>
            <version>3.0.9</version>
        </dependency>

        <!-- thymeleaf legacyhtml5 模式支持 -->
        <dependency>
            <groupId>net.sourceforge.nekohtml</groupId>
            <artifactId>nekohtml</artifactId>
            <version>1.9.22</version>
        </dependency>
        <!-- 测试支持 -->
        <dependency>
              <groupId>junit</groupId>
              <artifactId>junit</artifactId>
              <version>4.12</version>
              <scope>test</scope>
        </dependency>
        <!-- tomcat的支持.-->
        <dependency>
               <groupId>org.apache.tomcat.embed</groupId>
               <artifactId>tomcat-embed-jasper</artifactId>
               <version>8.5.23</version>
        </dependency>
        <!-- mysql-->
        <dependency>
            <groupId>mysql</groupId>
            <artifactId>mysql-connector-java</artifactId>
            <version>5.1.21</version>
        </dependency>

        <!-- junit -->
        <dependency>
          <groupId>junit</groupId>
          <artifactId>junit</artifactId>
          <version> 4.12</version>
        </dependency>
        <!-- commons-lang -->
        <dependency>
            <groupId>commons-lang</groupId>
            <artifactId>commons-lang</artifactId>
            <version>2.6</version>
        </dependency>
        <!-- shiro -->
        <dependency>
            <groupId>org.apache.shiro</groupId>
            <artifactId>shiro-spring</artifactId>
            <version>1.3.2</version>
        </dependency>
        <!-- hsqldb -->
        <dependency>
            <groupId>org.hsqldb</groupId>
            <artifactId>hsqldb</artifactId>
        </dependency>
    </dependencies>
    <properties>
        <java.version>1.8</java.version>
    </properties>
    <build>
        <plugins>
            <plugin>
                <groupId>org.springframework.boot</groupId>
                <artifactId>spring-boot-maven-plugin</artifactId>
            </plugin>
        </plugins>
    </build>
</project>
三、后台分类管理
1、实体类
Category.java
首先新建包,菜单 -> File -> Package -> 然后输入
com.how2java.tmall.pojo
然后创建类 Category,接下来.讲解这个类。
@Entity
表示这是一个实体类
@Table(name = "category")
表示对应的表名是 category
@JsonIgnoreProperties({ "handler","hibernateLazyInitializer" })
因为是做前后端分离,而前后端数据交互用的是 json 格式。 那么 Category 对象就会被转换为 json 数据。 而本项目使用 jpa 来做实体类的持久化,jpa 默认会使用 hibernate, 在 jpa 工作过程中,就会创造代理类来继承 Category ,并添加 handler 和 hibernateLazyInitializer 这两个 无须 json 化的属性 ,所以这里需要用 JsonIgnoreProperties 把这两个属性忽略掉。
package com.how2java.tmall.pojo;

import javax.persistence.Column;
import javax.persistence.Entity;
import javax.persistence.GeneratedValue;
import javax.persistence.GenerationType;
import javax.persistence.Id;
import javax.persistence.Table;

import com.fasterxml.jackson.annotation.JsonIgnoreProperties;

@Entity
@Table(name = "category")
@JsonIgnoreProperties({ "handler","hibernateLazyInitializer" })

public class Category {
    @Id
    @GeneratedValue(strategy = GenerationType.IDENTITY)
    @Column(name = "id")
    int id;

    String name;

    public int getId() {
        return id;
    }
    public void setId(int id) {
        this.id = id;
    }

    public String getName() {
        return name;
    }
    public void setName(String name) {
        this.name = name;
    }
}
2、创建DAO类
CategoryDAO.java
在 Category.java 步骤里已经讲解过了如何创建包,这里就不讲解如何创建包,而是直接给出类了。
CategoryDAO 类集成了 JpaRepository,就提供了CRUD和分页 的各种常见功能。 这就是采用 JPA 方便的地方~
package com.how2java.tmall.dao;

import org.springframework.data.jpa.repository.JpaRepository;

import com.how2java.tmall.pojo.Category;

public interface CategoryDAO extends JpaRepository<Category,Integer>{

}
3、服务类
CategoryService.java
@Service
标记这个类是 Service类
@Autowired CategoryDAO categoryDAO;
自动装配 上个步骤的 CategoryDAO 对象
public List<Category> list() {
       Sort sort = new Sort(Sort.Direction.DESC, "id");
       return categoryDAO.findAll(sort);
   }
首先创建一个 Sort 对象,表示通过 id 倒排序, 然后通过 categoryDAO进行查询。
注: 这里抛弃了 CategoryService 接口 加上 CategoryService 实现类的这种累赘的写法,而是直接使用 CategoryService 作为实现类来做。
package com.how2java.tmall.service;

import java.util.List;

import org.springframework.beans.factory.annotation.Autowired;
import org.springframework.data.domain.Sort;
import org.springframework.stereotype.Service;

import com.how2java.tmall.dao.CategoryDAO;
import com.how2java.tmall.pojo.Category;

@Service
public class CategoryService {
    @Autowired CategoryDAO categoryDAO;

    public List<Category> list() {
        Sort sort = new Sort(Sort.Direction.DESC, "id");
        return categoryDAO.findAll(sort);
    }
}
4、页面控制器类
AdminPageController.java
后台管理页面跳转专用控制器。
因为是做前后端分离,所以数据是通过 RESTFUL接口来取的,而在业务上,除了 RESTFUL 服务要提供,还要提供页面跳转服务,所以所有的后台页面跳转都放在 AdminPageController 这个控制器里。 而RSTFUL 专门放在 Category 对应的控制器 CategoryController.java 里面。 这样代码更清晰,不会搅起搅起的~
@Controller
表示这是一个控制器。
@GetMapping(value="/admin")
public String admin(){
   return "redirect:admin_category_list";
}
访问地址 admin,就会客户端跳转到 admin_category_list去。
@GetMapping(value="/admin_category_list")
public String listCategory(){
    return "admin/listCategory";
}
访问地址 admin_category_list 就会访问 admin/listCategory.html 文件。
package com.how2java.tmall.web;

import org.springframework.stereotype.Controller;
import org.springframework.web.bind.annotation.GetMapping;

@Controller
public class AdminPageController {
    @GetMapping(value="/admin")
    public String admin(){
        return "redirect:admin_category_list";
    }
    @GetMapping(value="/admin_category_list")
    public String listCategory(){
        return "admin/listCategory";
    }
}
5、REST服务控制器
CategoryController.java
这个就是专门用来提供 RESTFUL 服务器控制器了
@RestController
表示这是一个控制器,并且对每个方法的返回值都会直接转换为 json 数据格式。
@Autowired CategoryService categoryService;
自动装配 CategoryService
@GetMapping("/categories")
    public List<Category> list() throws Exception {
        return categoryService.list();
    }
对于categories 访问,会获取所有的 Category对象集合,并返回这个集合。 因为是声明为 @RestController, 所以这个集合,又会被自动转换为 JSON数组抛给浏览器。
package com.how2java.tmall.web;

import com.how2java.tmall.pojo.Category;
import com.how2java.tmall.service.CategoryService;
import org.springframework.beans.factory.annotation.Autowired;
import org.springframework.web.bind.annotation.GetMapping;
import org.springframework.web.bind.annotation.RestController;

import java.util.List;

@RestController
public class CategoryController {
    @Autowired CategoryService categoryService;

    @GetMapping("/categories")
    public List<Category> list() throws Exception {
        return categoryService.list();
    }
}
6、启动类
启动类,代替自动生成的 TmallSpringbootApplication.java
package com.how2java.tmall;
import org.springframework.boot.SpringApplication;
import org.springframework.boot.autoconfigure.SpringBootApplication;
@SpringBootApplication
public class Application {
    public static void main(String[] args) {
        SpringApplication.run(Application.class, args);
    }
}
7、跨域配置类
CORSConfiguration.java
配置类,用于允许所有的请求都跨域。
因为是二次请求,第一次是获取 html 页面, 第二次通过 html 页面上的 js 代码异步获取数据,一旦部署到服务器就容易面临跨域请求问题,所以允许所有访问都跨域,就不会出现通过 ajax 获取数据获取不到的问题了。
package com.how2java.tmall.config;

import org.springframework.context.annotation.Configuration;
import org.springframework.web.servlet.config.annotation.CorsRegistry;
import org.springframework.web.servlet.config.annotation.WebMvcConfigurerAdapter;

@Configuration
public class CORSConfiguration extends WebMvcConfigurerAdapter{
    @Override
    public void addCorsMappings(CorsRegistry registry) {
        //所有请求都允许跨域
        registry.addMapping("/**")
                .allowedOrigins("*")
                .allowedMethods("*")
                .allowedHeaders("*");
    }
}
8、异常处理类
GloabalExceptionHandler.java
异常处理,主要是在处理删除父类信息的时候,因为外键约束的存在,而导致违反约束。
package com.how2java.tmall.exception;

import javax.servlet.http.HttpServletRequest;

import org.springframework.web.bind.annotation.ControllerAdvice;
import org.springframework.web.bind.annotation.ExceptionHandler;
import org.springframework.web.bind.annotation.RestController;

@RestController
@ControllerAdvice
public class GloabalExceptionHandler {
    @ExceptionHandler(value = Exception.class)
    public String defaultErrorHandler(HttpServletRequest req, Exception e) throws Exception {
        e.printStackTrace();
        Class constraintViolationException = Class.forName("org.hibernate.exception.ConstraintViolationException");
        if(null!=e.getCause()  && constraintViolationException==e.getCause().getClass()) {
            return "违反了约束,多半是外键约束";
        }
        return e.getMessage();
    }

}
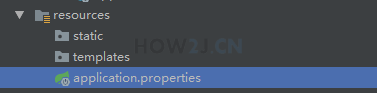
9、springboot配置文件
application.properties
springboot 配置文件,有些项目会用 application.yml ,站长习惯用 .properties ,觉得更易读。
下面是配置文件的内容:
spring.datasource.url=jdbc:mysql://127.0.0.1:3306/tmall_springboot?characterEncoding=UTF-8
spring.datasource.username=root
spring.datasource.password=admin
spring.datasource.driver-class-name=com.mysql.jdbc.Driver
spring.jpa.hibernate.ddl-auto = none
分别是数据库访问地址,账号密码,驱动以及表结构自动生成策略(none)。
spring.thymeleaf.mode=LEGACYHTML5
spring.thymeleaf.encoding=UTF-8
spring.thymeleaf.content-type=text/html
spring.thymeleaf.cache=false
使用 thymeleaf 作为视图,这个是springboot 官方推荐视图, 它的好处是可以是纯 html 。
其中LEGACYHTML5表示经典html5模式,即允许非严格的html出现,元素少点什么也可以编译通过, 这个比较符合大家的编写习惯,太过严格的html,写起来累。
cache=false 表示不要缓存,以免在开发过程中因为停留在缓存而给开发人员带来困扰。
server.context-path=/tmall_springboot
上下文地址为 tmall_springboot, 所以访问的时候,都要加上这个,比如:
http://127.0.0.1:8080/tmall_springboot/admin
spring.http.multipart.maxFileSize=100Mb
spring.http.multipart.maxRequestSize=100Mb
设置上传文件大小,默认只有1 m
spring.jpa.hibernate.naming.physical-strategy=org.hibernate.boot.model.naming.PhysicalNamingStrategyStandardImpl
jpa对实体类的默认字段会把驼峰命名的属性,转换为字段名的时候自动加上下划线。 这个配置的作用就是去掉下划线
比如属性名称是 createDate, jpa 默认转换为字段名 create_Date。 有了这个配置之后,就会转换为同名字段 createDate
spring.jpa.show-sql=true
显示 hibernate 执行的sql语句。 这个在上线之后,应该是关掉的,因为大量的 控制台输出会严重影响系统性能。 但是呢,因为本项目会和 redis 和 es 整合,打印 sql 语句的目的是为了观察 缓存是否起效果。
#database
spring.datasource.url=jdbc:mysql://127.0.0.1:3306/tmall_springboot?characterEncoding=UTF-8
spring.datasource.username=root
spring.datasource.password=admin
spring.datasource.driver-class-name=com.mysql.jdbc.Driver
spring.jpa.hibernate.ddl-auto = none

#thymeleaf
spring.thymeleaf.mode=LEGACYHTML5
spring.thymeleaf.encoding=UTF-8
spring.thymeleaf.content-type=text/html
spring.thymeleaf.cache=false

#context
server.context-path=/tmall_springboot

#设置上传文件大小,默认只有1 m
spring.http.multipart.maxFileSize=100Mb
spring.http.multipart.maxRequestSize=100Mb

spring.jpa.hibernate.naming.physical-strategy=org.hibernate.boot.model.naming.PhysicalNamingStrategyStandardImpl

#显示 hibernate运行的 sql 语句
spring.jpa.show-sql=true
四、项目源代码
本项目源代码托管在GitHub上,地址: https://github.com/corwien/tmall_springboot/
Java学习资源推荐:
Java 最强学习站 https://how2j.cn?p=126405正文到此结束
- 本文标签: message java 管理 springboot maven DOM 开发 站长 删除 配置 plugin 服务器 代码 list 缓存 tomcat build description JPA spring IDE id db HTML dependencies 2019 js http map bean root HTML5 value JDBC servlet schema find 下载 rmi redis IO tab App 参数 部署 https DDL sql Service web GitHub XML 数据库访问 mina dataSource tar ACE mysql 数据 cache 测试 CTO 分页 category git entity cat Persistence apache RESTful Elasticsearch pom json Ajax Word UI 自动生成 编译 时间 REST junit ip src 数据库
- 版权声明: 本文为互联网转载文章,出处已在文章中说明(部分除外)。如果侵权,请联系本站长删除,谢谢。
- 本文海报: 生成海报一 生成海报二
热门推荐


相关文章

近期评论
-
ws0132613@gmail.comhttps://getmacos.com/gopanel/william smith
-
谢谢
-
https://www.newcmy.com/register?aff=HBVX建议您试试草莓云机场,可以流畅观看youtube和tiktok,上reddit/x也没有问题,还有各种ai优化节点。
-
-
-
想购买您这个站,我的联系方式QQ741756694微信同步 能卖联系
-
-
-
-
Loading...
![[HBLOG]公众号](https://www.liuhaihua.cn/img/qrcode_gzh.jpg)

