源码深度剖析Eureka与Ribbon是怎么做服务发现的?
本文基于 spring cloud dalston,同时文章较长,请选择舒服姿势进行阅读。
Eureka 与 Ribbon 是什么?和服务发现什么关系?
Eureka 与 Ribbon 都是 Netflix 提供的微服务组件,分别用于服务注册与发现、负载均衡。同时,这两者均属于 spring cloud netflix 体系,和 spring cloud 无缝集成,也正由于此被大家所熟知。
Eureka 本身是服务注册发现组件,实现了完整的 Service Registry 和 Service Discovery。Ribbon 则是一款负载均衡组件,那它和服务发现又有什么关系呢?负载均衡在整个微服务的调用模型中是紧挨着服务发现的,而 Ribbon 这个框架它其实是起到了开发者服务消费行为与底层服务发现之间桥梁的作用。具体来说,用户直接使用@LoadBalanced 注解过的 RestTemplate 就可以发起请求调用了,在这次请求中 Ribbon 负责对背后的实例进行负载均衡,最终调用到具体实例上。问题是实例列表从何而来,其实是 Ribbon 通过 Eureka (或其他注册发现组件)组件的服务发现功能获得的,Ribbon 帮助我们封装了 Eureka 服务发现的一些细节,使得我们专注于微服务开发即可。我们有些开发者可能使用更多的是 Feign,因为它更接近于动态代理的调用方式,其实它是在 Ribbon 上的又一层封装,与服务发现层 Eureka 离的更远了些。
Eureka 的服务注册与发现
我们会先对 Eureka 的服务发现进行描述,重点是 Eureka-client 是如何进行服务的注册与发现的,同时不会过多停留于 Eureka 的架构、Eureka-server 的实现、Zone/Region 等范畴。
Eureka-client 的服务发现都是由 DiscoveryClient 类实现的,它主要包括的功能有:
- 向 Eureka-server 注册服务实例
- 更新在 Eureka-server 的租期
- 取消在 Eureka-server 的租约(服务下线)
- 发现服务实例并定期更新
服务注册
DiscoveryClient 所有的定时任务都是在 initScheduledTasks()方法里,我们可以看到以下关键代码:
private void initScheduledTasks() {
    ...
    if (clientConfig.shouldRegisterWithEureka()) {
        ...
         // InstanceInfo replicator
        instanceInfoReplicator = new InstanceInfoReplicator(
                this,
                instanceInfo,
                clientConfig.getInstanceInfoReplicationIntervalSeconds(),
                2); // burstSize
        ...
        instanceInfoReplicator.start(clientConfig.getInitialInstanceInfoReplicationIntervalSeconds());
    }
}
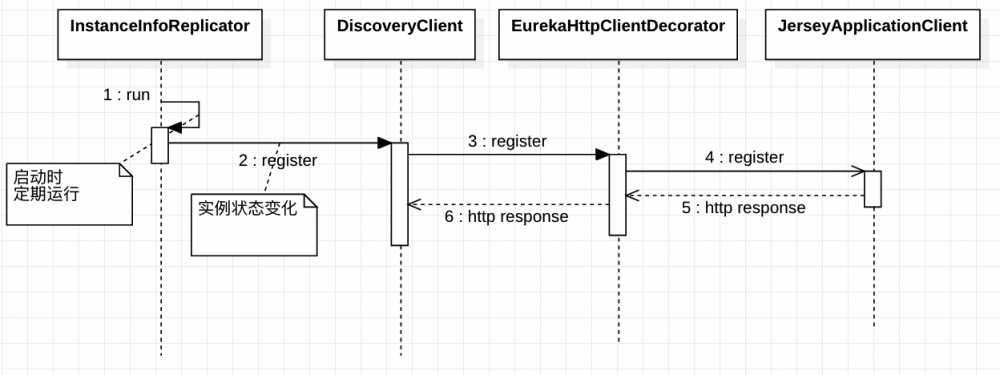
我们可以看到在 if 判断分支里创建了一个 instanceInfoReplicator 实例,它会通过 start 执行一个定时任务:
public void run() {
        try {
            discoveryClient.refreshInstanceInfo();

            Long dirtyTimestamp = instanceInfo.isDirtyWithTime();
            if (dirtyTimestamp != null) {
                discoveryClient.register();
                instanceInfo.unsetIsDirty(dirtyTimestamp);
            }
        } catch (Throwable t) {
            logger.warn("There was a problem with the instance info replicator", t);
        } finally {
            Future next = scheduler.schedule(this, replicationIntervalSeconds, TimeUnit.SECONDS);
            scheduledPeriodicRef.set(next);
        }
    }
我们可以在 InstanceInfoReplicator 类的 run()方法中找到这一段,同时可以一眼发现其注册关键点在于 discoveryClient.register() 这段,我们点进去看看:
boolean register() throws Throwable {
        logger.info(PREFIX + appPathIdentifier + ": registering service...");
        EurekaHttpResponse<Void> httpResponse;
        try {
            httpResponse = eurekaTransport.registrationClient.register(instanceInfo);
        } catch (Exception e) {
            logger.warn("{} - registration failed {}", PREFIX + appPathIdentifier, e.getMessage(), e);
            throw e;
        }
        if (logger.isInfoEnabled()) {
            logger.info("{} - registration status: {}", PREFIX + appPathIdentifier, httpResponse.getStatusCode());
        }
        return httpResponse.getStatusCode() == 204;
    }
这边可以发现是通过 HTTP REST (jersey 客户端)请求的方式将 instanceInfo 实例信息注册到 Eureka-server 上。我们简单看一下 InstanceInfo 对象,属性基本上都能见名知义:
@JsonCreator
    public InstanceInfo(
            @JsonProperty("instanceId") String instanceId,
            @JsonProperty("app") String appName,
            @JsonProperty("appGroupName") String appGroupName,
            @JsonProperty("ipAddr") String ipAddr,
            @JsonProperty("sid") String sid,
            @JsonProperty("port") PortWrapper port,
            @JsonProperty("securePort") PortWrapper securePort,
            @JsonProperty("homePageUrl") String homePageUrl,
            @JsonProperty("statusPageUrl") String statusPageUrl,
            @JsonProperty("healthCheckUrl") String healthCheckUrl,
            @JsonProperty("secureHealthCheckUrl") String secureHealthCheckUrl,
            @JsonProperty("vipAddress") String vipAddress,
            @JsonProperty("secureVipAddress") String secureVipAddress,
            @JsonProperty("countryId") int countryId,
            @JsonProperty("dataCenterInfo") DataCenterInfo dataCenterInfo,
            @JsonProperty("hostName") String hostName,
            @JsonProperty("status") InstanceStatus status,
            @JsonProperty("overriddenstatus") InstanceStatus overriddenstatus,
            @JsonProperty("leaseInfo") LeaseInfo leaseInfo,
            @JsonProperty("isCoordinatingDiscoveryServer") Boolean isCoordinatingDiscoveryServer,
            @JsonProperty("metadata") HashMap<String, String> metadata,
            @JsonProperty("lastUpdatedTimestamp") Long lastUpdatedTimestamp,
            @JsonProperty("lastDirtyTimestamp") Long lastDirtyTimestamp,
            @JsonProperty("actionType") ActionType actionType,
            @JsonProperty("asgName") String asgName) {
        this.instanceId = instanceId;
        this.sid = sid;
        this.appName = StringCache.intern(appName);
        this.appGroupName = StringCache.intern(appGroupName);
        this.ipAddr = ipAddr;
        this.port = port == null ? 0 : port.getPort();
        this.isUnsecurePortEnabled = port != null && port.isEnabled();
        this.securePort = securePort == null ? 0 : securePort.getPort();
        this.isSecurePortEnabled = securePort != null && securePort.isEnabled();
        this.homePageUrl = homePageUrl;
        this.statusPageUrl = statusPageUrl;
        this.healthCheckUrl = healthCheckUrl;
        this.secureHealthCheckUrl = secureHealthCheckUrl;
        this.vipAddress = StringCache.intern(vipAddress);
        this.secureVipAddress = StringCache.intern(secureVipAddress);
        this.countryId = countryId;
        this.dataCenterInfo = dataCenterInfo;
        this.hostName = hostName;
        this.status = status;
        this.overriddenstatus = overriddenstatus;
        this.leaseInfo = leaseInfo;
        this.isCoordinatingDiscoveryServer = isCoordinatingDiscoveryServer;
        this.lastUpdatedTimestamp = lastUpdatedTimestamp;
        this.lastDirtyTimestamp = lastDirtyTimestamp;
        this.actionType = actionType;
        this.asgName = StringCache.intern(asgName);

        // ---------------------------------------------------------------
        // for compatibility

        if (metadata == null) {
            this.metadata = Collections.emptyMap();
        } else if (metadata.size() == 1) {
            this.metadata = removeMetadataMapLegacyValues(metadata);
        } else {
            this.metadata = metadata;
        }

        if (sid == null) {
            this.sid = SID_DEFAULT;
        }
    }
总结一下整个过程如下:
服务续期
服务续期说起来可能比较晦涩,其实就是在 client 端定时发起调用,让 Eureka-server 知道自己还活着,在 eureka 代码中的注释解释为心跳(heart-beat)。
这里有两个比较重要的配置需要注意:
- instance.leaseRenewalIntervalInSeconds
表示客户端的更新频率,默认 30s,也就是每 30s 就会向 Eureka-server 发起 renew 更新操作。 - instance.leaseExpirationDurationInSeconds
这是服务端视角的失效时间,默认是 90s,也就是 Eureka-server 在 90s 内没有接收到来自 client 的 renew 操作就会将其剔除。
我们直接从代码角度看一下,同样呢相关定时任务在 initScheduledTasks()方法中:
private void initScheduledTasks() {
    ...
    if (clientConfig.shouldRegisterWithEureka()) {
        ...
         // Heartbeat timer
            scheduler.schedule(
                    new TimedSupervisorTask(
                            "heartbeat",
                            scheduler,
                            heartbeatExecutor,
                            renewalIntervalInSecs,
                            TimeUnit.SECONDS,
                            expBackOffBound,
                            new HeartbeatThread()
                    ),
                    renewalIntervalInSecs, TimeUnit.SECONDS);
        ...
    }
}
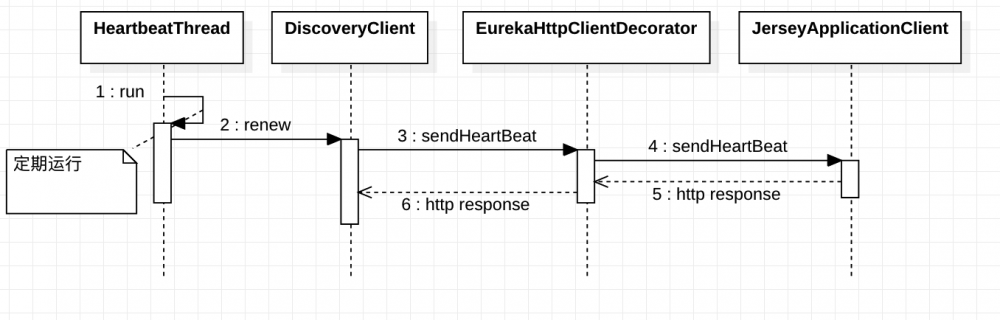
可以看到这里创建了一个 HeartbeatThread()线程执行操作:
private class HeartbeatThread implements Runnable {

        public void run() {
            if (renew()) {
                lastSuccessfulHeartbeatTimestamp = System.currentTimeMillis();
            }
        }
    }
我们直接看 renew()方法:
boolean renew() {
        EurekaHttpResponse<InstanceInfo> httpResponse;
        try {
            httpResponse = eurekaTransport.registrationClient.sendHeartBeat(instanceInfo.getAppName(), instanceInfo.getId(), instanceInfo, null);
            logger.debug("{} - Heartbeat status: {}", PREFIX + appPathIdentifier, httpResponse.getStatusCode());
            if (httpResponse.getStatusCode() == 404) {
                REREGISTER_COUNTER.increment();
                logger.info("{} - Re-registering apps/{}", PREFIX + appPathIdentifier, instanceInfo.getAppName());
                return register();
            }
            return httpResponse.getStatusCode() == 200;
        } catch (Throwable e) {
            logger.error("{} - was unable to send heartbeat!", PREFIX + appPathIdentifier, e);
            return false;
        }
    }
这里比较简单,可以发现和服务注册是类似的,同样使用 HTTP REST 发起一个 hearbeat 请求,底层使用 jersey 客户端。
总结一下整个过程如下:
服务注销
服务注销逻辑比较简单,本身并不在定时任务中触发,而是通过对方法标记@PreDestroy,从而调用 shutdown 方法触发,最终会调用 unRegister()方法进行注销,同样的这也是一个 HTTP REST 请求,可以简单看下代码:
@PreDestroy
    @Override
    public synchronized void shutdown() {
        if (isShutdown.compareAndSet(false, true)) {
            logger.info("Shutting down DiscoveryClient ...");

            if (statusChangeListener != null && applicationInfoManager != null) {
                applicationInfoManager.unregisterStatusChangeListener(statusChangeListener.getId());
            }

            cancelScheduledTasks();

            // If APPINFO was registered
            if (applicationInfoManager != null && clientConfig.shouldRegisterWithEureka()) {
                applicationInfoManager.setInstanceStatus(InstanceStatus.DOWN);
                unregister();
            }

            if (eurekaTransport != null) {
                eurekaTransport.shutdown();
            }

            heartbeatStalenessMonitor.shutdown();
            registryStalenessMonitor.shutdown();

            logger.info("Completed shut down of DiscoveryClient");
        }
    }

    /**
     * unregister w/ the eureka service.
     */
    void unregister() {
        // It can be null if shouldRegisterWithEureka == false
        if(eurekaTransport != null && eurekaTransport.registrationClient != null) {
            try {
                logger.info("Unregistering ...");
                EurekaHttpResponse<Void> httpResponse = eurekaTransport.registrationClient.cancel(instanceInfo.getAppName(), instanceInfo.getId());
                logger.info(PREFIX + appPathIdentifier + " - deregister  status: " + httpResponse.getStatusCode());
            } catch (Exception e) {
                logger.error(PREFIX + appPathIdentifier + " - de-registration failed" + e.getMessage(), e);
            }
        }
    }
服务发现及更新
我们来看作为服务消费者的关键逻辑,即发现服务以及更新服务。
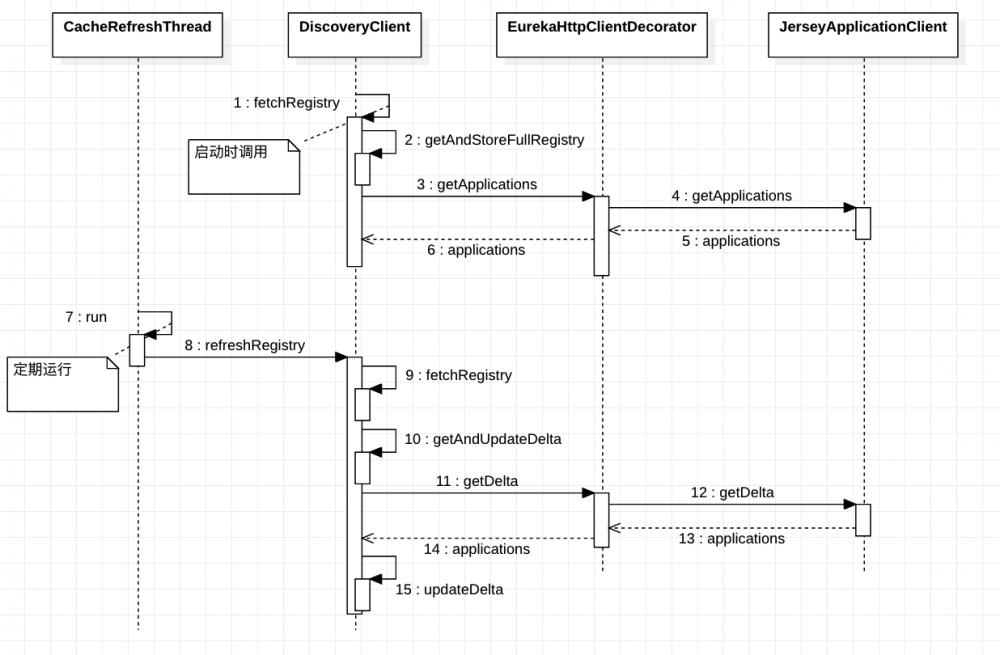
首先 consumer 会在启动时从 Eureka-server 获取所有的服务列表,并在本地缓存。同时呢,由于本地有一份缓存,所以需要定期更新,更新频率可以配置。
启动时候在 consumer 在 discoveryClient 中会调用 fetchRegistry() 方法:
private boolean fetchRegistry(boolean forceFullRegistryFetch) {
            ...
            if (clientConfig.shouldDisableDelta()
                    || (!Strings.isNullOrEmpty(clientConfig.getRegistryRefreshSingleVipAddress()))
                    || forceFullRegistryFetch
                    || (applications == null)
                    || (applications.getRegisteredApplications().size() == 0)
                    || (applications.getVersion() == -1)) //Client application does not have latest library supporting delta
            {
                ...
                getAndStoreFullRegistry();
            } else {
                getAndUpdateDelta(applications);
            }
            ...
}
这里可以看到 fetchRegistry 里有 2 个判断分支,对应首次更新以及后续更新。首次更新会调用 getAndStoreFullRegistry()方法,我们看一下:
private void getAndStoreFullRegistry() throws Throwable {
        long currentUpdateGeneration = fetchRegistryGeneration.get();

        logger.info("Getting all instance registry info from the eureka server");

        Applications apps = null;
        EurekaHttpResponse<Applications> httpResponse = clientConfig.getRegistryRefreshSingleVipAddress() == null
                ? eurekaTransport.queryClient.getApplications(remoteRegionsRef.get())
                : eurekaTransport.queryClient.getVip(clientConfig.getRegistryRefreshSingleVipAddress(), remoteRegionsRef.get());
        if (httpResponse.getStatusCode() == Status.OK.getStatusCode()) {
            apps = httpResponse.getEntity();
        }
        logger.info("The response status is {}", httpResponse.getStatusCode());

        if (apps == null) {
            logger.error("The application is null for some reason. Not storing this information");
        } else if (fetchRegistryGeneration.compareAndSet(currentUpdateGeneration, currentUpdateGeneration + 1)) {
            localRegionApps.set(this.filterAndShuffle(apps));
            logger.debug("Got full registry with apps hashcode {}", apps.getAppsHashCode());
        } else {
            logger.warn("Not updating applications as another thread is updating it already");
        }
    }
可以看到和之前类似,如果在没有特殊指定的情况下,我们会发起一个 HTTP REST 请求拉取所有应用的信息并进行缓存,缓存对象为 Applications,有兴趣的可以进一步查看。
接下来,在我们熟悉的 initScheduledTasks()方法中,我们还会启动一个更新应用信息缓存的 task:
private void initScheduledTasks() {
        if (clientConfig.shouldFetchRegistry()) {
            // registry cache refresh timer
            int registryFetchIntervalSeconds = clientConfig.getRegistryFetchIntervalSeconds();
            int expBackOffBound = clientConfig.getCacheRefreshExecutorExponentialBackOffBound();
            scheduler.schedule(
                    new TimedSupervisorTask(
                            "cacheRefresh",
                            scheduler,
                            cacheRefreshExecutor,
                            registryFetchIntervalSeconds,
                            TimeUnit.SECONDS,
                            expBackOffBound,
                            new CacheRefreshThread()
                    ),
                    registryFetchIntervalSeconds, TimeUnit.SECONDS);
        }
        ...
}
在 CacheRefreshThread()这个 task 的 run 方法中,仍然会调用到我们之前的 fetchRegistry()方法,同时在判断时会走到另一个分支中,即调用到 getAndUpdateDelta()方法:
private void getAndUpdateDelta(Applications applications) throws Throwable {
        long currentUpdateGeneration = fetchRegistryGeneration.get();

        Applications delta = null;
        EurekaHttpResponse<Applications> httpResponse = eurekaTransport.queryClient.getDelta(remoteRegionsRef.get());
        if (httpResponse.getStatusCode() == Status.OK.getStatusCode()) {
            delta = httpResponse.getEntity();
        }

        if (delta == null) {
            logger.warn("The server does not allow the delta revision to be applied because it is not safe. "
                    + "Hence got the full registry.");
            getAndStoreFullRegistry();
        } else if (fetchRegistryGeneration.compareAndSet(currentUpdateGeneration, currentUpdateGeneration + 1)) {
            logger.debug("Got delta update with apps hashcode {}", delta.getAppsHashCode());
            String reconcileHashCode = "";
            if (fetchRegistryUpdateLock.tryLock()) {
                try {
                    updateDelta(delta);
                    reconcileHashCode = getReconcileHashCode(applications);
                } finally {
                    fetchRegistryUpdateLock.unlock();
                }
            } else {
                logger.warn("Cannot acquire update lock, aborting getAndUpdateDelta");
            }
            // There is a diff in number of instances for some reason
            if (!reconcileHashCode.equals(delta.getAppsHashCode()) || clientConfig.shouldLogDeltaDiff()) {
                reconcileAndLogDifference(delta, reconcileHashCode);  // this makes a remoteCall
            }
        } else {
            logger.warn("Not updating application delta as another thread is updating it already");
            logger.debug("Ignoring delta update with apps hashcode {}, as another thread is updating it already", delta.getAppsHashCode());
        }
    }
可以看到,这边是使用 HTTP REST 发起一个 getDelta 请求,同时在 updateDelta()方法中会更新本地的 Applications 缓存对象。
总结一下,整个服务发现与更新的过程如下:
Ribbon 的服务发现
接下来我们来看看 Ribbon 是怎么基于 Eureka 进行服务发现的,注意这边我们的关注点还是在于服务发现,而不是 Ribbon 的负载均衡的具体逻辑(包括 IRule 路由,IPing 判断可用性),也就是负载均衡列表是怎么构建起来的呢?
我们可以先做一些猜想,首先 Ribbon 肯定是基于 Eureka 的服务发现的。我们上边描述了 Eureka 会拉取所有服务信息到本地缓存 Applications 中,那么 Ribbon 肯定是基于这个 Applications 缓存来构建负载均衡列表的了,同时呢,负载均衡列表同样需要一个定时更新的机制来保证一致性。
服务调用
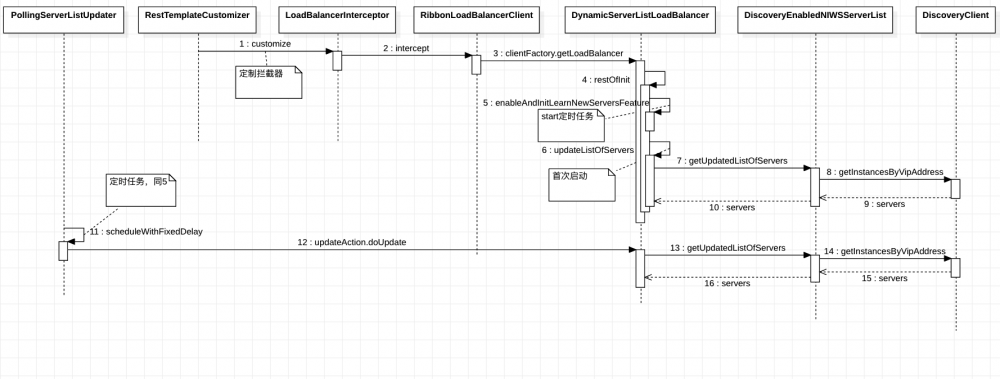
首先我们从开发者的最初使用上看,在开发者在 RestTemplate 上开启@LoadBalanced 注解就可开启 Ribbon 的逻辑了,显然这是用了类似拦截的方法。在 LoadBalancerAutoConfiguration 类中,我们可以看到相关代码:
...
@Bean
	public SmartInitializingSingleton loadBalancedRestTemplateInitializer(
			final List<RestTemplateCustomizer> customizers) {
		return new SmartInitializingSingleton() {
			@Override
			public void afterSingletonsInstantiated() {
				for (RestTemplate restTemplate : LoadBalancerAutoConfiguration.this.restTemplates) {
					for (RestTemplateCustomizer customizer : customizers) {
						customizer.customize(restTemplate);
					}
				}
			}
		};
	}


	@Configuration
	@ConditionalOnMissingClass("org.springframework.retry.support.RetryTemplate")
	static class LoadBalancerInterceptorConfig {
		@Bean
		public LoadBalancerInterceptor ribbonInterceptor(
				LoadBalancerClient loadBalancerClient,
				LoadBalancerRequestFactory requestFactory) {
			return new LoadBalancerInterceptor(loadBalancerClient, requestFactory);
		}

		@Bean
		@ConditionalOnMissingBean
		public RestTemplateCustomizer restTemplateCustomizer(
				final LoadBalancerInterceptor loadBalancerInterceptor) {
			return new RestTemplateCustomizer() {
				@Override
				public void customize(RestTemplate restTemplate) {
					List<ClientHttpRequestInterceptor> list = new ArrayList<>(
							restTemplate.getInterceptors());
					list.add(loadBalancerInterceptor);
					restTemplate.setInterceptors(list);
				}
			};
		}
	}
...
可以看到,在初始化的过程中通过调用 customize()方法来给 RestTemplate 增加了拦截器 LoadBalancerInterceptor。而 LoadBalancerInterceptor 则是在拦截方法中使用了 loadBalancer(RibbonLoadBalancerClient 类) 完成请求调用:
@Override
	public ClientHttpResponse intercept(final HttpRequest request, final byte[] body,
			final ClientHttpRequestExecution execution) throws IOException {
		final URI originalUri = request.getURI();
		String serviceName = originalUri.getHost();
		Assert.state(serviceName != null, "Request URI does not contain a valid hostname: " + originalUri);
		return this.loadBalancer.execute(serviceName, requestFactory.createRequest(request, body, execution));
	}
服务发现
到现在为止呢,我们的请求调用已经被 RibbonLoadBalancerClient 所封装,而其服务发现也是发生在 RibbonLoadBalancerClient 中的。
我们点到其 execute()方法中:
@Override
	public <T> T execute(String serviceId, LoadBalancerRequest<T> request) throws IOException {
		ILoadBalancer loadBalancer = getLoadBalancer(serviceId);
		Server server = getServer(loadBalancer);
		if (server == null) {
			throw new IllegalStateException("No instances available for " + serviceId);
		}
		RibbonServer ribbonServer = new RibbonServer(serviceId, server, isSecure(server,
				serviceId), serverIntrospector(serviceId).getMetadata(server));

		return execute(serviceId, ribbonServer, request);
	}
这里根据 serviceId 构建了一个 ILoadBalancer,同时从 loadBalancer 中获取到了最终的实例 server 信息。ILoadBalancer 是定义了负载均衡的一个接口,它的关键方法 chooseServer()即是从负载均衡列表根据路由规则中选取一个 server。当然我们主要关心的点在于,负载均衡列表是怎么构建出来的。通过源码跟踪我们发现,在通过 getLoadBalancer()方法构建好 ILoadBalancer 对象后,对象中就已经包含了服务列表。所以我们来看看 ILoadBalancer 对象是怎么创建的:
protected ILoadBalancer getLoadBalancer(String serviceId) {
		return this.clientFactory.getLoadBalancer(serviceId);
	}
那么这里其实是 springcloud 封装的 clientFactory,它会在 applicationContext 容器中寻找对应的 bean 。
通过源码追踪,我们可以在自动配置类 RibbonClientConfiguration 中找到对应代码:
@Bean
	@ConditionalOnMissingBean
	public ILoadBalancer ribbonLoadBalancer(IClientConfig config,
			ServerList<Server> serverList, ServerListFilter<Server> serverListFilter,
			IRule rule, IPing ping, ServerListUpdater serverListUpdater) {
		if (this.propertiesFactory.isSet(ILoadBalancer.class, name)) {
			return this.propertiesFactory.get(ILoadBalancer.class, config, name);
		}
		return new ZoneAwareLoadBalancer<>(config, rule, ping, serverList,
				serverListFilter, serverListUpdater);
	}
我们看到这里最终构建了 ILoadBalancer,其实现类是 ZoneAwareLoadBalancer,我们观察其超类的初始化:
public DynamicServerListLoadBalancer(IClientConfig clientConfig, IRule rule, IPing ping,
                                         ServerList<T> serverList, ServerListFilter<T> filter,
                                         ServerListUpdater serverListUpdater) {
        super(clientConfig, rule, ping);
        this.serverListImpl = serverList;
        this.filter = filter;
        this.serverListUpdater = serverListUpdater;
        if (filter instanceof AbstractServerListFilter) {
            ((AbstractServerListFilter) filter).setLoadBalancerStats(getLoadBalancerStats());
        }
        restOfInit(clientConfig);
    }
这边最终执行了 restOfInit()方法,进一步跟踪:
void restOfInit(IClientConfig clientConfig) {
        boolean primeConnection = this.isEnablePrimingConnections();
        // turn this off to avoid duplicated asynchronous priming done in BaseLoadBalancer.setServerList()
        this.setEnablePrimingConnections(false);
        enableAndInitLearnNewServersFeature();

        updateListOfServers();
        if (primeConnection && this.getPrimeConnections() != null) {
            this.getPrimeConnections()
                    .primeConnections(getReachableServers());
        }
        this.setEnablePrimingConnections(primeConnection);
        LOGGER.info("DynamicServerListLoadBalancer for client {} initialized: {}", clientConfig.getClientName(), this.toString());
    }
updateListOfServers()方法是获取所有的 ServerList 的,最终由 serverListImpl.getUpdatedListOfServers()获取所有的服务列表,在此 serverListImpl 即实现类为 DiscoveryEnabledNIWSServerList。其中 DiscoveryEnabledNIWSServerList 有 getInitialListOfServers()和 getUpdatedListOfServers()方法,具体代码如下
@Override
    public List<DiscoveryEnabledServer> getInitialListOfServers(){
        return obtainServersViaDiscovery();
    }

    @Override
    public List<DiscoveryEnabledServer> getUpdatedListOfServers(){
        return obtainServersViaDiscovery();
    }
此时我们查看 obtainServersViaDiscovery()方法,已经基本接近于事物本质了,它创建了一个 EurekaClient 对象,在此就是 Eureka 的 DiscoveryClient 实现类,调用了其 getInstancesByVipAddress()方法,它最终从 DiscoveryClient 的 Applications 缓存中根据 serviceId 选取了对应的服务信息:
private List<DiscoveryEnabledServer> obtainServersViaDiscovery() {
        List<DiscoveryEnabledServer> serverList = new ArrayList<DiscoveryEnabledServer>();

        if (eurekaClientProvider == null || eurekaClientProvider.get() == null) {
            logger.warn("EurekaClient has not been initialized yet, returning an empty list");
            return new ArrayList<DiscoveryEnabledServer>();
        }

        EurekaClient eurekaClient = eurekaClientProvider.get();
        if (vipAddresses!=null){
            for (String vipAddress : vipAddresses.split(",")) {
                // if targetRegion is null, it will be interpreted as the same region of client
                List<InstanceInfo> listOfInstanceInfo = eurekaClient.getInstancesByVipAddress(vipAddress, isSecure, targetRegion);
                for (InstanceInfo ii : listOfInstanceInfo) {
                    if (ii.getStatus().equals(InstanceStatus.UP)) {

                        if(shouldUseOverridePort){
                            if(logger.isDebugEnabled()){
                                logger.debug("Overriding port on client name: " + clientName + " to " + overridePort);
                            }

                            // copy is necessary since the InstanceInfo builder just uses the original reference,
                            // and we don't want to corrupt the global eureka copy of the object which may be
                            // used by other clients in our system
                            InstanceInfo copy = new InstanceInfo(ii);

                            if(isSecure){
                                ii = new InstanceInfo.Builder(copy).setSecurePort(overridePort).build();
                            }else{
                                ii = new InstanceInfo.Builder(copy).setPort(overridePort).build();
                            }
                        }

                        DiscoveryEnabledServer des = new DiscoveryEnabledServer(ii, isSecure, shouldUseIpAddr);
                        des.setZone(DiscoveryClient.getZone(ii));
                        serverList.add(des);
                    }
                }
                if (serverList.size()>0 && prioritizeVipAddressBasedServers){
                    break; // if the current vipAddress has servers, we dont use subsequent vipAddress based servers
                }
            }
        }
        return serverList;
    }
服务更新
我们已经知道初次启动时,Ribbon 是怎么结合 Eureka 完成负载均衡列表的构建了,那么与 Eureka 类似,我们还需要及时对服务列表进行更新以保证一致性。
在 RibbonClientConfiguration 自动配置类中构建 ILoadBalancer 时我们可以看到其构造器中有 ServerListUpdater 对象,而此对象也是在当前类中构建的:
@Bean
	@ConditionalOnMissingBean
	public ServerListUpdater ribbonServerListUpdater(IClientConfig config) {
		return new PollingServerListUpdater(config);
	}
我们观察此对象中的 start()方法看是如何完成更新的:
@Override
    public synchronized void start(final UpdateAction updateAction) {
        if (isActive.compareAndSet(false, true)) {
            final Runnable wrapperRunnable = new Runnable() {
                @Override
                public void run() {
                    if (!isActive.get()) {
                        if (scheduledFuture != null) {
                            scheduledFuture.cancel(true);
                        }
                        return;
                    }
                    try {
                        updateAction.doUpdate();
                        lastUpdated = System.currentTimeMillis();
                    } catch (Exception e) {
                        logger.warn("Failed one update cycle", e);
                    }
                }
            };

            scheduledFuture = getRefreshExecutor().scheduleWithFixedDelay(
                    wrapperRunnable,
                    initialDelayMs,
                    refreshIntervalMs,
                    TimeUnit.MILLISECONDS
            );
        } else {
            logger.info("Already active, no-op");
        }
    }
这里有 2 个配置,即 initialDelayMs 首次检测默认 1s,refreshIntervalMs 检测间隔默认 30s(和 Eureka 一致),创建了一个定时任务,执行 updateAction.doUpdate()方法。
我们回到之前的 restOfInit()方法,查看其中的 enableAndInitLearnNewServersFeature()方法,可以看到是在此处触发了 ServerListUpdater 的 start 方法,同时传入了 updateAction 对象:
public void enableAndInitLearnNewServersFeature() {
        LOGGER.info("Using serverListUpdater {}", serverListUpdater.getClass().getSimpleName());
        serverListUpdater.start(updateAction);
    }
其实 updateAction 一开始就已经创建好了,它仍然是调用 之前的 updateListOfServers 方法来进行后续的更新:
protected final ServerListUpdater.UpdateAction updateAction = new ServerListUpdater.UpdateAction() {
        @Override
        public void doUpdate() {
            updateListOfServers();
        }
    };
总结一下 Ribbon 三部分服务发现的整体流程如下:
参考资料
深度剖析服务发现组件 Netflix Eureka
深入理解 Ribbon 之源码解析正文到此结束
- 本文标签: Connection Feign ip ACE 微服务 Region cache App 开发 bug 源码 src ArrayList tar Property 代码 Collections 服务端 consumer ribbon http retry 配置 ORM CTO REST 专注 update lib HashMap 负载均衡 Transport IDE json Collection provider Spring cloud heartbeat ECS 缓存 map bean CEO Eureka 一致性 ssh client 服务注册 js message 开发者 IO 实例 总结 springcloud db ask synchronized cat Service 注释 list 模型 spring build Netflix https 文章 rand UI executor 解析 final 本质 remote entity equals 线程 Action 时间 value id
- 版权声明: 本文为互联网转载文章,出处已在文章中说明(部分除外)。如果侵权,请联系本站长删除,谢谢。
- 本文海报: 生成海报一 生成海报二
热门推荐


相关文章

近期评论
-
谢谢
-
https://www.newcmy.com/register?aff=HBVX建议您试试草莓云机场,可以流畅观看youtube和tiktok,上reddit/x也没有问题,还有各种ai优化节点。
-
-
-
想购买您这个站,我的联系方式QQ741756694微信同步 能卖联系
-
-
-
-
-
https://www.liuhaihua.cn/archives/40657.html 这篇博客中的图片打不开了
Loading...
![[HBLOG]公众号](https://www.liuhaihua.cn/img/qrcode_gzh.jpg)

