SpringCloud 配置中心
在微服务架构中,每一个服务都有自己的配置文件,这些配置文件还会因为生产、测试环境的不同而分为多个。某些配置项是相同的,某些配置项又是不同的,这给服务的部署和管理造成了一些困难。
Config Center 可以解决这些问题。
通过将配置文件统一放到某个地方(通常是 GitHub),然后让 配置中心 来统一读取、刷新配置信息。
Spring Cloud 提供了 Spring Cloud Config 来提供这一功能。
本节介绍一下 Spring Cloud Config 的使用。本节源码在 https://github.com/laolunsi/spring-boot-examples 中。
config-sever
首先创建一个父级 maven 项目,取名 spring-cloud-config-example ,添加 spring-cloud 依赖:
<?xml version="1.0" encoding="UTF-8"?>
<project xmlns="http://maven.apache.org/POM/4.0.0"
         xmlns:xsi="http://www.w3.org/2001/XMLSchema-instance"
         xsi:schemaLocation="http://maven.apache.org/POM/4.0.0 http://maven.apache.org/xsd/maven-4.0.0.xsd">
    <modelVersion>4.0.0</modelVersion>
    <parent>
        <groupId>org.springframework.boot</groupId>
        <artifactId>spring-boot-dependencies</artifactId>
        <version>2.1.13.RELEASE</version>
        <relativePath />
    </parent>

    <groupId>com.example</groupId>
    <artifactId>spring-cloud-config-example</artifactId>
    <version>1.0.RELEASE</version>

    <properties>
        <spring-cloud.version>Greenwich.SR5</spring-cloud.version>
    </properties>

    <dependencies>
        <dependency>
            <groupId>org.springframework.boot</groupId>
            <artifactId>spring-boot-starter-web</artifactId>
        </dependency>
    </dependencies>

    <dependencyManagement>
        <dependencies>
            <dependency>
                <groupId>org.springframework.cloud</groupId>
                <artifactId>spring-cloud-dependencies</artifactId>
                <version>${spring-cloud.version}</version>
                <type>pom</type>
                <scope>import</scope>
            </dependency>
        </dependencies>
    </dependencyManagement>

</project>
第二步,创建 config-server 项目,继承父级项目,并引入 spring-cloud-config-server 依赖:
<parent>
        <groupId>com.example</groupId>
        <artifactId>spring-cloud-config-example</artifactId>
        <version>1.0.RELEASE</version>
        <relativePath/> <!-- lookup parent from repository -->
    </parent>

    <dependencies>
        <dependency>
            <groupId>org.springframework.cloud</groupId>
            <artifactId>spring-cloud-config-server</artifactId>
        </dependency>
    </dependencies>
在启动类上添加 @EnableConfigServer ,这个注解表示这是一个配置中心:
@EnableConfigServer
@SpringBootApplication
public class ConfigServerApplication {

    public static void main(String[] args) {
        SpringApplication.run(ConfigServerApplication.class, args);
    }

}
下面需要配置一下 github 上仓库的相关信息:
server:
  port: 8888
spring:
  application:
    name: config-server
  cloud:
    config:
      server:
        git:
          uri: https://github.com/laolunsi/config-center-example # 仓库地址
          search-paths: demo # 目录
          username: '' # 用户名
          password: '' # 密码
客户端默认是访问服务端的 8888 端口,所以这里设置 server.port=8888 。
我们可以看到这里的 spring.cloud.config.server.git.uri 指向了 github 上的一个仓库地址。这是我创建的一个测试仓库,仓库 master 分支下有一个 demo 文件夹,里面有 config-demo-dev.yml 和 config-demo-prod.yml 两个文件,文件内容稍有不同:

启动项目,访问浏览器 http://localhost:8888/config-demo-dev.yml :

关于浏览器端直接通过 config-server 去获取远程仓库中配置文件的格式,有如下几种:
来自 Spring 官网:
The HTTP service has resources in the following form:
/{application}/{profile}[/{label}]
/{application}-{profile}.yml
/{label}/{application}-{profile}.yml
/{application}-{profile}.properties
/{label}/{application}-{profile}.properties
where application is injected as the spring.config.name in the SpringApplication (what is normally application in a regular Spring Boot app), profile is an active profile (or comma-separated list of properties), and label is an optional git label (defaults to master .)
含义:
-
application指代 springboot 项目中的spring.application.name,也就是示例中的config-demo -
profile指active,比如示例文件config-demo-dev.yml中的dev -
label指 git 分支
具体在以上示例项目中,如 config-demo-dev.yml 文件,对应了 spring.application.name=config-demo 的项目,并表示其 profile=dev
下面讲解 config-demo 这个消费者项目如何对应 config-demo-dev.yml 这个配置文件。
config-demo
创建子项目 config-demo ,继承自 spring-cloud-config-example ,引入 spring-cloud-starter-config 依赖。这个项目是实际配置文件的使用者。
<dependency>
            <groupId>org.springframework.cloud</groupId>
            <artifactId>spring-cloud-starter-config</artifactId>
        </dependency>
下面直接在配置文件中添加如下配置:
server:
  port: 8021
spring:
  application:
    name: config-demo
  cloud:
    config:
      #uri: http://localhost:8888 # 注意,URI 的默认值就是 http://localhost:8888
      label: master # 指定 master 分支
      profile: dev # 指定 config-demo-dev.yml 文件
好了,到这一步, config-demo 这个项目已经可以从配置中心读取配置数据了,那么,如何去使用数据呢?
可以使用 @Value("${}") 注解:
@RestController
@RequestMapping(value = "test")
public class TestAction {

    @Value("${msg}")
    private String msg;

    @GetMapping(value = "")
    public String msg() {
        return msg;
    }
}
启动项目,打开浏览器,访问该接口:

将上面配置文件中的 active 换成 prod 试试:

修改配置中心端口
在 config-server 中,修改 server.port 后,修改 config-demo 中 application.yml 下的 spring.config.server.url ,发现 config-demo 启动失败。
config-demo 配置如下:
server:
  port: 8021
spring:
  application:
    name: config-demo
  cloud:
    config:
      uri: http://localhost:8887
      label: master
      profile: dev
控制台报错如下:
c.c.c.ConfigServicePropertySourceLocator : Fetching config from server at : http://localhost:8888
c.c.c.ConfigServicePropertySourceLocator : Connect Timeout Exception on Url - http://localhost:8888. Will be trying the next url if available
c.c.c.ConfigServicePropertySourceLocator : Could not locate PropertySource: I/O error on GET request for "http://localhost:8888/config-demo/dev/master": Connection refused: connect; nested exception is java.net.ConnectException: Connection refused: connect
这里可以看到, config-demo 还是尝试从默认的 http://localhost:8888 去请求配置中心数据。而我们上面已经将 config-server 的端口号改掉了(8887),现在看来这个配置根本没有生效。
出错在哪里呢?
Spring Cloud 中除了 Spring 的 Application Context,还有一个 Boostrap Context。后者是前者的父上下文。在 Spring Cloud 应用启动时,首先加载 Boostrap Context,对应的配置文件是 bootstrap.yml,然后加载 Application Context,对应的配置文件是 application.yml
bootstrap.yml 首先加载,然后加载 application.yml,如果两个文件中存在相同的配置项,前者会覆盖后者。
在 Spring Cloud Config 中,需要连接配置中心的应用,需要在 boostrap.yml 中指定外部配置 spring.cloud.config.uri 来指明配置中心地址。
参考资料: https://blog.csdn.net/ThinkWon/article/details/100007093
于是,在 config-demo 项目的 resources 目录下,新建 bootstrap.yml 文件,加入如下配置:
spring:
  cloud:
    config:
      uri: http://localhost:8887
重新启动项目,启动成功。测试获取远程 git 上的配置数据,一切正常。
配置中心服务化
将配置中心接入微服务,我们这里使用 Consul 作为服务注册中心。
之前尝试使用了 Nacos 作为注册中心,结果 config-server 正常,但是 config-demo 启动异常了,猜测是 nacos 底层通信机制导致的,后续有空研究一下,如果你们谁知道这个问题的解释,麻烦告诉我。
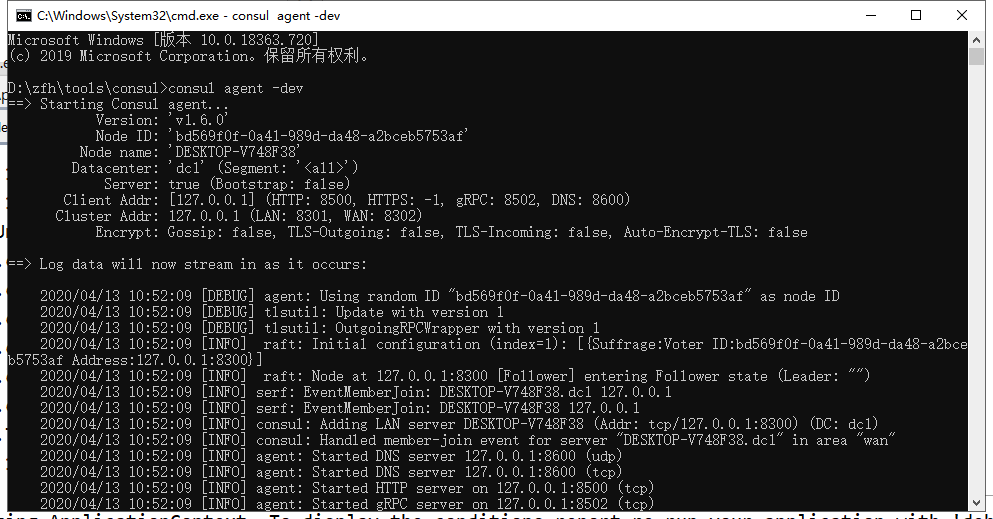
启动 consul
命令: consul agent -dev

两个项目都引入如下依赖:
<!-- 服务治理 consul -->
<dependency>
    <groupId>org.springframework.cloud</groupId>
    <artifactId>spring-cloud-starter-consul-discovery</artifactId>
</dependency>

<!-- 健康检查 -->
<dependency>
    <groupId>org.springframework.boot</groupId>
    <artifactId>spring-boot-starter-actuator</artifactId>
</dependency>
Application 类上加上 @EnableDiscoveryClient 注解。
将 config-server 接入 Consul
配置文件修改:
server:
  port: 8887
spring:
  application:
    name: config-server
  cloud:
    config:
      server:
        git:
          uri: https://github.com/laolunsi/config-center-example # 仓库地址
          search-paths: demo # 目录
          #username: '' # 用户名
          #password: '' # 密码
    consul: # consul-config
      host: localhost
      port: 8500 # consul默认端口
      discovery:
        register: true
        instance-id: ${spring.application.name}:${server.port}
        service-name: ${spring.application.name}
        port: ${server.port}
启动项目,控制台出现:
2020-04-13 10:53:14.599 INFO 24772 --- [ main] o.s.c.c.s.ConsulServiceRegistry : Registering service with consul: NewService{id='config-server-8887', name='config-server', tags=[secure=false], address='host.docker.internal', meta=null, port=8887, enableTagOverride=null, check=Check{script='null', interval='10s', ttl='null', http='http://host.docker.internal:8887/actuator/health', method='null', header={}, tcp='null', timeout='null', deregisterCriticalServiceAfter='null', tlsSkipVerify=null, status='null'}, checks=null}
config-demo 接入 consul
配置文件:
server:
  port: 8022
spring:
  application:
    name: config-demo
  cloud:
    config:
      #uri: http://localhost:8887 # 使用注册中心来获取数据时,开启服务注册,然后不需要指定 config.uri 了
      label: master
      profile: dev
      discovery:
        enabled: true
        service-id: config-server
    # consul-config
    consul:
      host: localhost
      port: 8500 # consul默认端口
      discovery:
        register: true
        instance-id: ${spring.application.name}:${server.port}
        service-name: ${spring.application.name}
        port: ${server.port}
打开浏览器,输入 consul 地址 http://localhost:8500 :

可以看到 config-server 和 config-demo 两个服务注册完成了。下面测试一下 config-demo 获取配置数据,发现测试正常。
Nacos as Config
上面我测试过,当直接使用 Nacos 作为注册中心,Spring-Cloud-Config 作为配置中心时,配置消费者启动异常。
Nacos 实际上也提供了配置中心的功能,即将配置添加到 Nacos 中,然后直接从 Nacos 获取。关于 Nacos 作为注册中心的知识将在以后的文章中体现。
感谢阅读!~
参考:
- 官方文档——SpringCloudConfig: https://spring.io/projects/spring-cloud-config
- 方志朋——分布式配置中心 SpringCloudConfig(Finchley版本): https://blog.csdn.net/forezp/article/details/81041028
- 方志朋——高可用分布式配置中心: https://blog.csdn.net/forezp/article/details/81041045
- 方志朋——史上最简单的 SpringCloud 教程: https://blog.csdn.net/forezp/article/details/70148833
- 纯洁的微笑—— SpringCloud 系列: http://www.ityouknow.com/spring-cloud.html
- SpringBoot YML属性: https://blog.csdn.net/hxc1314157/article/details/79424381
- SpringBoot 使用 Nacos 配置中心: https://juejin.im/post/5c4c2a4251882525a7245426
- 本文标签: 注册中心 App schema PHP Service https springboot Bootstrap value 测试环境 目录 http maven 服务端 map 配置中心 TCP Connection web Action git 高可用 IDE XML Agent src 端口 Master cat Spring Cloud Config GitHub dependencies 部署 apache Property ip 分布式 数据 consul Docker client 源码 IO 微笑 Spring cloud SDN REST tag java 文章 Spring Boot UI 服务注册 HTML example 测试 ORM tar springcloud 管理 list 微服务 spring Word pom id 配置
- 版权声明: 本文为互联网转载文章,出处已在文章中说明(部分除外)。如果侵权,请联系本站长删除,谢谢。
- 本文海报: 生成海报一 生成海报二


![[HBLOG]公众号](https://www.liuhaihua.cn/img/qrcode_gzh.jpg)

