Mybatis详解系列(二)--Mybatis如何加载配置及初始化
简介
Mybatis 是一个持久层框架,它对 JDBC 进行了高级封装,使我们的代码中不会出现任何的 JDBC 代码,另外,它还通过 xml 或注解的方式将 sql 从 DAO/Repository 层中解耦出来,除了这些基本功能外,它还提供了动态 sql、延迟加载、缓存等功能。 相比 Hibernate,Mybatis 更面向数据库,可以灵活地对 sql 语句进行优化。
前面已经说完 mybatis 的使用( Mybatis详解系列(一)--持久层框架解决了什么及如何使用Mybatis ),现在开始分析源码,和使用例子一样,我用的 mybatis 是 3.5.4 版本的。考虑连贯性,我会按下面的顺序来展开分析,计划两篇博客写完,本文只涉及第一点内容:
- 加载配置、初始化
SqlSessionFactory; - 获取
SqlSession和Mapper; - 执行
Mapper方法。
这个过程基本符合下面的代码的工作过程。
// 加载配置,初始化SqlSessionFactory对象
String resource = "Mybatis-config.xml";
InputStream in = Resources.getResourceAsStream(resource));
SqlSessionFactory sqlSessionFactory = new SqlSessionFactoryBuilder().build(in);
// 获取 SqlSession 和 Mapper
SqlSession sqlSession = sqlSessionFactory.openSession();
EmployeeMapper baseMapper = sqlSession.getMapper(EmployeeMapper.class);
// 执行Mapper方法
Employee employee = baseMapper.selectByPrimaryKey(id);
// do something
注意,考虑可读性,文中部分源码经过删减。
初始化的过程
这里简单概括下初始化的整个流程,如下图。
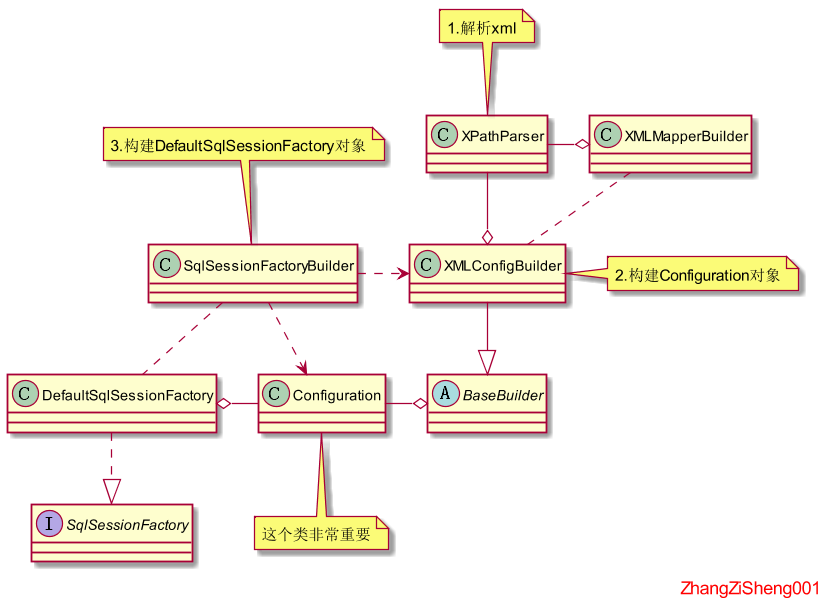
- 构建 xml 的“节点树” 。
XPathParser使用的是 JDK 自带的 JAXP API来解析并构建Document对象,并且支持 XPath 功能。 - 初始化
Configuration对象的成员属性。XMLConfigBuilder利用“节点树”来构建Configuration对象(也会去解析注解的配置),Configuration对象包含了 configuration 文件和 mapper 文件的所有配置信息。这部分内容比较难,尤其是初始化 mapper 相关的配置。 - 创建
SqlSessionFactory。SqlSessionFactoryBuilder利用构建好的Configuration对象来创建SqlSessionFactory。
上面的过程只要进入到 SqlSessionFactoryBuilder.build(InputStream) 方法就可以直观的看到。
public SqlSessionFactory build(InputStream inputStream) {
    return build(inputStream, null, null);
}
// 入参里我们可以指定使用哪个环境,还可以传入properties来“覆盖”xml中<properties>变量
public SqlSessionFactory build(InputStream inputStream, String environment, Properties properties) {
    try {
        // 1. 构建XMLConfigBuilder对象,这个过程会构建Document对象
        XMLConfigBuilder parser = new XMLConfigBuilder(inputStream, environment, properties);
        // 2. 构建Configuration对象后,然后调用build(Configuration)
        return build(parser.parse());
    } catch(Exception e) {
        throw ExceptionFactory.wrapException("Error building SqlSession.", e);
    } finally {
        ErrorContext.instance().reset();
        try {
            inputStream.close();
        } catch(IOException e) {
            // Intentionally ignore. Prefer previous error.
        }
    }
}
public SqlSessionFactory build(Configuration config) {
    // 3. 直接使用构造方法构建DefaultSqlSessionFactory对象
    return new DefaultSqlSessionFactory(config);
}
接下来会具体分析第1和2点的代码,第3点比较简单,就不展开了。
构建xml节点树
XMLConfigBuilder 使用 XPathParser 来解析 xml 获得“节点树”,它本身会通过“节点树”的配置信息来进行初始化操作。现在我们进入到 XMLConfigBuilder 的构造方法:
private final XPathParser parser;
private String environment;
public XMLConfigBuilder(InputStream inputStream, String environment, Properties props) {
    // 构建XPathParser对象,构建时去解析xml
    this(new XPathParser(inputStream, true, props, new XMLMapperEntityResolver()), environment, props);
}
// 这里只是初始化XMLConfigBuilder的几个成员属性
private XMLConfigBuilder(XPathParser parser, String environment, Properties props) {
    // ······
}
XPathParser 的构造方法里将对 xml 进行解析,如下。点进 XPathParser.createDocument(InputSource) 方法就会发现 mybatis 使用的是 JAXP 的 API,这部分的内容就不在本文的讨论范围,感兴趣可参考我的另一篇博客: 源码详解系列(三) ------ dom4j的使用和分析(重点对比和DOM、SAX的区别) 。
private final Document document;
    private Properties variables;
	public XPathParser(Reader reader, boolean validation, Properties variables, EntityResolver entityResolver) {
        // 初始化一列成员属性,没必要看
		commonConstructor(validation, variables, entityResolver);
        // 构建Document对象,使用的是JAXP的API
        this.document = createDocument(new InputSource(reader));
  }
这里补充说明下 XMLMapperEntityResolver 这个类。它是 EntityResolver 子类,xml 的解析会基于事件触发对应的 Resolver 或 Handler,当解析到 dtd 等外部资源时会触发 EntityResolver 的 resolveEntity 方法。在 XMLMapperEntityResolver.resolveEntity 中,当解析到 mybatis-3-config.dtd、mybatis-3-mapper.dtd 等资源时,会直接从 classpath 下的 org/apache/ibatis/builder/xml/ 路径获取资源,而不需要通过 url 获取。
注意,上面对构建的Document对象,只是 configuration 文件的,并不包含 mapper 文件。
先认识下Configuration这个类
我们已经拿到了配置信息,接下来就是构建 Configuration 对象了。
在此之前,我们先认识下 Configurantion 这个类,如下图。可以看到,这些成员属性对应了 xml 文件中各个配置项,接下来讲的就是如何初始化这些属性。
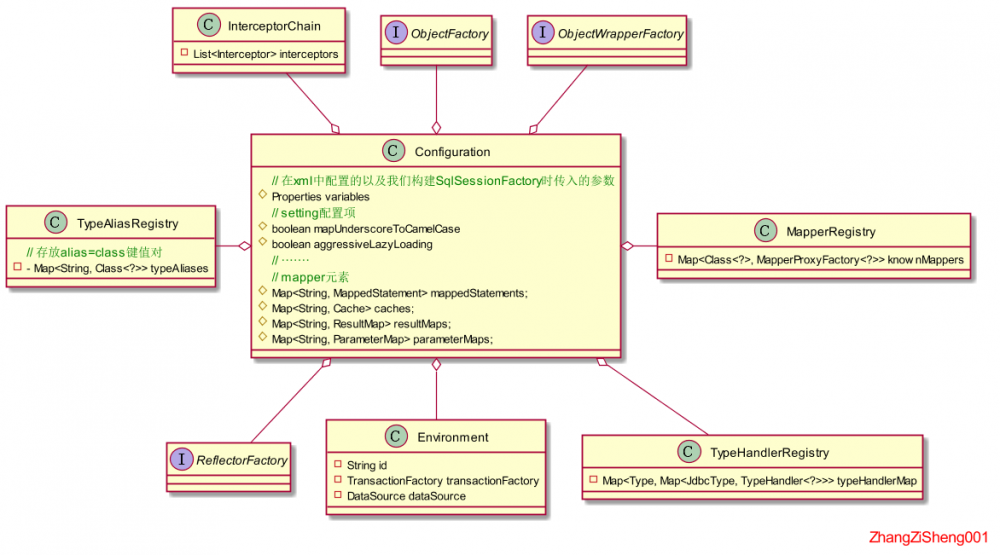
进入到 XMLConfigBuilder.parse() 方法,可以看到所有配置项的初始化顺序。这里的 XNode 类是 mybatis 对 org.w3c.dom.Node 的包装,为后续操作 xml 节点提供了更加简便的接口。
public Configuration parse() {
    if (parsed) {
        throw new BuilderException("Each XMLConfigBuilder can only be used once.");
    }
    // 标记已经解析过
    parsed = true;
    // 通过Document对象构建configuration节点的XNode对象,并构建Configurantion对象
    parseConfiguration(parser.evalNode("/configuration"));
    return configuration;
}
private void parseConfiguration(XNode root) {
    try {
        // 以下初始化不同的配置项
        propertiesElement(root.evalNode("properties"));
        Properties settings = settingsAsProperties(root.evalNode("settings"));
        loadCustomVfs(settings);
        loadCustomLogImpl(settings);
        typeAliasesElement(root.evalNode("typeAliases"));
        pluginElement(root.evalNode("plugins"));
        objectFactoryElement(root.evalNode("objectFactory"));
        objectWrapperFactoryElement(root.evalNode("objectWrapperFactory"));
        reflectorFactoryElement(root.evalNode("reflectorFactory"));
        settingsElement(settings);
        // read it after objectFactory and objectWrapperFactory issue #631
        environmentsElement(root.evalNode("environments"));
        databaseIdProviderElement(root.evalNode("databaseIdProvider"));
        typeHandlerElement(root.evalNode("typeHandlers"));
        mapperElement(root.evalNode("mappers"));
    } catch (Exception e) {
        throw new BuilderException("Error parsing SQL Mapper Configuration. Cause: " + e, e);
    }
}
接下来会挑其中几个配置项展开分析,而不会每个都讲到, 重点关注 typeHandlers 和 mapper 节点的配置 。
properties
properties 是 xml 中使用的全局参数,可以在 xml 中显式配置或引入外部 properties 文件,也可以在构建 SqlSessionFactory 对象时通过方法入参传入(比较少用),通过下面的代码可以知道:
- properties节点的属性 resource 和 url 只能配置一个,两个都配置会报错;
- 不同方式配置会覆盖,优先级如下:方法入参方式 > xml 中引入外部 properties 文件方式 > xml 中显示配置方式,优先级低的会被优先级高的覆盖。
private void propertiesElement(XNode context) throws Exception {
    if (context != null) {
        // 获取xml里显式配置的所有property
        Properties defaults = context.getChildrenAsProperties();
        // 获取resource和url属性值
        String resource = context.getStringAttribute("resource");
        String url = context.getStringAttribute("url");
        // resource和url只能有一个
        if (resource != null && url != null) {
            throw new BuilderException("The properties element cannot specify both a URL and a resource based property file reference.  Please specify one or the other.");
        }
        // 添加resource或url指定资源的properties,如果相同,就覆盖
        if (resource != null) {
            defaults.putAll(Resources.getResourceAsProperties(resource));
        } else if (url != null) {
            defaults.putAll(Resources.getUrlAsProperties(url));
        }
        // 添加方法入参的properties,如果相同,就覆盖
        Properties vars = configuration.getVariables();
        if (vars != null) {
            defaults.putAll(vars);
        }
        // 重新设置XPathParser对象和Configuration对象里的成员属性,以备后面配置项使用
        parser.setVariables(defaults);
        configuration.setVariables(defaults);
    }
}
settings
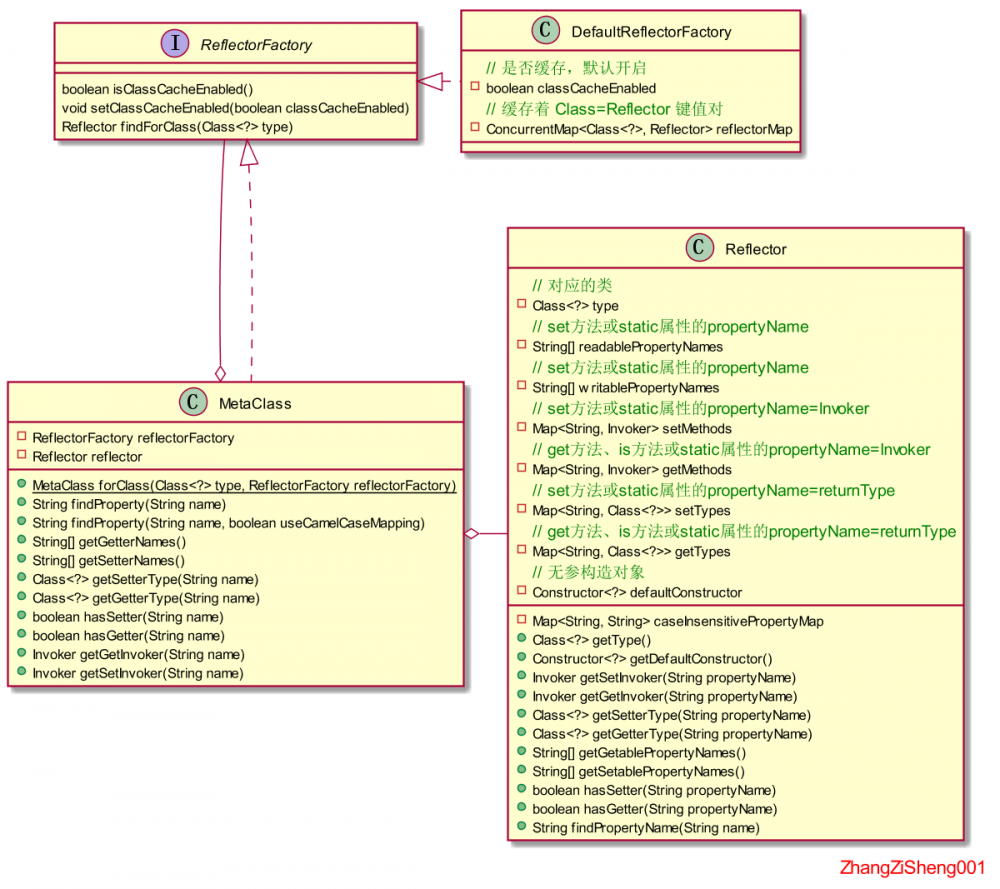
setting 的初始化过程比较简单,这里我们重点关注下 MetaClass 这个类。
private final ReflectorFactory localReflectorFactory = new DefaultReflectorFactory();
private Properties settingsAsProperties(XNode context) {
    if (context == null) {
        return new Properties();
    }
    // 获取settings子节点的配置信息
    Properties props = context.getChildrenAsProperties();
    // 判断该配置项是否存在,不合法会抛错
    MetaClass metaConfig = MetaClass.forClass(Configuration.class, localReflectorFactory);
    for (Object key : props.keySet()) {
        if (!metaConfig.hasSetter(String.valueOf(key))) {
            throw new BuilderException("The setting " + key + " is not known.  Make sure you spelled it correctly (case sensitive).");
        }
    }
    return props;
}
// 这里就是直接初始化属性了
private void settingsElement(Properties props) {
    // ······
}
通常情况下,如果要判断一个配置参数是否存在,可能会在代码中将参数集给写死,但是 mybatis 没有这么做,它提供了一个非常好用的工具类-- MetaClass 。 MetaClass 可以用来初始化某个类的参数集,例如 Configuration ,并且提供了这些参数的 Invoker 对象,通过它可以进行值的设置和获取 。这个类将在后续源码分析中多次出现。
typeAliases
TypeAliasRegistry ,即别名注册器,存放着 alias = Class 的键值对,这些别名仅限于在加载配置的时候使用。
我们可以通过两种方式配置: package 和 typeAlias 的方式 ,而且这两种方式可以共存。
private void typeAliasesElement(XNode parent) {
    if (parent != null) {
        // 遍历typeAliases下的typeAlias或package节点
        for (XNode child : parent.getChildren()) {
            // 配置包的情况
            if ("package".equals(child.getName())) {
                String typeAliasPackage = child.getStringAttribute("name");
                // 使用包名注册
                configuration.getTypeAliasRegistry().registerAliases(typeAliasPackage);
            } else {
                // 配置具体类的情况
                String alias = child.getStringAttribute("alias");
                String type = child.getStringAttribute("type");
                try {
                    // 加载指定类
                    Class<?> clazz = Resources.classForName(type);
                    if (alias == null) {
                        // 如果没有通过xml显式设置别名,将读取该类的Alias注解里的value值
                        // 如果没有通过xml或注解显式设置别名,将使用该Class对象的simpleName小写作为别名
                        typeAliasRegistry.registerAlias(clazz);
                    } else {
                        typeAliasRegistry.registerAlias(alias, clazz);
                    }
                } catch (ClassNotFoundException e) {
                    throw new BuilderException("Error registering typeAlias for '" + alias + "'. Cause: " + e, e);
                }
            }
        }
    }
}
这里只看使用 package 注册别名的情况,进入到 TypeAliasRegistry.registerAliases(String) 方法。通过以下代码可知,注册别名时无法注册接口或内部类。这里 mybatis 又提供了一个好用的工具类-- ResolverUtil , 通过 ResolverUtil 我们可以获取到指定包路径下的接口、注解或指定类的子类 。
public void registerAliases(String packageName) {
    // 查找指定包名下Object的子类,并注册别名
    registerAliases(packageName, Object.class);
}

public void registerAliases(String packageName, Class<?> superType) {
    ResolverUtil<Class<?>> resolverUtil = new ResolverUtil<>();
    // 查找指定包名下superType的子类
    resolverUtil.find(new ResolverUtil.IsA(superType), packageName);
    Set<Class<? extends Class<?>>> typeSet = resolverUtil.getClasses();

    for (Class<?> type : typeSet) {
        // 跳过内部类和接口
        if (!type.isAnonymousClass() && !type.isInterface() && !type.isMemberClass()) {
            // 注册指定类的别名
            registerAlias(type);
        }
    }
}
接着进入 TypeAliasRegistry.registerAlias(Class<?>) 。因为按 package 注册别名的方式没有在 xml 中指定别名,所以,这里会试图从类的 Alias 注解里获取,如果没有,默认使用该类的 simpleName。
public void registerAlias(Class<?> type) {
    // 获取指定类的simpleName
    String alias = type.getSimpleName();
    // 获取指定类的Alias注解
    Alias aliasAnnotation = type.getAnnotation(Alias.class);
    if (aliasAnnotation != null) {
        // 如果不为空,设置别名为注解里的value
        alias = aliasAnnotation.value();
    }
    // 注册指定类的别名
    registerAlias(alias, type);
}
最后进入 TypeAliasRegistry.registerAlias(String, Class<?>) 方法,通过以下代码可知,别名都会被转化为小写,而且,如果同一个别名注册多个不同的类,会报错。最终会以 alias=Class 的键值对存入 TypeAliasRegistry 维护的 map中,供其他配置项使用。
// 存放着 alias=Class 的键值对
private final Map<String, Class<?>> typeAliases = new HashMap<>();
public void registerAlias(String alias, Class<?> value) {
    if (alias == null) {
        throw new TypeException("The parameter alias cannot be null");
    }
    // 取别名的小写
    String key = alias.toLowerCase(Locale.ENGLISH);
    // 如果相同的别名或类已经注册过,会抛错
    if (typeAliases.containsKey(key) && typeAliases.get(key) != null && !typeAliases.get(key).equals(value)) {
        throw new TypeException("The alias '" + alias + "' is already mapped to the value '" + typeAliases.get(key).getName() + "'.");
    }
	// 存入键值对
    typeAliases.put(key, value);
}
plugins
插件/拦截器的初始化比较简单,就简单过一下吧。通过代码可知,我们可以在 plugin 节点下增加 property节点。
private void pluginElement(XNode parent) throws Exception {
    if (parent != null) {
        for (XNode child : parent.getChildren()) {
            // 获取interceptor名
            String interceptor = child.getStringAttribute("interceptor");
            // 获取interceptor的参数
            Properties properties = child.getChildrenAsProperties();
            // 实例化。注意,这里解析Class时会先从别名注册器查,没有才会用Class.forName的方式实例化
            Interceptor interceptorInstance = (Interceptor) resolveClass(interceptor).getDeclaredConstructor().newInstance();
            // 设置参数
            interceptorInstance.setProperties(properties);
            // 添加到configuration的interceptorChain
            configuration.addInterceptor(interceptorInstance);
        }
    }
}
environments
这里的 Environment 对象包含了两个部分:事务工厂和数据源,并且使用 id 作为唯一标识。在下面的代码中,事务工厂和数据源的实例化过程有点类似于插件的过程,这里就不展开了。
private void environmentsElement(XNode context) throws Exception {
    if (context != null) {
        // 如果没有指定环境,会使用default
        if (environment == null) {
            environment = context.getStringAttribute("default");
        }
        for (XNode child : context.getChildren()) {
            String id = child.getStringAttribute("id");
            // 判断是否指定环境
            if (isSpecifiedEnvironment(id)) {
                // 根据配置的transactionManager创建TransactionFactory对象
                TransactionFactory txFactory = transactionManagerElement(child.evalNode("transactionManager"));
                // 根据配置的dataSource创建DataSourceFactory对象
                DataSourceFactory dsFactory = dataSourceElement(child.evalNode("dataSource"));
                // 获取数据源
                DataSource dataSource = dsFactory.getDataSource();
                // 根据id(环境名)、数据源和事务工厂构建并设置Environment对象
                Environment.Builder environmentBuilder = new Environment.Builder(id)
                    .transactionFactory(txFactory)
                    .dataSource(dataSource);
                configuration.setEnvironment(environmentBuilder.build());
            }
        }
    }
}
typeHandlers*
配置TypeHandler的规则
TypeHandler 用于处理参数映射和结果集映射, 一个 TypeHandler 一般需要包含 javaType 和 jdbcType 两个属性来标识,如果某个 javaType 和数据库的 jdbcType 关系为的 一对一或一对多,则可以不用设置 jdbcType 。例如 BooleanTypeHandler 、 ByteTypeHandler 。
在分析源码前,我们先来看看声明 javaType 和 jdbcType 的几种方式:
- xml 中声明,如下
<typeHandlers>
  <typeHandler handler="org.mybatis.example.ExampleTypeHandler" javaType="String" jdbcType="VARCHAR"/>
</typeHandlers>
- 在注解中声明,如下:
@MappedTypes(value = String.class)
@MappedJdbcTypes(value = JdbcType.VARCHAR)
public class ExampleTypeHandler implements TypeHandler<String> {
}
- 在泛型中声明,如下。这种只能用来配置 javaType,而且,必须继承
BaseTypeHandler或TypeReference才行。
public class BigDecimalTypeHandler extends BaseTypeHandler<BigDecimal> {
}
兼容的配置方式越多,代码逻辑也会更复杂,如果 xml 中没有显式地配置 javaType 或 jdbcType,mybatis 会尝试去推断出来,只要明白这个逻辑,接下来的代码就简单很多了。
源码分析
现在开始分析源码吧。我们可以使用 package 和 typeHandler 的两种配置方式,且它们可以共存。
private void typeHandlerElement(XNode parent) {
    if (parent != null) {
        for (XNode child : parent.getChildren()) {
            // 使用包名注册的情况
            if ("package".equals(child.getName())) {
                String typeHandlerPackage = child.getStringAttribute("name");
                typeHandlerRegistry.register(typeHandlerPackage);
            } else {
                //使用具体类名注册的情况
                String javaTypeName = child.getStringAttribute("javaType");
                String jdbcTypeName = child.getStringAttribute("jdbcType");
                String handlerTypeName = child.getStringAttribute("handler");
                Class<?> javaTypeClass = resolveClass(javaTypeName);
                JdbcType jdbcType = resolveJdbcType(jdbcTypeName);
                Class<?> typeHandlerClass = resolveClass(handlerTypeName);
                if (javaTypeClass != null) {
                    if (jdbcType == null) {
                        // javaType不为空,jdbcType为空的情况
                        typeHandlerRegistry.register(javaTypeClass, typeHandlerClass);
                    } else {
                        // javaType不为空,jdbcType不为空的情况
                        typeHandlerRegistry.register(javaTypeClass, jdbcType, typeHandlerClass);
                    }
                } else {
                    // javaType为空,jdbcType为空的情况
                    typeHandlerRegistry.register(typeHandlerClass);
                }
            }
        }
    }
}
按 package 注册类型处理器的方式有点像前面提到的按 package 注册别名,都会先加载指定包里的类,这里就不展开了,直接看按类名注册的情况( 不指定 javaType 和 jdbcType ),进入到 TypeHandlerRegistry.register(Class<?>) 方法。这种情况下,mybatis 会先去推断出该类型处理器对应的 javaType,方法如下:
- 通过 MappedTypes 注解的 value 来判断;
- 通过泛型判断,这种类型处理器需要继承BaseTypeHandler,而不仅仅只是实现TypeHandler。(3.1.0之后才支持)
public void register(Class<?> typeHandlerClass) {
    boolean mappedTypeFound = false;
    // 获取指定类型处理器的MappedTypes注解,里面的value就是该类型处理器处理的javaType
    MappedTypes mappedTypes = typeHandlerClass.getAnnotation(MappedTypes.class);
    if (mappedTypes != null) {
        // 获取MappedTypes注解的value,并遍历
        for (Class<?> javaTypeClass : mappedTypes.value()) {
            // 根据javaType注册类型处理器
            register(javaTypeClass, typeHandlerClass);
            mappedTypeFound = true;
        }
    }
    // 如果没有MappedTypes注解,mybatis 3.1.0之后会通过泛型推断出javaType,但这种类型处理器需要继承BaseTypeHandler,而不仅仅只是实现TypeHandler
    if (!mappedTypeFound) {
        register(getInstance(null, typeHandlerClass));
    }
}
接下来就是推断 jdbcType 了,这里会通过 MappedJdbcTypes 注解来确定(可配置多个 jdbcType),如果设置了 includeNullJdbcType=true ,则会将 jdbcTyp 为 null 情况也注册上去。如果没有MappedJdbcTypes 注解,会直接将 jdbcTyp 为 null 情况也注册上去。
public void register(Class<?> javaTypeClass, Class<?> typeHandlerClass) {
    // 实例化类型处理器,并根据javaType注册
    register(javaTypeClass, getInstance(javaTypeClass, typeHandlerClass));
}
public <T> void register(Class<T> javaType, TypeHandler<? extends T> typeHandler) {
    // 强转javaType为Type类型
    register((Type) javaType, typeHandler);
}
private <T> void register(Type javaType, TypeHandler<? extends T> typeHandler) {
    // 获取类型处理器的MappedJdbcTypes注解,里面的value就是该类型处理器处理的jdbcType
    MappedJdbcTypes mappedJdbcTypes = typeHandler.getClass().getAnnotation(MappedJdbcTypes.class);
    if (mappedJdbcTypes != null) {
        // 获取MappedJdbcTypes注解的value,并遍历
        for (JdbcType handledJdbcType : mappedJdbcTypes.value()) {
            // 根据javaType和jdbcType注册类型处理器
            register(javaType, handledJdbcType, typeHandler);
        }
        // 读取MappedJdbcTypes注解的includeNullJdbcType,如果为true,则根据javaType注册类型处理器
        // 当includeNullJdbcType为true时,即使不指定jdbcType,该类型处理器也能被使用。从 Mybatis 3.4.0 开始,如果某个 Java 类型只有一个注册的类型处理器,即使没有设置 includeNullJdbcType=true,那么这个类型处理器也会是 ResultMap 使用 Java 类型时的默认处理器。
        if (mappedJdbcTypes.includeNullJdbcType()) {
            register(javaType, null, typeHandler);
        }
    } else {
        // 根据javaType注册类型处理
        register(javaType, null, typeHandler);
    }
}
最后就是具体的注册过程了。 mybatis 进行参数或结果集映射时一般用到的是 typeHandlerMap,其他的成员属性一般用于判断是否有某种类型处理器 。
// javaType=(jdbcType=typeHandler)
private final Map<Type, Map<JdbcType, TypeHandler<?>>> typeHandlerMap = new ConcurrentHashMap<>();
// class=typeHandler,这个没什么用
private final Map<Class<?>, TypeHandler<?>> allTypeHandlersMap = new HashMap<>();

private void register(Type javaType, JdbcType jdbcType, TypeHandler<?> handler) {
    // 只有javaType非空时才会放入typeHandlerMap
    if (javaType != null) {
        // 从typeHandlerMap里获取当前javaType的jdbcType=TypeHandler
        Map<JdbcType, TypeHandler<?>> map = typeHandlerMap.get(javaType);
        // 如果这张表为空,则重置
        if (map == null || map == NULL_TYPE_HANDLER_MAP) {
            map = new HashMap<>();
        }
        // 放入当前需要注册的jdbcType=TypeHandler,注意,相同的会被覆盖掉
        map.put(jdbcType, handler);
        // 放入javaType=map
        typeHandlerMap.put(javaType, map);
    }
    // allTypeHandlersMap放入了所有的handler,包括javaType为空的。
    allTypeHandlersMap.put(handler.getClass(), handler);
}
mappers*
mapper 的节点对象
接下来就是初始化中最难的部分了。因为 mybatis 的 mapper 支持了非常多个语法,甚至还允许使用注解配置,所以,在对 mapper 的解析方面需要非常复杂的逻辑。我们先来看看 mapper 中的配置项,如下。
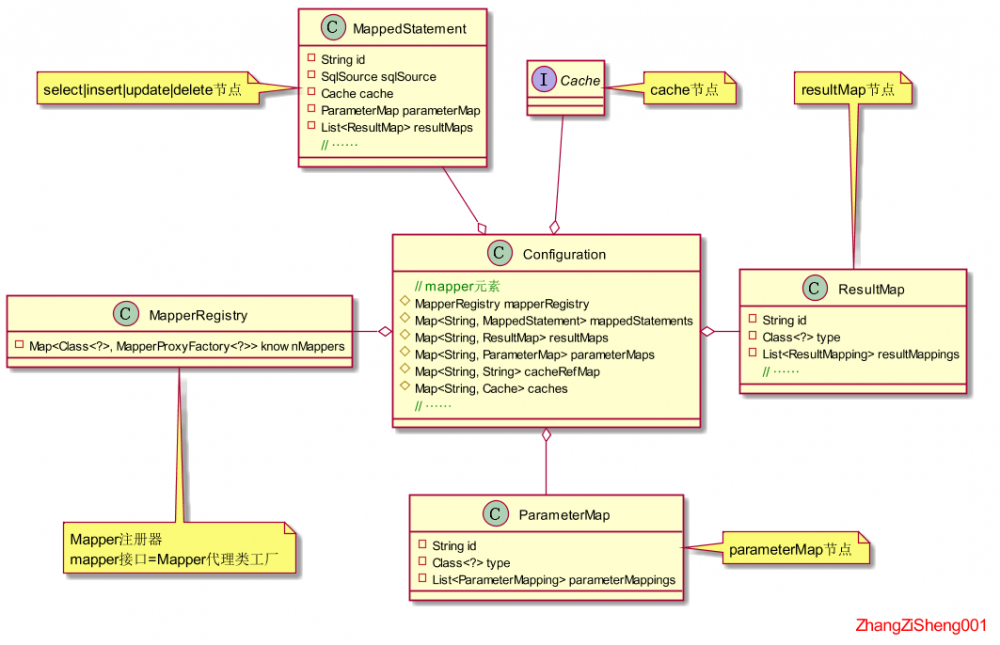
ResultMap的组成
接下来我只会写 resultMap 节点的 xml 配置,其他的就不写了。为了更好地理清代码逻辑,我们先看看 resultMap 的几种配置方式。
<resultMap id="detailedBlogResultMap" type="Blog">
    <constructor>
        <idArg column="blog_id" javaType="int" />
    </constructor>
    <result property="title" column="blog_title" />
    <association property="author" javaType="Author">
        <id property="id" column="author_id" />
        <result property="username" column="author_username" />
        <result property="password" column="author_password" />
        <result property="email" column="author_email" />
    </association>
    <collection property="posts" ofType="Post">
        <id property="id" column="post_id" />
        <result property="subject" column="post_subject" />
        <association property="author" javaType="Author" />
        <collection property="comments" ofType="Comment">
            <id property="id" column="comment_id" />
        </collection>
        <collection property="tags" ofType="Tag">
            <id property="id" column="tag_id" />
        </collection>
    </collection>
    <discriminator javaType="int" column="draft">
        <case value="1" resultMap="resultMap01"/>
        <case value="2" resultMap="resultMap02"/>
        <case value="3" resultMap="resultMap03"/>
        <case value="4" resultMap="resultMap04"/>
    </discriminator>
</resultMap>
针对上面的配置,需要重点理解:
- 整个 resultMap 将作为
ResultMap对象存在,并使用 id 作为唯一标识。除了 id="detailedBlogResultMap" 的ResultMap对象,association 、collection 和 case 节点也会生成新的ResultMap对象(如果不是配置 resultMap 和 select 属性的话)。 - idArg、result、association 和 collection 节点都会被转换为
ResultMapping对象被ResultMap对象持有 ,区别在于 association 和 collection 的ResultMapping对象会持有 nestedResultMapId 来指向另外一个ResultMap对象,持有 nestedQueryId 来指向另外一个MappedStatement对象。 - discriminator 节点,将转换为
Discriminator对象被ResultMap对象持有。
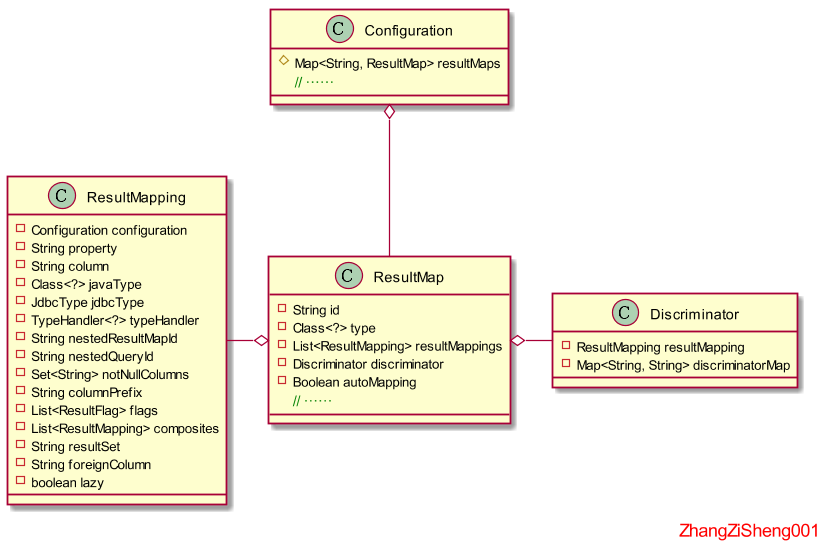
源码分析
那么,开始看源码吧。mapper 的配置支持下面两种配置,两者可以共存:
- mapper 节点配置。支持 resource、url 和 class 属性,但这三个属性只能配置一个,不然会报错。
- package 节点配置。
private void mapperElement(XNode parent) throws Exception {
    if (parent != null) {
        for (XNode child : parent.getChildren()) {
            // 使用包配置的情况
            if ("package".equals(child.getName())) {
                String mapperPackage = child.getStringAttribute("name");
                configuration.addMappers(mapperPackage);
            } else {
                // 使用mapper配置的情况
                String resource = child.getStringAttribute("resource");
                String url = child.getStringAttribute("url");
                String mapperClass = child.getStringAttribute("class");
                if (resource != null && url == null && mapperClass == null) {
                    // resource属性不为空
                    ErrorContext.instance().resource(resource);
                    InputStream inputStream = Resources.getResourceAsStream(resource);
                    XMLMapperBuilder mapperParser = new XMLMapperBuilder(inputStream, configuration, resource, configuration.getSqlFragments());
                    mapperParser.parse();
                } else if (resource == null && url != null && mapperClass == null) {
                    // url属性不为空
                    ErrorContext.instance().resource(url);
                    InputStream inputStream = Resources.getUrlAsStream(url);
                    XMLMapperBuilder mapperParser = new XMLMapperBuilder(inputStream, configuration, url, configuration.getSqlFragments());
                    mapperParser.parse();
                } else if (resource == null && url == null && mapperClass != null) {
                    // class属性不为空
                    Class<?> mapperInterface = Resources.classForName(mapperClass);
                    configuration.addMapper(mapperInterface);
                // resource、url和class只能存在一个
                } else {
                    throw new BuilderException("A mapper element may only specify a url, resource or class, but not more than one.");
                }
            }
        }
    }
}
使用 package 配置 mapper 的情况,会有加载包内类的过程,和前面的 typeAliases 差不多,所以这里选择使用 mapper 配置(属性为class)的情况,进入到 Configuration.addMapper(Class<T>) 。在注册 mapper 时,其实有两个内容:
- 注册 mapper 接口,初始化 mapperRegistry 里的 type=mapperProxyFactory 的map。
MapperProxyFactory用于生成Mapper的代理类,后面会讲到。 - 解析 mapper 的 xml 文件和注解,初始化 mappedStatements、caches、resultMaps、parameterMaps 等属性。
public <T> void addMapper(Class<T> type) {
    mapperRegistry.addMapper(type);
}
public <T> void addMapper(Class<T> type) {
	// 只有是接口才行
    if (type.isInterface()) {
        // 该mapper是不是已经注册
        if (hasMapper(type)) {
            throw new BindingException("Type " + type + " is already known to the MapperRegistry.");
        }
        boolean loadCompleted = false;
        try {
            // 注册该mapper接口
            knownMappers.put(type, new MapperProxyFactory<>(type));
            // 接下来解析mapper的xml和注解,不要被MapperAnnotationBuilder这个类名误导,接下来不止会解析注解,也会解析xml
            MapperAnnotationBuilder parser = new MapperAnnotationBuilder(config, type);
            parser.parse();
            loadCompleted = true;
        } finally {
            if (!loadCompleted) {
                knownMappers.remove(type);
            }
        }
    }
}
进入到 MapperAnnotationBuilder.parse() 方法,这里先解析 xml 文件,再解析注解。接下来我们只看 xml 的,注解的就不看了。
// 存放已加载的资源
protected final Set<String> loadedResources = new HashSet<>();
public void parse() {
    String resource = type.toString();
    // 该资源未被加载才进入
    if (!configuration.isResourceLoaded(resource)) {
        // 加载xml
        loadXmlResource();
        // 标记已加载
        configuration.addLoadedResource(resource);
        assistant.setCurrentNamespace(type.getName());
        // 接下来是解析注解
        parseCache();
        parseCacheRef();
        Method[] methods = type.getMethods();
        for (Method method : methods) {
            try {
                // issue #237
                if (!method.isBridge()) {
                    parseStatement(method);
                }
            } catch (IncompleteElementException e) {
                // 未解析完成,会放入对应的集合中,等待最后再解析
                configuration.addIncompleteMethod(new MethodResolver(this, method));
            }
        }
    }
    // 因为存在嵌套引用的问题,有些内容还没解析完,这里会做最后的解析
    parsePendingMethods();
}
进入到 MapperAnnotationBuilder.loadXmlResource() 方法。这里的 XMLMapperBuilder 用于解析 mapper 文件的配置,前面说到的 XMLConfigBuilder 则是解析 configurantion 文件的配置,它们都是 BaseBuilder 的子类。
private void loadXmlResource() {
    // 该命名空间未被加载,才会进入
    if (!configuration.isResourceLoaded("namespace:" + type.getName())) {
        // 根据mapper获取xml
        String xmlResource = type.getName().replace('.', '/') + ".xml";
        InputStream inputStream = type.getResourceAsStream("/" + xmlResource);
        if (inputStream == null) {
            // Search XML mapper that is not in the module but in the classpath.
            try {
                inputStream = Resources.getResourceAsStream(type.getClassLoader(), xmlResource);
            } catch (IOException e2) {
                // ignore, resource is not required
            }
        }
        if (inputStream != null) {
            // 和XMLConfigBuilder一样,这里会解析xml并构建document
            XMLMapperBuilder xmlParser = new XMLMapperBuilder(inputStream, assistant.getConfiguration(), xmlResource, configuration.getSqlFragments(), type.getName());
            // 进入解析
            xmlParser.parse();
        }
    }
}
进入到 XMLMapperBuilder.parse() 。我们会发现,如果使用 resource 或 url 的方式来配置 mapper,那么 Mapper 接口的注册会在这个方法里。
public void parse() {
    // 该资源未加载才会进入
    if (!configuration.isResourceLoaded(resource)) {
        // 构建mapper节点的XNode对象,并解析
        configurationElement(parser.evalNode("/mapper"));
        // 标记已解析
        configuration.addLoadedResource(resource);
        // 注册Mapper接口,其实这个注册过了的
        bindMapperForNamespace();
    }
	// 因为存在嵌套引用的问题,有的节点还没初始化完成,这里继续初始化
    parsePendingResultMaps();
    parsePendingCacheRefs();
    parsePendingStatements();
}
private void configurationElement(XNode context) {
    try {
        // mapper文件的namespace不能为空
        String namespace = context.getStringAttribute("namespace");
        if (namespace == null || namespace.equals("")) {
            throw new BuilderException("Mapper's namespace cannot be empty");
        }
        builderAssistant.setCurrentNamespace(namespace);
        // 接下来讲初始化各个节点
        cacheRefElement(context.evalNode("cache-ref"));
        cacheElement(context.evalNode("cache"));
        parameterMapElement(context.evalNodes("/mapper/parameterMap"));
        resultMapElements(context.evalNodes("/mapper/resultMap"));
        sqlElement(context.evalNodes("/mapper/sql"));
        buildStatementFromContext(context.evalNodes("select|insert|update|delete"));
    } catch (Exception e) {
        throw new BuilderException("Error parsing Mapper XML. The XML location is '" + resource + "'. Cause: " + e, e);
    }
}
前面已经说过,我们只看 resultMap 的构建,进入到 XMLMapperBuilder.resultMapElements(List<XNode>) 。
private void resultMapElements(List<XNode> list) {
    // 我们可以配置多个resultMap,这里一个个遍历
    for (XNode resultMapNode : list) {
        try {
            // 解析resultMap节点
            resultMapElement(resultMapNode);
        } catch (IncompleteElementException e) {
            // ignore, it will be retried
        }
    }
}
private ResultMap resultMapElement(XNode resultMapNode) {
    return resultMapElement(resultMapNode, Collections.emptyList(), null);
}
// 注意,这个类传入的resultMapNode不仅是resultMap节点,也可以是association、collection或case节点
// 如果是association、collection或case节点,enclosingType为当前resultMap节点的type,additionalResultMappings为所属resultMap的ResultMappings
private ResultMap resultMapElement(XNode resultMapNode, List<ResultMapping> additionalResultMappings, Class<?> enclosingType) {
    ErrorContext.instance().activity("processing " + resultMapNode.getValueBasedIdentifier());
    // 获取当前的类名
    String type = resultMapNode.getStringAttribute("type",
                                                   resultMapNode.getStringAttribute("ofType",
                                                                                    resultMapNode.getStringAttribute("resultType",
                                                                                                                     resultMapNode.getStringAttribute("javaType"))));
    // 获取该类的Class对象。如果为空,针对association和case的情况会通过enclosingType来推断
    Class<?> typeClass = resolveClass(type);
    if (typeClass == null) {
        typeClass = inheritEnclosingType(resultMapNode, enclosingType);
    }
    Discriminator discriminator = null;
    List<ResultMapping> resultMappings = new ArrayList<>(additionalResultMappings);
    List<XNode> resultChildren = resultMapNode.getChildren();
    for (XNode resultChild : resultChildren) {
        // 如果为constructor节点
        if ("constructor".equals(resultChild.getName())) {
            // 这里会将每个idArg或arg转换为ResultMapping对象,并放入resultMappings
            processConstructorElement(resultChild, typeClass, resultMappings);
        // 如果为discriminator节点
        } else if ("discriminator".equals(resultChild.getName())) {
            // discriminator将转换为Discriminator对象
            discriminator = processDiscriminatorElement(resultChild, typeClass, resultMappings);
        // 这种就是的result、collection或association节点了
        } else {
			List<ResultFlag> flags = new ArrayList<>();
            // 标记id
            if ("id".equals(resultChild.getName())) {
                flags.add(ResultFlag.ID);
            }
            // 将result、collection或association节点转换为ResultMapping对象,并放入resultMappings,如果是collection或association节点,会指向生成的新的ResultMap对象或已有的ResultMap对象
            resultMappings.add(buildResultMappingFromContext(resultChild, typeClass, flags));
        }
    }
    // 获取resultMap的id、extends和autoMapping属性
    String id = resultMapNode.getStringAttribute("id",
                                                 resultMapNode.getValueBasedIdentifier());
    String extend = resultMapNode.getStringAttribute("extends");
    Boolean autoMapping = resultMapNode.getBooleanAttribute("autoMapping");
    // 创建ResultMapResolver对象
    ResultMapResolver resultMapResolver = new ResultMapResolver(builderAssistant, id, typeClass, extend, discriminator, resultMappings, autoMapping);
    try {
        // 解析resultMap,这里所谓的解析,其实就是将extends的东西放入resultMappings
        return resultMapResolver.resolve();
    } catch (IncompleteElementException  e) {
        // 如果没有解析完成,放入集合incompleteResultMaps,等待后面再解析
        configuration.addIncompleteResultMap(resultMapResolver);
        throw e;
    }
}
以上,mybatis 初始化的源码基本已分析完,不足的地方欢迎指正。
相关源码请移步: mybatis-demo
本文为原创文章,转载请附上原文出处链接: https://www.cnblogs.com/ZhangZiSheng001/p/12704076.html
- 本文标签: stream tab tar UI App 实例 参数 entity 处理器 cache session 缓存 源码 配置 CTO Select mybatis src 文章 plugin ConcurrentHashMap Proxy classpath https map 空间 DOM 插件 build ACE sqlsession HashMap Statement ssl struct sql 代码 Document list example Word mapper id JDBC root mail apr API parse value dataSource 博客 SqlSessionFactory MQ 构造方法 selectByPrimaryKey apache mina cat NSA 遍历 key provider http SqlSessionFactoryBuilder iBATIS equals tag update db 数据库 IDE 解析 XML final W3C Action Collection HashSet java node find 数据 HTML Collections 一对多 DDL Property IO ArrayList
- 版权声明: 本文为互联网转载文章,出处已在文章中说明(部分除外)。如果侵权,请联系本站长删除,谢谢。
- 本文海报: 生成海报一 生成海报二


![[HBLOG]公众号](https://www.liuhaihua.cn/img/qrcode_gzh.jpg)

