【一起学源码-微服务】Zuul 源码二:Zuul核心源码解析
本文章首发自本人公众号: 壹枝花算不算浪漫 ,如若转载请标明来源!
感兴趣的小伙伴可关注个人公众号:壹枝花算不算浪漫

前言
前情回顾
上一讲主要是讲了zuul的原理及demo演示,这一讲主要讲zuul的核心源码剖析。
本讲目录
我们在上一讲结尾放了一张zuul原理图,我们可以看到zuul其实就是用了很多拦截器去实现的。具体可分为preFilter、routeFilter、postFilter、errorFilter

其中errorFilter就是post中的 SendErrorFilter ,下面会做详细的讲解,具体目录如下:
- zuul入口:ZuulServlet源码剖析
- preFilter源码剖析
- routeFilter源码剖析
- postFilter源码剖析
- errorFilter源码剖析
源码分析
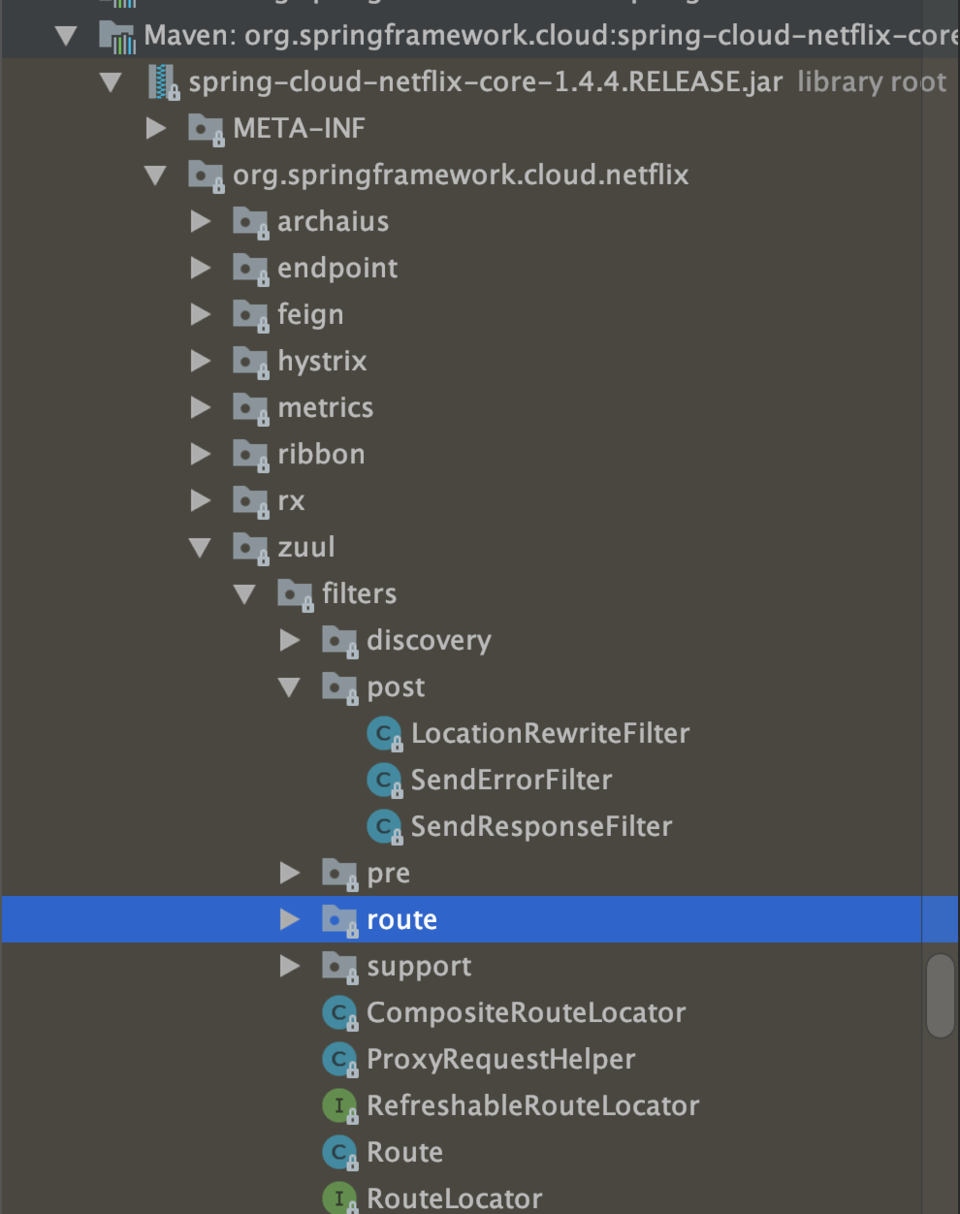
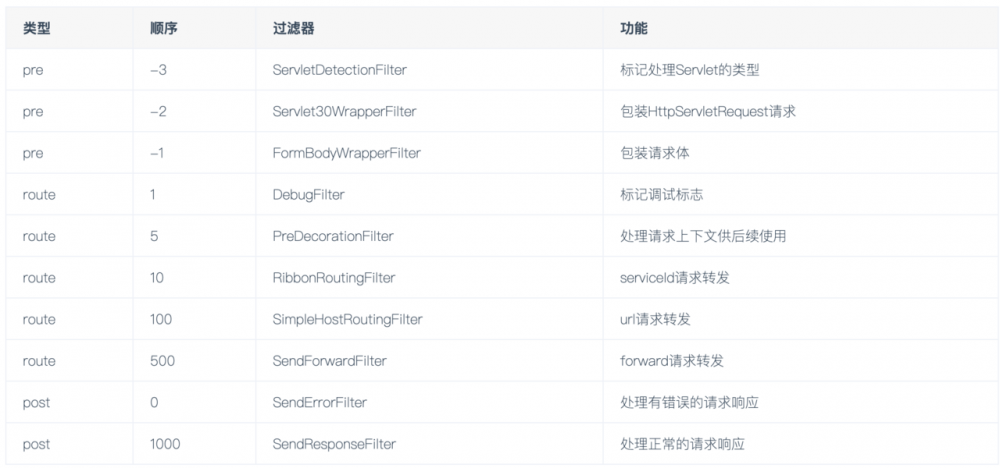
我们已经知道,zuul的核心原理就是各种filter。这里我们先看下有哪些filter:

zuul入口:ZuulServlet源码剖析
作为一个api网管,zuul是要接受前端传递过来的请求。 所以我们的入口可以从 ZuulServlet 开始。
public class ZuulServlet extends HttpServlet {

	@Override
	public void service(javax.servlet.ServletRequest servletRequest, javax.servlet.ServletResponse servletResponse) throws ServletException, IOException {
	    try {
	        init((HttpServletRequest) servletRequest, (HttpServletResponse) servletResponse);

	        // 获取请求上下文信息,这里context使用ThreadLocal实现
	        RequestContext context = RequestContext.getCurrentContext();
	        context.setZuulEngineRan();

	        try {
	        	// 执行preRoute
	            preRoute();
	        } catch (ZuulException e) {
	            error(e);
	            postRoute();
	            return;
	        }
	        try {
	        	// 执行route
	            route();
	        } catch (ZuulException e) {
	            error(e);
	            postRoute();
	            return;
	        }
	        try {
	      		// 执行postRoute
	            postRoute();
	        } catch (ZuulException e) {
	            error(e);
	            return;
	        }

	    } catch (Throwable e) {
	        error(new ZuulException(e, 500, "UNHANDLED_EXCEPTION_" + e.getClass().getName()));
	    } finally {
	        RequestContext.getCurrentContext().unset();
	    }
	}
}
复制代码
我们可以看到这里首先是构造一个 RequestContext , 它是个Map结构,会存放request、response等信息。
public class RequestContext extends ConcurrentHashMap<String, Object> {

    protected static Class<? extends RequestContext> contextClass = RequestContext.class;

    private static RequestContext testContext = null;

    protected static final ThreadLocal<? extends RequestContext> threadLocal = new ThreadLocal<RequestContext>() {
        @Override
        protected RequestContext initialValue() {
            try {
            	// 通过反射初始化一个RequestContext
                return contextClass.newInstance();
            } catch (Throwable e) {
                throw new RuntimeException(e);
            }
        }
    };

    /**
     * Get the current RequestContext
     *
     * @return the current RequestContext
     */
    public static RequestContext getCurrentContext() {
        if (testContext != null) return testContext;
        // 返回当前线程的一个RequestContext
        RequestContext context = threadLocal.get();
        return context;
    }

}
复制代码
然后在ZuulServlet中依次执行 preRoute 、 route 、 postRoute ,如果出现异常则会执行 error 和 post 过滤器。
不通过滤器是通过 ZuulRunner 中根据 filterType 去一一执行的。
这里其实是是使用策略+责任链模式去实现的,看过我博客的朋友应该知道我前面也讲解过这两种模式的实战,这里就不多赘述。
filter核心原理讲解
Filter是Zuul的核心,用来实现对外服务的控制。Filter的生命周期有4个,分别是:
- pre:在请求被路由之前调用。
- routing:将请求路由到微服务。这种过滤器用于构建发送给微服务的请求,并使用Apache HttpClient或Netfilx Ribbon请求微服务。
- post:在路由到微服务以后执行。这种过滤器可用来为响应添加标准的HTTP Header、收集统计信息和指标、将响应从微服务发送给客户端等。
- error:其他阶段发生错误时执行该过滤器。
所有的过滤器都是继承 ZuulFilter 抽象类并重写了下面的四个方法来实现自定义的过滤器。这四个方法分别定义了:
- filterType():过滤器的类型,它决定过滤器在请求的哪个生命周期中执行。这里定义为 pre,代表会在请求被路由之前执行。
- filterOrder():过滤器的执行顺序。当请求在一个阶段中存在多个过滤器时,需要根据该方法返回的值来依次执行。通过数字指定,数字越大,优先级越低。
- shouldFilter():判断该过滤器是否需要被执行。这里我们直接返回了 true,因此该过滤器对所有请求都会生效。实际运用中我们可以利用该函数来指定过滤器的有效范围。
- run():过滤器的具体逻辑。这里我们通过 ctx.setSendZuulResponse(false) 来让 Zuul 过滤该请求,不对其进行路由,然后通过 ctx.setResponseStatusCode(401) 设置了其返回的错误码,当然我们也可以进一步优化我们的返回,比如,通过 ctx.setResponseBody(body) 对返回 body 内容进行编辑等。
filter配置讲解
-
请求头配置 默认情况下,zuul有些敏感的请求头不会转发给后端的服务
比如说:Cookie、Set-Cookie、Authorization,也可以自己配置敏感请求头
zuul: sensitiveHeaders: accept-language, cookie routes: demo: ensitiveHeaders: cookie 复制代码 -
路由映射信息
我们在zuul-gateway中引入actuator项目,然后在配置文件中,将management.security.enabled设置为false,就可以访问/routes地址,然后可以看到路由的映射信息
-
hystrix配置
与ribbon整合转发时,会使用RibbonRoutingilter,转发会使用hystrix包裹请求,如果请求失败,会执行fallback逻辑
public class ServiceBFallbackProvider implements ZuulFallbackProvider {

}

@Configuration
public class FallbackConfig {

  @Bean
  public ZuulFallbackProvider fallbackProvider() {
    return new ServiceBFallbackProvider();
  }
}
复制代码
zuul配置如下:
zuul:
      routes:
        ServiceB:
         path: /ServiceB/**
复制代码
上面的代码就定义了ServiceB的降级逻辑 但是一般不会针对某个服务搞降级,你最好是在getRoute()方法中,返回:*,这样子就是做一个全局的降级
-
ribbon客户端预加载 默认情况下,第一次请求zuul才会初始化ribbon客户端,所以可以配置预加载
zuul: ribbon: eager-load: enabled: true 复制代码 -
超时配置
zuul也是用的hystrix + ribbon那套东西,所以说,超时这里要考虑hystrix和ribbon的,而且hystrix的超时要考虑ribbon的重试次数和单次超时时间
hystrix的超时时间计算公式如下:
(ribbon.ConnectTimeout + ribbon.ReadTimeout) * (ribbon.MaxAutoRetries + 1) * (ribbon.MaxAutoRetriesNextServer + 1)
ribbon:
  ReadTimeout:100
  ConnectTimeout:500
  MaxAutoRetries:1
  MaxAutoRetriesNextServer:1
复制代码
如果不配置ribbon的超时时间,默认的hystrix超时时间是4000ms
zuul如何处理一个请求
上面已经分析得出Zuul是基于Servlet这一套逻辑来做的,往下跟就变得简单。SpringMVC是如何处理请求的呢?大家应该都比较熟悉,浏览器发出一个请求到达服务端,首先到达DispatcherServlet,Servlet容器将请求交给HandlerMapping,找到对应的Controller访问路径和处理方法对应关系,接着交由HandlerAdapter路由到真实的处理逻辑中去进行处理。
下面我贴出来 ZuulServerAutoConfiguration#ZuulHandlerMapping,定义了ZuulHandlerMapping bean对象。
public class ZuulHandlerMapping extends AbstractUrlHandlerMapping {

}
复制代码
ZuulHandlerMapping 自身继承了AbstractUrlHandlerMapping,即通过url来查找对应的处理器。判断的核心逻辑在 lookupHandler方法中:
@Override
protected Object lookupHandler(String urlPath, HttpServletRequest request) throws Exception {
  if (this.errorController != null && urlPath.equals(this.errorController.getErrorPath())) {
    return null;
  }
  //判断urlPath是否被忽略,如果忽略则返回null
  if (isIgnoredPath(urlPath, this.routeLocator.getIgnoredPaths())) return null;
  RequestContext ctx = RequestContext.getCurrentContext();
  if (ctx.containsKey("forward.to")) {
    return null;
  }
  if (this.dirty) {
    synchronized (this) {
      if (this.dirty) {
        //如果没有加载过路由或者路由有刷新,则加载路由
        registerHandlers();
        this.dirty = false;
      }
    }
  }
  return super.lookupHandler(urlPath, request);
}


private void registerHandlers() {
  Collection<Route> routes = this.routeLocator.getRoutes();
  if (routes.isEmpty()) {
    this.logger.warn("No routes found from RouteLocator");
  }
  else {
    for (Route route : routes) {
      //调用父类,注册处理器,这里所有路径的处理器都是ZuulController
      registerHandler(route.getFullPath(), this.zuul);
    }
  }
}
复制代码
整体逻辑就是在路由加载的时候需要为每个路由指定处理器,因为Zuul不负责逻辑处理,所以它也没有对应的Controller可以使用,那怎么办呢,注册处理器的时候,使用的是ZuulController,是Controller的子类,对应的适配器是SimpleControllerHandlerAdapter,也就说每一个路由规则公共处理器都是ZuulController,这个处理器最终会调用ZuulServlet经过zuul定义的和自定义的拦截器。
上面还有一句:
Collection<Route> routes = this.routeLocator.getRoutes();
复制代码
RouteLocator的作用是路由定位器,先看它有哪些实现类:
- SimpleRouteLocator:主要加载配置文件的路由规则;
- DiscoveryClientRouteLocator:服务发现的路由定位器,去注册中心如Eureka,Consul等拿到服务名称,以这样的方式/服务名称/**映射成路由规则;
- CompositeRouteLocator:复合路由定位器,主要集成所有的路由定位器(如配置文件路由定位器,服务发现定位器,自定义路由定位器等)来路由定位;
- RefreshableRouteLocator:路由刷新,只有实现了此接口的路由定位器才能被刷新。
从实现类的功能看路由定位器的作用就是区分当前从哪里加载路由进行注册。上面这几个实现类都实现了Ordered类,加载的顺序依照getOrder()数值大小来定。
zuul如何整合Ribbon
我们可以直接看 RibbonRouteFilter 这个核心类,这里面就是集成了Ribbon和Hystrix
public class RibbonRoutingFilter extends ZuulFilter {
protected ClientHttpResponse forward(RibbonCommandContext context) throws Exception {
Map<String, Object> info = this.helper.debug(context.getMethod(),
context.getUri(), context.getHeaders(), context.getParams(),
context.getRequestEntity());
RibbonCommand command = this.ribbonCommandFactory.create(context);
try {
ClientHttpResponse response = command.execute();
this.helper.appendDebug(info, response.getRawStatusCode(), response.getHeaders());
return response;
}
catch (HystrixRuntimeException ex) {
return handleException(info, ex);
}
}
}
复制代码
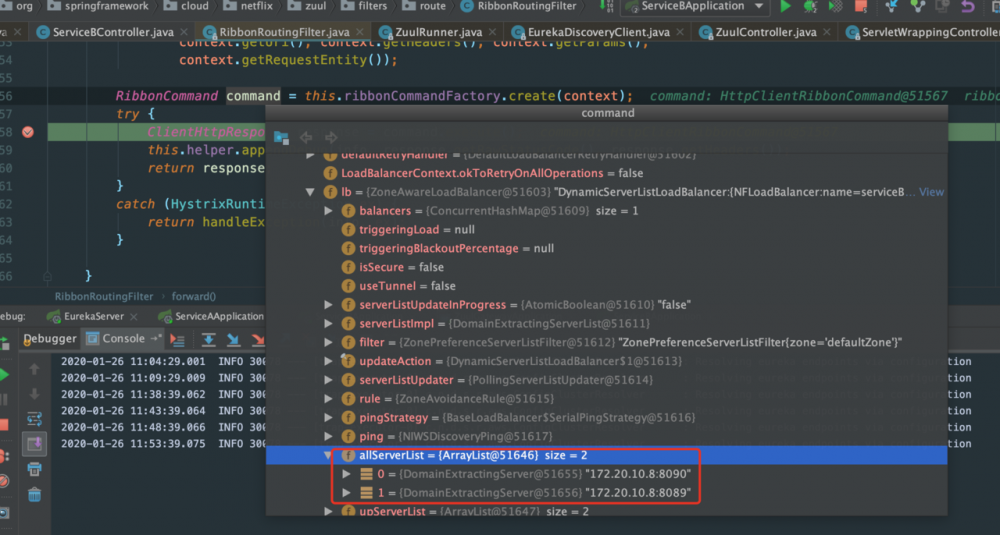
我们在 forward() 方法中, 有一个 RibbonCommand ,它继承了 HystrixExecutable ,这里就是和 HystrixCommand 整合的地方,我们debug看下这个command:

这个command 中就包含了LoadBalancer信息了。我们进一步看看这个里面的实现:
public class HttpClientRibbonCommandFactory extends AbstractRibbonCommandFactory {
    @Override
    public HttpClientRibbonCommand create(final RibbonCommandContext context) {
        ZuulFallbackProvider zuulFallbackProvider = getFallbackProvider(context.getServiceId());
        final String serviceId = context.getServiceId();
        final RibbonLoadBalancingHttpClient client = this.clientFactory.getClient(
                serviceId, RibbonLoadBalancingHttpClient.class);
        client.setLoadBalancer(this.clientFactory.getLoadBalancer(serviceId));

        return new HttpClientRibbonCommand(serviceId, client, context, zuulProperties, zuulFallbackProvider,
                clientFactory.getClientConfig(serviceId));
    }
}
复制代码
最后返回的 HttpClientRibbonCommand 最终就会到Hystrix中的 AbstractCommand 中了,前面讲解Hystrix有对这个类有过详细的介绍。这里就不再赘述了。
总结
上面已经简单地分析完了Zuul的核心原理和代码。相信我们都对这个有了基本的了解了,具体的还需要大家一点点去看源码分析了。
- 本文标签: client servlet Security API Hystrix Eureka 适配器 java http cat IO App consul provider db Authorization IDE bug SpringMVC synchronized spring 统计 线程 bean CTO 注册中心 tab 文章 UI id value equals 目录 entity Service 时间 zuul 总结 源码 生命 配置 服务端 key ConcurrentHashMap src https 处理器 代码 ribbon final 微服务 apache 博客 map Collection 解析 HashMap
- 版权声明: 本文为互联网转载文章,出处已在文章中说明(部分除外)。如果侵权,请联系本站长删除,谢谢。
- 本文海报: 生成海报一 生成海报二


![[HBLOG]公众号](https://www.liuhaihua.cn/img/qrcode_gzh.jpg)

