将jar包发布到maven中央仓库
最近做了一个swagger-ui的开源项目,因为是采用vue进行解析swagger-json,需要前端支持,为了后端也能方便的使用此功能,所以将vue项目编译后的结果打成jar包放到maven中央仓库供有需要的人进行使用。
将前端项目打成jar供后端使用还有一个好处就是,一些项目可能没有设置跨域,将jar与项目一起运行,就是同源访问,从根源上解决了跨域问题,可以很方便的使用。
申请一个groupId
中央仓库是很多jar的集合,对于maven的使用标识唯一性的由 groupId 、 artifactId 、 version 三个要素组成,第一个是我们对外需要唯一的,后面两个是我们自己进行规划使用,所以上传中央仓库最重要的是申请一个 groupId ,此 groupId 与你要上传的jar包的 groupId 必须一致。
注册账号
注册地址: issues.sonatype.org/secure/Sign…
账号和密码,在登陆工单系统和提交时会用到,需要牢记。
申请groupId
申请地址 issues.sonatype.org/secure/Dash…
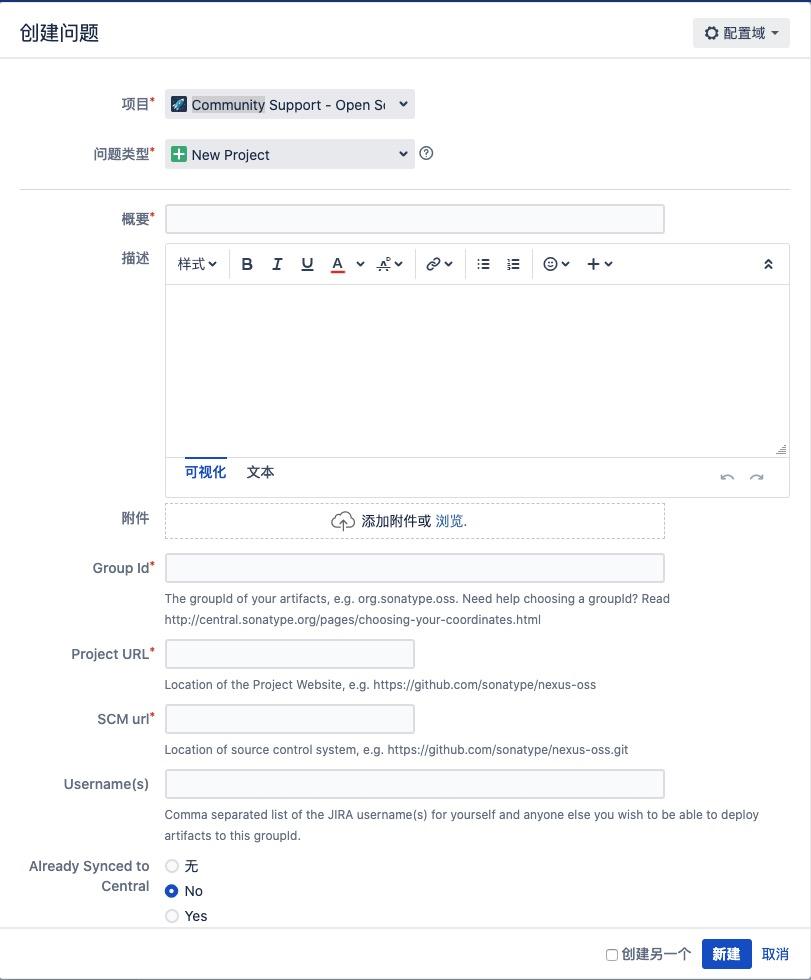
点击新建

- 项目:
Community Support - Open Source Project Repository Hosting - 问题类型:
New Project - 概要:描述下你要做的事情,尽量使用英文,可使用使用有道辅助翻译一下
- 描述:可空,可以随便写点你为什么要申请一个
groupId - Group Id:非常重要,填写一个唯一的,一般以自有域名比如
com.tennetcn.free这种,当前还可以是github的用户,可以填写com.github.chfree这种。不论填写哪种应该都是有相应的验证规则,我是自有域名,进行了域名的TXT解析验证 - Project URL:可以填写你开源项目的地址
- SCM URL:可以与
project url地址一样 - Already Synced to Centra:是否准备好同步到中央仓库,选择yes的话则会覆盖之前的构建。
然后点击新建就可以了,如果时间凑巧,可能马上就有人回复工单,如果是自有域名,则需要进行一下 TXT 解析验证。
切记:在别人回复了工单,你对工单的相关信息或对域名进行了解析操作,一定进行一下 Comment 操作,类似告诉当前工单处理人,我已经按你的操作进行了,你在看一下的意思。不然你傻等半天都不会有一下步的工单进度处理。
最后成功会有以下回复,且工单状态会变为已解决,如果你最后上传成功了,可以回来关闭此问题,其实用过jira之类的缺陷管理系统,这点就很好理解了。
com.tennetcn.free has been prepared, now user(s) chfree can:

Deploy snapshot artifacts into repository https://oss.sonatype.org/content/repositories/snapshots
Deploy release artifacts into the staging repository https://oss.sonatype.org/service/local/staging/deploy/maven2
Release staged artifacts into repository 'Releases'
please comment on this ticket when you promoted your first release, thanks
复制代码
gpg加密处理
它是一种基于密钥的加密方式,使用了一对密钥对消息进行加密和解密,来保证消息的安全传输。
windows 、 mac 、 linux 都有相应的使用方式。
windows 下分为以下六步,我觉得是命令行以下六步都可以
-
下载安装
GPG环境下载地址: www.gpg4win.org/
-
检查是否安装成功
打开cmd命令行窗口,输入
gpg --version
复制代码
执行后成功输出 gpg 版本即为安装成功
-
生成密钥
命令行执行
gpg --gen-key
复制代码
根据提示输入用户名和邮箱以及 Passphase ,其余信息使用默认即可, Passphase 即为密码,需记住,后续上传 jar 包时要用到
-
查看公钥
执行
gpg --list-keys
复制代码
输出如下信息
/Users/chenghuan/.gnupg/pubring.kbx
--------------------------------------------------------
pub   rsa4096 2020-04-24 [SC] [有效至:2024-04-24]
      29B9DBA6638B7D0DCFFA84ECBB95DD3381441B80
uid           [ 绝对 ] chfree <chfree365@qq.com>
sub   rsa4096 2020-04-24 [E] [有效至:2024-04-24]
复制代码
其中的十六进制串 29B9DBA6638B7D0DCFFA84ECBB95DD3381441B80 即为生成的公钥 id
- 发布公钥 执行
gpg --keyserver hkp://pool.sks-keyservers.net --send-keys 29B9DBA6638B7D0DCFFA84ECBB95DD3381441B80
复制代码
将公钥发布到 PGP 密钥服务器后,便可以使用本地的私钥来对上传构件进行数字签名,而下载该构件的用户可通过上传的公钥来验证签名,也就是说,大家可以验证这个构件是否由本人上传的,因为有可能该构件被坏人给篡改了。
-
验证是否发布成功
执行
gpg --keyserver hkp://pool.sks-keyservers.net --recv-keys 29B9DBA6638B7D0DCFFA84ECBB95DD3381441B80
复制代码
成功输出 gpg 密钥信息即为发布成功
我是用的 mac 上的一个 GPG Keychain ,下载地址为 gpgtools.org/ 更傻瓜式的界面操作。
项目打包上传
需要将项目打成 jar 包上传到中央仓库,在打 jar 包的过程中就需要用到我们 gpg 生成的秘钥信息,当然最主要的还是配置 pom 文件
配置setting.xml
在 setting 中,主要配置我们第一步中注册的账户和密码,因为 setting.xml 是本地的,而 pom.xml 是要上传到源码服务器中,所以是在 setting.xml 中。
可以找到 ide 对应的 maven 配置项,当前 ide 对应的 setting.xml 在哪个路径,如果没有配置,可以下载一个 apache-maven 的包,解压后里面有 setting.xml 进行配置
在 setting.xml 中配置如下:
<server>
  <id>maven_nexus_repo</id>
  <username>username</username>
  <password>password</password>
</server>
复制代码
这个 id 在后面配置 pom.xml 的时候还会用到,在进行 deploy 操作的时候,就是根据 id 名称从这个 setting.xml 中提取用户名和密码进行上传权限验证。
配置pom.xml
相关的 xml 配置及上传会验证的 doc jar 、 source jar 的插件配置包,都已经贴到下面,需要注意的是 licenses 、 developers 、 scm 几个节点在编译及上传过程不需要,但是在发布构建的时候,会进行检查,没有就会检查不通过,所以还是一开始就补全好点。
上传就很简单,直接 mvn deploy 即可,如果是 idea ,在 maven 的工具栏,选择相应的项目进行 deploy 操作即可
注意:如果在编译的过程中下载不到相关的jar包,你要看下,下载jar是在哪个地址下载,如果是 repo1.maven.org 这个中央仓库,就要注意是 http 还是 https ,发现是http那就要修改下 setting.xml 中的仓库链接里面的 http 为 https ,因为 maven.org 已经不支持http了。
<modelVersion>4.0.0</modelVersion>
<groupId>com.tennetcn.free</groupId>
<artifactId>think-swagger-ui-starter</artifactId>
<packaging>jar</packaging>
<version>0.0.4</version>
<description>swagger-ui</description>
<url>https://github.com/chfree/think-free-base</url>

<licenses>
    <!-- MIT许可证 -->
    <license>
        <name>MIT License</name>
        <url>http://www.opensource.org/licenses/mit-license.php</url>
    </license>
    <!-- Apache许可证 -->
    <!-- <license>
			<name>The Apache Software License, Version 2.0</name>
			<url>http://www.apache.org/licenses/LICENSE-2.0.txt</url>
		</license> -->
</licenses>
<developers>
    <developer>
        <name>chfree</name>
        <email>chfree365@qq.com</email>
        <url>http://www.tennetcn.com</url>
    </developer>
</developers>

<scm>
    <tag>master</tag>
    <connection>https://github.com/chfree/think-free-base</connection>
    <developerConnection>https://github.com/chfree</developerConnection>
    <url>https://github.com/chfree/think-free-base/tree/master/think-swagger-ui-starter</url>
</scm>

<dependencies>
    <dependency>
        <groupId>org.springframework.boot</groupId>
        <artifactId>spring-boot-starter-web</artifactId>
    </dependency>
    <dependency>
        <groupId>org.springframework.boot</groupId>
        <artifactId>spring-boot-starter</artifactId>
    </dependency>
    <dependency>
        <groupId>org.apache.maven.plugins</groupId>
        <artifactId>maven-gpg-plugin</artifactId>
        <version>1.6</version>
    </dependency>
</dependencies>

<profiles>
    <profile>
        <id>ossrh</id>
        <activation>
            <activeByDefault>true</activeByDefault>
        </activation>
        <build>
            <plugins>
                <!-- 要生成Javadoc和Source jar文件,您必须配置javadoc和源Maven插件 -->
                <plugin>
                    <groupId>org.apache.maven.plugins</groupId>
                    <artifactId>maven-source-plugin</artifactId>
                    <executions>
                        <execution>
                            <id>attach-sources</id>
                            <goals>
                                <goal>jar-no-fork</goal>
                            </goals>
                        </execution>
                    </executions>
                </plugin>
                <plugin>
                    <groupId>org.apache.maven.plugins</groupId>
                    <artifactId>maven-javadoc-plugin</artifactId>
                    <executions>
                        <execution>
                            <id>attach-javadocs</id>
                            <goals>
                                <goal>jar</goal>
                            </goals>
                        </execution>
                    </executions>
                </plugin>
                <!--  必须配置GPG插件用于使用以下配置对组件进行签名 -->
                <!-- GPG -->
                <plugin>
                    <groupId>org.apache.maven.plugins</groupId>
                    <artifactId>maven-gpg-plugin</artifactId>
                    <version>1.6</version>
                    <executions>
                        <execution>
                            <phase>verify</phase>
                            <goals>
                                <goal>sign</goal>
                            </goals>
                        </execution>
                    </executions>
                </plugin>
            </plugins>
        </build>
        <distributionManagement>
            <snapshotRepository>
                <!-- 这个id需要在setting.xml中设置  -->
                <id>maven_nexus_repo</id>
                <name>maven_nexus_repo</name>
                <!-- 这里的url就是Issue中回复的snapshots 的repo地址-->
                <url>https://oss.sonatype.org/content/repositories/snapshots</url>
            </snapshotRepository>
            <repository>
                <id>maven_nexus_repo</id>
                <name>maven_nexus_repo</name>
                <url>https://oss.sonatype.org/service/local/staging/deploy/maven2</url>
            </repository>
        </distributionManagement>
    </profile>
</profiles>
复制代码
构件仓库操作
当所有的上传操作处理完,就需要登录到构建发布地址,因为现在所有的操作都是将我们的 jar 包发布到了缓存仓库,需要进行后续操作才是发布到正式仓库,否则在 search.maven.org 中怎么都是搜索不到的。
构建发布地址: oss.sonatype.org/#welcome
用户名和密码就是第一步中申请的的用户名和密码。
登陆后在左边有一些菜单,在 Staging Respositories 下就能看到我们上次的缓存 jar 列表,勾选对应的数据,点击上面工具栏的 close ,先关闭缓存状态。等待一会儿,刷新当前记录,记录不是 open 后,就可以勾选点击 release 。
如果上传的 jar 不符合规范,一般是pom中不规范或是没有 doc jar , source jar 等情况,及会在 close 的时候会提示出相关异常,我们只需要解决相关异常即可重新上传,此时是不需要改版本号。
当你进行了 release 后,你的注册账号的邮箱就会收到一封邮件,告诉你发布成功了,但是在 search.maven.org 中搜索到还需要 2小时 左右。但你基本就可以通过 pom 来下载你的 jar 了。
- 本文标签: JavaDocs pom description 开源项目 XML Connection plugin 服务器 maven tar IDE json Developer Service tag PHP db 数据 解析 同步 下载 加密 web windows js UI 域名 开源 Word 缓存 apache cmd https 配置 时间 dependencies http java 源码 git 安装 代码 插件 src id spring 翻译 ip 安全 GitHub list dist Master linux 编译 mail 密钥 管理 key build IO
- 版权声明: 本文为互联网转载文章,出处已在文章中说明(部分除外)。如果侵权,请联系本站长删除,谢谢。
- 本文海报: 生成海报一 生成海报二


![[HBLOG]公众号](https://www.liuhaihua.cn/img/qrcode_gzh.jpg)

