浅谈微服务安全架构设计
1、 回顾微服务设计理念
在前面的一篇文章 https://gitbook.cn/gitchat/activity/5e8ada3452383e517ff2b5f8 中,我们了解到什么是微服务,微服务的划分依据,其实,说到底,微服务的设计,有其独到的好处:使得各个模块之间 解耦合 ,让每一个模块有自己独立的灵魂,其他服务即使出现任何问题,自己不会受到任何的影响。这是微服务的核心宗旨。那么今天要讲的微服务安全性问题,其实也是反映微服务的一个核心: 高内聚 。所谓高内聚,简单的理解就是,对外暴露的最小限度,降低其依赖关系,大部分都作为一个黑盒子封装起来,不直接对外,这样,即使内部发生变更、翻云覆雨,对外的接口没发生改变,这才是好的微服务设计理念,做到完美的对外兼容,一个好的架构设计,首先,这一点可能需要 get 到位,不知道大家咋认为呢?所以今天说的微服务安全性,就跟这个 高内聚 有一点点相关了。或者说,体现了微服务设计的核心理念。
2、微服务下的各种安全性保证
2.1 常见的几种安全性措施
在微服务中,我们常见的,有如下几种安全性设计的举措:网关设计、服务端口的对外暴露的限度、token 鉴权、OAuth2 的统一认证、微信中的 openId 设计等。这些都是在为服务的安全性作考虑的一些举措。
2.2 OAuth2 的概念
何为 OAuth2 呢?我们先了解 OAuth,Oauth 是一个开放标准,假设有这样一种场景:一个 QQ 应用,希望让一个第三方的(慕课网)应用,能够得到关于自身的一些信息(唯一用户标识,比如说 QQ 号,用户个人信息、一些基础资料,昵称和头像等)。但是在获得这些资料的同时,却又不能提供用户名和密码之类的信息。如下图:

而 OAuth 就是实现上述目标的一种规范。OAuth2 是 OAuth 协议的延续版本,但不兼容 OAuth1.0,即完全废弃了 OAuth1.0。
OAuth2.0 有这么几个术语:客户凭证、令牌、作用域。
客户凭证:客户的 clientId 和密码用于认证客户。
令牌:授权服务器在接收到客户请求后颁发的令牌。
作用域:客户请求访问令牌时,由资源拥有者额外指定的细分权限。
2.3 OAuth2 的原理
在 OAuth2 的授权机制中有 4 个核心对象:
Resource Owner:资源拥有者,即用户。
Client:第三方接入平台、应用,请求者。
Resource Server:资源服务器,存储用户信息、用户的资源信息等资源。
Authorization Server:授权认证服务器。
实现机制:
用户在第三方应用上点击登录,应用向认证服务器发送请求,说有用户希望进行授权操作,同时说明自己是谁、用户授权完成后的回调 url,例如:上面的截图,通过慕课网访问 QQ 获取授权。
认证服务器展示给用户自己的授权界面。
用户进行授权操作,认证服务器验证成功后,生成一个授权编码 code,并跳转到第三方的回调 url。
第三方应用拿到 code 后,连同自己在平台上的身份信息(ID 密码)发送给认证服务器,再一次进行验证请求,说明自己的身份正确,并且用户也已经授权我了,来换取访问用户资源的权限。
认证服务器对请求信息进行验证,如果没问题,就生成访问资源服务器的令牌 access_token,交给第三方应用。
第三方应用使用 access_token 向资源服务器请求资源。
资源服务器验证 access_token 成功后返回响应资源。
2.4 OAuth2 的几种授权模式
OAuth2.0 有这么几个授权模式:授权码模式、简化模式、密码模式、客户端凭证模式。
授权码模式:(authorization_code)是功能最完整、流程最严密的授权模式,code 保证了 token 的安全性,即使 code 被拦截,由于没有 client_secret,也是无法通过 code 获得 token 的。
简化模式:和授权码模式类似,只不过少了获取 code 的步骤,是直接获取令牌 token 的,适用于公开的浏览器单页应用,令牌直接从授权服务器返回,不支持刷新令牌,且没有 code 安全保证,令牌容易因为被拦截窃听而泄露。
密码模式:使用用户名/密码作为授权方式从授权服务器上获取令牌,一般不支持刷新令牌。
客户端凭证模式:一般用于资源服务器是应用的一个后端模块,客户端向认证服务器验证身份来获取令牌。
2.5 实战 OAuth2 的密码模式
本次结合 Spring Cloud Alibaba 组件,实现微服务的安全系统体系,本文主要讲解 OAuth2 的部分。
先来看鉴权中心,鉴权中心需要做到提供单点服务,为所有的客户端微服务的安全保驾护航。下面首先看依赖:
<dependency>
<groupId>org.springframework.cloud</groupId>
<artifactId>spring-cloud-starter-oauth2</artifactId>
</dependency>
<dependency> <groupId>com.alibaba.cloud</groupId> <artifactId>spring-cloud-starter-alibaba-nacos-discovery</artifactId> </dependency>
<dependency> <groupId>com.alibaba.cloud</groupId> <artifactId>spring-cloud-starter-alibaba-nacos-config</artifactId> </dependency> <!-- 对redis支持,引入的话项目缓存就支持redis了,所以必须加上redis的相关配置,否则操作相关缓存会报异常 --> <dependency> <groupId>org.springframework.boot</groupId> <artifactId>spring-boot-starter-data-redis</artifactId> </dependency>
复制代码
<span>复制代码</span>
如果需要使用 redis 来存储 token,则可以加入 reids 依赖,如果使用 jwt,则使用:
<dependency> <groupId>io.jsonwebtoken</groupId> <artifactId>jjwt</artifactId> <version>0.9.0</version> </dependency> 复制代码
当然,本次的项目模块引入的是比较新的 Spring Boot:
<parent>
  <groupId>org.springframework.boot</groupId>
  <artifactId>spring-boot-starter-parent</artifactId>
  <version>2.1.13.RELEASE</version>
  <relativePath/>
</parent>
<properties> <project.build.sourceEncoding>UTF-8</project.build.sourceEncoding> <project.reporting.outputEncoding>UTF-8</project.reporting.outputEncoding> <java.version>1.8</java.version> <swagger.version>2.6.1</swagger.version> <xstream.version>1.4.7</xstream.version> <pageHelper.version>4.1.6</pageHelper.version> <fastjson.version>1.2.51</fastjson.version> <springcloud.version>Greenwich.SR3</springcloud.version> <mysql.version>5.1.46</mysql.version>
<alibaba-cloud.version>2.1.1.RELEASE</alibaba-cloud.version>
  <springcloud.alibaba.version>0.9.0.RELEASE</springcloud.alibaba.version>
复制代码
</properties>
<dependencyManagement> <dependencies> <dependency> <groupId>com.alibaba.cloud</groupId> <artifactId>spring-cloud-alibaba-dependencies</artifactId> <version>${alibaba-cloud.version}</version> <type>pom</type> <scope>import</scope> </dependency>
<!-- <dependency>
        <groupId>org.springframework.cloud</groupId>
        <artifactId>spring-cloud-alibaba-dependencies</artifactId>
        <version>${springcloud.alibaba.version}</version>
        <type>pom</type>
        <scope>import</scope>
    </dependency> -->

    <dependency>
        <groupId>org.springframework.cloud</groupId>
        <artifactId>spring-cloud-dependencies</artifactId>
        <version>${springcloud.version}</version>
        <type>pom</type>
        <scope>import</scope>
    </dependency>
</dependencies>
复制代码
复制代码
</dependencyManagement> <span>复制代码</span>
剩下的,像数据库、持久化等,其他的可以根据需要添加。
配置完成后,我们需要写一个认证服务器的配置:
package com.damon.config;
import java.util.ArrayList; import java.util.List;
import javax.sql.DataSource;
import org.springframework.beans.factory.annotation.Autowired; import org.springframework.beans.factory.annotation.Qualifier; import org.springframework.context.annotation.Configuration; import org.springframework.core.env.Environment; import org.springframework.security.authentication.AuthenticationManager; import org.springframework.security.crypto.password.PasswordEncoder; import org.springframework.security.oauth2.config.annotation.configurers.ClientDetailsServiceConfigurer; import org.springframework.security.oauth2.config.annotation.web.configuration.AuthorizationServerConfigurerAdapter; import org.springframework.security.oauth2.config.annotation.web.configuration.EnableAuthorizationServer; import org.springframework.security.oauth2.config.annotation.web.configurers.AuthorizationServerEndpointsConfigurer; import org.springframework.security.oauth2.config.annotation.web.configurers.AuthorizationServerSecurityConfigurer; import org.springframework.security.oauth2.provider.error.WebResponseExceptionTranslator; import org.springframework.security.oauth2.provider.token.TokenEnhancer; import org.springframework.security.oauth2.provider.token.TokenEnhancerChain; import org.springframework.security.oauth2.provider.token.TokenStore; import org.springframework.security.oauth2.provider.token.store.JwtAccessTokenConverter;
import com.damon.component.JwtTokenEnhancer; import com.damon.login.service.LoginService;
@Configuration @EnableAuthorizationServer public class AuthorizationServerConfig extends AuthorizationServerConfigurerAdapter {
@Autowired
private PasswordEncoder passwordEncoder;

@Autowired
private AuthenticationManager authenticationManager;

@Autowired
private LoginService loginService;

@Autowired
//@Qualifier("jwtTokenStore")
@Qualifier("redisTokenStore")
private TokenStore tokenStore;
/*@Autowired
private JwtAccessTokenConverter jwtAccessTokenConverter;
@Autowired
private JwtTokenEnhancer jwtTokenEnhancer;*/

@Autowired
private Environment env;


@Autowired
private DataSource dataSource;

@Autowired
private WebResponseExceptionTranslator userOAuth2WebResponseExceptionTranslator;

/**
 * redis token 方式
 */
@Override
public void configure(AuthorizationServerEndpointsConfigurer endpoints) throws Exception {
	//验证时发生的情况处理
    endpoints.authenticationManager(authenticationManager) //支持 password 模式
    		.exceptionTranslator(userOAuth2WebResponseExceptionTranslator)//自定义异常处理类添加到认证服务器配置
            .userDetailsService(loginService)
            .tokenStore(tokenStore);

}

/**
 * 客户端配置(给谁发令牌)
 * 不同客户端配置不同
 *
 * authorizedGrantTypes 可以包括如下几种设置中的一种或多种:
		authorization_code:授权码类型。需要redirect_uri
		implicit:隐式授权类型。需要redirect_uri
		password:资源所有者(即用户)密码类型。
		client_credentials:客户端凭据(客户端ID以及Key)类型。
		refresh_token:通过以上授权获得的刷新令牌来获取新的令牌。

   accessTokenValiditySeconds:token 的有效期
   scopes:用来限制客户端访问的权限,在换取的 token 的时候会带上 scope 参数,只有在 scopes 定义内的,才可以正常换取 token。
 * @param clients
 * @throws Exception
 * @author Damon
 *
 */
@Override
public void configure(ClientDetailsServiceConfigurer clients) throws Exception {
    clients.inMemory()
            .withClient("provider-service")
            .secret(passwordEncoder.encode("provider-service-123"))
            .accessTokenValiditySeconds(3600)
            .refreshTokenValiditySeconds(864000)//配置刷新token的有效期
            .autoApprove(true) //自动授权配置
            .scopes("all")//配置申请的权限范围
            .authorizedGrantTypes("password", "authorization_code", "client_credentials", "refresh_token")//配置授权模式
            .redirectUris("http://localhost:2001/login")//授权码模式开启后必须指定


            .and()
            .withClient("consumer-service")
            .secret(passwordEncoder.encode("consumer-service-123"))
            .accessTokenValiditySeconds(3600)
            .refreshTokenValiditySeconds(864000)//配置刷新token的有效期
            .autoApprove(true) //自动授权配置
            .scopes("all")//配置申请的权限范围
            .authorizedGrantTypes("password", "authorization_code", "client_credentials", "refresh_token")//配置授权模式
            .redirectUris("http://localhost:2005/login")//授权码模式开启后必须指定


            .and()
            .withClient("resource-service")
            .secret(passwordEncoder.encode("resource-service-123"))
            .accessTokenValiditySeconds(3600)
            .refreshTokenValiditySeconds(864000)//配置刷新token的有效期
            .autoApprove(true) //自动授权配置
            .scopes("all")//配置申请的权限范围
            .authorizedGrantTypes("password", "authorization_code", "client_credentials", "refresh_token")//配置授权模式
            .redirectUris("http://localhost:2006/login")//授权码模式开启后必须指定

            .and()
            .withClient("test-sentinel")
            .secret(passwordEncoder.encode("test-sentinel-123"))
            .accessTokenValiditySeconds(3600)
            .refreshTokenValiditySeconds(864000)//配置刷新token的有效期
            .autoApprove(true) //自动授权配置
            .scopes("all")//配置申请的权限范围
            .authorizedGrantTypes("password", "authorization_code", "client_credentials", "refresh_token")//配置授权模式
            .redirectUris("http://localhost:2008/login")//授权码模式开启后必须指定

            .and()
            .withClient("test-sentinel-feign")
            .secret(passwordEncoder.encode("test-sentinel-feign-123"))
            .accessTokenValiditySeconds(3600)
            .refreshTokenValiditySeconds(864000)//配置刷新token的有效期
            .autoApprove(true) //自动授权配置
            .scopes("all")//配置申请的权限范围
            .authorizedGrantTypes("password", "authorization_code", "client_credentials", "refresh_token")//配置授权模式
            .redirectUris("http://localhost:2010/login")//授权码模式开启后必须指定

            .and()
            .withClient("customer-service")
            .secret(passwordEncoder.encode("customer-service-123"))
            .accessTokenValiditySeconds(3600)
            .refreshTokenValiditySeconds(864000)//配置刷新token的有效期
            .autoApprove(true) //自动授权配置
            .scopes("all")
            .authorizedGrantTypes("password", "authorization_code", "client_credentials", "refresh_token")//配置授权模式
            .redirectUris("http://localhost:2012/login")//授权码模式开启后必须指定
            ;
}

@Override
public void configure(AuthorizationServerSecurityConfigurer security) {
	security.allowFormAuthenticationForClients();//是允许客户端访问 OAuth2 授权接口,否则请求 token 会返回 401
	security.checkTokenAccess("isAuthenticated()");//是允许已授权用户访问 checkToken 接口
    security.tokenKeyAccess("isAuthenticated()"); // security.tokenKeyAccess("permitAll()");获取密钥需要身份认证,使用单点登录时必须配置,是允许已授权用户获取 token 接口
}
复制代码
复制代码
} <span>复制代码</span>
Redis 配置:
package com.damon.config;
import org.springframework.beans.factory.annotation.Autowired;
import org.springframework.context.annotation.Bean;
import org.springframework.context.annotation.Configuration;
import org.springframework.data.redis.connection.RedisConnectionFactory;
import org.springframework.security.oauth2.provider.token.TokenStore;
import org.springframework.security.oauth2.provider.token.store.redis.RedisTokenStore;
@Configuration public class RedisTokenStoreConfig {
@Autowired
private RedisConnectionFactory redisConnectionFactory;

@Bean
public TokenStore redisTokenStore (){
    //return new RedisTokenStore(redisConnectionFactory);
	return new MyRedisTokenStore(redisConnectionFactory);
}
复制代码
复制代码
} <span>复制代码</span>
后面接下来需要配置安全访问的拦截,这时候需要 SpringSecurity:
package com.damon.config;
import javax.servlet.http.HttpServletResponse;
import org.springframework.context.annotation.Bean; import org.springframework.context.annotation.Configuration; import org.springframework.security.authentication.AuthenticationManager; import org.springframework.security.config.annotation.authentication.builders.AuthenticationManagerBuilder; import org.springframework.security.config.annotation.web.builders.HttpSecurity; import org.springframework.security.config.annotation.web.builders.WebSecurity; import org.springframework.security.config.annotation.web.configuration.EnableWebSecurity; import org.springframework.security.config.annotation.web.configuration.WebSecurityConfigurerAdapter; import org.springframework.security.crypto.bcrypt.BCryptPasswordEncoder; import org.springframework.security.crypto.password.PasswordEncoder;
@Configuration @EnableWebSecurity public class SecurityConfig extends WebSecurityConfigurerAdapter {
@Bean
public PasswordEncoder passwordEncoder() {
    return new BCryptPasswordEncoder();
}

@Bean
@Override
public AuthenticationManager authenticationManagerBean() throws Exception {
    return super.authenticationManagerBean();
}

@Override
public void configure(HttpSecurity http) throws Exception {
    http.csrf()
            .disable()

            .exceptionHandling()
    		.authenticationEntryPoint(new AuthenticationEntryPointHandle())
    		//.authenticationEntryPoint((request, response, authException) -> response.sendError(HttpServletResponse.SC_UNAUTHORIZED))
    		.and()

            .authorizeRequests()
            .antMatchers("/oauth/**", "/login/**")//"/logout/**"
            .permitAll()
            .anyRequest()
            .authenticated()
            .and()
            .formLogin()
            .permitAll();
}

/*@Override
protected void configure(AuthenticationManagerBuilder auth) throws Exception {
    auth.userDetailsService(userDetailsService)
        .passwordEncoder(passwordEncoder());
}*/

@Override
public void configure(WebSecurity web) throws Exception {
    web.ignoring().antMatchers("/css/**", "/js/**", "/plugins/**", "/favicon.ico");
}
复制代码
复制代码
} <span>复制代码</span>
再者,就是需要配置资源拦截:
package com.damon.config;
import org.springframework.beans.factory.annotation.Autowired; import org.springframework.context.annotation.Configuration; import org.springframework.security.config.annotation.web.builders.HttpSecurity; import org.springframework.security.oauth2.config.annotation.web.configuration.EnableResourceServer; import org.springframework.security.oauth2.config.annotation.web.configuration.ResourceServerConfigurerAdapter;
@Configuration @EnableResourceServer public class ResourceServerConfig extends ResourceServerConfigurerAdapter {
@Override
public void configure(HttpSecurity http) throws Exception {
    http.csrf().disable()

            .exceptionHandling()
    		.authenticationEntryPoint(new AuthenticationEntryPointHandle())
    		//.authenticationEntryPoint((request, response, authException) -> response.sendError(HttpServletResponse.SC_UNAUTHORIZED))
    		.and()

            .requestMatchers().antMatchers("/api/**")
            .and()
            .authorizeRequests()
            .antMatchers("/api/**").authenticated()
            .and()
            .httpBasic();
}
复制代码
复制代码
} <span>复制代码</span>
其中,在上面我们配置了资源拦截、权限拦截的统一处理配置:
package com.damon.config;
import java.io.IOException;
import javax.servlet.ServletException; import javax.servlet.http.HttpServletRequest; import javax.servlet.http.HttpServletResponse;
import org.springframework.http.HttpStatus; import org.springframework.security.core.AuthenticationException; import org.springframework.security.web.AuthenticationEntryPoint;
import com.alibaba.fastjson.JSON; import com.damon.commons.Response;
/** *
- 统一结果处理
- @author Damon
*/
public class AuthenticationEntryPointHandle implements AuthenticationEntryPoint { /** * * @author Damon * */ @Override public void commence(HttpServletRequest request, HttpServletResponse response, AuthenticationException authException) throws IOException, ServletException {
//response.setStatus(HttpServletResponse.SC_FORBIDDEN);
	//response.setStatus(HttpStatus.OK.value());

    //response.setHeader("Access-Control-Allow-Origin", "*");  //gateway已加,无需再加
    //response.setHeader("Access-Control-Allow-Headers", "token");
    //解决低危漏洞点击劫持 X-Frame-Options Header未配置
    response.setHeader("X-Frame-Options", "SAMEORIGIN");
    response.setCharacterEncoding("UTF-8");
    response.setContentType("application/json; charset=utf-8");

	response.getWriter()
	.write(JSON.toJSONString(Response.ok(response.getStatus(), -2, authException.getMessage(), null)));
	/*response.getWriter()
			.write(JSON.toJSONString(Response.ok(200, -2, "Internal Server Error", authException.getMessage())));*/
}
复制代码
复制代码
} <span>复制代码</span>
最后,自定义异常处理类添加到认证服务器配置:
package com.damon.config;
import java.io.IOException;
import org.springframework.http.HttpHeaders; import org.springframework.http.HttpStatus; import org.springframework.http.ResponseEntity; import org.springframework.security.access.AccessDeniedException; import org.springframework.security.core.AuthenticationException; import org.springframework.security.oauth2.common.DefaultThrowableAnalyzer; import org.springframework.security.oauth2.common.exceptions.InsufficientScopeException; import org.springframework.security.oauth2.common.exceptions.OAuth2Exception; import org.springframework.security.oauth2.provider.error.WebResponseExceptionTranslator; import org.springframework.security.web.util.ThrowableAnalyzer; import org.springframework.stereotype.Component; import org.springframework.web.HttpRequestMethodNotSupportedException;
import com.damon.exception.UserOAuth2Exception;
/** *
- 自定义异常转换类
- @author Damon
*/
@Component("userOAuth2WebResponseExceptionTranslator") public class UserOAuth2WebResponseExceptionTranslator implements WebResponseExceptionTranslator { private ThrowableAnalyzer throwableAnalyzer = new DefaultThrowableAnalyzer();
@Override
public ResponseEntity<OAuth2Exception> translate(Exception e) throws Exception {
    Throwable[] causeChain = this.throwableAnalyzer.determineCauseChain(e);
    Exception ase = (OAuth2Exception)this.throwableAnalyzer.getFirstThrowableOfType(OAuth2Exception.class, causeChain);
    //异常链中有OAuth2Exception异常
    if (ase != null) {
        return this.handleOAuth2Exception((OAuth2Exception)ase);
    }
    //身份验证相关异常
    ase = (AuthenticationException)this.throwableAnalyzer.getFirstThrowableOfType(AuthenticationException.class, causeChain);
    if (ase != null) {
        return this.handleOAuth2Exception(new UserOAuth2WebResponseExceptionTranslator.UnauthorizedException(e.getMessage(), e));
    }
    //异常链中包含拒绝访问异常
    ase = (AccessDeniedException)this.throwableAnalyzer.getFirstThrowableOfType(AccessDeniedException.class, causeChain);
    if (ase instanceof AccessDeniedException) {
        return this.handleOAuth2Exception(new UserOAuth2WebResponseExceptionTranslator.ForbiddenException(ase.getMessage(), ase));
    }
    //异常链中包含Http方法请求异常
    ase = (HttpRequestMethodNotSupportedException)this.throwableAnalyzer.getFirstThrowableOfType(HttpRequestMethodNotSupportedException.class, causeChain);
    if(ase instanceof HttpRequestMethodNotSupportedException){
        return this.handleOAuth2Exception(new UserOAuth2WebResponseExceptionTranslator.MethodNotAllowed(ase.getMessage(), ase));
    }
    return this.handleOAuth2Exception(new UserOAuth2WebResponseExceptionTranslator.ServerErrorException(HttpStatus.INTERNAL_SERVER_ERROR.getReasonPhrase(), e));
}

private ResponseEntity<OAuth2Exception> handleOAuth2Exception(OAuth2Exception e) throws IOException {
    int status = e.getHttpErrorCode();
    HttpHeaders headers = new HttpHeaders();
    headers.set("Cache-Control", "no-store");
    headers.set("Pragma", "no-cache");
    if (status == HttpStatus.UNAUTHORIZED.value() || e instanceof InsufficientScopeException) {
        headers.set("WWW-Authenticate", String.format("%s %s", "Bearer", e.getSummary()));
    }
    UserOAuth2Exception exception = new UserOAuth2Exception(e.getMessage(),e);
    ResponseEntity<OAuth2Exception> response = new ResponseEntity(exception, headers, HttpStatus.valueOf(status));
    return response;
}


private static class MethodNotAllowed extends OAuth2Exception {
    public MethodNotAllowed(String msg, Throwable t) {
        super(msg, t);
    }
    @Override
    public String getOAuth2ErrorCode() {
        return "method_not_allowed";
    }
    @Override
    public int getHttpErrorCode() {
        return 405;
    }
}

private static class UnauthorizedException extends OAuth2Exception {
    public UnauthorizedException(String msg, Throwable t) {
        super(msg, t);
    }
    @Override
    public String getOAuth2ErrorCode() {
        return "unauthorized";
    }
    @Override
    public int getHttpErrorCode() {
        return 401;
    }
}

private static class ServerErrorException extends OAuth2Exception {
    public ServerErrorException(String msg, Throwable t) {
        super(msg, t);
    }
    @Override
    public String getOAuth2ErrorCode() {
        return "server_error";
    }
    @Override
    public int getHttpErrorCode() {
        return 500;
    }
}

private static class ForbiddenException extends OAuth2Exception {
    public ForbiddenException(String msg, Throwable t) {
        super(msg, t);
    }
    @Override
    public String getOAuth2ErrorCode() {
        return "access_denied";
        }
        @Override
        public int getHttpErrorCode() {
            return 403;
        }
    }
复制代码
复制代码
} <span>复制代码</span>
最后,我们可能需要配置一些请求客户端的配置,以及变量配置:
@Configuration
public class BeansConfig {
	@Resource
	private Environment env;
@Bean
public RestTemplate restTemplate() {
	SimpleClientHttpRequestFactory requestFactory = new SimpleClientHttpRequestFactory();
	requestFactory.setReadTimeout(env.getProperty("client.http.request.readTimeout", Integer.class, 15000));
	requestFactory.setConnectTimeout(env.getProperty("client.http.request.connectTimeout", Integer.class, 3000));
	RestTemplate rt = new RestTemplate(requestFactory);
	return rt;
}
复制代码
复制代码
} <span>复制代码</span>
package com.damon.config; import org.springframework.beans.factory.annotation.Value; import org.springframework.boot.context.properties.ConfigurationProperties; import org.springframework.cloud.context.config.annotation.RefreshScope; import org.springframework.context.annotation.Configuration; import org.springframework.stereotype.Component; /** * 配置信息 * @author Damon * */ @Component @RefreshScope public class EnvConfig { @Value("${jdbc.driverClassName:}") private String jdbc_driverClassName; @Value("${jdbc.url:}") private String jdbc_url; @Value("${jdbc.username:}") private String jdbc_username; @Value("${jdbc.password:}") private String jdbc_password; public String getJdbc_driverClassName() { return jdbc_driverClassName; } public void setJdbc_driverClassName(String jdbc_driverClassName) { this.jdbc_driverClassName = jdbc_driverClassName; } public String getJdbc_url() { return jdbc_url; } public void setJdbc_url(String jdbc_url) { this.jdbc_url = jdbc_url; } public String getJdbc_username() { return jdbc_username; } public void setJdbc_username(String jdbc_username) { this.jdbc_username = jdbc_username; } public String getJdbc_password() { return jdbc_password; } public void setJdbc_password(String jdbc_password) { this.jdbc_password = jdbc_password; } } 复制代码
最后需要配置一些环境配置:
spring:
  application:
    name: oauth-cas
  cloud:
    nacos:
      discovery:
        server-addr: 127.0.0.1:8848
      config:
        server-addr: 127.0.0.1:8848
        refreshable-dataids: actuator.properties,log.properties
redis: #redis相关配置 database: 8 host: 127.0.0.1 #localhost port: 6379 password: aaa #有密码时设置 jedis: pool: max-active: 8 max-idle: 8 min-idle: 0 timeout: 10000ms
复制代码
<span>复制代码</span>
记住:上面这个启动配置需要在 bootstrap 文件中添加,否则,可能会失败,大家可以尝试下。
server:
  port: 2000
  undertow:
    uri-encoding: UTF-8
    accesslog:
      enabled: false
      pattern: combined
  #这里我们使用了SpringBoot2.x,注意session与1.x不同
  servlet:
    session:
      timeout: PT120M
      cookie:
        name: OAUTH-CAS-SESSIONID #防止Cookie冲突,冲突会导致登录验证不通过
client: http: request: connectTimeout: 8000 readTimeout: 30000
mybatis: mapperLocations: classpath:mapper/ .xml typeAliasesPackage: com.damon. .model
复制代码
spring: profiles: active: dev <span>复制代码</span>
最后,我们添加启动类:
@Configuration @EnableAutoConfiguration @ComponentScan(basePackages = {"com.damon"}) @EnableDiscoveryClient public class CasApp { public static void main(String[] args) { SpringApplication.run(CasApp.class, args); } } 复制代码
以上,一个认证中心的代码实战逻辑就完成了。
接下来,我们看一个客户端如何去认证,首先还是依赖:
<dependency>
    <groupId>org.springframework.cloud</groupId>
    <artifactId>spring-cloud-starter-oauth2</artifactId>
</dependency>
<dependency> <groupId>com.alibaba.cloud</groupId> <artifactId>spring-cloud-starter-alibaba-nacos-discovery</artifactId> </dependency>
<dependency> <groupId>com.alibaba.cloud</groupId> <artifactId>spring-cloud-starter-alibaba-nacos-config</artifactId> </dependency>
<dependency> <groupId>org.springframework.cloud</groupId> <artifactId>spring-cloud-starter-netflix-ribbon</artifactId> </dependency>
复制代码
<dependency> <groupId>org.springframework.cloud</groupId> <artifactId>spring-cloud-starter-netflix-hystrix</artifactId> </dependency> <span>复制代码</span>
在客户端,我们也需要配置一个资源配置与权限配置:
package com.damon.config;
import org.springframework.context.annotation.Configuration; import org.springframework.security.config.annotation.web.builders.HttpSecurity; import org.springframework.security.oauth2.config.annotation.web.configuration.EnableResourceServer; import org.springframework.security.oauth2.config.annotation.web.configuration.ResourceServerConfigurerAdapter;
/** * *
- @author Damon
*/ @Configuration @EnableResourceServer public class ResourceServerConfig extends ResourceServerConfigurerAdapter {
@Override
public void configure(HttpSecurity http) throws Exception {
    http.csrf().disable()

            .exceptionHandling()
    		.authenticationEntryPoint(new AuthenticationEntryPointHandle())
    		//.authenticationEntryPoint((request, response, authException) -> response.sendError(HttpServletResponse.SC_UNAUTHORIZED))
    		.and()

            .requestMatchers().antMatchers("/api/**")
            .and()
            .authorizeRequests()
            .antMatchers("/api/**").authenticated()
            .and()
            .httpBasic();
}
复制代码
复制代码
} <span>复制代码</span>
当然,权限拦截可能就相对简单了:
package com.damon.config;
import org.springframework.context.annotation.Configuration; import org.springframework.core.annotation.Order; import org.springframework.security.config.annotation.method.configuration.EnableGlobalMethodSecurity; import org.springframework.security.config.annotation.web.configuration.WebSecurityConfigurerAdapter;
/** *
- 在接口上配置权限时使用
- @author Damon
复制代码
*/ @Configuration @EnableGlobalMethodSecurity(prePostEnabled = true) @Order(101) public class SecurityConfig extends WebSecurityConfigurerAdapter { } <span>复制代码</span>
同样,这里也需要一个统一结果处理类,这里就不展示了。
接下来,我们主要看配置:
cas-server-url: http://oauth-cas #http://localhost:2000#设置可以访问的地址 复制代码
security: oauth2: #与cas对应的配置 client: client-id: provider-service client-secret: provider-service-123 user-authorization-uri: {cas-server-url}/oauth/token #是密码模式需要用到的获取 token 的接口 resource: loadBalanced: true #jwt: #jwt存储token时开启 #key-uri: {cas-server-url}/api/user #指定user info的URI,原生地址后缀为/auth/user prefer-token-info: false #token-info-uri: authorization: check-token-access: ${cas-server-url}/oauth/check_token #当此web服务端接收到来自UI客户端的请求后,需要拿着请求中的 token 到认证服务端做 token 验证,就是请求的这个接口 复制代码
在上面的配置里,我们看到了各种注释了,讲得很仔细,但是我要强调下: 为了高可用,我们的认证中心可能多个,所以需要域名来作 LB。同时,开启了 loadBalanced=true。最后,如果是授权码认证模式,则需要 "user-authorization-uri",如果是密码模式,需要 "access-token-uri" 来获取 token。我们通过它 "user-info-uri" 来获取认证中心的用户信息,从而判断该用户的权限,从而访问相应的资源。另外,上面的配置需要在 bootstrap 文件中,否则可能失败,大家可以试试。
接下来,我们添加一般配置:
server:
  port: 2001
  undertow:
    uri-encoding: UTF-8
    accesslog:
      enabled: false
      pattern: combined
  servlet:
    session:
      timeout: PT120M
      cookie:
        name: PROVIDER-SERVICE-SESSIONID #防止Cookie冲突,冲突会导致登录验证不通过
backend: ribbon: client: enabled: true ServerListRefreshInterval: 5000
ribbon: ConnectTimeout: 3000
设置全局默认的ribbon的读超时
ReadTimeout: 1000 eager-load: enabled: true clients: oauth-cas,consumer-service MaxAutoRetries: 1 #对第一次请求的服务的重试次数 MaxAutoRetriesNextServer: 1 #要重试的下一个服务的最大数量(不包括第一个服务) #listOfServers: localhost:5556,localhost:5557 #ServerListRefreshInterval: 2000 OkToRetryOnAllOperations: true NFLoadBalancerRuleClassName: com.netflix.loadbalancer.RoundRobinRule
复制代码
hystrix.command.BackendCall.execution.isolation.thread.timeoutInMilliseconds: 5000 hystrix.threadpool.BackendCallThread.coreSize: 5 <span>复制代码</span>
这里,我们使用了 Ribbon 来做 LB,hystrix 来作熔断,最后需要注意的是: 加上了 cookie name,防止 Cookie 冲突,冲突会导致登录验证不通过。
配置启动类:
@Configuration
@EnableAutoConfiguration
@ComponentScan(basePackages = {"com.damon"})
@EnableDiscoveryClient
@EnableOAuth2Sso
public class ProviderApp {
public static void main(String[] args) {
    SpringApplication.run(ProviderApp.class, args);
}
复制代码
复制代码
} <span>复制代码</span>
我们在上面配置了所有带有 "/api/**" 的路径请求,都会加以拦截,根据用户的信息来判断其是否有权限访问。
写一个简单的测试类:
@RestController
@RequestMapping("/api/user")
public class UserController {
private static final Logger logger = LoggerFactory.getLogger(UserController.class);

@Autowired
private UserService userService;
复制代码
复制代码
@PreAuthorize("hasAuthority('admin')") @GetMapping("/auth/admin") public Object adminAuth() { logger.info("test password mode"); return "Has admin auth!"; } } <span>复制代码</span>
上面的代码表示:如果用户具有 "admin" 的权限,则能够访问该接口,否则会被拒绝。
本文用的是 alibaba 的组件来作 LB,具体可以看前面的文章,用域名来找到服务。同时也加上了网关 Gateway。
最后,我们先来通过密码模式来进行认证吧:
curl -i -X POST -d "username=admin&password=123456&grant_type=password&client_id=provider-service&client_secret=provider-service-123" http://localhost:5555/oauth-cas/oauth/token 复制代码
认证成功后,会返回如下结果:
{"access_token":"d2066f68-665b-4038-9dbe-5dd1035e75a0","token_type":"bearer","refresh_token":"44009836-731c-4e6a-9cc3-274ce3af8c6b","expires_in":3599,"scope":"all"} 复制代码
接下来,我们通过 token 来访问接口:
curl -i -H "Accept: application/json" -H "Authorization:bearer d2066f68-665b-4038-9dbe-5dd1035e75a0" -X GET http://localhost:5555/provider-service/api/user/auth/admin 复制代码
成功会返回结果:
Has admin auth! 复制代码
token 如果失效,会返回:
{"error":"invalid_token","error_description":"d2066f68-665b-4038-9dbe-5dd1035e75a01"} 复制代码
3、GitHub 的授权应用案例
如果你的应用想要接入 GitHub,则可以通过如下办法来实现。
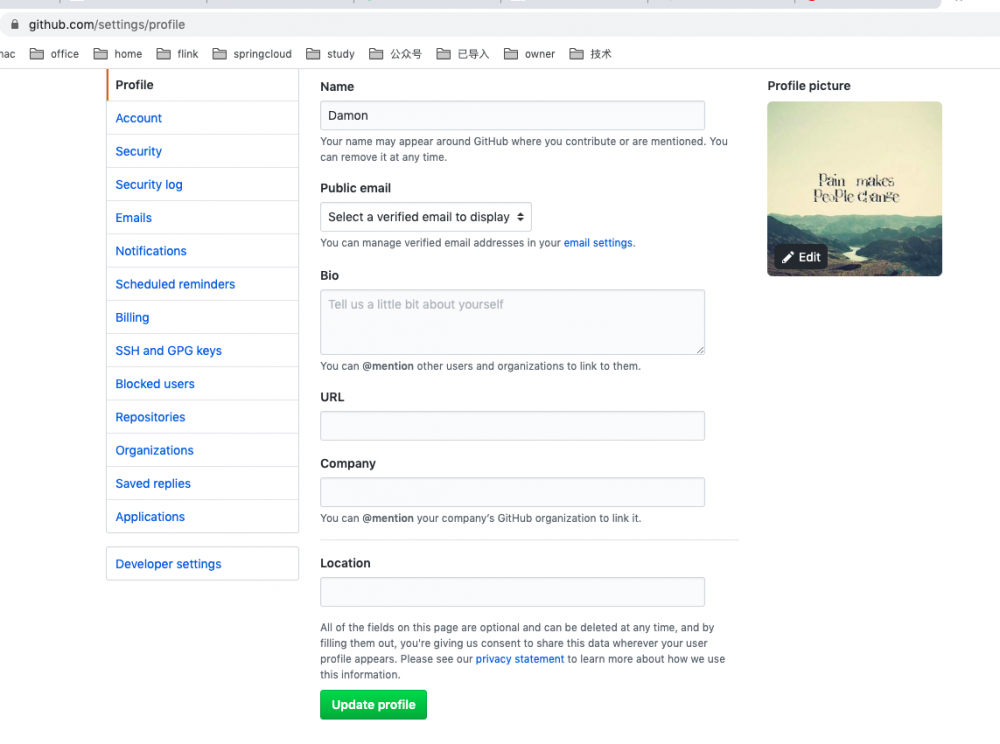
首先注册一个 GitHub 账号,登陆后,找到设置,打开页面,最下面有一个开发者设置:

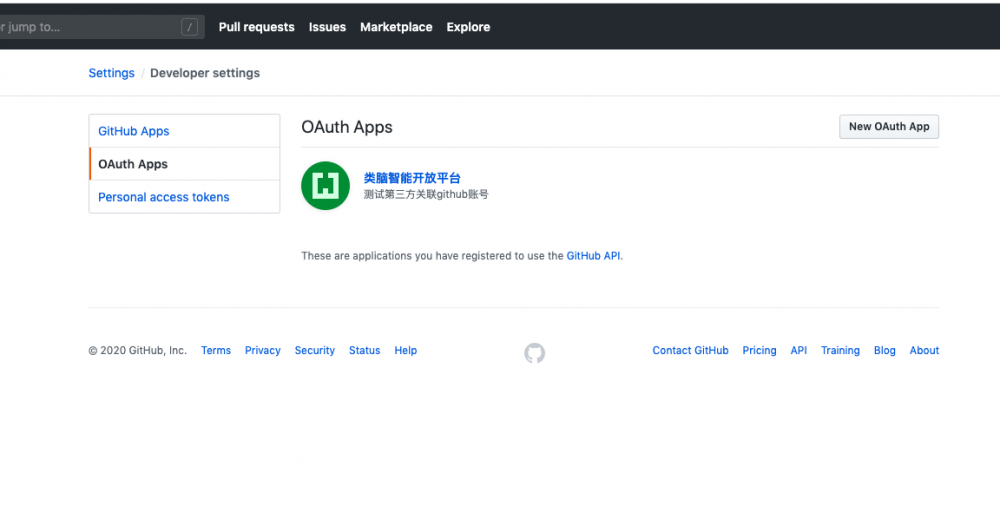
找到后,点击,可以看到三个,可以选择第二个方式来接入:

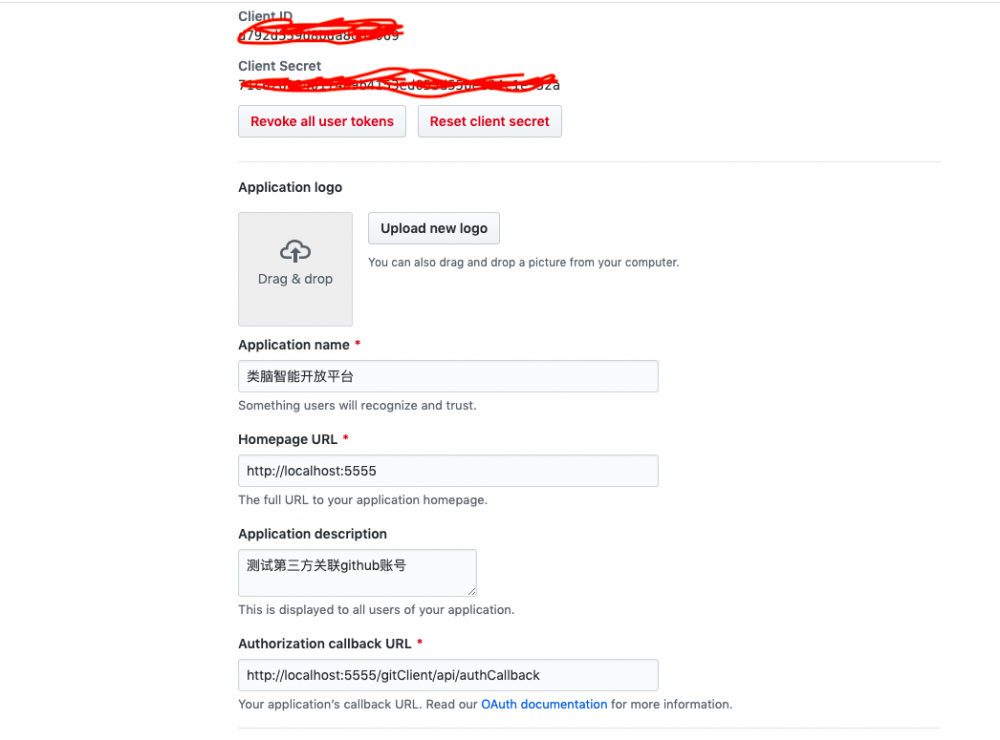
可以新增你的应用 app,新建时,应用名、回调地址必填项:

最后,完成后会生成一个 Client ID、Client Secret。
然后利用 Github 官方给的文档来进行认证、接入,授权逻辑:
1.在注册完信息后生成了 Client ID、Client Secret,首先,用户点击 github 登录本地应用引导用户跳转到第三方授权页跳转地址:
https://github.com/login/oauth/authorize?client_id={client_id}&redirect_uri={redirect_uri}&state={state} 复制代码
其中,client_id,client_secret 是注册好 Oauth APP 后 github 提供的,需要写在本地代码或者配置文件中,state 也是在本地生成的。redirect_uri 就是在 GitHub 官网填的 Authorization callback URL。此时带着 state 等参数去申请授权,但此时尚未登陆,未能通过 authorize,GitHub 返回 code 参数。
2.授权成功后会重定向带参数访问上面的 redirect_uri,并多了一个 code 参数 后台接收 code 这个参数,我们带着这个 code 再次访问 github 地址:
https://github.com/login/oauth/access_token?client_id=xxx&client_secret=xxx&code=xxx&redirect_uri=http://localhost:3001/authCallback 复制代码
注意:上面的 redirect_uri 要与之前在新建 app 时填写的保持一直,否则会报错。
3.通过 state 参数和 code 参数,成功获取 access_token 有了 access_token,只需要把 access_token 参数放在 URL 后面即可,就可以换取用户信息了。访问地址:
https://api.github.com/user?access_token=xxx 复制代码
4.得到 GitHub 授权用户的个人信息,就表明授权成功。
4、微服务安全架构设计
在微服务中,安全性是一个很重要的问题。我们经常比较多的场景是:服务 A 需要调用服务 B,但是问题来了,到底是走外网调用呢?还是走局域网调用呢?这当然看 A、B 是否在同一个网段,如果在同一个局域网段,那肯定走局域网好。为什么呢?因为局域网快呀,如果说还有理由吗?当然有:除了网络快,降低网络开销,还可以保证安全性,不至于被黑客黑掉。这是安全的一个保证。
那么除了上面说的安全性,还有其他的吗?比如:在一个局域网下,有 N 个微服务模块,但是这些微服务并不想完全直接暴露给外部,这时候,就需要一个网关 Gateway 来处理。网关把所有的服务给路由了,就像在所有的服务上面一层,加了一个保护光环,突出 高内聚 的含义。同时还可以加上一些拦截,安全的拦截,鉴权、认证等。存在通过 token 的鉴权,也可以通过 jwt 的,等等。有时候,可以借助 redis 通过 session 共享。也可以通过 OAuth2 的鉴权模式来实现安全拦截。
最后安全性的考虑是在每个服务的接口设计上,比如: 幂等 的存在,让很多恶意攻击成为无用之功。更多的介绍可以看下面:
https://mp.weixin.qq.com/s/G3yhwvLVTu_T5uPxgZD00w 复制代码
结束福利
开源实战利用 k8s 作微服务的架构设计代码:
https://gitee.com/damon_one/spring-cloud-k8s
gitee.com/damon_one/s…
复制代码
<span>复制代码</span>
欢迎大家 star,多多指教。
关于作者
笔名:Damon,技术爱好者,长期从事 Java 开发、Spring Cloud 的微服务架构设计,以及结合 docker、k8s 做微服务容器化,自动化部署等一站式项目部署、落地。Go 语言学习,k8s 研究,边缘计算框架 KubeEdge 等。公众号 程序猿Damon 发起人。个人微信 MrNull008 ,欢迎來撩。
最后,欢迎关注 InfoQ:
https://www.infoq.cn/profile/1905020/following/user 复制代码
本文使用 mdnice 排版
- 本文标签: Service tar 微服务 value 服务端 UI 开源 rmi lib 认证 架构设计 API message ip JDBC HTML plugin 密钥 mybatis 服务器 springboot redis dataSource http db Feign 灵魂 Property retry key 希望 配置 final 云 dist classpath token 漏洞 安全架构 servlet ArrayList App mapper cat 部署 程序猿 web 高可用 数据 consumer core 端口 ribbon 注释 Security js 幂等 XML IO map 开发 logo client 测试 Sentinel CSS 文章 mina session CTO ORM 数据库 pagehelper REST Spring Boot 黑客 provider java entity tab Spring cloud 代码 Authorization https 缓存 Docker 个人信息 sql dependencies mysql 协议 Hystrix Bootstrap build ACE pom EnableAutoConfiguration CEO bean description stream list id 开发者 spring src authenticate springcloud GitHub connectionFactory git Qualifier json cache 安全 参数 ssl Go 语言 IDE Connection Word 自动化 Netflix 域名
- 版权声明: 本文为互联网转载文章,出处已在文章中说明(部分除外)。如果侵权,请联系本站长删除,谢谢。
- 本文海报: 生成海报一 生成海报二


![[HBLOG]公众号](https://www.liuhaihua.cn/img/qrcode_gzh.jpg)

