Netty 在 Dubbo 中是如何应用的?
作者:莫那·鲁道
https://www.cnblogs.com/state...众所周知,国内知名框架 Dubbo 底层使用的是 Netty 作为网络通信,那么内部到底是如何使用的呢?今天我们就来一探究竟。
1. dubbo 的 Consumer 消费者如何使用 Netty
注意:此次代码使用了从 github 上 clone 的 dubbo 源码中的 dubbo-demo 例子。
代码如下:
System.setProperty("java.net.preferIPv4Stack", "true");
   ClassPathXmlApplicationContext context = new ClassPathXmlApplicationContext(new String[]{"META-INF/spring/dubbo-demo-consumer.xml"});
   context.start();
    // @1
   DemoService demoService = (DemoService) context.getBean("demoService"); // get remote service proxy
   int a = 0;
   while (true) {
       try {
           Thread.sleep(1000);
           System.err.println( ++ a + " ");

           String hello = demoService.sayHello("world"); // call remote method
           System.out.println(hello); // get result

       } catch (Throwable throwable) {
           throwable.printStackTrace();
       }
   }
当代码执行到 @1 的时候,会调用 Spring 容器的 getBean 方法,而 dubbo 扩展了 FactoryBean,所以,会调用 getObject 方法,该方法会创建代理对象。
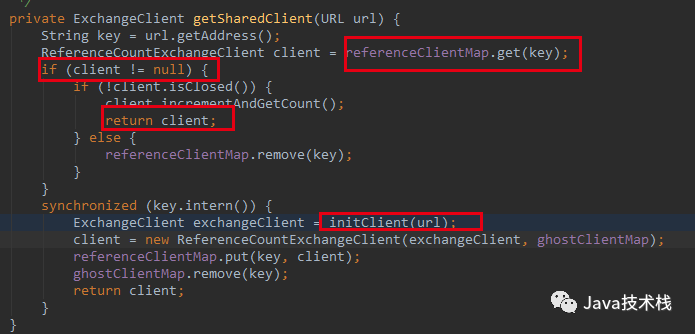
这个过程中会调用 DubboProtocol 实例的 getClients(URL url) 方法,当这个给定的 URL 的 client 没有初始化则创建,然后放入缓存,代码如下:

这个 initClient 方法就是创建 Netty 的 client 的。

最终调用的就是抽象父类 AbstractClient 的构造方法,构造方法中包含了创建 Socket 客户端,连接客户端等行为。
public AbstractClient(URL url, ChannelHandler handler) throws RemotingException {
   doOpen();
   connect();
}
doOpent 方法用来创建 Netty 的 bootstrap :
protected void doOpen() throws Throwable {
   NettyHelper.setNettyLoggerFactory();
   bootstrap = new ClientBootstrap(channelFactory);
   bootstrap.setOption("keepAlive", true);
   bootstrap.setOption("tcpNoDelay", true);
   bootstrap.setOption("connectTimeoutMillis", getTimeout());
   final NettyHandler nettyHandler = new NettyHandler(getUrl(), this);
   bootstrap.setPipelineFactory(new ChannelPipelineFactory() {
       public ChannelPipeline getPipeline() {
           NettyCodecAdapter adapter = new NettyCodecAdapter(getCodec(), getUrl(), NettyClient.this);
           ChannelPipeline pipeline = Channels.pipeline();
           pipeline.addLast("decoder", adapter.getDecoder());
           pipeline.addLast("encoder", adapter.getEncoder());
           pipeline.addLast("handler", nettyHandler);
           return pipeline;
       }
   });
}
connect 方法用来连接提供者:
protected void doConnect() throws Throwable {
   long start = System.currentTimeMillis();
   ChannelFuture future = bootstrap.connect(getConnectAddress());
   boolean ret = future.awaitUninterruptibly(getConnectTimeout(), TimeUnit.MILLISECONDS);
   if (ret && future.isSuccess()) {
       Channel newChannel = future.getChannel();
       newChannel.setInterestOps(Channel.OP_READ_WRITE);
   }
}
上面的代码中,调用了 bootstrap 的 connect 方法,熟悉的 Netty 连接操作。当然这里使用的是 jboss 的 netty3,稍微有点区别。点击这篇: 教你用 Netty 实现一个简单的 RPC 。当连接成功后,注册写事件,准备开始向提供者传递数据。
当 main 方法中调用 demoService.sayHello(“world”) 的时候,最终会调用 HeaderExchangeChannel 的 request 方法,通过 channel 进行请求。
public ResponseFuture request(Object request, int timeout) throws RemotingException {
   Request req = new Request();
   req.setVersion("2.0.0");
   req.setTwoWay(true);
   req.setData(request);
   DefaultFuture future = new DefaultFuture(channel, req, timeout);
   channel.send(req);
   return future;
}
send 方法中最后调用 jboss Netty 中继承了 NioSocketChannel 的 NioClientSocketChannel 的 write 方法。完成了一次数据的传输。
2. dubbo 的 Provider 提供者如何使用 Netty
Provider demo 代码:
System.setProperty("java.net.preferIPv4Stack", "true");
ClassPathXmlApplicationContext context = new ClassPathXmlApplicationContext(new String[]{"META-INF/spring/dubbo-demo-provider.xml"});
context.start();
System.in.read(); // press any key to exit
Provider 作为被访问方,肯定是一个 Server 模式的 Socket。如何启动的呢?
当 Spring 容器启动的时候,会调用一些扩展类的初始化方法,比如继承了 InitializingBean,ApplicationContextAware,ApplicationListener 。
而 dubbo 创建了 ServiceBean 继承了一个监听器。Spring 会调用他的 onApplicationEvent 方法,该类有一个 export 方法,用于打开 ServerSocket 。
然后执行了 DubboProtocol 的 createServer 方法,然后创建了一个NettyServer 对象。NettyServer 对象的 构造方法同样是 doOpen 方法和。
代码如下:
protected void doOpen() throws Throwable {
   NettyHelper.setNettyLoggerFactory();
   ExecutorService boss = Executors.newCachedThreadPool(new NamedThreadFactory("NettyServerBoss", true));
   ExecutorService worker = Executors.newCachedThreadPool(new NamedThreadFactory("NettyServerWorker", true));
   ChannelFactory channelFactory = new NioServerSocketChannelFactory(boss, worker, getUrl().getPositiveParameter(Constants.IO_THREADS_KEY, Constants.DEFAULT_IO_THREADS));
   bootstrap = new ServerBootstrap(channelFactory);

   final NettyHandler nettyHandler = new NettyHandler(getUrl(), this);
   channels = nettyHandler.getChannels();
   bootstrap.setPipelineFactory(new ChannelPipelineFactory() {
       public ChannelPipeline getPipeline() {
           NettyCodecAdapter adapter = new NettyCodecAdapter(getCodec(), getUrl(), NettyServer.this);
           ChannelPipeline pipeline = Channels.pipeline();
           pipeline.addLast("decoder", adapter.getDecoder());
           pipeline.addLast("encoder", adapter.getEncoder());
           pipeline.addLast("handler", nettyHandler);
           return pipeline;
       }
   });
   channel = bootstrap.bind(getBindAddress());
}
该方法中,看到了熟悉的 boss 线程,worker 线程,和 ServerBootstrap,在添加了编解码 handler 之后,添加一个 NettyHandler,最后调用 bind 方法,完成绑定端口的工作。和我们使用 Netty 是一摸一样。
3. 总结
可以看到,dubbo 使用 Netty 还是挺简单的,消费者使用 NettyClient,提供者使用 NettyServer,Provider 启动的时候,会开启端口监听,使用我们平时启动 Netty 一样的方式。
而 Client 在 Spring getBean 的时候,会创建 Client,当调用远程方法的时候,将数据通过 dubbo 协议编码发送到 NettyServer,然后 NettServer 收到数据后解码,并调用本地方法,并返回数据,完成一次完美的 RPC 调用。
好,关于 dubbo 如何使用 Netty 就简短的介绍到这里。
推荐去我的博客阅读更多:
1. Java JVM、集合、多线程、新特性系列教程
2. Spring MVC、Spring Boot、Spring Cloud 系列教程
3. Maven、Git、Eclipse、Intellij IDEA 系列工具教程
4. Java、后端、架构、阿里巴巴等大厂最新面试题
觉得不错,别忘了点赞+转发哦!
- 本文标签: http bean Spring cloud 协议 ip UI TCP final DDL constant Spring Boot java eclipse 阿里巴巴 代码 REST src Service id spring maven cat GitHub list client Property IO node 线程 多线程 key consumer 监听器 NIO 缓存 remote tar Netty XML IOS executor Proxy 端口 Bootstrap 实例 provider ACE cache 构造方法 源码 https IDE App dubbo 博客 ioc JVM classpath git 数据 CTO 总结
- 版权声明: 本文为互联网转载文章,出处已在文章中说明(部分除外)。如果侵权,请联系本站长删除,谢谢。
- 本文海报: 生成海报一 生成海报二


![[HBLOG]公众号](https://www.liuhaihua.cn/img/qrcode_gzh.jpg)

