java并发编程基础2
本文是笔者阅读《java并发编程艺术》一书的笔记中的一部分,笔者将 所有笔记 已经整理成了一本gitbook电子书(还在完善中),阅读体验可能会好一些.
若有需要可关注微信公众号 大雄和你一起学编程 并在后台回复 我爱java 领取(不想关注又想看看这个笔记的朋友,可以看 文末给出的链接 )

内容简介
本文比较长,主要介绍 线程的基本概念和意义、多线程程序开发需要注意的问题、创建线程的方式、线程同步、线程通信、线程的生命周期、原子类等内容。
这些内容基本都是来自《java并发编程艺术》一书,在此感谢,我是在微信读书免费看的,所以算是白嫖了。部分源码的解读是笔者自己从jdk源码扒下来的。
线程的定义与意义
线程的定义
- 是轻量级的进程,线程的创建和切换成本比进程低
- 同一进程中的多条线程将共享该进程中的全部系统资源,如虚拟地址空间,文件描述符和信号处理等等
- 是操作系统能够进行运算调度的最小单位
- java程序至少有一个线程main,main线程由JVM创建
为什么要有多线程
- 可以充分利用多处理器核心
- 更快的响应时间,可以将数据一致性要求不强的工作交给别的线程做
- 更好的编程模型,例如可以使用生产者消费者模型进行解耦
并发编程需要注意的问题
上下文切换
cpu通过时间分片来执行任务,多个线程在cpu上争抢时间片执行,线程切换需要保存一些状态,再次切换回去需要恢复状态,此为上下文切换成本。
因此 并不是线程越多越快 ,频繁的切换会损失性能
减少上下文切换的方法:
- 无锁并发编程:例如把一堆数据分为几块,交给不同线程执行,避免用锁
- 使用CAS:用自旋不用锁可以减少线程竞争切换,但是可能会更加耗cpu
- 使用最少的线程
- 使用协程:在一个线程里执行多个任务
死锁
死锁就是线程之间因争夺资源, 处理不当出现的相互等待现象
避免死锁的方法:
- 避免一个线程同时获取多个锁
- 避免一个线程在锁内同时占用多个资源,尽量保证每个锁只占用一个资源
- 尝试使用定时锁,lock.tryLock(timeout)
- 对于数据库锁,加锁和解锁必须在一个数据库连接里,否则会出现解锁失败的情况
资源限制
程序的执行需要资源,比如数据库连接、带宽,可能会由于资源的限制,多个线程并不是并发,而是串行,不仅无优势,反而带来不必要的上下文切换损耗
常见资源限制
-
硬件资源限制
- 带宽
- 磁盘读写速度
- cpu处理速度
-
软件资源限制
- 数据库连接数
- socket连接数
应对资源限制
- 集群化,增加资源
- 根据不同的资源限制调整程序的并发度,找到瓶颈,把瓶颈资源搞多一些,或者根据这个瓶颈调整线程数
创建线程的三种方式
废话不说,直接上代码
继承Thread类
// 继承Thread
class MyThread extends Thread {
    // 重写run方法执行任务
    @Override
    public void run() {
        for (int i = 0; i < 10; i++) {
            // 可以通过this拿到当前线程
            System.out.println(this.getName()+"执行了"+i);
        }
    }
}

public class Demo_02_02_1_ThreadCreateWays {
    public static void main(String[] args) {
        // 先new出来,然后启动
        MyThread myThread = new MyThread();
        myThread.start();
        for (int i = 0; i < 10; i++) {
            // 通过Thread的静态方法拿到当前线程
            System.out.println(Thread.currentThread().getName()+"执行了"+i);
        }
    }
}
实现Runnable
// 实现Runnable接口
class MyThreadByRunnable implements Runnable {

    @Override
    public void run() {
        for (int i = 0; i < 10; i++) {
            // 不能用this了
            System.out.println(Thread.currentThread().getName() + "执行了" + i);
        }
    }
}

public class Demo_02_02_1_ThreadCreateWays {
    public static void main(String[] args) {
        // 实现Runnable接口的方式启动线程
        Thread thread = new Thread(new MyThreadByRunnable());
        thread.start();
        for (int i = 0; i < 10; i++) {
            // 通过Thread的静态方法拿到当前线程
            System.out.println(Thread.currentThread().getName() + "执行了" + i);
        }
    }
}
因为Runnable是函数式接口,用lamba也可以
new Thread(() -> {
    System.out.println("Runnable是函数式接口, java8也可以使用lamba");
}).start();
使用Callable和Future
// 使用Callable
class MyThreadByCallable implements Callable<Integer> {

    @Override
    public Integer call() throws Exception {
        int sum = 0;
        for (int i = 0; i < 10; i++) {
            System.out.println(Thread.currentThread().getName()+"执行了"+i);
            sum+=i;
        }
        return sum;
    }
}
public class Demo_02_02_1_ThreadCreateWays {
    public static void main(String[] args) {
        // 用FutureTask包一层
        FutureTask<Integer> futureTask = new FutureTask<>(new MyThreadByCallable());
        new Thread(futureTask).start();
        try {
            // 调用futureTask的get能拿到返回的值
            System.out.println(futureTask.get());
        } catch (InterruptedException e) {
            e.printStackTrace();
        } catch (ExecutionException e) {
            e.printStackTrace();
        }
    }
}
这是最复杂的一种方式,他可以有返回值,归纳一下步骤:
- 搞一个类实现
Callable接口,重写call方法,在call执行任务 - 用
FutureTask包装实现Callable接口类的实例 - 将
FutureTask的实例作为Thread构造参数 - 调用
FutureTask实例的get拿到返回值,调这一句会阻塞父线程
Callable 也是函数式接口,所以也能用lamba
为啥Thread构造里边能放Runnable,也能放FutureTask? 其实FutureTask继承RunnableFuture,而RunnableFuture继承Runnable和Future,所以FutureTask也是Runnable
三种方式比较
| 方式 | 使用简易程度 | 是否可以共享任务代码 | 是否可以有返回值 | 是否可以声明抛出异常 | 是否可以再继承别的类 |
|---|---|---|---|---|---|
| 继承Thread | 简单 | 不能 | 不能 | 不能 | 不能 |
| Runnable | 中等 | 可以 | 不能 | 不能 | 可以 |
| Callable | 复杂 | 可以 | 可以 | 可以 | 可以 |
继承 Thread 是最容易的,但是也是最不灵活的
使用 Callable 时最复杂的,但是也是最灵活的
这里说的 共享任务代码 举个例子:
还是上面那个 MyThreadByRunnable 类
MyThreadByRunnable myThreadByRunnable = new MyThreadByRunnable();
Thread thread = new Thread(myThreadByRunnable);
thread.start();
// 再来一个,复用了任务代码,继承Thread就不行
Thread thread2 = new Thread(myThreadByRunnable);
thread2.start();
线程的一些属性
名字
给以给线程取一个响亮的名字,便于排查问题,默认为 Thread-${一个数字} 这个样子
- 设置名字
threadA.setName("欢迎关注微信公号'大雄和你一起学编程'");
- 获取名字
threadA.getName();
是否是守护线程(daemon)
为其他线程服务的线程可以是守护线程,守护线程的特点是如果所有的前台线程死亡,则守护线程自动死亡。
非守护线程创建的线程默认为非守护线程,守护线程创建的则默认为守护
- set
threadA.setDaemon(true);
- get
threadA.isDaemon();
线程优先级(priority)
优先级高的线程可以得到更多cpu资源, 级别是1-10,默认优先级和创建他的父线程相同,main是5
set
threadA.setPriority(Thread.NORM_PRIORITY);
get
threadA.getPriority()
所属线程组
可以把线程放到组里,一起管理
设置线程组
Thread的构造里边可以指定
ThreadGroup threadGroup = new ThreadGroup("欢迎关注微信公号'大雄和你一起学编程'");
Thread thread = new Thread(threadGroup, () -> {
    System.out.println("欢迎关注微信公号'大雄和你一起学编程'");
});
拿到线程组
thread.getThreadGroup()
基于线程组的操作
ThreadGroup threadGroup1 = thread.getThreadGroup();
System.out.println(threadGroup1.activeCount()); // 有多少活的线程
threadGroup1.interrupt();                       // 中断组里所有线程
threadGroup1.setMaxPriority(10);                // 设置线程最高优先级是多少
线程同步
多个线程访问同一个资源可能会导致结果的不确定性,因此有时需要控制只有一个线程访问共享资源,此为线程同步。
一个是可以使用synchronized同步,一个是可以使用Lock。synchronized是也是隐式的锁。
同步方法
class Account {
    private Integer total;

    public Account(int total) {
        this.total = total;
    }

    public synchronized void draw(int money) {
        if (total >= money) {
            this.total = this.total - money;
            System.out.println(Thread.currentThread().getName() + "剩下" + this.total);
        } else {
            System.out.println(Thread.currentThread().getName() + "不够了");
        }
    }

    public synchronized int getTotal() {
        return total;
    }
}

public class Demo_02_04_1_ThreadSync {
    public static void main(String[] args) {
        Account account = new Account(100);
        Runnable runnable = new Runnable() {
            @Override
            public void run() {
                while (account.getTotal() >= 10) {
                    account.draw(10);
                    try {
                        Thread.sleep(1);
                    } catch (InterruptedException e) {
                        e.printStackTrace();
                    }
                }
            }
        };
        Thread A = new Thread(runnable);
        A.setName("A");
        Thread B = new Thread(runnable);
        B.setName("B");
        A.start();
        B.start();
    }
}
假设AB两个人从同一个账户里取钱,直接在draw这个方法加synchronized关键字,防止两个人同时进入draw
sychronized加在普通方法上,锁为当前实例对象
加在静态方法上,锁为当前类的Class
同步代码块
public  void draw(int money) {
    synchronized (total) {
        if (total >= money) {
            this.total = this.total - money;
            System.out.println(Thread.currentThread().getName() + "剩下" + this.total);
        } else {
            System.out.println(Thread.currentThread().getName() + "不够了");
        }
    }
}
synchronized同步块,锁为()里边的对象
锁
Lock lock = new ReentrantLock();
public void draw(int money) {
    lock.lock();
    try {
        if (total >= money) {
            this.total = this.total - money;
            System.out.println(Thread.currentThread().getName() + "剩下" + this.total);
        } else {
            System.out.println(Thread.currentThread().getName() + "不够了");
        }
    } finally {
        lock.unlock();
    }
}
使用比较简单,进方法加锁,执行完释放,后面会专门发一篇文章介绍锁,包括AQS之类的东西,敬请关注。
线程间的通信
线程之间协调工作的方式
基于等待通知模型的通信
等待/通知的相关方法是任意Java对象都具备的,因为这些方法被定义在java.lang.Object上。
相关API
- notify: 通知一个对象上等待的线程,使其从wait方法返回,而返回的前提是该线程获取到了对象的锁
- notifyAll: 通知对象上所有等待的线程,使其从wait方法返回
- wait: 使线程进入WAITING(后面线程的生命周期里边有)状态,只有等待另一个线程 通知或者被中断 才返回,需要注意的是,调用wait方法后需要 释放对象的锁
- wait(long): 和wait类似,加入了 超时时间 ,超时了还没被通知就直接返回
- wait(long, int): 纳秒级,不常用
一些需要注意的点:
- 使用wait()、notify()和notifyAll()时 需要先对调用对象加锁 。
- 调用wait()方法后,线程状态由RUNNING变为WAITING,并将当前线程放置到对象的 等待队列,释放锁 。
- notify()或notifyAll()方法调用后,等待线程不会立即从wait()返回,需要调用notify()或notifAll()的线程释放锁之后,等待线程才有机会从wait()返回。
- notify()方法将等待队列中的一个等待线程从等待队列中移到同步队列中,而notifyAll()方法则是将等待队列中所有的线程全部移到同步队列,被移动的线程状态由WAITING变为BLOCKED。
- 从wait()方法返回的前提是获得了调用对象的锁。
关于等待队列和同步队列
- 同步队列(锁池):假设线程A已经拥有了某个对象(注意:不是类)的锁,而其它的线程想要调用这个对象的某个synchronized方法(或者synchronized块),由于这些线程在进入对象的synchronized方法之前必须先获得该对象的锁的拥有权,但是该对象的锁目前正被线程A拥有,所以这些线程就 进入了该对象的同步队列(锁池)中,这些线程状态为Blocked 。
- 等待队列(等待池):假设一个线程A调用了某个对象的wait()方法,线程A就会释放该对象的锁(因为wait()方法必须出现在synchronized中,这样自然在执行wait()方法之前线程A就已经拥有了该对象的锁),同时 线程A就进入到了该对象的等待队列(等待池)中,此时线程A状态为Waiting 。如果另外的一个线程调用了相同对象的notifyAll()方法,那么 处于该对象的 等待池中的线程就会全部进入该对象的同步队列(锁池)中 ,准备争夺锁的拥有权。如果另外的一个线程调用了相同对象的notify()方法,那么 仅仅有一个处于该对象的等待池中的线程(随机)会进入该对象的同步队列(锁池)。
以上来自 啃碎并发(二):Java线程的生命周期
等待通知模型的示例
class WaitNotifyModel {
    Object lock = new Object();
    boolean flag = false;

    public void start() {
        Thread A = new Thread(() -> {
            synchronized (lock) {
                while (!flag) {
                    try {
                        System.out.println(Thread.currentThread().getName()+":等待通知");
                        lock.wait();
                    } catch (InterruptedException e) {
                        e.printStackTrace();
                    }
                }
                System.out.println(Thread.currentThread().getName()+ ":收到通知,处理业务逻辑");
            }
        });
        A.setName("我是等待者");
        Thread B = new Thread(() -> {
            synchronized (lock) {
                try {
                    Thread.sleep(1000);
                } catch (InterruptedException e) {
                    e.printStackTrace();
                }
                flag = true;
                System.out.println(Thread.currentThread().getName()+":发出通知");
                lock.notify();
            }
        });
        B.setName("通知者");
        A.start();
        B.start();
    }
}
模型归纳
等待者
synchronized (对象) {
    while (不满足条件) {
        对象.wait()
    }
    处理业务逻辑
}
通知者
synchronized (对象) {
    改变条件
    对象.notify();
}
基于Condition的通信
上述的这种等待通知需要使用synchronized, 如果使用Lock的话就要用 Condition 了
Condition接口也提供了类似Object的监视器方法,与Lock配合可以实现等待/通知模式
Condition与Object监视器的区别
| 项目 | Object的监视器方法 | Condition |
|---|---|---|
| 前置条件 | 获得对象的锁 | Lock.lock()获取锁<br/>Lock.newCondition()获取Condition |
| 调用方式 | obj.wait() | condition.await() |
| 等待队列个数 | 一个 | 可以多个 |
| 当前线程释放锁并进入等待状态 | 支持 | 支持 |
| 等待状态中不响应中断 | 不支持 | 支持 |
| 释放锁进入超时等待状态 | 支持 | 支持 |
| 进入等待状态到将来的某个时间 | 不支持 | 支持 |
| 唤醒等待中的一个或多个线程 | 支持 notify notifyAll | 支持signal signalAll |
这里有一些线程的状态,可以看完后边的线程的生命周期再回过头看看
示例
一般都会将Condition对象作为成员变量。当调用await()方法后,当前线程会释放锁并在此等待,而其他线程调用Condition对象的signal()方法,通知当前线程后,当前线程才从await()方法返回,并且在返回前已经获取了锁。
实现一个有界队列,当队列为空时阻塞消费线程,当队列满时阻塞生产线程
class BoundList<T> {
    private LinkedList<T> list;
    private int size;
    private Lock lock = new ReentrantLock();
    // 拿两个condition,一个是非空,一个是不满
    private Condition notEmpty = lock.newCondition();
    private Condition notFullCondition = lock.newCondition();

    public BoundList(int size) {
        this.size = size;
        list = new LinkedList<>();
    }

    public void push(T x) throws InterruptedException {
        lock.lock();
        try {
            while (list.size() >= size) {
                // 满了就等待
                notFullCondition.await();
            }
            list.push(x);
            // 唤醒等待的消费者
            notEmpty.signalAll();

        } finally {
            lock.unlock();
        }
    }

    public T get() throws InterruptedException {
        lock.lock();
        try {
            while (list.isEmpty()) {
                // 空了就等
                notEmpty.await();
            }
            T x = list.poll();
            // 唤醒生产者
            notFullCondition.signalAll();
            return x;
        } finally {
            lock.unlock();
        }
    }

}

public class Demo_02_05_1_Condition {
    public static void main(String[] args) {
        BoundList<Integer> list = new BoundList<>(10);
        // 生产数据的线程
        new Thread(() -> {
            for (int i = 0; i < 20; i++) {
                try {
                    Thread.sleep(1000);
                    list.push(i);
                } catch (InterruptedException e) {
                    e.printStackTrace();
                }
            }
        }).start();

        // 消费数据的线程
        new Thread(() -> {
            for (int i = 0; i < 20; i++) {
                try {
                    System.out.println(list.get());
                } catch (InterruptedException e) {
                    e.printStackTrace();
                }
            }
        }).start();
    }
}
基于BlockingQueue实现线程通信
后面会专门发文介绍BlockingQueue, 敬请关注
控制线程
参考了《疯狂java讲义》的提法,将如下内容归为控制线程的方式。
join
主线程join一个线程,那么主线程会阻塞直到join进来的线程执行完,主线程继续执行, join如果带超时时间的话,那么如果超时的话主线程也会不再等join进去的线程而继续执行.
join实际就是判断join进来的线程存活状态,如果活着就调用wait(0),如果带超时时间了的话,wait里边的时间会算出来
while (isAlive()) {
    wait(0);
}
API
- public final void join() throws InterruptedException
- public final synchronized void join(long millis, int nanos)
- public final synchronized void join(long millis)
例子
public class Demo_02_06_1_join extends Thread {
    @Override
    public void run() {
        for (int i = 0; i < 10; i++) {
            System.out.println(this.getName() + "  " + i);
        }
    }

    public static void main(String[] args) throws InterruptedException {
        Demo_02_06_1_join joinThread = new Demo_02_06_1_join();
        for (int i = 0; i < 100; i++) {

            if (i == 10) {
                joinThread.start();
                joinThread.join();
            }
            // 打到9就停了,然后执行joinThread这里边的代码,完事继续从10打
            System.out.println(Thread.currentThread().getName()+"  "+i);
        }
    }
}
sleep
睡觉方法,使得线程暂停一段时间,进入阻塞状态。
API
- public static native void sleep(long millis) throws InterruptedException
- public static void sleep(long millis, int nanos) throws InterruptedException
示例
public class Demo_02_06_2_sleep extends Thread {
    @Override
    public void run() {
        for (int i = 0; i < 10; i++) {
            if (i == 5) {
                try {
                    Thread.sleep(5000);
                } catch (InterruptedException e) {
                    e.printStackTrace();
                }

            }
            // 输出到4停止, 5秒后继续
            System.out.println(this.getName() + "  " + i);
        }
    }

    public static void main(String[] args) throws InterruptedException {
        Demo_02_06_2_sleep sleepThread = new Demo_02_06_2_sleep();
        sleepThread.start();
    }
}
yield
也是让线程暂停一下,但是是进入就绪状态,让系统重新开始一次新的调度过程,下一次可能运气好被yield的线程又被选中。
Thread.yield()
中断
Java中断机制是一种协作机制,也就是说通过中断并不能直接终止另一个线程,而需要被中断的线程自己处理中断。
前面有一些方法声明了InterruptedException, 这意味者他们可以被中断,中断后把异常抛给调用方,让调用方自己处理.
被中断的线程可以自已处理中断,也可以不处理或者抛出去。
public class Demo_02_06_3_interrupt extends Thread {

    static class MyCallable implements Callable {
        @Override
        public Integer call() throws InterruptedException {
            for (int i = 0; i < 5000; i++) {
                if (Thread.currentThread().isInterrupted()) {
                    System.out.println("3333");
                    throw new InterruptedException("中断我干嘛,关注 微信号 大雄和你一起学编程 呀");
                }
            }
            return 0;
        }
    }
    public static void main(String[] args) throws InterruptedException {
        FutureTask<Integer> futureTask = new FutureTask<>(new MyCallable());
        Thread thread = new Thread(futureTask);
        thread.start();
        for (int i = 0; i < 100; i++) {
            if (i == 3) {
                thread.interrupt();
            }
        }
        try {
            futureTask.get();
        } catch (ExecutionException e) {
            // 这里会捕获到异常
            e.printStackTrace();
        }

    }
}
线程的生命周期
啃碎并发(二):Java线程的生命周期 这篇文章写的非常好,建议看一下。
要是早点发现这篇文章的话,大雄也不用费劲在《java并发编程艺术》和《疯狂java讲义》以及各种博客找资料了。
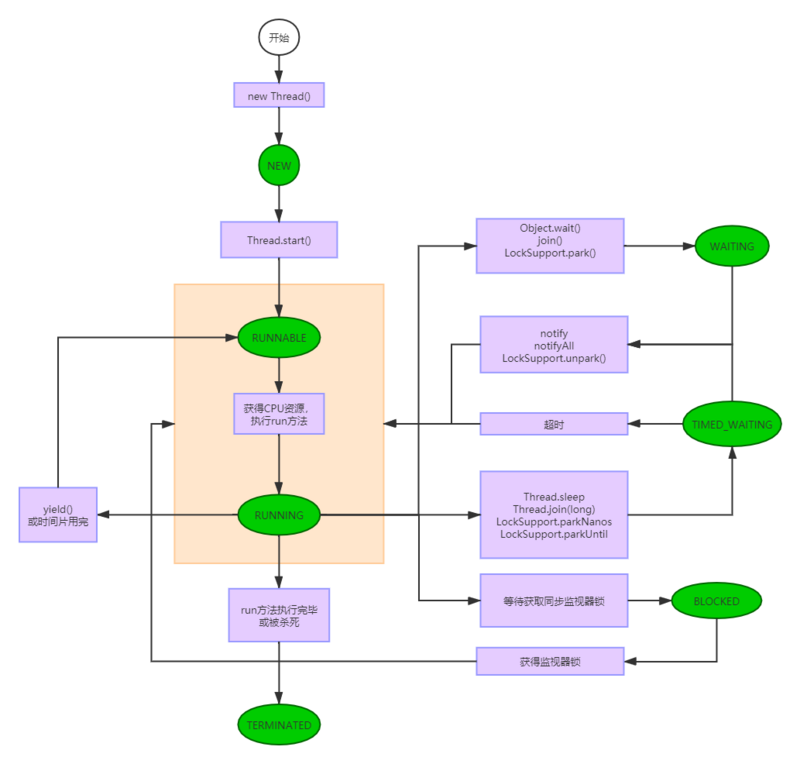
这里我只想把这篇文章里一个图改一下贴到这里,细节部分大家可以参考上述这篇文章。
还是先说两嘴,这个生命周期的图我找到了不少版本,不仅图的形式不一样,里边的内容也有些出入
- 《疯狂java讲义》里边只有5中状态,缺少WAITING和TIMED_WAITING
- 《java并发编程艺术》里边有7中状态
- 上边的那篇文章,文字描述有7中状态,但是图里边只有6种
大雄也懵了,遂在源码找到了如下一个枚举, 里面有一些注释,翻译了一下。
public enum State {
        // 表示没有开始的线程
        NEW,

        // 表示可运行(大家的翻译应该是就绪)的线程
        // 表示在JVM正在运行,但是他可能需要等操作系统分配资源
        // 比如CPU
        RUNNABLE,

         // 表示线程在等待监视器锁
         // 表示正在等待监视器锁以便重新进进入同步块或者同步方法
         // OR 在调用了Object.wait重新进入同步块或者同步方法
        BLOCKED,

         // 调用如下方法之一会进入WAITING
         // 1. Object.wait() 没有加超时参数
         // 2. 调用join() 没有加超时参数
         // 3. 调用LockSupport.park()
         // WAITING状态的线程在等待别的线程做一个特殊的事情(action)例如
         // 1. 调用了wait的在等待其他线程调用notify或者notifyAll
         // 2. 调用了join的在等待指定线程结束
        WAITING,

         // 就是有一个特定等待时间的线程
         // 加上一个特定的正的超时时间调用如下方法会进入此状态
         // 1. Thread.sleep
         // 2. Thread.join(long)
         // 3. LockSupport.parkNanos
         // 4. LockSupport.parkUntil
        TIMED_WAITING,

        // 执行完了结束的状态
        TERMINATED;
    }
对于一个拥有8级英语水品的6级没过的人来说,这段翻译太难了,但是翻译出来感觉很清晰了。
应该是 7种状态!!!
大雄不去具体研究状态的流转了,直接参考一些资料及上述翻译,搞一个前无古人、后有来者的线程生命周期图

这个图八成、没准、大概是没有太大问题的。此图中, 原谅色 是线程状态, 紫色 是引起状态变化的原因。
ThereadLocal
就是绑定到线程上边的一个存东西的地方。
使用示例
class Profiler {
    // ThreadLocal的创建
    private static ThreadLocal<Long> threadLocal = new ThreadLocal<Long>(){
        @Override
        protected Long initialValue() {
            return System.currentTimeMillis();
        }

    };

    // 记录开始时间
    public static void begin() {
        threadLocal.set(System.currentTimeMillis());
    }

    // 记录耗时
    public static Long end() {
        return System.currentTimeMillis() - threadLocal.get();
    }
}
public class Demo_02_08_1_ThreadLocal {
    public static void main(String[] args) {
        new Thread(() -> {
            Profiler.begin();
            long sum = 1;
            for (int i = 1; i < 20; i++) {
                sum*=i;
            }
            System.out.println(sum);
            System.out.println(Thread.currentThread().getName()+"耗时="+Profiler.end());
        }).start();

        new Thread(() -> {
            Profiler.begin();
            int sum = 1;
            for (int i = 1; i < 1000; i++) {
                sum+=i;
                try {
                    Thread.sleep(1);
                } catch (InterruptedException e) {
                    e.printStackTrace();
                }
            }
            System.out.println(sum);
            System.out.println(Thread.currentThread().getName()+"耗时="+Profiler.end());
        }).start();
    }
}
InheritableThreadLocal
这种ThreadLocal可以从父线程传到子线程,也就是子线程能访问父线程中的InheritableThreadLocal
public class Demo_02_08_2_ThreadLocalInherit {
    static class TestThreadLocalInherit extends Thread{
        @Override
        public void run() {
            System.out.println(threadLocal.get()); // null
            System.out.println(inheritableThreadLocal.get()); // 欢迎关注微信公众号 大雄和你一起学编程
        }
    }

    public static ThreadLocal<Object> threadLocal = new ThreadLocal<Object>();
    public static InheritableThreadLocal<Object> inheritableThreadLocal = new InheritableThreadLocal<>();
    public static void main(String[] args) {
        inheritableThreadLocal.set("欢迎关注微信公众号 大雄和你一起学编程");
        threadLocal.set("ddd");
        new TestThreadLocalInherit().start();
    }
}
实现原理
很容易想到,因为这个东西是 跟着线程走 的,所以应该是线程的一个属性,事实上也是这样,ThreadLocal和InheritableThreadLocal都是存储在Thread里面的。
/* ThreadLocal values pertaining to this thread. This map is maintained
 * by the ThreadLocal class. */
ThreadLocal.ThreadLocalMap threadLocals = null;

/*
 * InheritableThreadLocal values pertaining to this thread. This map is
 * maintained by the InheritableThreadLocal class.
 */
ThreadLocal.ThreadLocalMap inheritableThreadLocals = null;
上边这个就是Thread的两个成员变量,其实两个是一样的类型。
ThreadLocalMap是ThreadLocal的内部类,他里边是一个用一个Entry数组来存数据的。set时将ThreadLocal作为key,要存的值传进去,他会对key做一个hash,构建Entry,放到Entry数组里边。
// 伪码
static class ThreadLocalMap {
    // 内部的Entry结构
    static class Entry {...}
    // 存数据的
    private Entry[] table;
    // set
    private void set(ThreadLocal<?> key, Object value) {
        int i = key.threadLocalHashCode & (len-1);
        tab[i] = new Entry(key, value);
    }
    // get
    private Entry getEntry(ThreadLocal<?> key) {
        int i = key.threadLocalHashCode & (table.length - 1);
        Entry e = table[i];
        if (e != null && e.get() == key)
            return e;
        else
            return getEntryAfterMiss(key, i, e);
    }
}
再来看看ThreadLocal的get方法
public T get() {
    Thread t = Thread.currentThread();
    ThreadLocalMap map = getMap(t); // 这个就是拿到的存在Thread的threadLocals这个变量
    if (map != null) {
        // 这里就是毫无难度的事情了
        ThreadLocalMap.Entry e = map.getEntry(this);
        if (e != null) {
            @SuppressWarnings("unchecked")
            T result = (T)e.value;
            return result;
        }
    }
    // 这个也很简单,他会调你重写的initialValue方法,拿到一个值,set进去并且返回给你
    // 这个也很有趣,一般init在初始化完成,但是他是在你取的时候去调,应该算是一个小小优化吧
    return setInitialValue();
}
再来看看ThreadLocal的set, 超级简单,不多说
public void set(T value) {
    Thread t = Thread.currentThread();
    ThreadLocalMap map = getMap(t);
    if (map != null)
        map.set(this, value);
    else
        createMap(t, value);
}
ThreadLocal看完了,再来瞅瞅InheritableThreadLocals,看看他是怎么可以从父线程那里拿东西的
// 继承了ThreadLocal, 重写了三个方法
public class InheritableThreadLocal<T> extends ThreadLocal<T> {
    // 这个方法在ThreadLocal是直接抛出一个异常UnsupportedOperationException
    protected T childValue(T parentValue) {
        return parentValue;
    }
    // 超简单,我们的Map不要threadLocals了,改为inheritableThreadLocals
    ThreadLocalMap getMap(Thread t) {
       return t.inheritableThreadLocals;
    }
    // 同上
    void createMap(Thread t, T firstValue) {
        t.inheritableThreadLocals = new ThreadLocalMap(this, firstValue);
    }
}
发现他和ThreadLocal长得差不多,就是重写了三个方法,由此看来关键在inheritableThreadLocals是如何传递的
直接在Thread里面搜inheritableThreadLocals
你会发现他是在init方法中赋值的,而init实在Thread的构造方法中调用的
// 这个parent就是 创建这个线程的那个线程,也就是父线程
if (inheritThreadLocals && parent.inheritableThreadLocals != null)
this.inheritableThreadLocals = ThreadLocal.createInheritedMap(parent.inheritableThreadLocals);
看来现在得看看ThreadLocal.createInheritedMap这个方法了
// parentMap就是父线程的inheritableThreadLocals
static ThreadLocalMap createInheritedMap(ThreadLocalMap parentMap) {
    return new ThreadLocalMap(parentMap);
}
// 发现很简单,就是把父线程的东西到自己线程的inheritableThreadLocals里边
private ThreadLocalMap(ThreadLocalMap parentMap) {
    Entry[] parentTable = parentMap.table;
    int len = parentTable.length;
    setThreshold(len);
    table = new Entry[len];

    for (int j = 0; j < len; j++) {
        Entry e = parentTable[j];
        if (e != null) {
            @SuppressWarnings("unchecked")
            ThreadLocal<Object> key = (ThreadLocal<Object>) e.get();
            if (key != null) {
                Object value = key.childValue(e.value);
                Entry c = new Entry(key, value);
                int h = key.threadLocalHashCode & (len - 1);
                while (table[h] != null)
                    h = nextIndex(h, len);
                table[h] = c;
                size++;
            }
        }
    }
}
总结一下
ThreadLocal和InheritableThreadLocal是基于在Thread里边的两个变量实现的,这两个变量类似于一个HashMap的结构ThreadLocalMap,里边的Entry key为ThreadLocal, value为你存的值. InheritableThreadLocal的实现主要是在线程创建的时候,如果父线程有inheritableThreadLocal, 会被拷贝到子线程。
原子类
一个简单的i++操作, 多线程环境下如果i是共享的,这个操作就不是原子的。
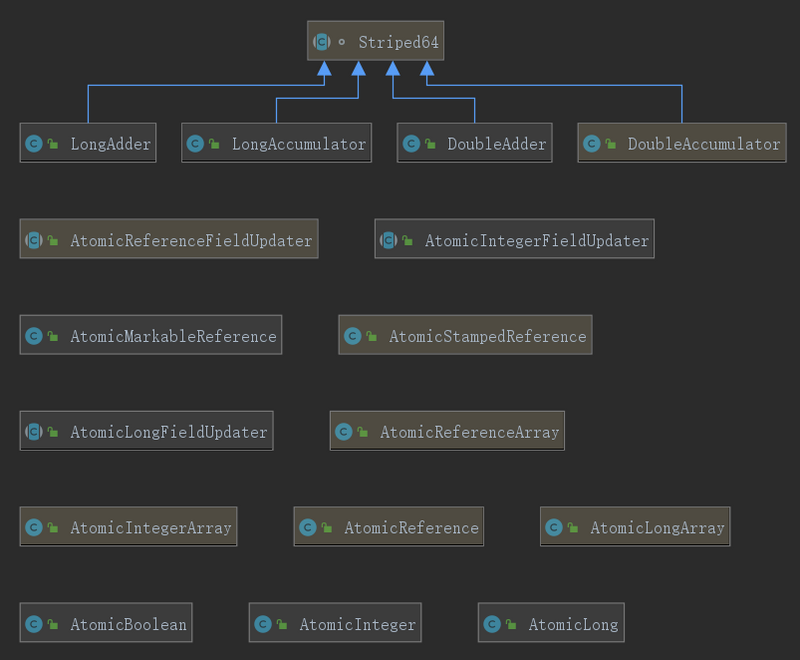
为此,java.util.concurrent.atomic这个包下边提供了一些原子类,这些原子操作类提供了一种用法简单、性能高效、线程安全地更新一个变量的方式。

一个使用的例子
public class Demo_04_01_1_Atomic {
    static class Counter {
        private AtomicInteger atomicInteger = new AtomicInteger(0);
        public int increment() {
            return atomicInteger.getAndIncrement();
        }
        public int get() {
            return atomicInteger.get();
        }
    }
    static class Counter2 {
        private int value = 0;
        public int increment() {
            return value++;
        }
        public int get() {
            return value;
        }
    }

    public static void main(String[] args) throws InterruptedException {
        // 这个用了原子类
        Counter counter = new Counter();
        // 这个没有用原子类
        Counter2 counter2 = new Counter2();
        for (int i = 0; i < 50; i++) {
            new Thread(() -> {
                for (int j = 0; j < 100; j++) {
                    counter.increment();
                    counter2.increment();
                }
            }).start();
        }
        Thread.sleep(2000);
        System.out.println(counter.get());  // 一定是5000
        System.out.println(counter2.get()); // 可能少于5000
    }
}
超级简单~
原子类的实现没细看,貌似是CAS吧
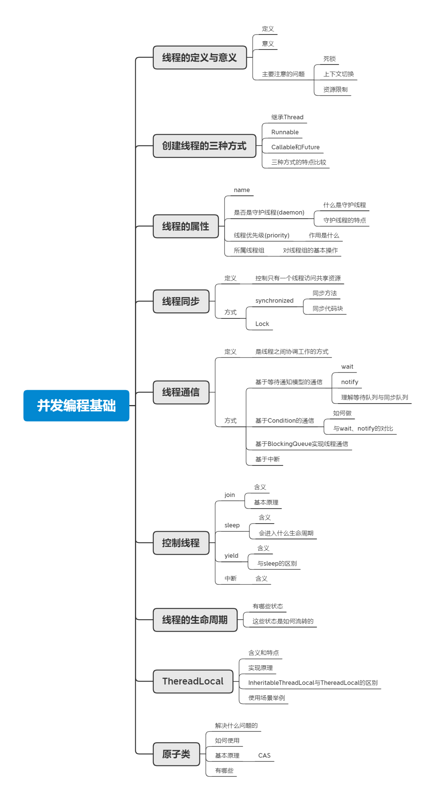
章小结

本图源文件可以在github java-concurrent-programming-art-mini 对应章下面找到
参考文献
- 啃碎并发(二):Java线程的生命周期
- 《疯狂java讲义》
- 《java并发编程艺术》
- 本文标签: map 文章 时间 id 静态方法 源码 参数 线程 ask 管理 Atom key 线程同步 并发 git 锁 安全 ACE 代码 IO JVM 翻译 快的 数据库 src IDE queue 实例 java线程 原子类 mina 并发编程 集群 生命 GitHub ORM LinkedList java 软件 tar 同步 数据 微信公众号 空间 一致性 synchronized db 开发 cat 博客 多线程 Action HashMap rmi list 总结 UI 免费 注释 模型 构造方法 tab 操作系统 进程 http API 处理器 线程通信 value https final
- 版权声明: 本文为互联网转载文章,出处已在文章中说明(部分除外)。如果侵权,请联系本站长删除,谢谢。
- 本文海报: 生成海报一 生成海报二


![[HBLOG]公众号](https://www.liuhaihua.cn/img/qrcode_gzh.jpg)

