三、深入理解OkHttp:连接处理-ConnectIntercepter
终于来到OkHttp的网络连接模块,这块内容是OkHttp的核心内容。我们知道Http的连接需要进行3此握手,断开需要4次挥手。而连接的每一次握手,都需要进行Socket连接、释放,这是一个非常麻烦而且耗时耗力的过程。那么连接的服用就显得尤为重要了,同个地址的连接,如果在用完后不断开,保持连接,在下次的请求中便能重复使用这个连接,节省了连接的时间。 这对于大部分时间需要重复频繁访问同一个服务器地址的移动端网络来说更加不可或缺。
在本篇文章中,我们将以ConnectIntercepter为起点,跟随网络连接获取的过程,深入探究其中涉及到的:连接查找、连接复用,网络连接的建立(三次握手、Http2协议等的处理)。面对这复杂的过程,我们先总体的走一遍连接获取过程,然后在后续介绍 RealConnection.java 和 ConnectionPool.java 来更深入的理解连接的建立和缓存查找等逻辑。除此之外,我们还需要先看一下另一个类: Transmitter.java ,它将在connect的过程中起到重要的地位。
二、Transmmiter:应用和Http的桥梁
【2.1】来历和作用
RealCall.java
static RealCall newRealCall(OkHttpClient client, Request originalRequest, boolean forWebSocket) {
    // Safely publish the Call instance to the EventListener.
    RealCall call = new RealCall(client, originalRequest, forWebSocket);
    call.transmitter = new Transmitter(client, call);
    return call;
  }

Transmitter.java
  public final class Transmitter {

  private final OkHttpClient client;
  //重点:连接池
  private final RealConnectionPool connectionPool;
  //此次请求
  private final Call call;
  private Request request;
  //重点:连接查找器,它将承当主要的连接查找工作。
  private ExchangeFinder exchangeFinder;
  //Connecttion的实现类,代表着和服务器的连接。
  public RealConnection connection;
  //重点:负责请求的发送和响应接收
  private @Nullable Exchange exchange;
  //请求是否已取消
  private boolean canceled;
  ...

  public Transmitter(OkHttpClient client, Call call) {
    this.client = client;
    this.connectionPool = Internal.instance.realConnectionPool(client.connectionPool());
    this.call = call;
    this.eventListener = client.eventListenerFactory().create(call);
    this.timeout.timeout(client.callTimeoutMillis(), MILLISECONDS);
  }

复制代码
总结:Transmitter是在创建RealCall的时候被创建的,其中需要了OkHttpClient和当前请求Call作为参数。所以我们知道了,一个请求对应着一个Transmitter。而且,它的成员变量里有ExchangeFinder等类,负责为这个请求查找到一个合适的请求。
【2.2】 releaseConnectionNoEvents()
这个方法是释放一个连接,该方法在后面的查找连接中会涉及到,我们在这里先对其进行讲述。
Transmitter.java
@Nullable Socket releaseConnectionNoEvents() {
    ...
    int index = -1;
    //一个连接,可以有多个transmitter,也就是用于多个请求。所以在这里需要
    //找到自己的那一个。
    for (int i = 0, size = this.connection.transmitters.size(); i < size; i++) {
      Reference<Transmitter> reference = this.connection.transmitters.get(i);
      if (reference.get() == this) {
        index = i;
        break;
      }
    }

    if (index == -1) throw new IllegalStateException();

    //将自己从连接中剔除掉。
    RealConnection released = this.connection;
    released.transmitters.remove(index);
    this.connection = null;

    //如果这个请求释放了这个连接后,这个连接没有被用于其他请求
    //调用连接池,使这个连接变为一个空闲连接。
    if (released.transmitters.isEmpty()) {
      released.idleAtNanos = System.nanoTime();
      //详见【5.4】
      if (connectionPool.connectionBecameIdle(released)) {
        //没人在用了,把Socket返回回去。
        return released.socket();
      }
    }

    //还有其他请求在用,就不返回socket回去。
    return null;
  }
复制代码
总结:这是一个请求关闭一个连接的过程。
- 先找到连接中对直接的索引,断开。
- 判断连接是否还有请求在用,不用使其变为空闲连接。
【2.1】prepareToConnect():连接的准备工作
【2.2.1】
RetryAndFollowUpInterceptor.java
@Override public Response intercept(Chain chain) throws IOException {
    ...
    Transmitter transmitter = realChain.transmitter();
    ...
    while (true) {
      transmitter.prepareToConnect(request);

      if (transmitter.isCanceled()) {
        throw new IOException("Canceled");
      }

      ...
    }
  }
复制代码
从上面可以看到,在执行第一个默认拦截器的逻辑的时候,调用transmitter.prepareToConnect()方法。我们接下去看一下这个方法做了上面准备工作。
【2.2.2】prepareToConnect()
Transmitter.java
 public void prepareToConnect(Request request) {

    if (this.request != null) {
    //如果这个Transmitter已经有了一个请求了
    //并且他们的url所指向的地址都是同一个,那么这个连接可以复用,直接返回。
      if (sameConnection(this.request.url(), request.url())) return;
      //如果上个请求的信息交换器不为空,代表这次request还没有结束
      //那么抛出错误,该Transmitter不能给新的request用。
      if (exchange != null) throw new IllegalStateException();

      //释放上次的连接。
      if (exchangeFinder != null) {
        maybeReleaseConnection(null, true);
        exchangeFinder = null;
      }
    }

    //第一次进来时,直接来到这里。
    this.request = request;
    //给自己创建一个连接查找器,注意这里的CreateAddress(),它将返回一个Adrees对象,代表着远方服务器的一个地址。
    this.exchangeFinder = new ExchangeFinder(this, connectionPool, createAddress(request.url()),
        call, eventListener);
  }

复制代码
总结:其实这个方法,重点就是为连接作准备。但是主要目的还是找到可以复用的连接。它的逻辑如下:
- 如果这个Transmiiter之前已经有过请求,而且和新请求所指向的地址是一样的,那么这个连接可以复用,直接返回。
- 如果不是同个地址,而且上个请求还没用完(exchange != null),那么这个Tranmitter不能复用。直接报错。如果上个请求已经完了, 释放上个请求的连接。
- 如果这个Tranmitter是新的,那么给这个Transmiiter新创建一个ExcahgeFinder,请注意这个类,它很重要,将负责最主要的连接查找工作。
【2.2】acquireConnectionNoEvents
Transmitter.java
 void acquireConnectionNoEvents(RealConnection connection) {
    ...
    this.connection = connection;
    connection.transmitters.add(new TransmitterReference(this, callStackTrace));
  }
复制代码
总结:这个方法是代表Transmitter获得了一个可用的连接了。那么它做的工作是将这个连接保存起来。然后将自己登记到RealConnection。这个方法后面会有用到,这里先讲解一下。
三、查找连接
有了章节二的预备知识后,我们可以来看ConnectIntercepter了。不过他只是触发打开连接的按钮,真正连接的查找和连接逻辑在exchangeFinder.java和Exchage.java。不管怎么样,我们先来看一下开始的地方。
【3.1】ConnectIntercepter
ConnectIntercepter.java
@Override public Response intercept(Chain chain) throws IOException {
    ...
    boolean doExtensiveHealthChecks = !request.method().equals("GET");
    //详见【3.2】
    Exchange exchange = transmitter.newExchange(chain, doExtensiveHealthChecks);

    return realChain.proceed(request, transmitter, exchange);
  }
复制代码
调用transmitter的newExcahge()方法,得到一个可以与远程地址进行通行的Exchage,然后就丢给下一个拦截器了。顺带说一下,在第一篇《》我们知道,紧跟着ConnectIntercepter的下一个拦截器是ServerIntercepter,那我们可以很容易的推理出,它拿到了ConnectIntercepter的excahge后,就进行了数据传输和数据接收。
【3.2】newExchange()
Transmitter.java
Exchange newExchange(Interceptor.Chain chain, boolean doExtensiveHealthChecks) {
    synchronized (connectionPool) {
    ...
    //详见3.3:find()
    //详见四:ExchangeCodec.java
    ExchangeCodec codec = exchangeFinder.find(client, chain, doExtensiveHealthChecks);
    Exchange result = new Exchange(this, call, eventListener, exchangeFinder, codec);

    synchronized (connectionPool) {
      this.exchange = result;
      this.exchangeRequestDone = false;
      this.exchangeResponseDone = false;
      return result;
    }
  }
复制代码
调用exchangeFinder.find()找到一个连接,返回ExchangeCodec。ExchangeCodec是一个接口,它代表着Http请求的加密,和响应的解密。它有2个具体实现:Http1ExchangeCodec和Http2ExchangeCodec,它的详细内容详见【4】。我们继续看连接的查找。
【3.4】find()
ExcahgeFinder.java
 public ExchangeCodec find(
      OkHttpClient client, Interceptor.Chain chain, boolean doExtensiveHealthChecks) {
    int connectTimeout = chain.connectTimeoutMillis();
    int readTimeout = chain.readTimeoutMillis();
    int writeTimeout = chain.writeTimeoutMillis();
    int pingIntervalMillis = client.pingIntervalMillis();
    boolean connectionRetryEnabled = client.retryOnConnectionFailure();

    try {
      //详见【3.5】
      RealConnection resultConnection = findHealthyConnection(connectTimeout, readTimeout,
          writeTimeout, pingIntervalMillis, connectionRetryEnabled, doExtensiveHealthChecks);
      //详见【3.7】
      return resultConnection.newCodec(client, chain);
    } catch (RouteException e) {
      trackFailure();
      throw e;
    } catch (IOException e) {
      trackFailure();
      throw new RouteException(e);
    }
  }
复制代码
【3.5】findHealthyConnection()
ExcahgeFinder.java
  private RealConnection findHealthyConnection(int connectTimeout, int readTimeout,
      int writeTimeout, int pingIntervalMillis, boolean connectionRetryEnabled,
      boolean doExtensiveHealthChecks) throws IOException {
    while (true) {
      //详见:【3.6】找到连接候选人
      RealConnection candidate = findConnection(connectTimeout, readTimeout, writeTimeout,
          pingIntervalMillis, connectionRetryEnabled);

      // 如果这个连接是全新的,那么可以直接用
      synchronized (connectionPool) {
        if (candidate.successCount == 0) {
          return candidate;
        }
      }

      // 在这里需要检查一下这个连接是否健康的
      if (!candidate.isHealthy(doExtensiveHealthChecks)) {
       //如果不加看,调用RealConnection.noNewExcahge()方法,将此连接丢弃并继续找。
        candidate.noNewExchanges();
        continue;
      }

      return candidate;
    }
  }
复制代码
总结:该方法顾名思义,就是通过一个while(true)不断的找一个连接候选人,然后检查是否健康可用的,如果不能用就进行标记,丢弃。详细的如下:
- 调用findConnection()找到一个连接。
- 如果全新的直接用。
- 如果不健康的调用RealConnection.noNewExcahge(), 它内部主要做的是noNewExchanges = true; 这个标志为后续将会用到,用来丢弃连接。
- 不见看的判断:isHealthy() 就不展开了,就是判断connection的socket等是否被关闭了,进而判断连接是否健康。
【3.6】findConnection()
接下来就是重中之重了,让我们来一起品味这很香的查找逻辑。
private RealConnection findConnection(int connectTimeout, int readTimeout, int writeTimeout,
      int pingIntervalMillis, boolean connectionRetryEnabled) throws IOException {
    boolean foundPooledConnection = false;
    RealConnection result = null;
    Route selectedRoute = null;
    RealConnection releasedConnection;
    Socket toClose;
    synchronized (connectionPool) {
      //1.如果这个请求已经被取消过,那么再次请求抛出错误。
      if (transmitter.isCanceled()) throw new IOException("Canceled");
      ...

      //2. 先找到这个连接之前的路由结果
      Route previousRoute = retryCurrentRoute()
          ? transmitter.connection.route()
          : null;

      //3. 在这里尝试使用一个已经分配好的连接,但是如上文【3.5】看到的
      //他会检查它的noNewExchange标志为,如果是true 的话,那么这个连接不但不能用,而且还要复制给toClose,关闭掉。
      //详见【2.3】:releaseConnectionNoEvents()
      releasedConnection = transmitter.connection;
      toClose = transmitter.connection != null && transmitter.connection.noNewExchanges
          ? transmitter.releaseConnectionNoEvents()
          : null;

      //4.如果transmitter的connection历经了上面的的逻辑,没有被置空,说明这个连接可用,赋值给result。
      if (transmitter.connection != null) {
        result = transmitter.connection;
        releasedConnection = null;  //这个连接可以用,不能把他释放掉,重新置为空。
      }

      //5. 如果此时的result还是为空,说明上面尝试获取一个已经分配好的连接失败
      //那么这次尝试重连接池中获取。
      if (result == null) {
        //详见【5.3】:尝试获取一个连接
        if (connectionPool.transmitterAcquirePooledConnection(address, transmitter, null, false)) {
         //获取成功
          foundPooledConnection = true;
          result = transmitter.connection;
        } else {
          //连接池都获取失败的话,需要进行路由
          selectedRoute = previousRoute;
        }
      }
    }
    //将刚刚要关闭的连接关闭。
    closeQuietly(toClose);

    ...
    //result不空,找到一个可用的连接,直接返回。
    if (result != null) {
      return result;
    }

    // 6.进行路由选择
    boolean newRouteSelection = false;
    if (selectedRoute == null && (routeSelection == null || !routeSelection.hasNext())) {
      newRouteSelection = true;
      routeSelection = routeSelector.next();
    }

    List<Route> routes = null;
    synchronized (connectionPool) {
      if (transmitter.isCanceled()) throw new IOException("Canceled");

      if (newRouteSelection) {
        //7. 由于有新的路由,用路由选择的新的IP集合,再次此时到连接池中找可以复用的连接。
        routes = routeSelection.getAll();
        if (connectionPool.transmitterAcquirePooledConnection(
            address, transmitter, routes, false)) {
          foundPooledConnection = true;
          result = transmitter.connection;
        }
      }

      //8. 既然路由都没有找到可以用的,那么就创建一个新的RealConnection,
      if (!foundPooledConnection) {
        if (selectedRoute == null) {
          selectedRoute = routeSelection.next();
        }
        result = new RealConnection(connectionPool, selectedRoute);
        connectingConnection = result;
      }
    }

    // 9. 如果刚刚第二次在连接池找到了,那么返回这个连接。
    if (foundPooledConnection) {
      eventListener.connectionAcquired(call, result);
      return result;
    }

    // 10. 详见【4.2】说明要用新连接,那么进行TCP+TSL连接
    result.connect(connectTimeout, readTimeout, writeTimeout, pingIntervalMillis,
        connectionRetryEnabled, call, eventListener);
    connectionPool.routeDatabase.connected(result.route());

    Socket socket = null;
    synchronized (connectionPool) {
      connectingConnection = null;
      //11. 当多个连接连接到同一个主机时,在这里会进行连接合并。这是最后一次尝试
      if (connectionPool.transmitterAcquirePooledConnection(address, transmitter, routes, true)) {
        //说明连接池中已经有一个可用的连接了,不需要刚刚创建的连接。
        pooled connection.
        result.noNewExchanges = true;
        socket = result.socket();
        result = transmitter.connection;
      } else {
        //12.详见【5.5】新创建的连接正常使用,将它放入池子中
        connectionPool.put(result);
        transmitter.acquireConnectionNoEvents(result);
      }
    }
    //如果有需要,丢掉刚刚新创建的连接
    closeQuietly(socket);

    eventListener.connectionAcquired(call, result);
    //终于可以返回
    return result;
  }
复制代码
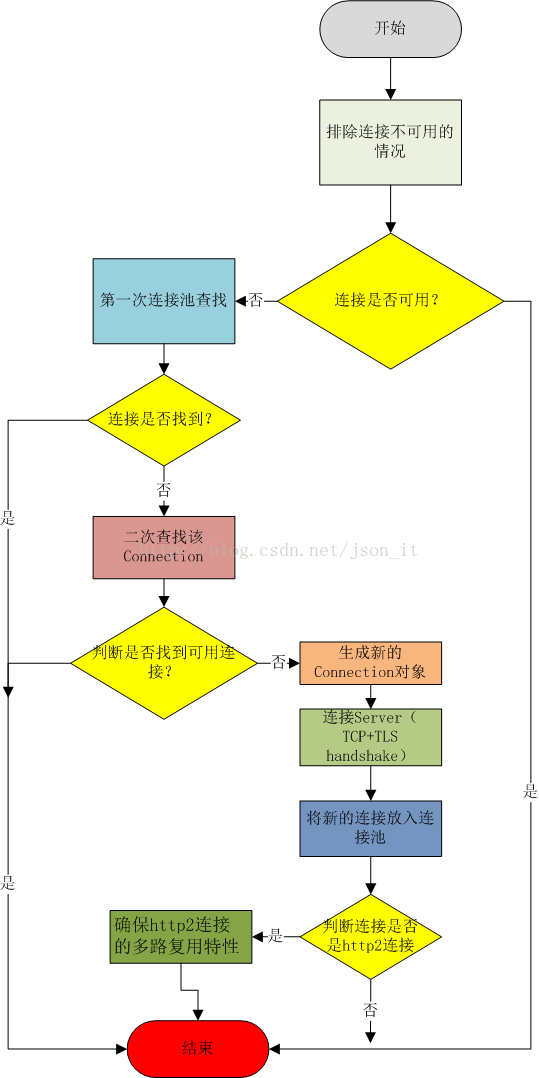
总结:这是一个查找连接的过程,在查找的时候,综合考虑了自身的连接,路由的结果,连接池的复用,和新建几种方案。具体的如下:
- 尝试获取这个请求被已经被分配的连接,如果存在,且可用,那么直接使用这个,返回。否则,这个连接的socket将会被关闭。
- 尝试从连接池中获取,如果可用,返回结果。
- 尝试使用路由器进行路由选择出路由结果集合,再次到连接池中进行查找可用连接。
- 如果路由都找不到,新建一个连接,进行TCP+TSL 连接。
- 再次到连接池中,看有没有可用的连接,避免多次连接造成重复创建。如果找到,关闭新建的连接。结果替换为新找到的连接。如果没有,将新连接放入连接池中。
- 返回结果。
【3.7】 newCodec(): 获得数据加解密器
ExchangeCodec newCodec(OkHttpClient client, Interceptor.Chain chain) throws SocketException {
    if (http2Connection != null) {
      return new Http2ExchangeCodec(client, this, chain, http2Connection);
    } else {
      socket.setSoTimeout(chain.readTimeoutMillis());
      source.timeout().timeout(chain.readTimeoutMillis(), MILLISECONDS);
      sink.timeout().timeout(chain.writeTimeoutMillis(), MILLISECONDS);
      return new Http1ExchangeCodec(client, this, source, sink);
    }
  }
复制代码
总结:根据连接性质不一样,生成不同的数据加解密器。
章节小结:本节从ConnectIntercepter开始,追寻了一个连接如何被获得的过程,它涉及到了新建连接、路由选择,连接池复用等逻辑,最终的产物是Exchange,由它去到下一个拦截器:ServerIntercepter进行网络传输工作。其中Exchange、RealConnectionPool起到了很重要角色,我们将在下一小节中解析
四、RealConnection
RealConnection,描述的是一次与远程服务器的连接,所以它需要具备与远程地址进行建立连接,通行的能力。这些能里我们可以在后续它的成员变量和方法中看出来。照例,我们来看一下的构造函数和成员变量。
【4.1】成员变量和构造
public final class RealConnection extends Http2Connection.Listener implements Connection {
  ...
  private static final int MAX_TUNNEL_ATTEMPTS = 21;

  //连接池
  public final RealConnectionPool connectionPool;
  //路由器
  private final Route route;

  //这个socket将在connect()方法中被赋值,并且不会再重新赋值。它用于底层的Socket通信。
  private Socket rawSocket;

  //代表着应用层的Socket
  private Socket socket;
  //描述一次完整握手过程的对象。
  private Handshake handshake;
  //协议枚举类,包括“http/1.0”、“http/3.1”等。
  private Protocol protocol;
  //代表了一个Http2的Socket连接
  private Http2Connection http2Connection;
  //与服务器进行数据交互的流操作对象。
  private BufferedSource source;
  private BufferedSink sink;

  //表示connection的一个标志位,被connectionPool管理着,并且一旦为true,将一直为true。代表着这个连接不需要新的Exchage了。
  boolean noNewExchanges;

  ...

  /** 这个连接所负载的请求 */
  final List<Reference<Transmitter>> transmitters = new ArrayList<>();
  ...

  //构造函数需要连接池和路由器。
  public RealConnection(RealConnectionPool connectionPool, Route route) {
    this.connectionPool = connectionPool;
    this.route = route;
  }
复制代码
总结:一些主要的成员变量已经如上列出注释。接下来从它最重要的方法connect()入手来理解它的作用。
【4.2】 connect():与远程服务器建立连接
public void connect(int connectTimeout, int readTimeout, int writeTimeout,
      int pingIntervalMillis, boolean connectionRetryEnabled, Call call,
      EventListener eventListener) {
    //当portacol不等空时,代表连接已经建立,抛出错误。
    if (protocol != null) throw new IllegalStateException("already connected");

    RouteException routeException = null;
    //注意这里的ConnectSpec对象,它代表了Http的Socket通信的配置,比如它会指定TLS协议版本。
    List<ConnectionSpec> connectionSpecs = route.address().connectionSpecs();
    ConnectionSpecSelector connectionSpecSelector = new ConnectionSpecSelector(connectionSpecs);

    //1.对协议配置的一些检查,如果配置不合法将会抛出错误
    //HTTP的话,判断是否配置了不允许明文传输或者Android平台规定了不允许明文传输。不满足的抛出错误。
    if (route.address().sslSocketFactory() == null) {
      if (!connectionSpecs.contains(ConnectionSpec.CLEARTEXT)) {
        throw new RouteException(new UnknownServiceException(
            "CLEARTEXT communication not enabled for client"));
      }
      String host = route.address().url().host();
      if (!Platform.get().isCleartextTrafficPermitted(host)) {
        throw new RouteException(new UnknownServiceException(
            "CLEARTEXT communication to " + host + " not permitted by network security policy"));
      }
    } else {
    //如果是Https连接,判断是否配置h2_prior_knowledge。
      if (route.address().protocols().contains(Protocol.H2_PRIOR_KNOWLEDGE)) {
        throw new RouteException(new UnknownServiceException(
            "H2_PRIOR_KNOWLEDGE cannot be used with HTTPS"));
      }
    }

    //从这里开始连接。
    while (true) {
      try {
        //2.检查是否需要隧道模式,如果需要就建立隧道连接。
        //如果目标地址是Https协议,但是又通过Http协议代理的话,将会满足判定。
        if (route.requiresTunnel()) {
          //详见【4.3】
          connectTunnel(connectTimeout, readTimeout, writeTimeout, call, eventListener);
          //rawSocket为空,代表不能建立隧道连接,退出。
          if (rawSocket == null) {
            break;
          }
        } else {
        //3.详见【4.4】建立普通的Socket连接
          connectSocket(connectTimeout, readTimeout, call, eventListener);
        }
        //4. 详见【4.5】建立协议。
        establishProtocol(connectionSpecSelector, pingIntervalMillis, call, eventListener);
        eventListener.connectEnd(call, route.socketAddress(), route.proxy(), protocol);
        break;
      } catch (IOException e) {
        ...
      }
    }

    //5. 对隧道连接建立失败的处理
    if (route.requiresTunnel() && rawSocket == null) {
      ProtocolException exception = new ProtocolException("Too many tunnel connections attempted: "
          + MAX_TUNNEL_ATTEMPTS);
      throw new RouteException(exception);
    }

    //如果是Http2协议,获取最大并发流限制
    if (http2Connection != null) {
      synchronized (connectionPool) {
        allocationLimit = http2Connection.maxConcurrentStreams();
      }
    }
  }
复制代码
总结:该方法是Connection处理连接逻辑的地方,主要包括一下几点:
- 通过protocol来判断这个连接是否已经建立好了,如果不为空,就代表已经建立好,此时会抛出错误。
- 根据不同的Http连接协议,进行配置的检查。
- 判断是否建立隧道连接,是的话进入隧道连接流程。它的判定条件是,HTTP代理的Http2或者Https。建立隧道连接的Http代理将不再解析数据,而是直接转发数据。
- 建立普通的Socket连接。
- 建立协议:TCL握手,HTTP/2的协商等。
- 对连接建立后或者失败的一些处理
【4.3】connectTunnel():建立隧道连接
private void connectTunnel(int connectTimeout, int readTimeout, int writeTimeout, Call call,
      EventListener eventListener) throws IOException {
    //1. 创建用于隧道连接用的请求。
    Request tunnelRequest = createTunnelRequest();
    HttpUrl url = tunnelRequest.url();
    for (int i = 0; i < MAX_TUNNEL_ATTEMPTS; i++) {
      //2. 详见【4.4】和普通连接一样,也需要进行Socket连接
      connectSocket(connectTimeout, readTimeout, call, eventListener);
      //3. 创建隧道
      tunnelRequest = createTunnel(readTimeout, writeTimeout, tunnelRequest, url);

      if (tunnelRequest == null) break; // Tunnel successfully created.

      // The proxy decided to close the connection after an auth challenge. We need to create a new
      // connection, but this time with the auth credentials.
      closeQuietly(rawSocket);
      rawSocket = null;
      sink = null;
      source = null;
      eventListener.connectEnd(call, route.socketAddress(), route.proxy(), null);
    }
  }
复制代码
总结:创建隧道连接,就是在Http代理的代理上建立Https连接。主要的做了如下事情:
- 创建一个tunnelRequest:一个通过代理建里TLS隧道的请求。由于是未加密的,它的头部信息是只包涵了最小的头集,这也是为了避免传递一些敏感的数据给到Http,比如cookie等。
- 进行Socket连接。
- 进行隧道连接:传入刚刚创建的tunnelRequset,构建出一个Http1ExchangeCodec对象,用于Http1协议的流操作实现类,对Http代理进行连接请求。
【4.4】connectSocket()
private void connectSocket(int connectTimeout, int readTimeout, Call call,
      EventListener eventListener) throws IOException {
    Proxy proxy = route.proxy();
    Address address = route.address();

    //1. 根据不同的代理类型来选择不同的Socket生成策略。
    rawSocket = proxy.type() == Proxy.Type.DIRECT || proxy.type() == Proxy.Type.HTTP
        ? address.socketFactory().createSocket()
        : new Socket(proxy);

    eventListener.connectStart(call, route.socketAddress(), proxy);
    //设置超时
    rawSocket.setSoTimeout(readTimeout);
    try {
    //2. 采用平台上的连接socket方式
      Platform.get().connectSocket(rawSocket, route.socketAddress(), connectTimeout);
    } catch (ConnectException e) {
      ...
    }

   //得到Socket的输出输入流
    try {
      source = Okio.buffer(Okio.source(rawSocket));
      sink = Okio.buffer(Okio.sink(rawSocket));
    } catch (NullPointerException npe) {
      if (NPE_THROW_WITH_NULL.equals(npe.getMessage())) {
        throw new IOException(npe);
      }
    }
  }
复制代码
总结:该方法是与远程服务器地址建立起Socket连接,并获得输入输出流。具体的如下:
- 如果是直连或者Http类型时,直接通过SocketFactory新建一个Socket。否则是代理Socket,将代理传入Socket新建一个代理Socket。
- 建立Socket连接。Platform.get()在这里得到的是Android平台,而它的内部做的是也就是
socket.connect(address, connectTimeout);
复制代码
在这一步connect过后,socket完成了3次握手建立TCP连接。 3. 获得Socket的输出输入流。
####【4.5】establishProtocol()
private void establishProtocol(ConnectionSpecSelector connectionSpecSelector,
      int pingIntervalMillis, Call call, EventListener eventListener) throws IOException {
      //1. 判断是否为http请求
    if (route.address().sslSocketFactory() == null) {
      //2.如果http请求里包涵了“h2_prior_knowledge”协议,代表是一个支持明文的http2请求,所以仍然开启的是http2的连接
      if (route.address().protocols().contains(Protocol.H2_PRIOR_KNOWLEDGE)) {
        socket = rawSocket;
        protocol = Protocol.H2_PRIOR_KNOWLEDGE;
        //3. 建立http2连接
        startHttp2(pingIntervalMillis);
        return;
      }
      //4. 不属于以上情况,正常建立http连接
      socket = rawSocket;
      protocol = Protocol.HTTP_1_1;
      return;
    }

    eventListener.secureConnectStart(call);
    //5. 详见【4.6】建立Tls协议
    connectTls(connectionSpecSelector);
    eventListener.secureConnectEnd(call, handshake);

    //建立http2连接
    if (protocol == Protocol.HTTP_2) {
      startHttp2(pingIntervalMillis);
    }
  }
复制代码
总结:该方法根据请求协议,来确定建立的连接是否需要进一步协议处理。具体的如下:
- 如果是http请求但是包涵“h2_prior_knowledge”或者是http2协议,都进一步构建htpp2连接。
- 其他的为正常的http请求,直接将代表底层的rawSocket赋值给应用层的socket。
【4.6】connectTls()
private void connectTls(ConnectionSpecSelector connectionSpecSelector) throws IOException {
    Address address = route.address();
    SSLSocketFactory sslSocketFactory = address.sslSocketFactory();
    boolean success = false;
    SSLSocket sslSocket = null;
    try {
      // 1. 将刚刚得到的socket通过sslSocketFactory进行包装
      //得到SSLSocket对象。
      sslSocket = (SSLSocket) sslSocketFactory.createSocket(
          rawSocket, address.url().host(), address.url().port(), true /* autoClose */);

      // 2. 详见【4.7】对sslSocket进行配置协议。
      ConnectionSpec connectionSpec = connectionSpecSelector.configureSecureSocket(sslSocket);
      //3. 看情况是否进行Tls扩展配置
      if (connectionSpec.supportsTlsExtensions()) {
        Platform.get().configureTlsExtensions(
            sslSocket, address.url().host(), address.protocols());
      }

      //4. 开始进行三次握手
      sslSocket.startHandshake();
      SSLSession sslSocketSession = sslSocket.getSession();
      Handshake unverifiedHandshake = Handshake.get(sslSocketSession);

      //5. 对sslSocket的地址与主机地址进行校验,确保一致可用。
      if (!address.hostnameVerifier().verify(address.url().host(), sslSocketSession)) {
        List<Certificate> peerCertificates = unverifiedHandshake.peerCertificates();
        if (!peerCertificates.isEmpty()) {
          X509Certificate cert = (X509Certificate) peerCertificates.get(0);
          throw new SSLPeerUnverifiedException(
              "Hostname " + address.url().host() + " not verified:"
                  + "/n    certificate: " + CertificatePinner.pin(cert)
                  + "/n    DN: " + cert.getSubjectDN().getName()
                  + "/n    subjectAltNames: " + OkHostnameVerifier.allSubjectAltNames(cert));
        } else {
          throw new SSLPeerUnverifiedException(
              "Hostname " + address.url().host() + " not verified (no certificates)");
        }
      }

      //6. 证书校验
      address.certificatePinner().check(address.url().host(),
          unverifiedHandshake.peerCertificates());

      //7. 在3中如果配置了进行扩展,那么在这里将会取到协议协商的结果。
      String maybeProtocol = connectionSpec.supportsTlsExtensions()
          ? Platform.get().getSelectedProtocol(sslSocket)
          : null;

      //8. 将刚才完成握手和协议校验的sslSocket保存起来
      //并且获得用于IO传输的source、sink
      socket = sslSocket;
      source = Okio.buffer(Okio.source(socket));
      sink = Okio.buffer(Okio.sink(socket));
      handshake = unverifiedHandshake;
      protocol = maybeProtocol != null
          ? Protocol.get(maybeProtocol)
          : Protocol.HTTP_1_1;
      success = true;
    } catch (AssertionError e) {
      ...
    } finally {
      ...
    }
  }
复制代码
总结:在这个方法里,连接将进行SSL配置,三次握手,证书校验等工作。具体的如下:
- 将socket包装成SLLSocket。
- 对SLLSocket进行协议配置。
- 如果有需要,对SLL协议进行扩展配置。
- 开始三次握手。
- 对主机地址一致性进行校验,防止握手过程中丢失。
- 对服务器回传回来的证书进行合法行校验。
- 如果需要,取得握手过程中,协议协商选择出的协议。
- 将完成握手和协议校验的SSLSocket保存起来,并获得用于IO传输的source、sink。
【4.7】configureSecureSocket() 对SSLScoket进行协议配置
ConnectionSpecSelector.java
 ConnectionSpec configureSecureSocket(SSLSocket sslSocket) throws IOException {
    ConnectionSpec tlsConfiguration = null;
    for (int i = nextModeIndex, size = connectionSpecs.size(); i < size; i++) {
      ConnectionSpec connectionSpec = connectionSpecs.get(i);
      if (connectionSpec.isCompatible(sslSocket)) {
        tlsConfiguration = connectionSpec;
        nextModeIndex = i + 1;
        break;
      }
    }
    ...
    Internal.instance.apply(tlsConfiguration, sslSocket, isFallback);
    return tlsConfiguration;
  }

复制代码
总结:可以看到,对SSLScoket配置,就是遍历connectionSpecs集合,然后挑出适合于这个sslScoket的配置,然后进行要用。具体的如下:
- connectionSpecs集合:在OkHttpClient创建的时候有默认值:
OkHttpClient.java
 static final List<ConnectionSpec> DEFAULT_CONNECTION_SPECS = Util.immutableList(
      ConnectionSpec.MODERN_TLS, ConnectionSpec.CLEARTEXT);
复制代码
- 协议的应用最终会调用到ConnectionSpec.apply() 方法,对SSLScoket进行tsl版本,设置密码套件。
【4.8】ConnectionSpec.apply(): 协议应用
ConnectionSpec.java
 void apply(SSLSocket sslSocket, boolean isFallback) {
    ConnectionSpec specToApply = supportedSpec(sslSocket, isFallback);

    if (specToApply.tlsVersions != null) {
      sslSocket.setEnabledProtocols(specToApply.tlsVersions);
    }
    if (specToApply.cipherSuites != null) {
      sslSocket.setEnabledCipherSuites(specToApply.cipherSuites);
    }
  }
复制代码
总结:对这个socket设置tls版本和密码套件
【4.9】isEligible():判断连接是否可复用的逻辑
RealConnection.java
boolean isEligible(Address address, @Nullable List<Route> routes) {
    // 如果这个连接所承载的请求达到最大,则不能重用
    if (transmitters.size() >= allocationLimit || noNewExchanges) return false;

    // 如果不是Host域,看他们地址是否完全一样。
    if (!Internal.instance.equalsNonHost(this.route.address(), address)) return false;

    // Host域相同,返回可以复用的结果。
    if (address.url().host().equals(this.route().address().url().host())) {
      return true;
    }

    //下面是Http2连接复用相关。
    ....

    return true;
  }
复制代码
总结:这个方法在后续的解析中会涉及到,所以先放在这里讲了。主要是用来判断这个连接可不可以复用的。判断条件如注释。
五、ConnectiongPool:连接池
在3.6的findConnetion过程中,我们看到了很多次连接池的身影,它对连接的复用也起着绝对重要的位置,如果不仔细的理解它的话,查找连接这块的逻辑就会少一大快。照例,从它的出生、成员变量和构造函数来初步认识它。
【5.1】RealConnection 的出生
OkHttpClient.Builder.java
public Builder() {
      ...
      connectionPool = new ConnectionPool();
    }
复制代码
在Builder()里创建默认的连接池。
public final class ConnectionPool {
  final RealConnectionPool delegate;
  public ConnectionPool() {
    this(5, 5, TimeUnit.MINUTES);
  }

  public ConnectionPool(int maxIdleConnections, long keepAliveDuration, TimeUnit timeUnit) {
    this.delegate = new RealConnectionPool(maxIdleConnections, keepAliveDuration, timeUnit);
  }
复制代码
总结:可以看出到,ConectionPool才用代理模式,实际逻辑交给RealConnection()。5个最大空闲连接,每个连接可保活5分钟。
【5.2】成员变量和构造函数
public final class RealConnectionPool{
 //
 private static final Executor executor = new ThreadPoolExecutor(0 /* corePoolSize */,
      Integer.MAX_VALUE /* maximumPoolSize */, 60L /* keepAliveTime */, TimeUnit.SECONDS,
      new SynchronousQueue<>(), Util.threadFactory("OkHttp ConnectionPool", true));

  /** 每个地址可保持的最大空闲连接 */
  private final int maxIdleConnections;
  //连接的保活时间
  private final long keepAliveDurationNs;
  //连接清理任务
  private final Runnable cleanupRunnable = () -> {
    while (true) {
    //详见【5.6】
      long waitNanos = cleanup(System.nanoTime());
      if (waitNanos == -1) return;
      if (waitNanos > 0) {
        long waitMillis = waitNanos / 1000000L;
        waitNanos -= (waitMillis * 1000000L);
        synchronized (RealConnectionPool.this) {
          try {
            //等待唤醒执行清理任务。
            RealConnectionPool.this.wait(waitMillis, (int) waitNanos);
          } catch (InterruptedException ignored) {
          }
        }
      }
    }
  };

  //连接集合,采用双向链标数据结构
  private final Deque<RealConnection> connections = new ArrayDeque<>();

  //路由数据库
  final RouteDatabase routeDatabase = new RouteDatabase();

  //清除任务执行标志
  boolean cleanupRunning;

  /**
  *构造函数
  */
  public RealConnectionPool(int maxIdleConnections, long keepAliveDuration, TimeUnit timeUnit) {
    this.maxIdleConnections = maxIdleConnections;
    this.keepAliveDurationNs = timeUnit.toNanos(keepAliveDuration);
    ...
  }
}
复制代码
总结:可以看出,这个连接池是用来管理同个地址的连接的。它提供根据地址查找可用连接、清除连接等功能。接下来介绍一下它的几个重要方法。
【5.3】transmitterAcquirePooledConnection():获取连接
boolean transmitterAcquirePooledConnection(Address address, Transmitter transmitter,
      @Nullable List<Route> routes, boolean requireMultiplexed) {
    assert (Thread.holdsLock(this));
    for (RealConnection connection : connections) {
      if (requireMultiplexed && !connection.isMultiplexed()) continue;
      【详见4.9】
      if (!connection.isEligible(address, routes)) continue;
      【详见2.2】
      transmitter.acquireConnectionNoEvents(connection);
      return true;
    }
    return false;
  }
复制代码
总结:遍历保存的连接,调用RealConnection.isEligible() 来判断这个连接是否符合条件。将这个请求的Transmitter登记到RealConnection。
【5.4】connectionBecameIdle()
boolean connectionBecameIdle(RealConnection connection) {
    assert (Thread.holdsLock(this));
    if (connection.noNewExchanges || maxIdleConnections == 0) {
      connections.remove(connection);
      return true;
    } else {
      //通知清理任务执行。
      notifyAll();
      connection limit.
      return false;
    }
  }
复制代码
总结:将一个连接变为空闲连接。如果此时这个连接不可用的话,将连接从连接集合中移除,并返回true。如果还可以,通知清理任务执行,并返回false。
【5.5】put()
void put(RealConnection connection) {
    assert (Thread.holdsLock(this));
    if (!cleanupRunning) {
      cleanupRunning = true;
      executor.execute(cleanupRunnable);
    }
    connections.add(connection);
  }
复制代码
总结:该方法是将一个连接放入连接池中,然后执行清理任务,不过它会被堵塞住,直到【5.4】方法触发。
【5.6】cleanup()
long cleanup(long now) {
    int inUseConnectionCount = 0;
    int idleConnectionCount = 0;
    RealConnection longestIdleConnection = null;
    long longestIdleDurationNs = Long.MIN_VALUE;

    synchronized (this) {
    //1. 遍历连接池
      for (Iterator<RealConnection> i = connections.iterator(); i.hasNext(); ) {
        RealConnection connection = i.next();

        //2. 如果连接还在用,继续遍历
        if (pruneAndGetAllocationCount(connection, now) > 0) {
          inUseConnectionCount++;
          continue;
        }

        idleConnectionCount++;

        //3. 找出最长空闲时间和对于的连接
        if (idleDurationNs > longestIdleDurationNs) {
          longestIdleDurationNs = idleDurationNs;
          longestIdleConnection = connection;
        }
      }

        //4. 清除空闲最长的连接,而且需要满足如下条件:
        //a. 空闲时间大于最大保活时间。
        //b. 空闲连接数大于最大空闲连接数
      if (longestIdleDurationNs >= this.keepAliveDurationNs
          || idleConnectionCount > this.maxIdleConnections) {
        connections.remove(longestIdleConnection);
      } else if (idleConnectionCount > 0) {
        // 清理不了,返回下次清理需要的时间
        return keepAliveDurationNs - longestIdleDurationNs;
      } else if (inUseConnectionCount > 0) {
        // 没有空闲连接,返回keepAliveDuration时间,代表keepAliveDuration后再执行。
        return keepAliveDurationNs;
      } else {
        // 没有空闲或者在用的连接,清理结束。
        cleanupRunning = false;
        return -1;
      }
    }

    closeQuietly(longestIdleConnection.socket());

    // 已经清理了一个,会立即再执行清理任务。
    return 0;
  }
复制代码
总结:这是一个清理连接的方法,它做的使其如下:
- 遍历连接,如果连接还在用跳过。
- 找出最长空闲时间和其连接。
- 如果满足条件下,将连接移除连接池。然后触发再执行一次清理任务。
- 如果没有找到,返回下次需要清理的时间或者-1代表结束清理。
小篇结:本篇是介绍OkHttp的网络连接建立。开篇先介绍了Trasnmitter这一重要的类,随后从ConnectIntercepter入手,深入研究了连接Connection的获取逻辑。在获取的过程中,我们将到了连接缓存的处理。当获取不到缓存的时候,便会新建一个全新的网络连接,在这个过程中会进行Http的3次握手等过程。在最后2小节中,分别介绍了在整个过程中的中心类,被查找对象:RealConnection。和管理缓存Connection的ConnectionPool。最后以一张图来总结这一过程
正文到此结束
- 本文标签: core Service 管理 ArrayList 解析 加密 ssl ThreadPoolExecutor cat ACE HTTP协议 注释 Proxy list https src Security IDE 索引 Android 并发 服务器 总结 数据库 http IO 时间 连接池 value ip client queue 数据 session App stream web final find ECS executor 代码 synchronized Select tab build message UI 一致性 CTO retry java 参数 tar 主机 ORM HTTP/2 equals 遍历 协议 Connection 配置 文章 id TCP 缓存 rmi REST
- 版权声明: 本文为互联网转载文章,出处已在文章中说明(部分除外)。如果侵权,请联系本站长删除,谢谢。
- 本文海报: 生成海报一 生成海报二
热门推荐


相关文章

近期评论
-
ws0132613@gmail.comhttps://getmacos.com/gopanel/william smith
-
谢谢
-
https://www.newcmy.com/register?aff=HBVX建议您试试草莓云机场,可以流畅观看youtube和tiktok,上reddit/x也没有问题,还有各种ai优化节点。
-
-
-
想购买您这个站,我的联系方式QQ741756694微信同步 能卖联系
-
-
-
-
Loading...
![[HBLOG]公众号](https://www.liuhaihua.cn/img/qrcode_gzh.jpg)

