Spring AOP源码分析(一)
关于Spring AOP的几个重要概念:
1.连接点(Joinpoint)
众所周知,AOP是作用在方法级别上的,所以说对于连接点,简单点理解,就是应用程序中类的方法(普通方法和构造方法)。目的是用于方法的执行。
2.切点(Pointcut)
对于切点也就是需要拦截的方法,也就是在哪里执行。它是一段表达式,通常包含四种:方法切点函数( execution() 、 @annotation() )、方法入参切点函数( args() 、 @args() )、目标类切点函数( within() 、 target() 、 @within() 、 @target() )、代理类切点函数( this() )。
3.通知(Advice)
通知表示了执行的顺序以及具体的执行逻辑,也就是在什么时候执行以及做什么。通知目前有五种:前置通知、后置通知、环绕通知、后置返回通知、后置异常通知。
4.切面(Advisor)
切面是由切点和通知组成。
5.织入(weaving)
织入就是为切面和目标类生成一个代理类。
对于非或标签,Spring都是由对应的 NameSpaceHandler 进行处理的,AOP也不例外,使用的是 AopNameSpaceHandler 。
public class AopNamespaceHandler extends NamespaceHandlerSupport {
    @Override
    public void init() {
        registerBeanDefinitionParser("config", new ConfigBeanDefinitionParser());
        registerBeanDefinitionParser("aspectj-autoproxy", new AspectJAutoProxyBeanDefinitionParser());
        registerBeanDefinitionDecorator("scoped-proxy", new ScopedProxyBeanDefinitionDecorator());
    }
}
复制代码
具体 AopNameSpaceHandler 是由Spring在解析XML文件的时候调用( org.springframework.beans.factory.xml.BeanDefinitionParserDelegate#parseCustomElement ),来分别解析三个对应的顶层标签。对于这种 Parse 类,主要关注其中的 parse 方法即可,解析标签的入口就是这里。
applicationContext.xml :
<bean id="helloImpl" class="com.ly.aop.HelloImpl"/>
<!--必须配置,因为被代理的对象必须是在容器中-->
<bean id="xmlAop" class="com.ly.aop.XmlAop"/>
<aop:config>
    <aop:pointcut id="txPointcut"  expression="execution(* com.ly.aop.HelloImpl.hello(..))"/>

    <!--该标签通常和Advice的子接口配合使用,例如配合事务<tx:advice/>-->
    <aop:advisor advice-ref="transactionInterceptor" pointcut-ref="txPointcut"/>

    <aop:aspect ref="xmlAop">
        <aop:pointcut id="pointcut" expression="execution(* com.ly.aop.HelloImpl.hello(..))"/>
        <aop:before method="before" pointcut-ref="pointcut"/>
        <aop:after method="after" pointcut-ref="pointcut"/>
        <aop:around method="around" pointcut-ref="pointcut"/>
        <aop:after-returning method="afterReturn" pointcut-ref="pointcut" returning="res"/>
        <aop:after-throwing method="afterThrowing" pointcut-ref="pointcut" throwing="exception"/>
    </aop:aspect>

</aop:config>
<tx:advice id="transactionInterceptor" transaction-manager="transactionManager">
    <tx:attributes>
        <tx:method name="get*" read-only="false" propagation="REQUIRED" isolation="DEFAULT"/>
    </tx:attributes>
</tx:advice>
<bean id="transactionManager" class="org.springframework.jdbc.datasource.DataSourceTransactionManager"/>
复制代码
1. aop:config
@Override
public BeanDefinition parse(Element element, ParserContext parserContext) {
    //1.<aop:config/>配置class为AspectJAwareAdvisorAutoProxyCreator的BeanDefinition
    //然后设置两个属性:proxy-target-class和expose-class
    //proxy-target-class代表是否使用CGLIB代理,默认false,使用JDK
    //expose-class表示是否暴露代理类,可以通过AopContext获取当前代理类
    configureAutoProxyCreator(parserContext, element);

    //2.解析<aop:config/>的子标签
    List<Element> childElts = DomUtils.getChildElements(element);
    for (Element elt: childElts) {
        String localName = parserContext.getDelegate().getLocalName(elt);
        //3.BeanDefinition的class是AspectjExpressionPointcut,保存id和expression,
        // 如果id为空,则自动生成,并且是prototype
        if (POINTCUT.equals(localName)) {
            parsePointcut(elt, parserContext);
        }
        //4.BeanDefinition的class是DefaultBeanFactoryPointcutAdvisor,
        // 如果是pointcut,则是AspectJExpressPointcut,
        // 如果是pointcut-ref,则是RuntimeBeanNameReference
        // 事务管理的时候用过
        else if (ADVISOR.equals(localName)) {
            parseAdvisor(elt, parserContext);
        }
        //5.会被组装为AspectJPointcutAdvisor为class的BeanDefinition,
        // 这个BeanDefinition还存储了创建Method的工厂Bean
        // 和创建Aspect Instance的BeanFactory
        // 以及AspectJExpressionPointcut或RuntimeBeanNameReference
        //而<aop:aspect/>会被转为AspectComponentBeanDefinition
        //<aop:declare-parents/>会被转为DeclareParentsAdvisor
        else if (ASPECT.equals(localName)) {
            parseAspect(elt, parserContext);
        }
    }
}
复制代码
上述源码只贴了关键代码,主要分为2步:1.解析 <aop:config/> 标签;2.解析 <aop:config/> 的三个子标签。
1.解析 <aop:config/> 标签
public static void registerAspectJAutoProxyCreatorIfNecessary(
    ParserContext parserContext, Element sourceElement) {

    //1.注入BeanDefinition,class为AspectJAwareAdvisorAutoProxyCreator
    BeanDefinition beanDefinition = AopConfigUtils.registerAspectJAutoProxyCreatorIfNecessary(
        parserContext.getRegistry(), parserContext.extractSource(sourceElement));
    //2.设置proxy-target-class和expose-class属性
    useClassProxyingIfNecessary(parserContext.getRegistry(), sourceElement);
    registerComponentIfNecessary(beanDefinition, parserContext);
}
复制代码
public static BeanDefinition registerAspectJAutoProxyCreatorIfNecessary(BeanDefinitionRegistry registry, Object source) {
		return registerOrEscalateApcAsRequired(AspectJAwareAdvisorAutoProxyCreator.class, registry, source);
}
复制代码
创建 class 为 AspectJAwareAutoProxyCreator 的 BeanDefinition 相对简单,就是新建了一个 BeanDefinition 对象,然后设置了一些基础属性就完成了。
private static void useClassProxyingIfNecessary(BeanDefinitionRegistry registry, Element sourceElement) {
    if (sourceElement != null) {
        boolean proxyTargetClass = Boolean.parseBoolean(sourceElement.getAttribute(PROXY_TARGET_CLASS_ATTRIBUTE));
        if (proxyTargetClass) {
            AopConfigUtils.forceAutoProxyCreatorToUseClassProxying(registry);
        }
        boolean exposeProxy = Boolean.parseBoolean(sourceElement.getAttribute(EXPOSE_PROXY_ATTRIBUTE));
        if (exposeProxy) {
            AopConfigUtils.forceAutoProxyCreatorToExposeProxy(registry);
        }
    }
}
复制代码
proxy-target-class 和 expose-proxy 这两个属性还是很重要的, proxy-target-class 代表的使用何种方式来代理目标类,如果 proxy-target-class 为true,则使用 CGLIB 动态代理;如果为false,则使用 JDK 动态代理,默认情况为false。 expose-proxy 代表是否需要暴露当前的代理对象,默认不暴露,如果暴露,可以使用 AopContext 获取当前代理对象,可以用来解决在一个类中一个方法调用另一个方法,切面无效的问题。
2.解析 <aop:pointcut/> 标签
private AbstractBeanDefinition parsePointcut(Element pointcutElement, ParserContext parserContext) {
    String id = pointcutElement.getAttribute(ID);
    String expression = pointcutElement.getAttribute(EXPRESSION);

    AbstractBeanDefinition pointcutDefinition = null;

    //1.创建AspectJExpressionPointcut
    pointcutDefinition = createPointcutDefinition(expression);
    pointcutDefinition.setSource(parserContext.extractSource(pointcutElement));

    //2.如果名称未设置,则自动生成
    String pointcutBeanName = id;
    if (StringUtils.hasText(pointcutBeanName)) {
        parserContext.getRegistry().registerBeanDefinition(pointcutBeanName, pointcutDefinition);
    }
    else {
        pointcutBeanName = parserContext.getReaderContext().registerWithGeneratedName(pointcutDefinition);
    }

}
复制代码
上述代码只贴了关键性代码。
protected AbstractBeanDefinition createPointcutDefinition(String expression) {
    RootBeanDefinition beanDefinition = new RootBeanDefinition(AspectJExpressionPointcut.class);
    beanDefinition.setScope(BeanDefinition.SCOPE_PROTOTYPE);
    beanDefinition.setSynthetic(true);
    beanDefinition.getPropertyValues().add(EXPRESSION, expression);
    return beanDefinition;
}
复制代码
由上述代码可以看出来,对于 <aop:pointcut/> 标签是使用 AspectJExpressionPointcut 。
注意:它的Scope是Prototype,这也就意味着如果有其他的类引用了Pointcut,则每次都一个新的对象,至于表达式是作为属性值保存。
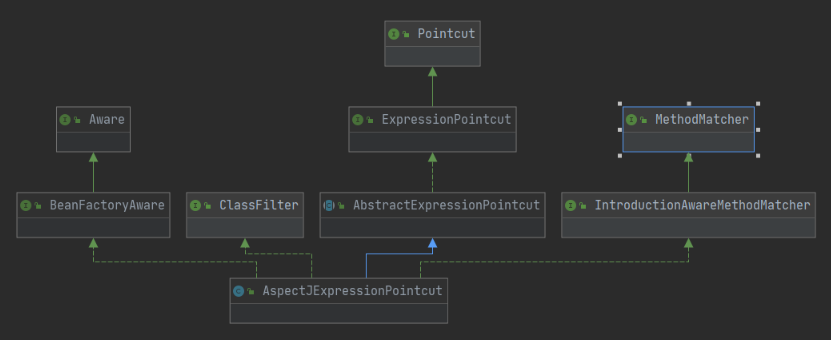
public interface Pointcut {
    /**
	 * 返回一个类型过滤器
	 */
    ClassFilter getClassFilter();

    /**
	 * 返回一个方法匹配器
	 */
    MethodMatcher getMethodMatcher();
}
复制代码
Pointcut 接口提供了两个核心方法,这两个核心方法分别返回两个重要的类: ClassFilter 和 MethodMatcher 。 ClassFilter 用于根据 expression 过滤 Class , MethodMatcher 用于根据 expression 过滤 method 。
3.解析 <aop:advisor/> 标签
private void parseAdvisor(Element advisorElement, ParserContext parserContext) {
    //1.创建BeanDefinition,class是DefaultBeanFactoryPointcutAdvisor
    //如果pointcut-ref存在, 则创建RuntimeBeanNameReference
    AbstractBeanDefinition advisorDef = createAdvisorBeanDefinition(advisorElement, parserContext);
    String id = advisorElement.getAttribute(ID);

    try {
        this.parseState.push(new AdvisorEntry(id));
        //2.设置名称,如果名称不存在,就自动生成
        String advisorBeanName = id;
        if (StringUtils.hasText(advisorBeanName)) {
            parserContext.getRegistry().registerBeanDefinition(advisorBeanName, advisorDef);
        }
        else {
            advisorBeanName = parserContext.getReaderContext().registerWithGeneratedName(advisorDef);
        }

        //3.如果是pointcut,则生成class为AspectJExpressionPointcut
        //如果是pointcut-ref,则为RuntimeBeanReference
        Object pointcut = parsePointcutProperty(advisorElement, parserContext);
        if (pointcut instanceof BeanDefinition) {
            advisorDef.getPropertyValues().add(POINTCUT, pointcut);
            parserContext.registerComponent(
                new AdvisorComponentDefinition(advisorBeanName, advisorDef, (BeanDefinition) pointcut));
        }
        else if (pointcut instanceof String) {
            advisorDef.getPropertyValues().add(POINTCUT, new RuntimeBeanReference((String) pointcut));
            parserContext.registerComponent(
                new AdvisorComponentDefinition(advisorBeanName, advisorDef));
        }
    }
    finally {
        this.parseState.pop();
    }
}
复制代码
private AbstractBeanDefinition createAdvisorBeanDefinition(Element advisorElement, ParserContext parserContext) {
    RootBeanDefinition advisorDefinition = new RootBeanDefinition(DefaultBeanFactoryPointcutAdvisor.class);
    advisorDefinition.setSource(parserContext.extractSource(advisorElement));

    //1.通知
    String adviceRef = advisorElement.getAttribute(ADVICE_REF);
    if (!StringUtils.hasText(adviceRef)) {
        parserContext.getReaderContext().error(
            "'advice-ref' attribute contains empty value.", advisorElement, this.parseState.snapshot());
    }
    else {
        advisorDefinition.getPropertyValues().add(
            ADVICE_BEAN_NAME, new RuntimeBeanNameReference(adviceRef));
    }

    //2.排序
    if (advisorElement.hasAttribute(ORDER_PROPERTY)) {
        advisorDefinition.getPropertyValues().add(
            ORDER_PROPERTY, advisorElement.getAttribute(ORDER_PROPERTY));
    }

    return advisorDefinition;
}
复制代码
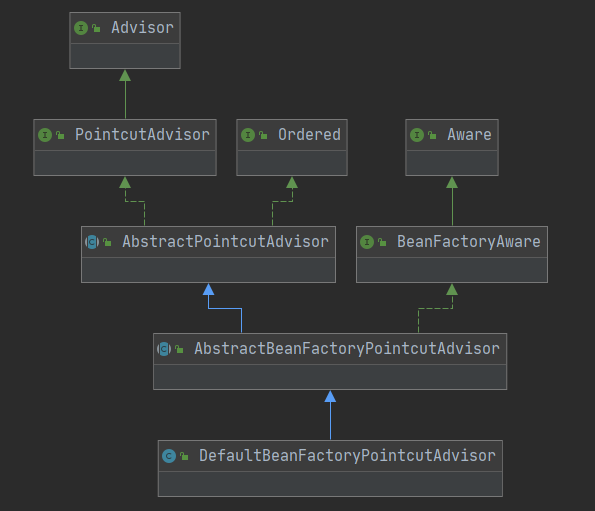
从上述源码可以看到,对于 <aop:advisor/> 标签使用的的 DefaultBeanFactoryPointcutAdvisor ,并且设置了通知和排序。对于名称的设置也是一样的,有就用,没有就自动生成。
private Object parsePointcutProperty(Element element, ParserContext parserContext) {
    //1.针对pointcut属性,使用AspectJExpressionPointcut直接创建,这里的创建方式和之前的一样
   if (element.hasAttribute(POINTCUT)) {
        // Create a pointcut for the anonymous pc and register it.
        String expression = element.getAttribute(POINTCUT);
        AbstractBeanDefinition pointcutDefinition = createPointcutDefinition(expression);
        pointcutDefinition.setSource(parserContext.extractSource(element));
        return pointcutDefinition;
    }
    //2.对于pointcut-ref属性,直接返回表达式,然后使用RuntimeBeanReference进行引用
    else if (element.hasAttribute(POINTCUT_REF)) {
        String pointcutRef = element.getAttribute(POINTCUT_REF);
        if (!StringUtils.hasText(pointcutRef)) {
            parserContext.getReaderContext().error(
                "'pointcut-ref' attribute contains empty value.", element, this.parseState.snapshot());
            return null;
        }
        return pointcutRef;
    }
}
复制代码
上述源码只展示了关键的源码,可以看到,主要是根据 pointcut 的形式来决定生成不同的类,如果是 pointcut 属性,则直接创建 AspectJExpressionPointcut 为class的 BeanDefinition ,如果是使用 pointcut-ref 进行引用,则根据切点表达式创建 RuntimeBeanReference ,最终都是作为 DeafultBeanFactoryPointcutAdvisor 为class的 BeanDefinition 的属性值,以便后续使用。
一般这种方式很少用,在事务管理的是有用过。
4.解析 <aop:aspect/> 标签
private void parseAspect(Element aspectElement, ParserContext parserContext) {
    //1.<aop:declare-parents/>会被转为DeclareParentsAdvisor
    List<Element> declareParents = DomUtils.getChildElementsByTagName(aspectElement, DECLARE_PARENTS);
    for (int i = METHOD_INDEX; i < declareParents.size(); i++) {
        Element declareParentsElement = declareParents.get(i);

        beanDefinitions.add(parseDeclareParents(declareParentsElement, parserContext));
    }

    //2.处理<aop:aspect/>的子标签,before、after、around、after-returning、after-throwing
    NodeList nodeList = aspectElement.getChildNodes();
    boolean adviceFoundAlready = false;
    for (int i = 0; i < nodeList.getLength(); i++) {
        Node node = nodeList.item(i);
        if (isAdviceNode(node, parserContext)) {
            if (!adviceFoundAlready) {
                adviceFoundAlready = true;
                if (!StringUtils.hasText(aspectName)) {
                    parserContext.getReaderContext().error(
                        "<aspect> tag needs aspect bean reference via 'ref' attribute when declaring advices.",
                        aspectElement, this.parseState.snapshot());
                    return;
                }
                beanReferences.add(new RuntimeBeanReference(aspectName));
            }
            AbstractBeanDefinition advisorDefinition = parseAdvice(
                aspectName, i, aspectElement, (Element) node, parserContext, beanDefinitions, beanReferences);
            beanDefinitions.add(advisorDefinition);
        }
    }

    //3.<aop:aspect/>本身转为AspectComponentDefinition
    AspectComponentDefinition aspectComponentDefinition = createAspectComponentDefinition(
        aspectElement, aspectId, beanDefinitions, beanReferences, parserContext);
    parserContext.pushContainingComponent(aspectComponentDefinition);

    //4.继续处理<aop:pointcut/>
    // 如果上面的Advice使用的是pointcut,则上面引用了,这里创建即可。
    // 如果上面的Advice使用的pointcut,则本身已经创建了
    List<Element> pointcuts = DomUtils.getChildElementsByTagName(aspectElement, POINTCUT);
    for (Element pointcutElement : pointcuts) {
        parsePointcut(pointcutElement, parserContext);
    }
}
复制代码
上述源码只展示了关键的部分。这个方法整体流程也很好理解,就是解析 <aop:aspect/> 标签内的子标签。
1. <aop:declare-parents/>
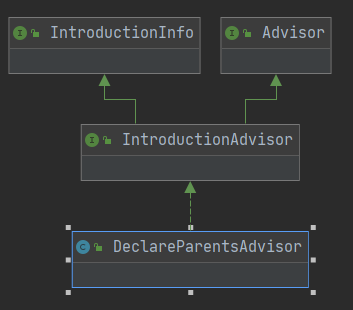
<aop:declare-parents/> 标签表示代理子类应该实现哪些接口,最终会被转为 class 为 DeclareParentsAdivsor 的 BeanDefinition 。基本不怎么使用。
2. Advice
private AbstractBeanDefinition parseAdvice(
String aspectName, int order, Element aspectElement, Element adviceElement, ParserContext parserContext,
List<BeanDefinition> beanDefinitions, List<BeanReference> beanReferences) {
this.parseState.push(new AdviceEntry(parserContext.getDelegate().getLocalName(adviceElement)));
//1.工厂Bean,用于根据aspectName和Advice的method获取Method对象
RootBeanDefinition methodDefinition = new RootBeanDefinition(MethodLocatingFactoryBean.class);
methodDefinition.getPropertyValues().add("targetBeanName", aspectName);
methodDefinition.getPropertyValues().add("methodName", adviceElement.getAttribute("method"));
methodDefinition.setSynthetic(true);
//2.Bean工厂,用于根据aspectName从beanFactory中获取Aspect Bean
RootBeanDefinition aspectFactoryDef =
new RootBeanDefinition(SimpleBeanFactoryAwareAspectInstanceFactory.class);
aspectFactoryDef.getPropertyValues().add("aspectBeanName", aspectName);
aspectFactoryDef.setSynthetic(true);
//3.获取Advice并且注册AspectJExpressionPointcut的BeanDefinition
AbstractBeanDefinition adviceDef = createAdviceDefinition(
adviceElement, parserContext, aspectName, order, methodDefinition, aspectFactoryDef,
beanDefinitions, beanReferences);
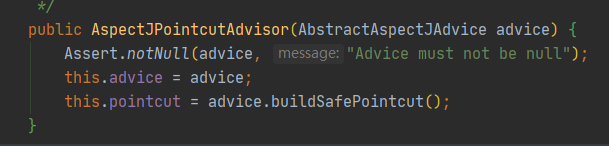
//4.最终生成的还是AspectJPointcutAdvisor
RootBeanDefinition advisorDefinition = new RootBeanDefinition(AspectJPointcutAdvisor.class);
advisorDefinition.setSource(parserContext.extractSource(adviceElement));
advisorDefinition.getConstructorArgumentValues().addGenericArgumentValue(adviceDef);
if (aspectElement.hasAttribute(ORDER_PROPERTY)) {
advisorDefinition.getPropertyValues().add(
ORDER_PROPERTY, aspectElement.getAttribute(ORDER_PROPERTY));
}
parserContext.getReaderContext().registerWithGeneratedName(advisorDefinition);
return advisorDefinition;
}
复制代码
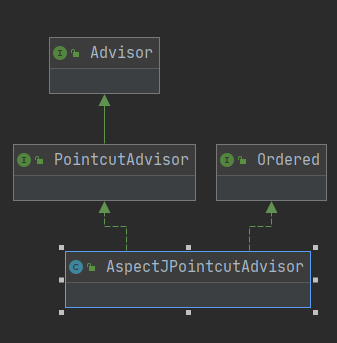
要看这个方法,首先先看下类图:
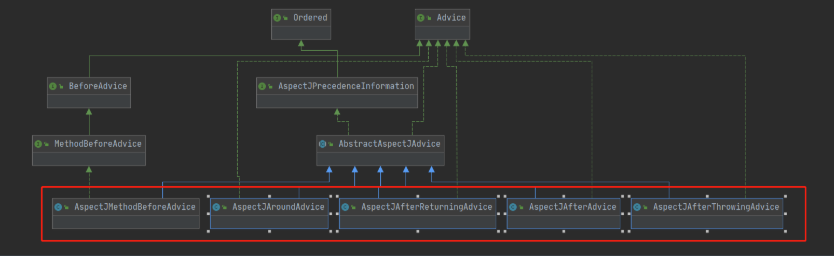
可以看到这五种通知都是 AbstractAspectJAdvice 子类,而且它们的构造方法都调用了父类的构造方法。
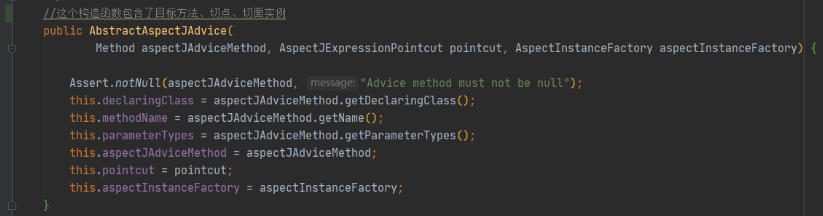
这个构造方法包含了三个重要的参数:通知方法( Method )、切点( AspectJExpressionPointcut )、切面实例工厂( AspectJInstanceFactory ),看到这三个参数就可以很明白的知道后续通知方法的执行、切面实例工厂的获取、切点的类匹配和方法匹配一定都是通过该类实现的。
上述 parseAdvice 方法其实就是这个参数的创建的过程。
1. Advice Method
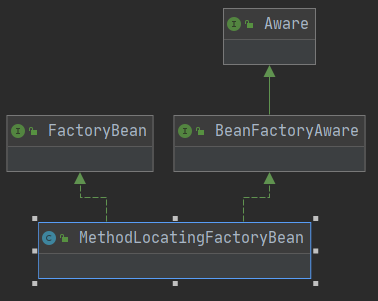
首先创建 class 为 MethodLocationFactoryBean 的 BeanDefinition ,这是一个工厂 Bean ,就是用来生产通知 Method 实例的。
public class MethodLocatingFactoryBean implements FactoryBean<Method>, BeanFactoryAware {

	private String targetBeanName;

	private String methodName;

	private Method method;

	@Override
	public void setBeanFactory(BeanFactory beanFactory) {
		Class<?> beanClass = beanFactory.getType(this.targetBeanName);
		this.method = BeanUtils.resolveSignature(this.methodName, beanClass);
	}

	@Override
	public Method getObject() throws Exception {
		return this.method;
	}
}
复制代码
上述源码只展示了关键部分,可以看到是通过IOC容器根据 targetBeanName 获取目标 Bean 的 Class ,然后根据 methodName 通过 Class 获取 Method 实例。
注意:这里的targetBeanName其实就是<aop:aspect ref="aspectName"/>中的ref的值,而methodName就是<aop:before method="before"/>中的method的值。
2. Aspect Instance
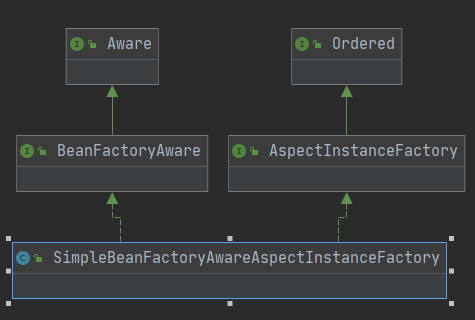
其次创建 class 为 SimpleBeanFactoryAwareAspectJInstanceFactory ,这是一个实例工厂,就是用来生产 Aspect 实例的。
public interface AspectInstanceFactory extends Ordered {
	Object getAspectInstance();
	ClassLoader getAspectClassLoader();
}
复制代码
这个接口是专门用来获取 AspectInstance 的工厂。
public class SimpleBeanFactoryAwareAspectInstanceFactory implements AspectInstanceFactory, BeanFactoryAware {
    private String aspectBeanName;
    private BeanFactory beanFactory;

    @Override
    public void setBeanFactory(BeanFactory beanFactory) {
        this.beanFactory = beanFactory;
        Assert.notNull(this.aspectBeanName, "'aspectBeanName' is required");
    }

    @Override
    public Object getAspectInstance() {
        return this.beanFactory.getBean(this.aspectBeanName);
    }

    @Override
	public ClassLoader getAspectClassLoader() {
		if (this.beanFactory instanceof ConfigurableBeanFactory) {
			return ((ConfigurableBeanFactory) this.beanFactory).getBeanClassLoader();
		}
		else {
			return ClassUtils.getDefaultClassLoader();
		}
	}
}
复制代码
上述源码只展示了关键部分。可以看到是根据 aspectBeanName 从IOC容器中获取 Bean 实例的。
注意:asepctBeanName其实就是<aop:aspect id="aspectBeanName"/>中的id的值。
3. AspectJPointcutAdvisor
然后就是根据通知类型获取通知类以及切点的设置。
private AbstractBeanDefinition createAdviceDefinition(
    Element adviceElement, ParserContext parserContext, String aspectName, int order,
    RootBeanDefinition methodDef, RootBeanDefinition aspectFactoryDef,
    List<BeanDefinition> beanDefinitions, List<BeanReference> beanReferences) {

    //1.class为AspectJXXX的BeanDefinition
    RootBeanDefinition adviceDefinition = new RootBeanDefinition(getAdviceClass(adviceElement, parserContext));
    adviceDefinition.setSource(parserContext.extractSource(adviceElement));

    //2.相关属性设置
    adviceDefinition.getPropertyValues().add(ASPECT_NAME_PROPERTY, aspectName);
    adviceDefinition.getPropertyValues().add(DECLARATION_ORDER_PROPERTY, order);

    if (adviceElement.hasAttribute(RETURNING)) {
        adviceDefinition.getPropertyValues().add(
            RETURNING_PROPERTY, adviceElement.getAttribute(RETURNING));
    }
    if (adviceElement.hasAttribute(THROWING)) {
        adviceDefinition.getPropertyValues().add(
            THROWING_PROPERTY, adviceElement.getAttribute(THROWING));
    }
    if (adviceElement.hasAttribute(ARG_NAMES)) {
        adviceDefinition.getPropertyValues().add(
            ARG_NAMES_PROPERTY, adviceElement.getAttribute(ARG_NAMES));
    }

    //3.构造参数值设置
    ConstructorArgumentValues cav = adviceDefinition.getConstructorArgumentValues();
    //4.生成Method对象的Bean工厂
    cav.addIndexedArgumentValue(METHOD_INDEX, methodDef);

    //5.注册AspectJExpressionPointcut或RuntimeBeanReference为class的BeanDefinition
    Object pointcut = parsePointcutProperty(adviceElement, parserContext);
    if (pointcut instanceof BeanDefinition) {
        cav.addIndexedArgumentValue(POINTCUT_INDEX, pointcut);
        beanDefinitions.add((BeanDefinition) pointcut);
    }
    else if (pointcut instanceof String) {
        RuntimeBeanReference pointcutRef = new RuntimeBeanReference((String) pointcut);
        cav.addIndexedArgumentValue(POINTCUT_INDEX, pointcutRef);
        beanReferences.add(pointcutRef);
    }

    //6.生成Aspect Instance的BeanFactory
    cav.addIndexedArgumentValue(ASPECT_INSTANCE_FACTORY_INDEX, aspectFactoryDef);

    return adviceDefinition;
}
复制代码
这个方法代码看着多,其实就是三步核心:1.获取 Advice ;2.设置 Advice 的属性;3.设置之前的三个构造参数。
- 获取
Advice
private Class<?> getAdviceClass(Element adviceElement, ParserContext parserContext) {
    String elementName = parserContext.getDelegate().getLocalName(adviceElement);
    if (BEFORE.equals(elementName)) {
        return AspectJMethodBeforeAdvice.class;
    }
    else if (AFTER.equals(elementName)) {
        return AspectJAfterAdvice.class;
    }
    else if (AFTER_RETURNING_ELEMENT.equals(elementName)) {
        return AspectJAfterReturningAdvice.class;
    }
    else if (AFTER_THROWING_ELEMENT.equals(elementName)) {
        return AspectJAfterThrowingAdvice.class;
    }
    else if (AROUND.equals(elementName)) {
        return AspectJAroundAdvice.class;
    }
    else {
        throw new IllegalArgumentException("Unknown advice kind [" + elementName + "].");
    }
}
复制代码
获取Advice 很简单,就是根据标签判断是哪种通知,返回相应通知的 Class 。
- 设置
Advice属性
设置Advice 的属性就更加简单了,主要是 AspecJAfterReturningAdivce 和 AspectJAfterThrowingAdvice 以及通知方法参数。
- 设置构造参数
设置之前的三个构造参数 , Method 和 Aspect Instance 已经拿到了,现在主要的是创建 Pointcut 。对于 Pointcut 会有两种情况:1.pointcut;2.pointcut-ref。
从上面的代码中可以看到,如果 <aop:before pointcut="xxx"/> ,则会直接生成 Class 为 AspectJExpressionPointcut 的 BeanDefinition ;而对于 <aop:before ref="xxx"/> ,则会生成 RuntimeBeanReference 对 Pointcut 进行引用,在运行的时候,会自动拿到。这一点和之前的 <aop:advisor/> 是一样的。
三个参数齐全,就可以直接设置构造参数了,最后返回对应 AspectJXXXAdvice 为 Class 的 BeanDefinition 。
最后回到 parseAdvice 方法,将拿到的 BeanDefinition 作为 Class 为 AspectJPointcutAdvisor 的 BeanDefintion 的构造参数值。
那么至此 Advisor 也就拿到了。
3. <aop:aspect/>
private AspectComponentDefinition createAspectComponentDefinition(
    Element aspectElement, String aspectId, List<BeanDefinition> beanDefs,
    List<BeanReference> beanRefs, ParserContext parserContext) {

    //1.所有的AspectJPointcutAdvisor,每个Advice都会生成一个
    BeanDefinition[] beanDefArray = beanDefs.toArray(new BeanDefinition[beanDefs.size()]);
    //2.所有的ref
    BeanReference[] beanRefArray = beanRefs.toArray(new BeanReference[beanRefs.size()]);
    Object source = parserContext.extractSource(aspectElement);
    return new AspectComponentDefinition(aspectId, beanDefArray, beanRefArray, source);
}
复制代码
被转为 Class 为 AspectConpenentDefintion ,保存了所有的 AspectJPointcutAdvisor 和 ref 。
4. <aop:pointcut/>
<aop:aspect/> 中的 <aop:pointcut/> 和 <aop:config/> 中的 <aop:pointcut/> 解析方式是一样的,生成 Class 为 AspectJExpressionPointcut 的 BeanDefintion 。
注意:
AspectJExpressionPointcut 是 Prototype ,如果有 Advice 引用这个 Pointcut ,那么有几个 Advice ,就会产生几个 Pointcut ,也就会有几个 AspectJPointcutAdvisor 存储 Advice 和 Pointcut 。
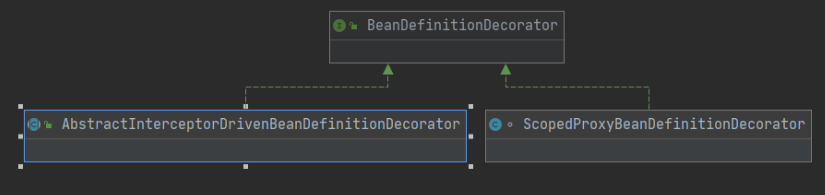
2. aop:scoped-proxy
class ScopedProxyBeanDefinitionDecorator implements BeanDefinitionDecorator {

    private static final String PROXY_TARGET_CLASS = "proxy-target-class";

    //装饰者
    @Override
    public BeanDefinitionHolder decorate(Node node, BeanDefinitionHolder definition, ParserContext parserContext) {
        //1.代理方式
        boolean proxyTargetClass = true;
        if (node instanceof Element) {
            Element ele = (Element) node;
            if (ele.hasAttribute(PROXY_TARGET_CLASS)) {
                proxyTargetClass = Boolean.valueOf(ele.getAttribute(PROXY_TARGET_CLASS));
            }
        }

        //2.创建代理对象,代理对象的名称和原对象一致,原对象的名称发生改变
        // Register the original bean definition as it will be referenced by the scoped proxy
        // and is relevant for tooling (validation, navigation).
        BeanDefinitionHolder holder =
            ScopedProxyUtils.createScopedProxy(definition, parserContext.getRegistry(), proxyTargetClass);
        String targetBeanName = ScopedProxyUtils.getTargetBeanName(definition.getBeanName());
        parserContext.getReaderContext().fireComponentRegistered(
            new BeanComponentDefinition(definition.getBeanDefinition(), targetBeanName));
        return holder;
    }

}
复制代码
这是一个装饰者模式,目的是根据不同的代理方式为原有的 BeanDefinition 生成代理的 BeanDefinition 。那么当使用 beanName 获取获取 bean 的时候,本质上拿到的是代理 bean 。
public static BeanDefinitionHolder createScopedProxy(BeanDefinitionHolder definition,
                                                     BeanDefinitionRegistry registry, boolean proxyTargetClass) {

    //1.原始BeanDefinition信息
    String originalBeanName = definition.getBeanName();
    BeanDefinition targetDefinition = definition.getBeanDefinition();
    //2.重写beanName,变为scopedTarget.元名称
    String targetBeanName = getTargetBeanName(originalBeanName);

    //3.创建代理BeanDefinition,本质上是一个class为工厂Bean,可以生成代理对象,并设置相关属性
    RootBeanDefinition proxyDefinition = new RootBeanDefinition(ScopedProxyFactoryBean.class);
    proxyDefinition.setDecoratedDefinition(new BeanDefinitionHolder(targetDefinition, targetBeanName));
    proxyDefinition.setOriginatingBeanDefinition(targetDefinition);
    proxyDefinition.setSource(definition.getSource());
    proxyDefinition.setRole(targetDefinition.getRole());

    proxyDefinition.getPropertyValues().add("targetBeanName", targetBeanName);
    if (proxyTargetClass) {
        targetDefinition.setAttribute(AutoProxyUtils.PRESERVE_TARGET_CLASS_ATTRIBUTE, Boolean.TRUE);
        // ScopedProxyFactoryBean's "proxyTargetClass" default is TRUE, so we don't need to set it explicitly here.
    }
    else {
        proxyDefinition.getPropertyValues().add("proxyTargetClass", Boolean.FALSE);
    }

    proxyDefinition.setAutowireCandidate(targetDefinition.isAutowireCandidate());
    proxyDefinition.setPrimary(targetDefinition.isPrimary());
    if (targetDefinition instanceof AbstractBeanDefinition) {
        proxyDefinition.copyQualifiersFrom((AbstractBeanDefinition) targetDefinition);
    }

    targetDefinition.setAutowireCandidate(false);
    targetDefinition.setPrimary(false);

    //4.注入原始BeanDefinition,但是名称是重写之后的beanName,而代理BeanDefinition使用原始的beanName
    // 这样我们拿到的Bean虽然名称是我们注入的那个,但是本质上已经成为了代理Bean
    registry.registerBeanDefinition(targetBeanName, targetDefinition);

    //5.返回代理BeanDefinition并注入IOC容器
    return new BeanDefinitionHolder(proxyDefinition, originalBeanName, definition.getAliases());
}
复制代码
这个方法很好理解,就是为原有的 BeanDefinition 生成了一个代理的 BeanDefinition ,原有的 BeanDefintion 和代理 BeanDefinition 都会注入IOC容器,当从容器中获取相应的 Bean 时候,获取到的是代理的 Bean 。当然代理的方式根据 proxy-target-class 属性进行设置的,默认为false,是``JDK 代理,为true,是 cglib`代理。
这个标签的使用场景,比如一个 Scope 作用的 Bean A 引用一个 Prototype 作用的 Bean B ,那么会导致 A 引用的 B 永远是同一个对象,而不是每次请求都是新的 B 实例。
<bean class="com.ly.scope.A">
    <property name="b" ref="b"/>
</bean>
<bean id="b" class="com.ly.scope.B" scope="prototype">
    <aop:scoped-proxy/>
</bean>
复制代码
3. aop:aspect-autoproxy
@Override
public BeanDefinition parse(Element element, ParserContext parserContext) {
    //1.生成class为AnnotationAwareAspectJAutoProxyCreator的BeanDefinition
    AopNamespaceUtils.registerAspectJAnnotationAutoProxyCreatorIfNecessary(parserContext, element);
    //2.<aop:include name="expression"/>是用来处理指示被@Aspect注解的Bean,也就是切面,并作为BeanDefinition的属性
    extendBeanDefinition(element, parserContext);
    return null;
}
复制代码
<aop:aspect-autoproxy/> 标签的作用是扫描被 @Aspect 注解的 Bean 。
public static void registerAspectJAnnotationAutoProxyCreatorIfNecessary(
    ParserContext parserContext, Element sourceElement) {

    //1.注入BeanDefinition,class为AnnotationAwareAspectJAutoProxyCreator
    BeanDefinition beanDefinition = AopConfigUtils.registerAspectJAnnotationAutoProxyCreatorIfNecessary(
        parserContext.getRegistry(), parserContext.extractSource(sourceElement));
    //2.proxy-target-class、expose-proxy
    useClassProxyingIfNecessary(parserContext.getRegistry(), sourceElement);
    registerComponentIfNecessary(beanDefinition, parserContext);
}

public static BeanDefinition registerAspectJAnnotationAutoProxyCreatorIfNecessary(BeanDefinitionRegistry registry, Object source) {
    return registerOrEscalateApcAsRequired(AnnotationAwareAspectJAutoProxyCreator.class, registry, source);
}

private static BeanDefinition registerOrEscalateApcAsRequired(Class<?> cls, BeanDefinitionRegistry registry, Object source) {
    Assert.notNull(registry, "BeanDefinitionRegistry must not be null");

    //1.beanDefinition已经存在,则根据权重设置beanClassName
    if (registry.containsBeanDefinition(AUTO_PROXY_CREATOR_BEAN_NAME)) {
        BeanDefinition apcDefinition = registry.getBeanDefinition(AUTO_PROXY_CREATOR_BEAN_NAME);
        if (!cls.getName().equals(apcDefinition.getBeanClassName())) {
            int currentPriority = findPriorityForClass(apcDefinition.getBeanClassName());
            int requiredPriority = findPriorityForClass(cls);
            if (currentPriority < requiredPriority) {
                apcDefinition.setBeanClassName(cls.getName());
            }
        }
        return null;
    }

    //2.新建,并设置相关属性
    RootBeanDefinition beanDefinition = new RootBeanDefinition(cls);
    beanDefinition.setSource(source);
    beanDefinition.getPropertyValues().add("order", Ordered.HIGHEST_PRECEDENCE);
    beanDefinition.setRole(BeanDefinition.ROLE_INFRASTRUCTURE);
    registry.registerBeanDefinition(AUTO_PROXY_CREATOR_BEAN_NAME, beanDefinition);
    return beanDefinition;
}
复制代码
可以看到是注册了一个 class 为 AnnotationAwareAspectJAutoProxyCreator 的 BeanDefnition ,这个 BeanDefintion 在调用AOP,获取所有候选AOP的时候会用到,用于扫描所有 @AspectJ 注解的 Bean 。
<aop:aspectj-autoproxy/> 也支持两个属性: proxy-target-class 和 expose-proxy 。 proxy-target-class 表示代理方式, expose-proxy 表示暴露代理对象,可以使用 AopContext#currentProxy 获取代理对象。
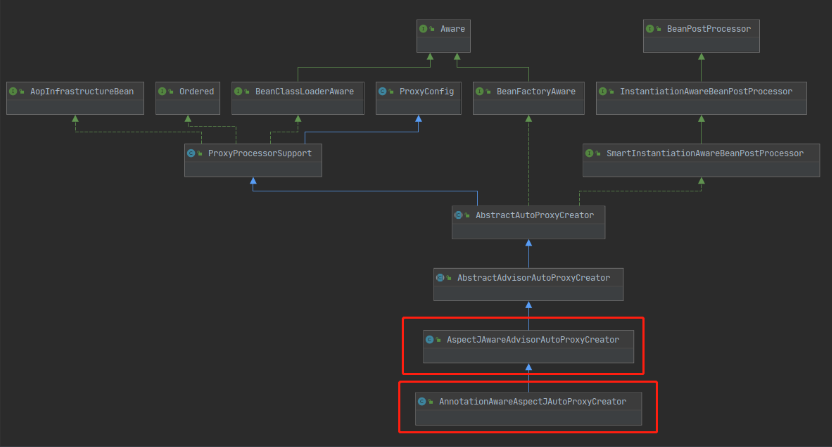
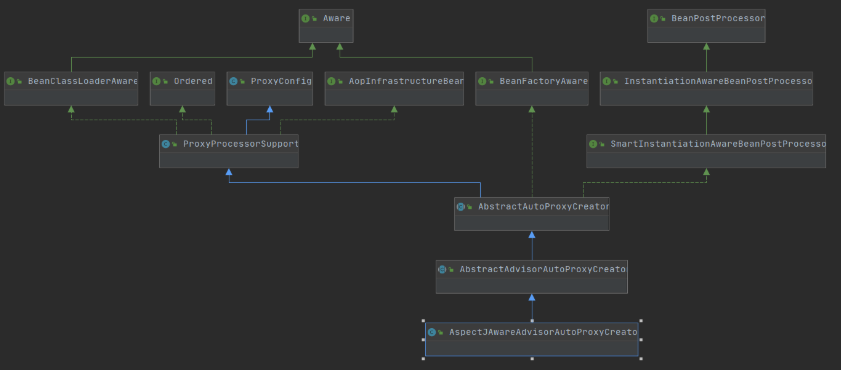
可以看到 AnnotationAwareAspectJAutoProxyCreator 是 AspectJAwareAdvisorAutoProxyCreator 的子类, AspectJAwareAdvisorAutoProxyCreator 是解析 <aop:config/> 的时候使用的。
正文到此结束
- 本文标签: src root 自动生成 find CTO cglib BeanUtils BeanDefinition db IDE 本质 DOM lib spring ioc tar CEO Proxy list scala node id UI parse tag dataSource bean 代码 JDBC value ACE 源码 AOP 配置 解析 类图 final Action https 管理 构造方法 XML http ssl IO cat App Qualifier 参数 Property struct NSA equals 实例
- 版权声明: 本文为互联网转载文章,出处已在文章中说明(部分除外)。如果侵权,请联系本站长删除,谢谢。
- 本文海报: 生成海报一 生成海报二
热门推荐


相关文章

近期评论
-
ws0132613@gmail.comhttps://getmacos.com/gopanel/william smith
-
谢谢
-
https://www.newcmy.com/register?aff=HBVX建议您试试草莓云机场,可以流畅观看youtube和tiktok,上reddit/x也没有问题,还有各种ai优化节点。
-
-
-
想购买您这个站,我的联系方式QQ741756694微信同步 能卖联系
-
-
-
-
Loading...
![[HBLOG]公众号](https://www.liuhaihua.cn/img/qrcode_gzh.jpg)

