一致性哈希的分析与实现
哈希函数,想必大家都不陌生。通过哈希函数我们可以将数据映射成一个数字(哈希值),然后可用于将数据打乱。例如,在HashMap中则是通过哈希函数使得每个桶中的数据尽量均匀。那一致性哈希又是什么?它是用于解决什么问题?本文将从普通的哈希函数说起,看看普通哈希函数存在的问题,然后再看一致性哈希是如何解决,一步步进行分析,并结合代码实现来讲解。
首先,设定这样一个场景,我们每天有1千万条业务数据,还有100个节点可用于存放数据。那我们希望能将数据尽量均匀地存放在这100个节点上,这时候哈希函数就能派上用场了,下面我们按一天的数据量来说明。
首先,准备下需要存放的数据,以及节点的地址。为了简单,这里的数据为随机整型数字,节点的地址为从“192.168.1.0”开始递增。
private static int dataNum = 10000000;
private static int nodeNum = 100;

private static List<Integer> datas = initData(dataNum);

private static List<String> nodes = initNode(nodeNum);

private static List<Integer> initData(int n) {
    List<Integer> datas = new ArrayList<>();
    Random random = new Random();
    for (int i = 0; i < n; i++) {
        datas.add(random.nextInt());
    }
    return datas;
}

private static List<String> initNode(int n) {
    List<String> nodes = new ArrayList<>();
    for (int i = 0; i < n; i++) {
        nodes.add(String.format("192.168.1.%d", i));
    }
    return nodes;
}
复制代码
接下来,我们看下通过“哈希+取模”得到数据相应的节点地址。这里的hash方法使用Guava提供的哈希方法来实现,后文也将继续使用该hash方法。
public static String normalHash(Integer data, List<String> nodes) {
    int hash = hash(data);
    int nodeIndex = hash % nodes.size();
    return nodes.get(nodeIndex);
}

private static int hash(Object object) {
    HashFunction hashFunction = Hashing.murmur3_32();
    if (object instanceof Integer) {
        return Math.abs(hashFunction.hashInt((Integer) object).asInt());
    } else if (object instanceof String) {
        return Math.abs(hashFunction.hashUnencodedChars((String) object).asInt());
    }
    return -1;
}
复制代码
最后,我们对数据的分布情况进行统计,观察分布是否均匀,这里通过标准差来观察。
public static void normalHashMain() {
    Map<String, Integer> nodeCount = new HashMap<>();
    for (Integer data : datas) {
        String node = normalHash(data, nodes);

        if (nodeCount.containsKey(node)) {
            nodeCount.put(node, nodeCount.get(node) + 1);
        } else {
            nodeCount.put(node, 1);
        }
    }

    analyze(nodeCount, dataNum, nodeNum);
}

public static void analyze(Map<String, Integer> nodeCount, int dataNum, int nodeNum) {
    double average = (double) dataNum / nodeNum;

    IntSummaryStatistics s1
        = nodeCount.values().stream().mapToInt(Integer::intValue).summaryStatistics();
    int max = s1.getMax();
    int min = s1.getMin();
    int range = max - min;
    double standardDeviation
        = nodeCount.values().stream().mapToDouble(n -> Math.abs(n - average)).summaryStatistics().getAverage();

    System.out.println(String.format("平均值:%.2f", average));
    System.out.println(String.format("最大值:%d,(%.2f%%)", max, 100.0 * max / average));
    System.out.println(String.format("最小值:%d,(%.2f%%)", min, 100.0 * min / average));
    System.out.println(String.format("极差:%d,(%.2f%%)", range, 100.0 * range / average));
    System.out.println(String.format("标准差:%.2f,(%.2f%%)", standardDeviation, 100.0 * standardDeviation / average));
}

/**
平均值:100000.00
最大值:100818,(100.82%)
最小值:99252,(99.25%)
极差:1566,(1.57%)
标准差:240.08,(0.24%)
**/
复制代码
其中标准差较小,说明分布较为均匀,那我们的需求达到了。
接着,随着业务的发展,你发现100个节点不够用了,我们希望再增加10个节点,来提高系统性能。而我们还将继续采用之前的方法来分布数据。这时候就出现了一个新的问题,我们是通过“哈希+取模”来决定数据的相应节点,原来数据的哈希值是不会改变的,可是取模的时候节点的数量发生了变化,这将导致的结果就是原来的数据存在A节点,现在可能需要迁移到B节点,也就是数据迁移问题。下面我们来看下有多少数据将发生迁移。
private static int newNodeNum = 11;

private static List<String> newNodes = initNode(newNodeNum);

public static void normalHashMigrateMain() {
    int migrateCount = 0;
    for (Integer data : datas) {
        String node = normalHash(data, nodes);
        String newNode = normalHash(data, newNodes);
        if (!node.equals(newNode)) {
            migrateCount++;
        }
    }
    System.out.println(String.format("数据迁移量:%d(%.2f%%)", migrateCount, migrateCount * 100.0 / datas.size()));
}

/**
数据迁移量:9091127(90.91%)
**/
复制代码
有90%多的数据都需要进行迁移,这是几乎全部的量了。普通哈希的问题暴露出来了,当将节点由100扩展为110时,会存在大量的迁移工作。在1997年MIT提出了一致性哈希算法,用于解决普通哈希的这一问题。
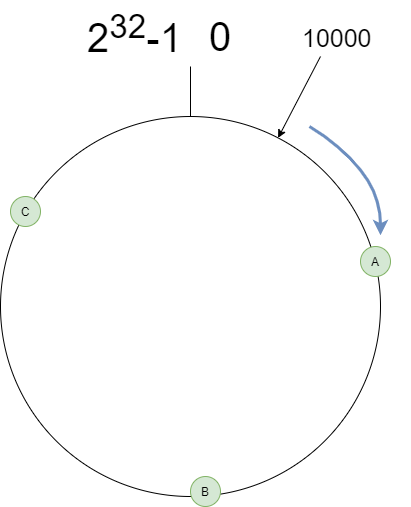
我们再分析下,假设hash值为10000,nodeNum为100,那按照 index = hash % nodeNum 得到的结果是0,而将100变为110时,取模的结果将改变为100。如果我们将取模的除数增大至大于hash值,那hash值取模的结果将仍是其本身。也就是说,只要除数保证大于hash值,那取模的结果将不会改变。这里的hash值是int,4个字节,那我们把除数固定为2^32-1, index = hash % (2^32-1) 。取模的结果也将固定在0到2^32-1中,可将其构成一个环,如下所示。

现在的除数是2^32-1,hash值为10000,取模的结果为10000,而我们有100个节点,该映射到哪个节点上呢?我们可以先将节点通过哈希映射到环上。为了绘图方便,我们以3个节点为例,如下图所示:

10000落到环上后,如果没有对应的节点,则按顺时针方向找到下一个节点,便为hash值对应的节点。下面我们用Java的 TreeMap 来存节点的hash值,利用TreeMap的 tailMap 寻找节点。
我们使用和之前同样的方法,测试下当节点由100变为110时,数据需要迁移的情况,如下所示:
public static void consistHashMigrateMain() {
    int migrateCount = 0;
    SortedMap<Integer, String> circle = new TreeMap<>();
    for (String node : nodes) {
        circle.put(hash(node), node);
    }
    SortedMap<Integer, String> newCircle = new TreeMap<>();
    for (String node : newNodes) {
        newCircle.put(hash(node), node);
    }

    for (Integer data : datas) {
        String node = consistHash(data, circle);
        String newNode = consistHash(data, newCircle);
        if (!node.equals(newNode)) {
            migrateCount++;
        }
    }
    System.out.println(String.format("数据迁移量:%d(%.2f%%)", migrateCount, migrateCount * 100.0 / datas.size()));
}

public static String consistHash(Integer data, SortedMap<Integer, String> circle) {
    int hash = hash(data);
    // 从环中取大于等于hash值的部分
    SortedMap<Integer, String> subCircle = circle.tailMap(hash);
    int index;
    // 如果在大于等于hash值的部分没有节点,则取环开始的第一个节点
    if (subCircle.isEmpty()) {
        index = circle.firstKey();
    } else {
        index = subCircle.firstKey();
    }
    return circle.get(index);
}

/**
数据迁移量:817678(8.18%)
**/
复制代码
可见需要迁移的数据由90%降到了8%,效果十分可观。那我们再看下数据的分布情况,是否仍然均匀:
/**
平均值:100000.00
最大值:589675,(589.68%)
最小值:227,(0.23%)
极差:589448,(589.45%)
标准差:77421.44,(77.42%)
**/
复制代码
77%的标准差,一个字,崩!这是为啥?我们原本设想的是节点映射到环上时,能将环均匀划分,所以当数据映射到环上时,也将被均匀分布到节点上。而实际情况,由于节点地址相似,映射到环上的位置也将相近,所以造成分布的不均匀,如下图所示:

由于A、B、C的地址相似,例如:
A: 192.168.1.0
B: 192.168.1.1
C: 192.168.1.2
复制代码
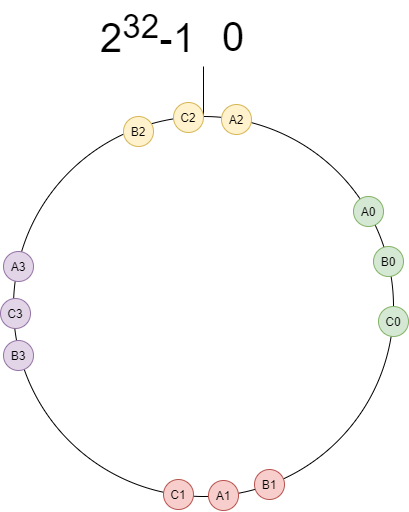
所以映射的位置相近,那我们可以复制几份A、B、C,并且通过改变key,让节点能更均匀的划分环。比如我们在地址后面追加 “-index” 的序号,例如:
A0: 192.168.1.0-0
B0: 192.168.1.1-0
C0: 192.168.1.2-0

A1: 192.168.1.0-1
B1: 192.168.1.1-1
C1: 192.168.1.2-1
复制代码
虽然A0、B0、C0会相距较近,但是和A1、B1、C1的key具有差别,将能够成功分开,这也正是虚拟节点的作用。达到的效果如下:

下面我们通过代码验证下实际效果:
private static int vNodeNum = 100;

public static void consistHashVirtualNodeMain() {
    Map<String, Integer> nodeCount = new HashMap<>();
    SortedMap<Integer, String> circle = new TreeMap<>();
    for (String node : nodes) {
        for (int i = 0; i < vNodeNum; i++) {
            circle.put(hash(node + "-" + i), node);
        }
    }

    for (Integer data : datas) {
        String node = consistHashVirtualNode(data, circle);
        if (nodeCount.containsKey(node)) {
            nodeCount.put(node, nodeCount.get(node) + 1);
        } else {
            nodeCount.put(node, 1);
        }
    }

    analyze(nodeCount, dataNum, nodeNum);
}

/**
平均值:100000.00
最大值:122931,(122.93%)
最小值:74434,(74.43%)
极差:48497,(48.50%)
标准差:7475.08,(7.48%)
**/
复制代码
可看到标准差已经由77%降到7%,效果显著。再多做几组实验,标准差随着虚拟节点数的变化如下:
| 虚拟节点数 | 标准差 |
|---|---|
| 10 | 21661.04,(21.66%) |
| 100 | 7475.08,(7.48%) |
| 1000 | 2498.36,(2.50%) |
| 10000 | 858.96,(0.86%) |
| 100000 | 363.98,(0.36%) |
结果中,随着虚拟节点数的增加,标准差逐步下降。可见虚拟节点能达到均匀分布数据的效果。
一句话总结下:
一致性哈希可用于解决哈希函数在扩容时的数据迁移的问题,而一致性哈希的实现中需要借助虚拟节点来均匀分布数据。
最后,大家可以再思考两个问题:
- 虚拟节点越多越好吗?会不会有什么负面影响?
- Java中的HashMap在扩容时如何优化数据迁移问题?
文中的代码已上传至github,感兴趣的同学可以自己试下: github.com/chaycao/Lea…


![[HBLOG]公众号](https://www.liuhaihua.cn/img/qrcode_gzh.jpg)

