自定义SpringBoot starter
我们这里以mybatis-spring-boot-starter来分析
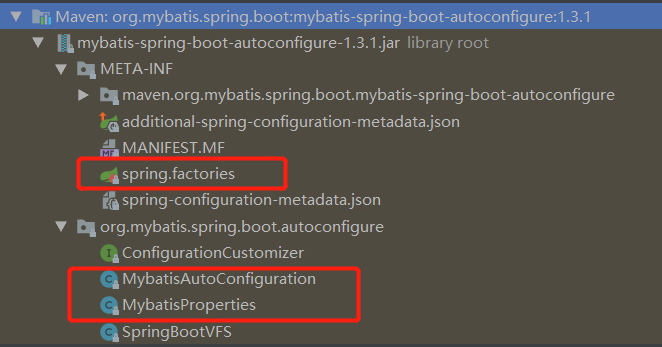
首先在IDEA里Ctrl+Shift+N 快捷键搜索mybatis-spring-boot-autoconfigure包下的 spring.factories 文件

这里主要看下面圈的三个文件:

核心就是这三个文件:
1、spring.factories

可以看到参数就是上面圈圈的这个 MybatisAutoConfiguration 这个类。
这个 spring.factories 文件会用来记录项目包外需要注册的bean类名,引导springboot 哪个是自动配置类。
不理解怎么加载的话可以看下这篇文章]( juejin.im/post/5e3ad9… )
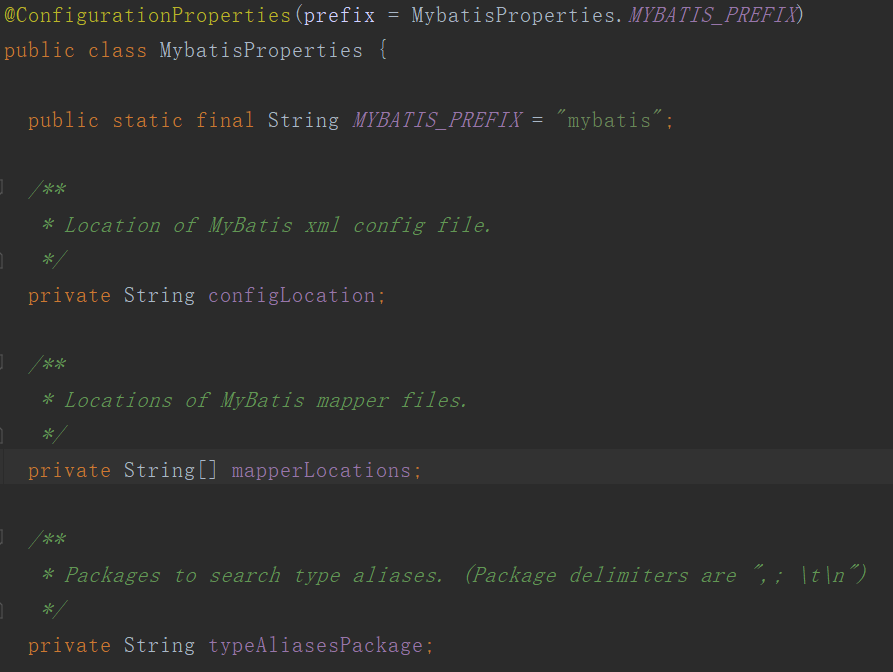
2、MybatisProperties属性文件加载类,通过@EnableConfigurationProperties({MybatisProperties.class})注入到spring容器中,使得在MybatisAutoConfiguration中可以直接注入使用配置属性

在MybatisProperties 类里 @ConfigurationProperties(prefix = MybatisProperties.MYBATIS_PREFIX) 定义了前缀。
像这里的前缀为mybatis,如果要配置mybatis的mapperLocations属性我们通常会在application.properties加上
mybatis.mapperLocations=classpath:mybatis/*.xml
复制代码
这样就可以指定mybatis 的xml文件的位置了,mybatis 正是这个 MybatisProperties 配置的前缀 而 mapperLocations 就是 我们这个 MybatisProperties.class 的其中一个成员变量 。
3、MybatisAutoConfiguration自动配置类

@EnableConfigurationProperties(MybatisProperties.class) 引入了MybatisProperties 配置文件
之后就可以利用这个配置文件里的参数实例化 一个对象完成整个mybatis 的创建。
整个starter 加载的流程
1、去META-INF 目录下找到这个spring.factories文件 2、通过文件内指定的类路径,找到配置类 3、配置类加载进属性类 4、配置类通过属性类的参数构建一个新的bean
手写一个自己的starter
1.新建一个properties类
@ConfigurationProperties(prefix=HelloProperties.HELLO_FORMAT_PREFIX)
public class HelloProperties {

    public static final String HELLO_FORMAT_PREFIX="xiaoxin.hello";
    private Map<String,Object> info;

    public Map<String, Object> getInfo() {
        return info;
    }

    public void setInfo(Map<String, Object> info) {
        this.info = info;
    }
}
复制代码
2.创建一个服务类HelloFormatTemplate
public class HelloFormatTemplate {

    private HelloProperties helloProperties;

    public HelloFormatTemplate(HelloProperties helloProperties) {
        this.helloProperties = helloProperties;
    }

    public <T> String doFormat() {
        return JSON.toJSONString(helloProperties.getInfo());
    }
}
复制代码
3.创建配置类HelloAutoConfiguration
@EnableConfigurationProperties(HelloProperties.class)
@Configuration
public class HelloAutoConfiguration {

    @Bean
    public HelloFormatTemplate helloFormatTemplate(HelloProperties helloProperties) {
        return new HelloFormatTemplate(helloProperties);
    }
}
复制代码
4.编写spring.factories 文件
在resources 目录下创建META-INF/spring.factories入口文件,内容为
org.springframework.boot.autoconfigure.EnableAutoConfiguration=/
  com.xiaoxin.starter.autoconfiguration.HelloAutoConfiguration
复制代码

5.部署到本地仓库
通过命令mvn install 部署到本地即可
测试工程
我们新建一个springboot的web项目,在pom中加入依赖
<dependency>
    <groupId>com.xiaoxin.starter</groupId>
    <artifactId>format-spring-boot-starter</artifactId>
    <version>1.0.0-SNAPSHOT</version>
</dependency>
复制代码
然后在application.properties文件写入一些配置信息
xiaoxin.hello.info.name=xiaoxin
xiaoxin.hello.info.learn=SpringBoot Starter
复制代码
这里的xiaoxin.hello是我们starter配置类里的前缀,info是里面的属性,name和learn这些可以自己随便定义
最后我们写一个简单的controller测试一下
@RestController
public class HelloController {

    @Autowired
    HelloFormatTemplate helloFormatTemplate;

    @GetMapping("/hello")
    public String format() {
        return helloFormatTemplate.doFormat();
    }
}
复制代码
说明:这里的HelloFormatTemplate就是我们自定义starter里的HelloFormatTemplate
测试结果:

这样我们一个自定义的Spring Boot starter就成功了
源码地址: github.com/LuDarwin/xi…


![[HBLOG]公众号](https://www.liuhaihua.cn/img/qrcode_gzh.jpg)

