Spring Cloud OAuth2(基于JWT)的微服务认证授权实战
在上一章中已经介绍了Spring Security Oauth2的基本理论知识及其使用场景,本章节中注解介绍在Spring Cloud 中如何通过Oauth2来实现微服统一认证授权。
1.1解决方案
本文中主要用到以下解决方案:
- 基于无状态令牌(jwt)的认证方案,服务端无需保存用户登陆状态;
- 基于spring security框架 + oauth2协议 搭建;
为什么使用jwt方式? 避免每次请求都需要远程调用认证授权服务,认证授权服务只验证一次,返回JWT。返回的 JWT 包含了用户的所有信息,包括权限信息。
1.2案例工程架构
三个工程:
- eureka-server:注册服务中心,端口8888。(在此前文章中已经搭建过,本文中不演示搭建过程)
- auth-server:负责授权,授权需要用户提供客户端的 clientId 和 password,以及授权用户的username和password。这些信息准备无误之后,auth-service 返回JWT,该 JWT 包含了用户的基本信息和权限点信息,并通过 RSA 加密。
- auth-client:鉴权客户端,公共依赖。其他所有资源服务引入
- user-server:作为资源服务,它的资源以及被保护起来了,需要相应的权限才能访问。user-server 服务得到用户请求的 JWT 后,先通过公钥解密JWT,得到该JWT对应的用户的信息和用户的权限信息,再判断该用户是否有权限访问该资源
- order-server:同上
工程架构图:
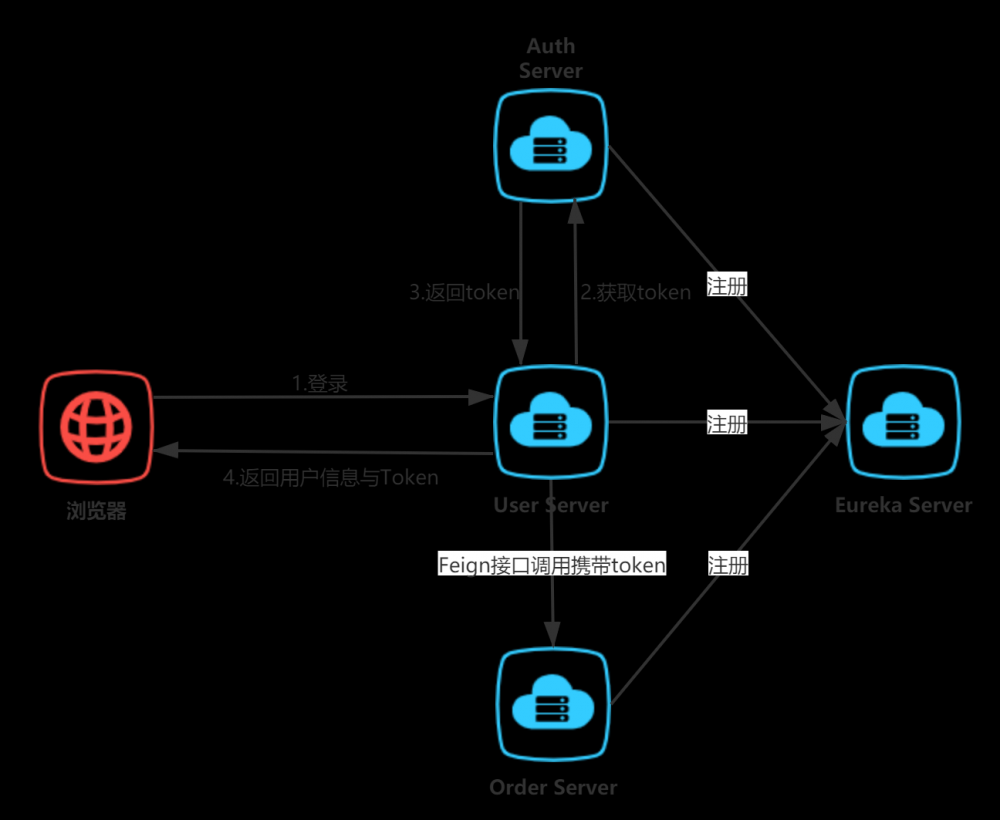
工程依赖关系:
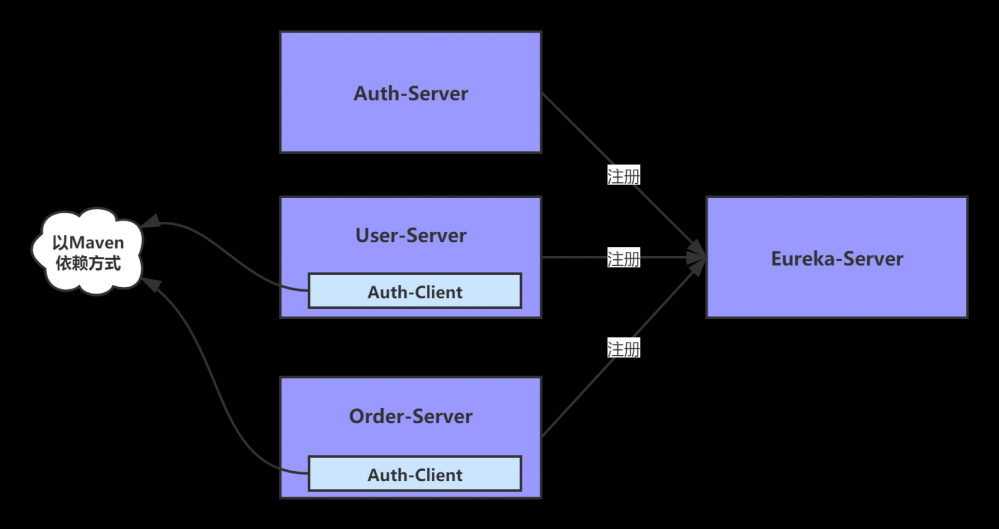
2.构建auth-server工程
2.1添加maven依赖
新建一个auth-server模块,并添加以下依赖:
<?xml version="1.0" encoding="UTF-8"?>
<project xmlns="http://maven.apache.org/POM/4.0.0"
         xmlns:xsi="http://www.w3.org/2001/XMLSchema-instance"
         xsi:schemaLocation="http://maven.apache.org/POM/4.0.0 http://maven.apache.org/xsd/maven-4.0.0.xsd">
    <parent>
        <artifactId>spring-cloud-oauth2</artifactId>
        <groupId>com.hxmec</groupId>
        <version>0.0.1-SNAPSHOT</version>
    </parent>
    <modelVersion>4.0.0</modelVersion>

    <artifactId>auth-server</artifactId>

    <dependencies>
        <dependency>
            <groupId>org.springframework.cloud</groupId>
            <artifactId>spring-cloud-starter-oauth2</artifactId>
        </dependency>
        <dependency>
            <groupId>org.springframework.boot</groupId>
            <artifactId>spring-boot-starter-web</artifactId>
        </dependency>
        <dependency>
            <groupId>org.springframework.boot</groupId>
            <artifactId>spring-boot-starter-jdbc</artifactId>
        </dependency>
        <dependency>
            <groupId>mysql</groupId>
            <artifactId>mysql-connector-java</artifactId>
        </dependency>
        <dependency>
            <groupId>org.springframework.cloud</groupId>
            <artifactId>spring-cloud-starter-netflix-eureka-client</artifactId>
        </dependency>
        <dependency>
            <groupId>com.alibaba</groupId>
            <artifactId>druid-spring-boot-starter</artifactId>
        </dependency>

        <dependency>
            <groupId>com.baomidou</groupId>
            <artifactId>mybatis-plus-boot-starter</artifactId>
        </dependency>

        <dependency>
            <groupId>p6spy</groupId>
            <artifactId>p6spy</artifactId>
            <version>3.8.5</version>
        </dependency>
    </dependencies>

    <build>
        <plugins>
            <plugin>
                <groupId>org.springframework.boot</groupId>
                <artifactId>spring-boot-maven-plugin</artifactId>
            </plugin>
        </plugins>
    </build>


</project>
复制代码
2.2创建数据表
工程所需要的的表主要有以下几个:
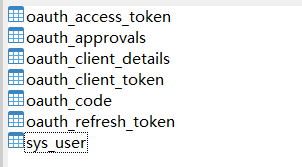
主要用于存放 oauth2 协议中的client信息,颁发的 access token,refresh token 等信息。 oauth2 相关的表说明参考http://andaily.com/spring-oauth-server/db_table_description.html 。演示工程中Access Token以jwt形式存储,所以实际只用到oauth_client_details表,以及sys_user用户信息表。如果改用用jdbc方式存储,则需要用到其他表。
建表语句如下:
-- 客户端应用注册详情
create table oauth_client_details (
  client_id VARCHAR(256) PRIMARY KEY, -- 客户端应用的账号
  resource_ids VARCHAR(256),		-- 客户端应用可访问的资源服务器列表,(空代表所有资源服务器都可以访问)
  client_secret VARCHAR(256),	-- 客户端应用的密码
  scope VARCHAR(256),	-- 资源服务器拥有的所有权限列表 (get add delete update)
  authorized_grant_types VARCHAR(256), -- 客户端支持的授权码模式列表
  web_server_redirect_uri VARCHAR(256), -- 授权码模式,申请授权码后重定向的uri.
  authorities VARCHAR(256),
  access_token_validity INTEGER,   -- 设置颁发token的有效期
  refresh_token_validity INTEGER,  -- 颁发refresh_token的有效期(不设置不会同时颁发refresh_token)
  additional_information VARCHAR(4096),
  autoapprove VARCHAR(256)     -- 设置为true,授权码模式下自动授权
);

create table oauth_client_token (
  token_id VARCHAR(256),
  token BLOB,
  authentication_id VARCHAR(256) PRIMARY KEY,
  user_name VARCHAR(256),
  client_id VARCHAR(256)
);

-- 存放颁发的token
create table oauth_access_token (
  token_id VARCHAR(256),
  token BLOB,
  authentication_id VARCHAR(256) PRIMARY KEY,
  user_name VARCHAR(256),
  client_id VARCHAR(256),
  authentication BLOB,
  refresh_token VARCHAR(256)
);

create table oauth_refresh_token (
  token_id VARCHAR(256),
  token BLOB,
  authentication BLOB
);

-- 授权码模式下,存放颁发的授权码
create table oauth_code (
  code VARCHAR(256), authentication BLOB
);

create table oauth_approvals (
	userId VARCHAR(256),
	clientId VARCHAR(256),
	scope VARCHAR(256),
	status VARCHAR(10),
	expiresAt DATETIME,
	lastModifiedAt DATETIME
);

CREATE TABLE `sys_user` (
  `id` bigint(32) NOT NULL,
  `username` varchar(100) DEFAULT NULL,
  `password` varchar(200) DEFAULT NULL,
  `enable_` tinyint(1) DEFAULT NULL,
  `email` varchar(50) DEFAULT NULL,
  `mobile` varchar(20) DEFAULT NULL,
  `del_flag` tinyint(1) DEFAULT NULL,
  `create_time` datetime DEFAULT NULL,
  `create_user` bigint(32) DEFAULT NULL,
  `modified_time` datetime DEFAULT NULL,
  `modified_user` bigint(32) DEFAULT NULL,
  PRIMARY KEY (`id`)
);

INSERT INTO `oauth_client_details`(`client_id`, `resource_ids`, `client_secret`, `scope`, `authorized_grant_types`, `web_server_redirect_uri`, `authorities`, `access_token_validity`, `refresh_token_validity`, `additional_information`, `autoapprove`) VALUES ('app', NULL, '$2a$10$JWSnLszKQANW7OF3p2b8IuIQXTVD8OUN//Q4l/sZGmzyaLEWnC5/u', 'server', 'password,authorization_code,refresh_token,client_credentials', NULL, NULL, 60000, 300, NULL, NULL);
INSERT INTO `oauth_client_details`(`client_id`, `resource_ids`, `client_secret`, `scope`, `authorized_grant_types`, `web_server_redirect_uri`, `authorities`, `access_token_validity`, `refresh_token_validity`, `additional_information`, `autoapprove`) VALUES ('order', NULL, '$2a$10$JWSnLszKQANW7OF3p2b8IuIQXTVD8OUN//Q4l/sZGmzyaLEWnC5/u', 'server', 'password,authorization_code,refresh_token,client_credentials', NULL, NULL, 60000, 300, NULL, NULL);
INSERT INTO `oauth_client_details`(`client_id`, `resource_ids`, `client_secret`, `scope`, `authorized_grant_types`, `web_server_redirect_uri`, `authorities`, `access_token_validity`, `refresh_token_validity`, `additional_information`, `autoapprove`) VALUES ('user', NULL, '$2a$10$JWSnLszKQANW7OF3p2b8IuIQXTVD8OUN//Q4l/sZGmzyaLEWnC5/u', 'server', 'password,authorization_code,refresh_token,client_credentials', NULL, NULL, 60000, 300, NULL, NULL);

INSERT INTO `sys_user` VALUES (1282941563927805954, 'trazen', '$2a$10$JWSnLszKQANW7OF3p2b8IuIQXTVD8OUN//Q4l/sZGmzyaLEWnC5/u', NULL, 'trazen@126.com', '18559756159', 0, '2020-07-14 15:34:39', NULL, '2020-07-14 15:40:45', NULL);
复制代码
2.3 添加配置
bootstrap.yml配置如下
server:
  port: 8889
spring:
  application:
    name: auth-server
logging:
  pattern:
    console: '%d{yyyy-MM-dd HH:mm:ss.SSS} %-5level [%thread] %logger{15} - %msg%n'
  config: classpath:logback-spring.xml
eureka:
  client:
    service-url:
      defaultZone: http://localhost:8888/eureka/
复制代码
application.yml配置如下:
# mybatis- plus配置
mybatis-plus:
  # xml扫描,多个目录用逗号或者分号隔开隔开
  mapper-locations: classpath:mapper/*.xml
  # 以下配置均有默认值,可以不设置
  global-config:
    db-config:
      #主键类型 AUTO:"数据库ID自增" INPUT:"用户输入ID",ID_WORKER:"全局唯一ID (数字类型唯一ID)", UUID:"全局唯一ID UUID";
      id-type: ASSIGN_ID
  configuration:
    # 是否开启自动驼峰命名规则映射:从数据库列名到Java属性驼峰命名的类似映射
    map-underscore-to-camel-case: true
    # 返回map时true:当查询数据为空时字段返回为null,false:不加这个查询数据为空时,字段将被隐藏
    call-setters-on-nulls: true

spring:
  datasource:
    #driver-class-name: com.mysql.cj.jdbc.Driver
    driver-class-name: com.p6spy.engine.spy.P6SpyDriver
    type: com.alibaba.druid.pool.DruidDataSource
    druid:
      url: jdbc:p6spy:mysql://192.168.29.188:3306/sc_oauth2?useUnicode=true&characterEncoding=utf-8
      username: root
      password: root
      # 初始连接数
      initial-size: 10
      # 最大连接池数量
      max-active: 100
      # 最小连接池数量
      min-idle: 10
      # 配置获取连接等待超时的时间
      max-wait: 60000
      # 打开PSCache,并且指定每个连接上PSCache的大小
      pool-prepared-statements: true
      max-pool-prepared-statement-per-connection-size: 20
      # 配置间隔多久才进行一次检测,检测需要关闭的空闲连接,单位是毫秒
      timeBetweenEvictionRunsMillis: 60000
      # 配置一个连接在池中最小生存的时间,单位是毫秒
      min-evictable-idle-time-millis: 300000
      validation-query: SELECT 1 FROM DUAL
      test-while-idle: true
      test-on-borrow: false
      test-on-return: false
      stat-view-servlet:
        enabled: false
复制代码
2.4 自定义UserDetailsService
- 客户端来请求颁发token实际上就是访问一个 spring security oauth2已经封装好的令牌端点(TokenEndPoint),该接口最终会调用UserDetailsService方法去根据请求的账号信息去获取用户信息,注意仅仅是获取用户信息,账号信息校验是交给spring security去做的,所以这里重写该接口从Mysql表中获取用户信息。
- UserDetailsService类就是用户来请求获取token时,根据该用户的username加载用户信息返回即可,而校验用户账号密码的操作之后会被AuthenticationManager调用一个认证器去校验用户账号密码完成。
接口MyUserDetailsService.java
/**
 * 功能描述: 继承UserDetailsService接口
 * @author  Trazen
 * @date  2020/7/14 15:43
 */
public interface MyUserDetailsService extends UserDetailsService {
}

复制代码
实现类MyUserDetailsServiceImpl
/**
 * 功能描述: 自定义UserDetailsService
 * @author  Trazen
 * @date  2020/7/14 15:43
 */
@Primary
@Service
@AllArgsConstructor
public class MyUserDetailsServiceImpl implements MyUserDetailsService {

    private final SysUserMapper sysUserMapper;

    @Override
    public AuthUserDetail loadUserByUsername(String username) throws UsernameNotFoundException {
        QueryWrapper<SysUser> wrapper = new QueryWrapper<>();
        wrapper.lambda().eq(SysUser::getUsername,username);
        SysUser sysUser = sysUserMapper.selectOne(wrapper);
        if(sysUser == null){
            throw new UsernameNotFoundException("用户不存在");
        }else {
            return UserDetailConverter.convert(sysUser);
        }
    }

    public static class UserDetailConverter{
        static AuthUserDetail convert(SysUser user){
            return new AuthUserDetail(user);
        }
    }
}

复制代码
2.5 认证授权配置
认证中心的spring security配置如下: Oauth2WebSecurityConfig.java
/**
 * 功能描述:  spring security 配置
 * @author  Trazen
 * @date  2020/7/14 16:00
 */
@Configuration
@EnableWebSecurity
@AllArgsConstructor
public class Oauth2WebSecurityConfig extends WebSecurityConfigurerAdapter {

    private final MyUserDetailsService myUserDetailsService;

    /**
     * 重新注入认证管理器
     * @return
     * @throws Exception
     */
    @Override
    @Bean
    public AuthenticationManager authenticationManagerBean() throws Exception {
        return super.authenticationManagerBean();
    }


    /**
     * 注入密码加密BCryptPasswordEncoder
     * @return
     */
    @Bean
    public PasswordEncoder passwordEncoder() {
        return new BCryptPasswordEncoder();
    }

    @Override
    protected void configure(AuthenticationManagerBuilder auth) throws Exception {
        // 使用自定义方式加载用户信息
        auth.userDetailsService(myUserDetailsService)
                .passwordEncoder(passwordEncoder());
    }

    @Override
    protected void configure(HttpSecurity http) throws Exception {
        http
                .authorizeRequests()
                .anyRequest().authenticated()
                .and()
                .formLogin().and()
                .csrf().disable()
                .httpBasic();
    }
}

复制代码
2.6 扩展token增强器TokenEnhancer
在之前Spring Security Oauth2的文中可以知道默认获取token的接口只会获取到accessToken,refreshToken等信息。在实际应用场景中,我们可能还需要增加一些和用户相关的信息(比如用户id,用户名,用户组织机构id等),这时候默认返回的信息就无法满足我们的需求,就可以通过实现TokenEnhancer 接并重写它的 enhance 方法实现。
MyTokenEnhancer.java
/**
 * 功能描述: 增强颁发的token的携带信息
 * @author  Trazen
 * @date  2020/7/14 16:07
 */
public class MyTokenEnhancer implements TokenEnhancer {


    /**
     * 客户端模式
     */
    private final static String CLIENT_CREDENTIALS = "client_credentials";

    @Override
    public OAuth2AccessToken enhance(OAuth2AccessToken accessToken, OAuth2Authentication authentication) {

        //客户端模式不进行增强
        if (CLIENT_CREDENTIALS.equals(authentication.getOAuth2Request().getGrantType())) {
            return accessToken;
        }
        //获取要增强携带的字段
        AuthUserDetail authUserDetail = (AuthUserDetail) authentication.getPrincipal();


        final Map<String, Object> additionalInfo = new HashMap<>(3);

        //添加token携带的字段
        additionalInfo.put("id", authUserDetail.getSysUser().getId());
        additionalInfo.put("username", authUserDetail.getSysUser().getUsername());
        additionalInfo.put("email", authUserDetail.getSysUser().getEmail());
        additionalInfo.put("mobile", authUserDetail.getSysUser().getMobile());

        DefaultOAuth2AccessToken token = (DefaultOAuth2AccessToken) accessToken;
        token.setAdditionalInformation(additionalInfo);
        ((DefaultOAuth2AccessToken) accessToken).setAdditionalInformation(additionalInfo);
        return accessToken;

    }
}
复制代码
2.7 认证授权服务器配置
配置认证中心的oauth2组件,比如自定义的TokenEnhancer,自定义的UserDetailService,重新配置的AuthenticationManager,以及之前创建数据库表的数据源。
认证授权服务器代码如下 Oauth2AuthServerConfig.java
/**
 * 功能描述: oauth2 认证服务器配置
 * @author  Trazen
 * @date  2020/7/14 16:11
 */
@Configuration
@EnableAuthorizationServer
@AllArgsConstructor
public class Oauth2AuthServerConfig extends AuthorizationServerConfigurerAdapter {

    private final AuthenticationManager authenticationManager;

    private final DataSource dataSource;

    private final MyUserDetailsService myUserDetailsService;

    @Override
    public void configure(ClientDetailsServiceConfigurer clients) throws Exception {
        MyClientDetailsService clientDetailsService = new MyClientDetailsService(dataSource);
        clients.withClientDetails(clientDetailsService);
    }

    @Override
    public void configure(AuthorizationServerSecurityConfigurer security) throws Exception {
    }

    @Override
    public void configure(AuthorizationServerEndpointsConfigurer endpoints) throws Exception {
        // 将增强的token设置到增强链中
        TokenEnhancerChain enhancerChain = new TokenEnhancerChain();
        enhancerChain.setTokenEnhancers(Arrays.asList(customTokenEnhancer(), jwtAccessTokenConverter()));

        endpoints.tokenStore(tokenStore())
                .authenticationManager(authenticationManager)
                // //刷新token的请求会用用到
                .userDetailsService(myUserDetailsService)
                .tokenEnhancer(enhancerChain);
    }


    /**
     * 更改存储token的策略,默认是内存策略,修改为jwt
     * @return
     */
    @Bean
    public TokenStore tokenStore() {
        //基于token认证
        return new JwtTokenStore(jwtAccessTokenConverter());
    }

    @Bean
    public JwtAccessTokenConverter jwtAccessTokenConverter(){
        JwtAccessTokenConverter jat = new JwtAccessTokenConverter();
        // jwt使用这个key来签名,验证token的服务也使用这个key来验签
        jat.setSigningKey("hxmec");
        return jat;
    }


    /**
     * 添加自定义token增强器实现颁发额外信息的token,因为默认颁发token的字段只有username和ROLE
     * @return
     */
    @Bean
    public TokenEnhancer customTokenEnhancer() {
        //自定义实现
        return new MyTokenEnhancer();
    }
}

复制代码
2.8 认证授权服务器测试
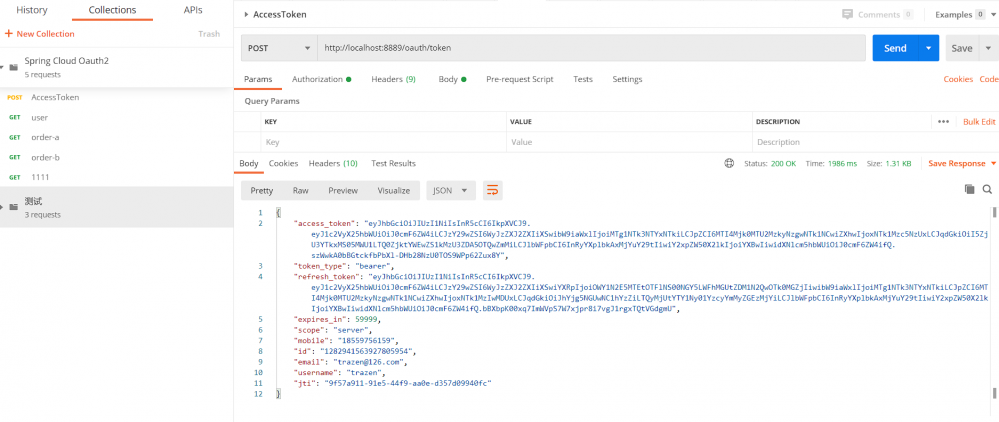
启动eureka-server,auth-server工程,进行获取access Token测试。 测试数据使用之前脚本中创建的数据(密码加密使用BCryptPasswordEncoder方式)。 oauth_client_details测试数据如下: client_id:app client_secret:123456
sys_user测试数据如下: username:trazen password:123456
具体测试步骤如下: 获取令牌端点地址为:http://{ip}:{port}/oauth/token

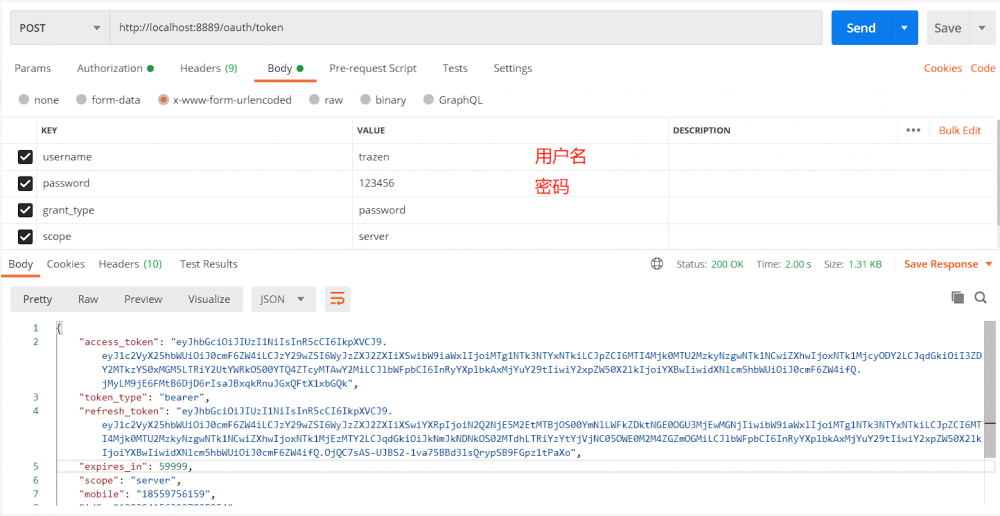
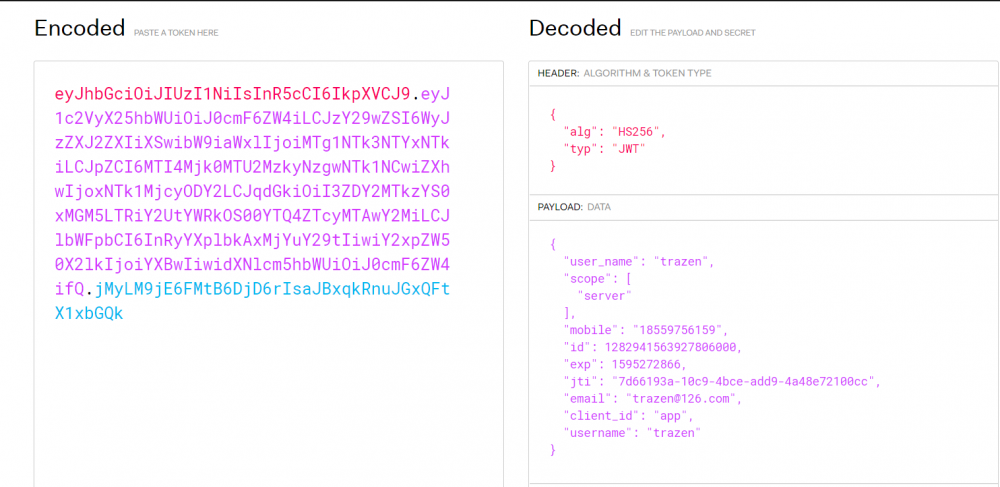
返回的access_tokenken可以在jwt官网【 jwt.io/#decoded-jw… 】进行解析地址。
3.构建auth-client工程
该工程主要封装资源服务器相关配置作为通用依赖。
3.1 添加maven依赖
<?xml version="1.0" encoding="UTF-8"?>
<project xmlns="http://maven.apache.org/POM/4.0.0"
         xmlns:xsi="http://www.w3.org/2001/XMLSchema-instance"
         xsi:schemaLocation="http://maven.apache.org/POM/4.0.0 http://maven.apache.org/xsd/maven-4.0.0.xsd">
    <parent>
        <artifactId>spring-cloud-oauth2</artifactId>
        <groupId>com.hxmec</groupId>
        <version>0.0.1-SNAPSHOT</version>
    </parent>
    <modelVersion>4.0.0</modelVersion>

    <artifactId>auth-client</artifactId>

    <dependencies>
        <!-- security ouath2 -->
        <dependency>
            <groupId>org.springframework.cloud</groupId>
            <artifactId>spring-cloud-starter-oauth2</artifactId>
        </dependency>
        <!--导入配置文件处理器,配置文件进行绑定就会有提示-->
        <dependency>
            <groupId>org.springframework.boot</groupId>
            <artifactId>spring-boot-configuration-processor</artifactId>
            <optional>true</optional>
        </dependency>
        <dependency>
            <groupId>javax.servlet</groupId>
            <artifactId>javax.servlet-api</artifactId>
        </dependency>
        <dependency>
            <groupId>org.springframework.cloud</groupId>
            <artifactId>spring-cloud-starter-openfeign</artifactId>
        </dependency>
        <dependency>
            <groupId>org.springframework.security</groupId>
            <artifactId>spring-security-web</artifactId>
            <version>5.3.3.RELEASE</version>
        </dependency>
    </dependencies>

    <build>
        <plugins>
            <plugin>
                <groupId>org.springframework.boot</groupId>
                <artifactId>spring-boot-maven-plugin</artifactId>
            </plugin>
        </plugins>
    </build>
</project>
复制代码
3.2 重写token解析器
代码如下: MyUserAuthenticationConverter.java
/**
 * 功能描述:  重写token解析器,根据checkToken的结果转化用户信息
 * @author  Trazen
 * @date  2020/7/14 17:16
 */
public class MyUserAuthenticationConverter implements UserAuthenticationConverter {

    private static final String N_A = "N/A";


    @Override
    public Map<String, ?> convertUserAuthentication(Authentication userAuthentication) {
        return null;
    }

    @Override
    public Authentication extractAuthentication(Map<String, ?> map) {
        if (!map.containsKey(USERNAME)){
            return null;
        }else{
            CurrentUser user = CurrentUser.builder()
                    .id((Long) map.get("id"))
                    .username((String) map.get(USERNAME))
                    .email((String) map.get("email"))
                    .mobile((String) map.get("mobile"))
                    .build();
            // 有权限信息就格式化权限信息
            if (map.containsKey("authorities") && map.get("authorities") != null){
                Collection<? extends GrantedAuthority> authorities = getAuthorities(map);
                user.setAuthorities(authorities);
                return new UsernamePasswordAuthenticationToken(user, N_A,authorities);
            }else {

                return new UsernamePasswordAuthenticationToken(user, N_A,null);
            }
        }

    }

    private Collection<? extends GrantedAuthority> getAuthorities(Map<String, ?> map) {
        Object authorities = map.get(AUTHORITIES);
        if (authorities instanceof String) {
            return AuthorityUtils.commaSeparatedStringToAuthorityList((String) authorities);
        }
        if (authorities instanceof Collection) {
            return AuthorityUtils.commaSeparatedStringToAuthorityList(StringUtils
                    .collectionToCommaDelimitedString((Collection<?>) authorities));
        }else if (authorities == null){

        }
        throw new IllegalArgumentException("Authorities must be either a String or a Collection");
    }

}
复制代码
3.3 解决Feign接口调用Token传递问题
主要代码如下(其他代码参考工程源码): MyFeignClientInterceptor.java
/**
 *  功能描述: 扩展OAuth2FeignRequestInterceptor
 *  如果特殊场景比如调度任务调用Feign接口等
 *  可以通过过滤指定header头的方式,防止accessTokenContextRelay.copyToken()报错
 * @author  Trazen
 * @date  2020/7/17 21:17
 */
public class MyFeignClientInterceptor extends OAuth2FeignRequestInterceptor {

    private final OAuth2ClientContext oAuth2ClientContext;
    private final AccessTokenContextRelay accessTokenContextRelay;

    /**
     * Default constructor which uses the provided OAuth2ClientContext and Bearer tokens
     * within Authorization header
     *
     * @param oAuth2ClientContext     provided context
     * @param resource                type of resource to be accessed
     * @param accessTokenContextRelay
     */
    public MyFeignClientInterceptor(OAuth2ClientContext oAuth2ClientContext
            , OAuth2ProtectedResourceDetails resource, AccessTokenContextRelay accessTokenContextRelay) {
        super(oAuth2ClientContext, resource);
        this.oAuth2ClientContext = oAuth2ClientContext;
        this.accessTokenContextRelay = accessTokenContextRelay;
    }


    /**
     * Create a template with the header of provided name and extracted extract
     * 1. 如果使用 非web 请求,header 区别
     * 2. 根据authentication 还原请求token
     *
     * @param template
     */
    @Override
    public void apply(RequestTemplate template) {
        accessTokenContextRelay.copyToken();
        if (oAuth2ClientContext != null
                && oAuth2ClientContext.getAccessToken() != null) {
            super.apply(template);
        }
    }
}

复制代码
3.4 资源服务器配置
代码如下: MyResourceServerConfig.java
/**
 * 功能描述: 资源服务器配置
 * @author  Trazen
 * @date  2020/7/14 21:37
 */
@Slf4j
@Configuration
@EnableResourceServer
@AllArgsConstructor
@ComponentScan("com.hxmec.auth")
@EnableConfigurationProperties(AuthClientProperties.class)
public class MyResourceServerConfig extends ResourceServerConfigurerAdapter {

    private final MyAuthenticationEntryPoint baseAuthenticationEntryPoint;

    private final AuthClientProperties authClientProperties;

    private final RestTemplate lbRestTemplate;

    @Override
    public void configure(HttpSecurity http) throws Exception {
        http.csrf().disable();

        // 放行 swagger ui (有整合swagger就放行这些请求吧)
        http.authorizeRequests().antMatchers(
                "/v2/api-docs",
                "/swagger-resources/configuration/ui",
                "/swagger-resources",
                "/swagger-resources/configuration/security",
                "/swagger-ui.html",
                "/webjars/**",
                "/api/**/v2/api-docs")
                .permitAll();

        // 根据自定义配置url放行
        if (authClientProperties.getIgnoreUrls() != null){
            for(String url: authClientProperties.getIgnoreUrls()){
                http.authorizeRequests().antMatchers(url).permitAll();
            }
        }
        // 其他请求均需要token才能访问
        http.authorizeRequests().anyRequest().authenticated();
    }

    @Override
    public void configure(ResourceServerSecurityConfigurer resources) throws Exception {
        if (authClientProperties.getResourceId() != null) {
            resources.resourceId(authClientProperties.getResourceId());
        }

        // 这里的签名key 保持和认证中心一致
        if (authClientProperties.getSigningKey() == null) {
            log.info("SigningKey is null cant not decode token.......");
        }

        DefaultAccessTokenConverter accessTokenConverter = new DefaultAccessTokenConverter();
        accessTokenConverter.setUserTokenConverter(new MyUserAuthenticationConverter());

        JwtAccessTokenConverter converter = new JwtAccessTokenConverter();
        //设置解析jwt的密钥
        converter.setSigningKey(authClientProperties.getSigningKey());
        converter.setVerifier(new MacSigner(authClientProperties.getSigningKey()));

        MyTokenServices tokenServices = new MyTokenServices();

        // 在CustomTokenServices注入三个依赖对象
        //设置token存储策略
        tokenServices.setTokenStore(new JwtTokenStore(converter));
        tokenServices.setJwtAccessTokenConverter(converter);
        tokenServices.setDefaultAccessTokenConverter(accessTokenConverter);
        tokenServices.setRestTemplate(lbRestTemplate);
        resources.tokenServices(tokenServices)
                .authenticationEntryPoint(baseAuthenticationEntryPoint);
    }
}

复制代码
4.构建资源服务器应用user-server/order-server工程
资源服务器应用构建步骤一致,order-server主要演示通过feign接口调用传递token的功能。
4.1 添加maven依赖
<?xml version="1.0" encoding="UTF-8"?>
<project xmlns="http://maven.apache.org/POM/4.0.0"
         xmlns:xsi="http://www.w3.org/2001/XMLSchema-instance"
         xsi:schemaLocation="http://maven.apache.org/POM/4.0.0 http://maven.apache.org/xsd/maven-4.0.0.xsd">
    <parent>
        <artifactId>spring-cloud-oauth2</artifactId>
        <groupId>com.hxmec</groupId>
        <version>0.0.1-SNAPSHOT</version>
    </parent>
    <modelVersion>4.0.0</modelVersion>

    <artifactId>user-server</artifactId>

    <dependencies>
        <dependency>
            <groupId>com.hxmec</groupId>
            <artifactId>auth-client</artifactId>
            <version>0.0.1-SNAPSHOT</version>
        </dependency>
        <!-- SpringRetry 重试框架依赖 -->
        <dependency>
            <groupId>org.springframework.retry</groupId>
            <artifactId>spring-retry</artifactId>
        </dependency>
        <dependency>
            <groupId>org.springframework.boot</groupId>
            <artifactId>spring-boot-starter-web</artifactId>
        </dependency>
        <dependency>
            <groupId>org.springframework.cloud</groupId>
            <artifactId>spring-cloud-starter-netflix-eureka-client</artifactId>
        </dependency>
    </dependencies>

    <build>
        <plugins>
            <plugin>
                <groupId>org.springframework.boot</groupId>
                <artifactId>spring-boot-maven-plugin</artifactId>
            </plugin>
        </plugins>
    </build>
</project>
复制代码
4.2 创建Spring Boot启动类
UserServerApplication.java
/**
 * 功能描述: User Server启动类
 * @author  Trazen
 * @date  2020/7/15 9:55
 */
@SpringBootApplication
@EnableDiscoveryClient
@EnableFeignClients
@EnableGlobalMethodSecurity(prePostEnabled = true)
public class UserServerApplication {

    public static void main(String[] args) {
        SpringApplication.run(UserServerApplication.class, args);
    }
}
复制代码
4.3 添加配置
bootstrap.yml配置
server:
  port: 8890
spring:
  application:
    name: user-server
  cloud:
    loadbalancer:
      retry:
        #开启重试机制
        enabled: true
logging:
  pattern:
    console: '%d{yyyy-MM-dd HH:mm:ss.SSS} %-5level [%thread] %logger{15} - %msg%n'
  config: classpath:logback-spring.xml
eureka:
  client:
    service-url:
      defaultZone: http://localhost:8888/eureka/
复制代码
application.yml配置
hx:
  oauth2:
    client:
      # jwt的密钥
      signingKey: hxmec
      resourceId: ${spring.application.name}
      # 放行的url
      ignoreUrls:
        - /oauth/**
        - /user/**


#ribbon全局配置
ribbon:
  #处理请求的超时时间,单位ms,默认1000
  ReadTimeout: 3000
  #连接建立的超时时间,单位ms,默认1000
  ConnectTimeout: 3000

feign:
  compression:
    request:
      #是否启用请求GZIP压缩,true:启用,false:不启用
      enabled: true
      #压缩支持的MIME TYPE
      mime-types: text/xml,application/xml,application/json
      #压缩数据的最小值
      min-request-size: 2048
    response:
      #是否启用响应GZIP压缩,true:启用,false:不启用
      enabled: true
  client:
    config:
      #feign全局配置
      default:
        #指定日志级别,none:不记录任何日志,basic:仅记录请求方法、URL、响应状态代码以及执行时间(适合生产环境)
        #headers:在basic基础上,记录请求和响应的header,full:记录请求和响应的header、body和元数据,默认none
        loggerLevel: basic
      #feign指定客户端配置,即仅对指定调用的服务生效
      eureka-client:
        loggerLevel: full
复制代码
4.4 编写测试接口
UserController.java
/**
 * 功能描述:
 * @author  Trazen
 * @date  2020/7/15 10:39
 */
@RestController
@RequestMapping("/user")
@Slf4j
public class UserController {

    @GetMapping("/a")
    @PreAuthorize("isAuthenticated()")
    public String get(@AuthenticationPrincipal CurrentUser currentUser){
        return "1";
    }

    @GetMapping("/b")
    public String get02(){
        log.info("---------------->{}",SecurityUtils.getCurrentUser());
        return SecurityUtils.getCurrentUser().getUsername();
    }

    @GetMapping("/c")
    public String get03(@AuthenticationPrincipal CurrentUser currentUser){
        Authentication authentication = SecurityContextHolder.getContext().getAuthentication();
        log.info("---------------->{}",currentUser);
        return "3";
    }

}

复制代码
4.5按照如上部署在构建order-server
Feign接口调用演示代码如下:
/**
 * 功能描述:
 * @author  Trazen
 * @date  2020/7/15 17:41
 */
@FeignClient(value = "user-server")
public interface UserFeignApi {

    /**
     * user服务b接口
     * @return
     */
    @GetMapping("/user/b")
    String get02();

}
复制代码
/**
 * 功能描述:
 * @author  Trazen
 * @date  2020/7/15 16:16
 */
@RestController
@RequestMapping("/order")
@Slf4j
@AllArgsConstructor
public class OrderController {

    private final UserFeignApi userFeignApi;

    @GetMapping("/a")
    public String get02(@AuthenticationPrincipal CurrentUser currentUser){
        log.info("---------------->{}", SecurityUtils.getCurrentUser());
        return "1";
    }

    @GetMapping("/b")
    public String getFeign(){
        return userFeignApi.get02();
    }
}

复制代码
4.6 启动项目进行测试
启动如下项目: eureka-server----> auth-server ----> user-server/order-server
-
1.通过认证授权服务接口获取Token
-
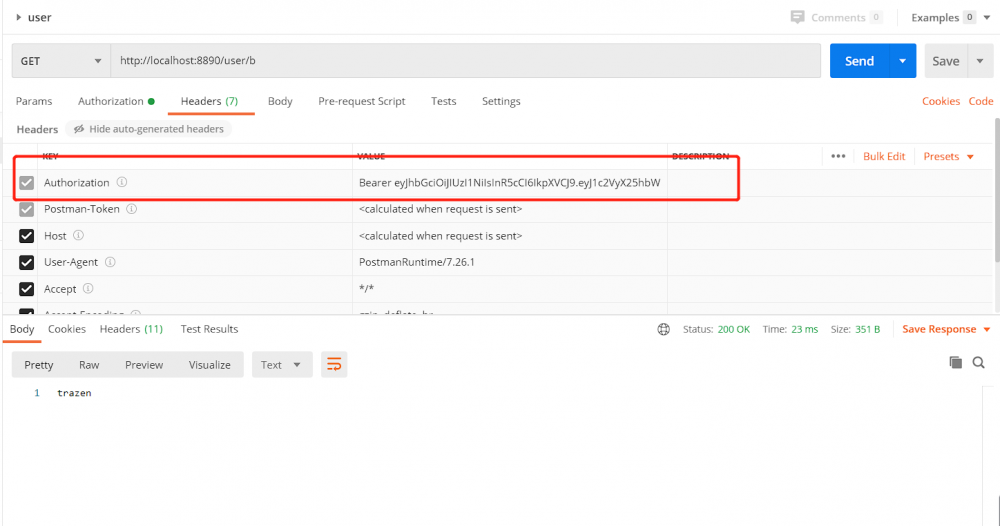
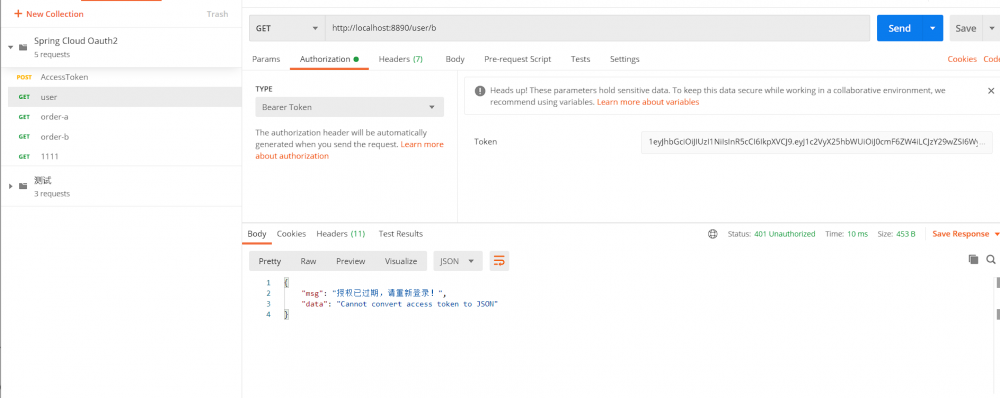
2.携带token访问user-server中接口 如果token有效并正常返回结果; 如果token无效则返回自定义的授权过期信息。
-
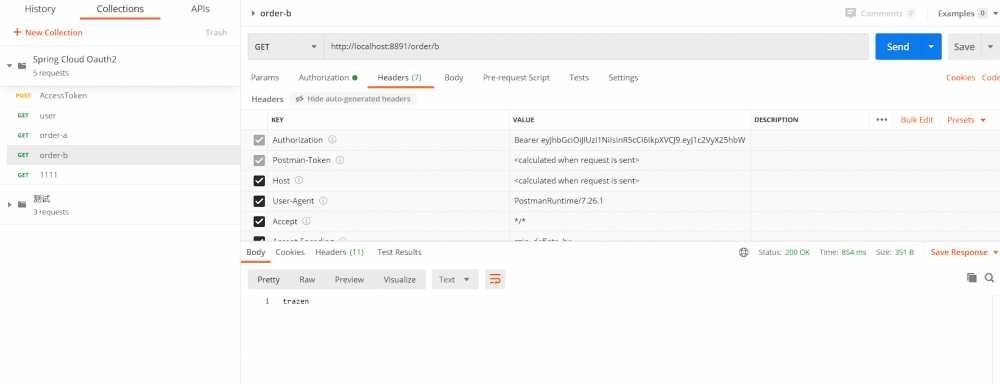
3.访order-server接口,演示feign接口调用传递token
- 本文标签: schema rmi HashMap sql 文章 协议 druid 代码 plugin maven URLs token tar mybatis src zip Statement 数据 处理器 认证 CTO 服务端 servlet value Connection 目录 Netflix 密钥 ACE 服务器 微服务 API mapper db Select springboot js REST lib update JDBC UI Security 源码 部署 CEO Collection key dataSource mysql Feign cat Word root 重试机制 管理 ORM 端口 解析 Spring Security https Eureka client java 连接池 配置 Authorization classpath 加密 时间 IO mail XML ribbon 数据库 final http web retry Bootstrap bean tab HTML Spring Boot struct 组织 build spring equals map Logging 测试 Logback 需求 cache pom json Spring cloud description dependencies core apache lambda IDE Service authenticate App id ip list
- 版权声明: 本文为互联网转载文章,出处已在文章中说明(部分除外)。如果侵权,请联系本站长删除,谢谢。
- 本文海报: 生成海报一 生成海报二


![[HBLOG]公众号](https://www.liuhaihua.cn/img/qrcode_gzh.jpg)

