Mybatis源码(二)---parseConfiguration读取XML文件
在上一节中简单谈到了在创建一个SqlSessionFactory对象时,通过SqlSessionFactoryBuilder类调用的大概过程 其中SqlSessionFactoryBuilder类的build方法在return时,是return的build(parser.parse());

点进parse()方法中,发现

其实标记处就是读取XMLConfigBuilder类中的parser加载的config配置文件的方法.
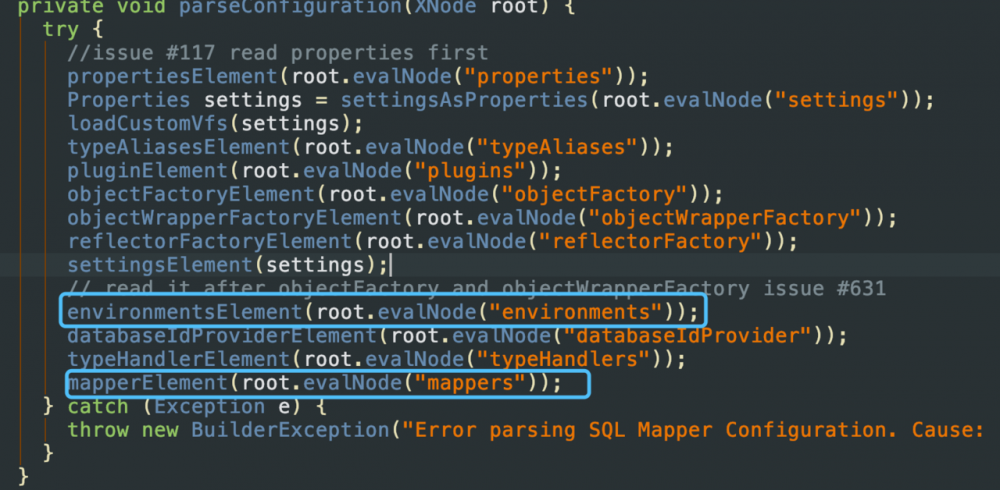
parseConfiguration(XNode root)源码
private void parseConfiguration(XNode root) {
    try {
      //issue #117 read properties first
      propertiesElement(root.evalNode("properties"));
      Properties settings = settingsAsProperties(root.evalNode("settings"));
      loadCustomVfs(settings);
      typeAliasesElement(root.evalNode("typeAliases"));
      pluginElement(root.evalNode("plugins"));
      objectFactoryElement(root.evalNode("objectFactory"));
      objectWrapperFactoryElement(root.evalNode("objectWrapperFactory"));
      reflectorFactoryElement(root.evalNode("reflectorFactory"));
      settingsElement(settings);
      // read it after objectFactory and objectWrapperFactory issue #631
      environmentsElement(root.evalNode("environments"));
      databaseIdProviderElement(root.evalNode("databaseIdProvider"));
      typeHandlerElement(root.evalNode("typeHandlers"));
      mapperElement(root.evalNode("mappers"));
    } catch (Exception e) {
      throw new BuilderException("Error parsing SQL Mapper Configuration. Cause: " + e, e);
    }
  }
复制代码
- properties 属性
- settings 设置
- typeAliases 类型别名
- typeHandlers 类型处理器
- objectFactory 对象工厂
- plugins 插件
- environments 环境
- databaseIdProvider 数据库厂商标识
- mappers 映射器
config.xml
<?xml version="1.0" encoding="UTF-8" ?>
<!DOCTYPE configuration PUBLIC "-//mybatis.org//DTD Config 3.0//EN" "http://mybatis.org/dtd/mybatis-3-config.dtd">
<configuration>
    <environments default="development">
        <environment id="development">
            <transactionManager type="JDBC"></transactionManager>
            <dataSource type="POOLED">
                <property name="driver" value="com.mysql.jdbc.Driver"/>
                <property name="url" value="jdbc:mysql://localhost:3306/demo"/>
                <property name="username" value="root"/>
                <property name="password" value="98629"/>
            </dataSource>
        </environment>
    </environments>
    <mappers>
        <mapper resource="mapper/UserMapper.xml"></mapper>
    </mappers>
</configuration>
复制代码
根据parseConfiguration结合config.xml观察
可以猜出,parseConfiguration方法是根据标签名来读取配置文件的,在父标签< configuration >下,有两个子标签,分别为< environments >和< mappers > 分别对应着以下两个方法

恰好是根据标签名来解析的,根据xml文件,其中< environments >是配置了数据源,< mappers >配置了mapper映射文件里面写的是sql语句,现在,断点打起来.
environmentsElement(XNode context)---加载数据源
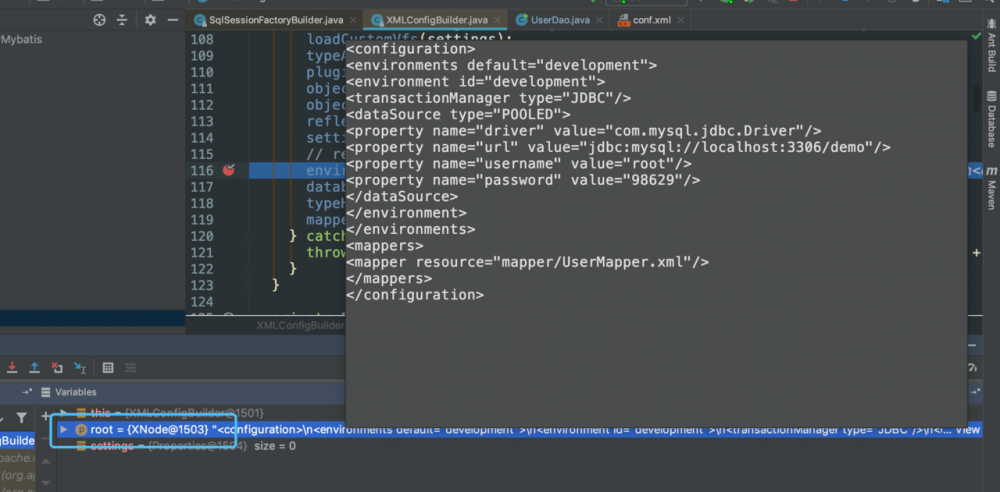
debug启动,断点设置在该方法下发现,root节点的值,恰好为配置文件,然后恰好调用XNode.evalNode(String expression)方法 现在,root对象是来自XMLConfigBuilder类中的变量parser,可以明白XPathParser中存储的值就为XML文件中的内容

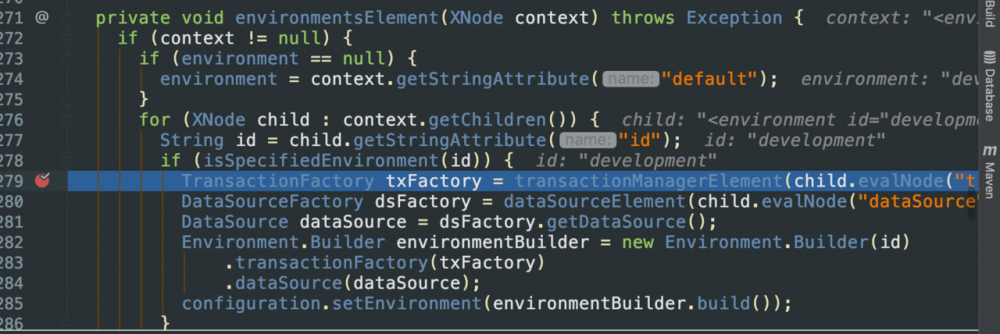
现在断点取消,点进environmentsElement方法 可以看见源码
private void environmentsElement(XNode context) throws Exception {
    if (context != null) {
      if (environment == null) {
        environment = context.getStringAttribute("default");
      }
      for (XNode child : context.getChildren()) {
        String id = child.getStringAttribute("id");
        if (isSpecifiedEnvironment(id)) {
          TransactionFactory txFactory = transactionManagerElement(child.evalNode("transactionManager"));
          DataSourceFactory dsFactory = dataSourceElement(child.evalNode("dataSource"));
          DataSource dataSource = dsFactory.getDataSource();
          Environment.Builder environmentBuilder = new Environment.Builder(id)
              .transactionFactory(txFactory)
              .dataSource(dataSource);
          configuration.setEnvironment(environmentBuilder.build());
        }
      }
    }
  }
复制代码
从代码看,就是首先获取标签元素的default属性,这个属性作用就是指定当前情况下使用哪个数据库配置,也就是使用哪个节点的配置,default的值就是配置的标签元素的id值。 随后又调用了isSpecifiedEnvironment方法 查看isSpecifiedEnvironment方法源码
private boolean isSpecifiedEnvironment(String id) {
    if (environment == null) {
      throw new BuilderException("No environment specified.");
    } else if (id == null) {
      throw new BuilderException("Environment requires an id attribute.");
    } else if (environment.equals(id)) {
      return true;
    }
    return false;
  }
复制代码
在遍历所有的时候一次判断相应的id是否是default设置的值,如果是,则使用当前元素进行数据库连接的初始化。
transactionManagerElement---加载事务
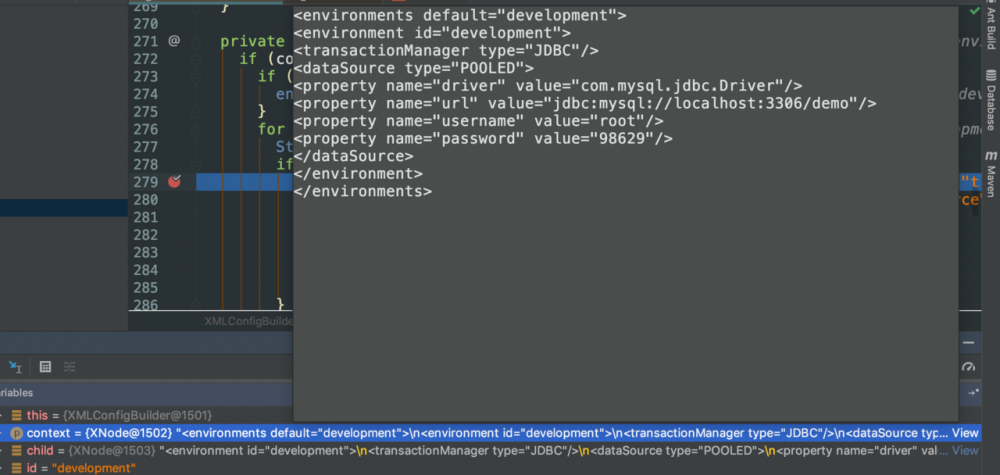
在上面找到指定的environment后就要进行事务的设置了,配置事务是在方法transactionManagerElement(child.evalNode(“transactionManager”))来实现的 再来在TransactionFactory factory = (TransactionFactory) resolveClass(type).newInstance();前打个断点

观察参数child的值,又一次验证了之前的猜想,它的值均为< environments >标签下的内容

再来看下它是怎么获得type值的吧 查看transactionManagerElement源码
private TransactionFactory transactionManagerElement(XNode context) throws Exception {
    if (context != null) {
      String type = context.getStringAttribute("type");
      Properties props = context.getChildrenAsProperties();
      TransactionFactory factory = (TransactionFactory) resolveClass(type).newInstance();
      factory.setProperties(props);
      return factory;
    }
    throw new BuilderException("Environment declaration requires a TransactionFactory.");
  }
复制代码
我们可以看到,这里其实是根据这个元素的type属性来找相应的事务管理器的, 在Mybatis里面支持两种配置:JDBC和MANAGED。这里根据type的设置值来返回相应的事务管理器 其中,JDBC和MANAGED其实已经在Configuration类配置好了,在上篇文章XMLConfigBuilder父类BaseBuilder中BaseBuilder构造方法参数是一个初始化的Configuration对象,Configuration对象初始化的时候,内置的别名注册器TypeAliasRegistry注册了默认的别名 其中就包括JDBC和MANAGED

还有就是关于这两种事务管理器的区别: JDBC:这个配置就是直接使用了 JDBC 的提交和回滚设置,它依赖于从数据源得到的连接来管理事务作用域 MANAGED:这个配置几乎没做什么。它从来不提交或回滚一个连接,而是让容器来管理事务的整个生命周期(比如 JEE 应用服务器的上下文)。 默认情况下它会关闭连接,然而一些容器并不希望这样,因此需要将 closeConnection 属性设置为 false 来阻止它默认的关闭行为
dataSourceElement---加载数据源
查看dataSourceElement源码
private DataSourceFactory dataSourceElement(XNode context) throws Exception {
    if (context != null) {
      String type = context.getStringAttribute("type");
      Properties props = context.getChildrenAsProperties();
      DataSourceFactory factory = (DataSourceFactory) resolveClass(type).newInstance();
      factory.setProperties(props);
      return factory;
    }
    throw new BuilderException("Environment declaration requires a DataSourceFactory.");
  }
复制代码
此时,DataSourceFactory factory = (DataSourceFactory) resolveClass(type).newInstance()前打个断点,观察数据:

在XML配置的数据已经全部获得到了,根据源码首先创建了一个POOLED类型的DataSourceFactory,然后将props连接信息set入了factory 关于Mybatis支持三种内建的数据源类型,分别是UNPOOLED、POOLED和JNDI 在Configuration对象,Configuration对象初始化的时候,内置的别名注册器TypeAliasRegistry注册了默认的别名 其中也包括UNPOOLED、POOLED和JNDI

(1)UNPOOLED 这个数据源的实现只是每次被请求时打开和关闭连接。虽然一点慢,它对在及时可用连接方面没有性能要求的简单应用程序是一个很好的选择。 不同的数据库在这方面表现也是不一样的,所以对某些数据库来说使用连接池并不重要,这个配置也是理想的。 (2)POOLED 这种数据源的实现利用“池”的概念将 JDBC 连接对象组织起来,避免了创建新的连接实例时所必需的初始化和认证时间。 这是一种使得并发 Web 应用快速响应请求的流行处理方式。 (3)JNDI 这个数据源的实现是为了能在如 EJB 或应用服务器这类容器中使用,容器可以集中或在外部配置数据源,然后放置一个 JNDI 上下文的引用。 得知我们的创建的数据源为POOLED类型 由此,根据environmentsElement代码
DataSource dataSource = dsFactory.getDataSource();
          Environment.Builder environmentBuilder = new Environment.Builder(id)
              .transactionFactory(txFactory)
              .dataSource(dataSource);
          configuration.setEnvironment(environmentBuilder.build());
复制代码
将JDBC所需要的数据set入configuration中
总结
当使用数据库连接池时、即时、DataSourceFactory具体实例是PooledDataSourceFactory。返回的DataSource具体实例是内部持有UnpooledDataSource实例的PooledDataSource。
当不使用数据库连接池时、即 时、DataSourceFactory具体实例是UnpooledDataSourceFactory。返回的DataSource具体实例是UnpooledDataSource实例。
mapperElement(root.evalNode("mappers"))—加载映射XML文件
所谓Mybatis的精髓可能就是这个mappers节点下的xml的配置文件了
<mappers>
        <mapper resource="mapper/UserMapper.xml"></mapper>
</mappers>
复制代码
mapper/UserMapper.xml
<?xml version="1.0" encoding="UTF-8"?>
<!DOCTYPE mapper PUBLIC "-//mybatis.org//DTD Mapper 3.0//EN"
        "http://mybatis.org/dtd/mybatis-3-mapper.dtd">
<mapper namespace="mapper.UserMapper">

    <!--    通过id查找User-->
    <select id="selectById" resultType="domain.User" parameterType="int">
            select * from user where id = #{id}
        </select>
    <!--    查找全部-->
    <select id="selectAll" resultType="domain.User">
            select  * from user
        </select>
    <!--    一对一查找-->
    <select id="selectInfo" parameterType="int" resultMap="StudentAndUserSelect">
            select student.*,user.*
            from student,user
            where student.id=user.id and user.id = #{id}
        </select>
    <resultMap id="StudentAndUserSelect" type="domain.Json.UserAndStudent">
        <association property="user" javaType="domain.User">
            <id property="id" column="id"></id>
            <result property="username" column="username"></result>
            <result property="password" column="password"></result>
        </association>
        <association property="student" javaType="domain.Student">
            <id property="id" column="id"></id>
            <result property="age" column="age"></result>
            <result property="sex" column="sex"></result>
        </association>
    </resultMap>
<!--    一对多查找-->
    <select id="selectCourse" parameterType="int" resultMap="StudentAndCourseSelect">
            SELECT s.*,c.*
            from student s
            INNER JOIN course c
            on s.id = c.student_id
            where c.student_id =#{id}

    </select>
    <resultMap id="StudentAndCourseSelect" type="domain.Json.StudentAndCourse">
        <collection property="students" ofType="domain.Student">
            <id property="id" column="id"></id>
            <result property="age" column="age"></result>
            <result property="sex" column="sex"></result>
        </collection>
        <collection property="courses" ofType="domain.Course">
            <id property="id" column="id"></id>
            <result property="student_id" column="student_id"></result>
            <result property="course" column="course"></result>
        </collection>
    </resultMap>
</mapper>
复制代码
下面来看一下源码
private void mapperElement(XNode parent) throws Exception {
    if (parent != null) {
      for (XNode child : parent.getChildren()) {
        if ("package".equals(child.getName())) {
          //检测是否是package节点
          String mapperPackage = child.getStringAttribute("name");
          configuration.addMappers(mapperPackage);
        } else {
          //读取<mapper resource="mapper/UserMapper.xml"></mapper>中的mapper/UserMapper.xml,即resource = "mapper/UserMapper.xml"
          String resource = child.getStringAttribute("resource");
          //读取mapper节点的url属性
          String url = child.getStringAttribute("url");
          //读取mapper节点的class属性
          String mapperClass = child.getStringAttribute("class");
          if (resource != null && url == null && mapperClass == null) {
            //根据rusource加载mapper文件
            ErrorContext.instance().resource(resource);
            //读取文件字节流
            InputStream inputStream = Resources.getResourceAsStream(resource);
            //实例化mapper解析器
            XMLMapperBuilder mapperParser = new XMLMapperBuilder(inputStream, configuration, resource, configuration.getSqlFragments());
            //执行解析mapper文件,即解析mapper/userDao-mapping.xml,文件
            mapperParser.parse();
          } else if (resource == null && url != null && mapperClass == null) {
            //从网络url资源加载mapper文件
            ErrorContext.instance().resource(url);
            InputStream inputStream = Resources.getUrlAsStream(url);
            XMLMapperBuilder mapperParser = new XMLMapperBuilder(inputStream, configuration, url, configuration.getSqlFragments());
            mapperParser.parse();
          } else if (resource == null && url == null && mapperClass != null) {
            //使用mapperClass加载文件
            Class<?> mapperInterface = Resources.classForName(mapperClass);
            configuration.addMapper(mapperInterface);
          } else {
            //resource,url,mapperClass三种配置方法只能使用其中的一种,否则就报错
            throw new BuilderException("A mapper element may only specify a url, resource or class, but not more than one.");
          }
        }
      }
    }
  }
复制代码
很明显遍历mappers中的mapper节点,然后逐一解析。我们的配置文件中只有一个mapper节点,所以这里要解析的就是mapper/UserMapper.xml文件。 在此处打个断点 debug模式

观察值可以发现

解析mappers节点下的核心代码为
//实例化mapper解析器
    XMLMapperBuilder mapperParser = new XMLMapperBuilder(inputStream, configuration, resource, configuration.getSqlFragments());
    //执行解析mapper文件,即解析mapper/userDao-mapping.xml,文件
    mapperParser.parse();
复制代码
实例化mapper解析器:XMLMapperBuilder
查看mapper解析器XMLMapperBuilder类的声明可以发现,mapper解析器类XMLMapperBuilder和xml配置解析器XMLConfigBuilder同时继承了父类BaseBuilder。其实后面还有几个类也继承了父类BaseBuilder。 观察其构造方法
public XMLMapperBuilder(InputStream inputStream, Configuration configuration, String resource, Map<String, XNode> sqlFragments) {
    this(new XPathParser(inputStream, true, configuration.getVariables(), new XMLMapperEntityResolver()),
        configuration, resource, sqlFragments);
  }
复制代码
在其this关键字调用了一个私有方法
private XMLMapperBuilder(XPathParser parser, Configuration configuration, String resource, Map<String, XNode> sqlFragments) {
    super(configuration);
    this.builderAssistant = new MapperBuilderAssistant(configuration, resource);
    this.parser = parser;
    this.sqlFragments = sqlFragments;
    this.resource = resource;
  }
复制代码
在里面new一个类MapperBuilderAssistant,它的作用是来辅助解析XML文件的 同样的,MapperBuilderAssistant类它也是继承了BaseBuilder的 到了这里mapper解析器(XMLMapperBuilder)的实例化工作就已经完成了。但是为了更好了进行接下来的分析,我们有必要再认识Configuration类的一些属性和方法
public class Configuration {

  protected Environment environment;
  protected Properties variables = new Properties();
  ......
  //初始化值为null
  protected String databaseId;
  protected final TypeAliasRegistry typeAliasRegistry = new TypeAliasRegistry();
  protected final LanguageDriverRegistry languageRegistry = new LanguageDriverRegistry();

  // 这是一个HashMap ,存放的是已经解析过的sql声明,String  类型的键,例如com.zcz.learnmybatis.entity.User.findUserById,值是MappedStatement实例对象
  protected final Map<String, MappedStatement> mappedStatements = new StrictMap<MappedStatement>("Mapped Statements collection");
  protected final Map<String, KeyGenerator> keyGenerators = new StrictMap<KeyGenerator>("Key Generators collection");
  ......
  //这是一个无序不重复的Set集合,里面存放的是已经加载解析过的 mapper文件名。例如<mapper resource="mapper/userDao-mapping.xml"/>中的mapper/userDao-mapping.xml
  protected final Set<String> loadedResources = new HashSet<String>();
  ......
  //sql碎片Map,键String 值XNode,这个Map中存放的是已经在先前的mapper中解析过的碎片
  protected final Map<String, XNode> sqlFragments = new StrictMap<XNode>("XML fragments parsed from previous mappers");
  ......
  public Configuration() {
    .....
    // 注册默认的XML语言驱动
    languageRegistry.setDefaultDriverClass(XMLLanguageDriver.class);
    languageRegistry.register(RawLanguageDriver.class);
  }
  ......
  //将resource 添加到 加载解析完成Set loadedResources中
  public void addLoadedResource(String resource) {
    loadedResources.add(resource);
  }
  //检测mapper文件是否已经被加载解析过,resource是<mapper resource="mapper/userDao-mapping.xml"/>中的resource
  public boolean isResourceLoaded(String resource) {
    return loadedResources.contains(resource);
  }

  ......

  //根据标签声明类(MappedStatement) 实例对象的id获取 解析过的标签声明类实例对象
  // 标签声明是什么,在下文中会给出解释
  public MappedStatement getMappedStatement(String id) {
    return this.getMappedStatement(id, true);
  }

  //根据标签声明类(MappedStatement) 实例对象的id获取 解析过的标签声明类实例对象
  public MappedStatement getMappedStatement(String id, boolean validateIncompleteStatements) {
    if (validateIncompleteStatements) {
      buildAllStatements();
    }
    return mappedStatements.get(id);
  }

  //获取sql碎片
  public Map<String, XNode> getSqlFragments() {
    return sqlFragments;
  }

  ......
  // 根据检查是否存在 标签声明名称 为statementName 的标签声明
  public boolean hasStatement(String statementName) {
    return hasStatement(statementName, true);
  }
  // 根据检查是否存在 标签声明名称 为statementName 的标签声明
  public boolean hasStatement(String statementName, boolean validateIncompleteStatements) {
    if (validateIncompleteStatements) {
      buildAllStatements();
    }
    return mappedStatements.containsKey(statementName);
  }
  ......
}
复制代码
mapperParser.parse();
现在,可以详细看看它是怎么解析xml文件了 在方法前打个断点,看看数据先

parse方法源码
public void parse() {
    // 先判断mapper文件是否已经解析
    if (!configuration.isResourceLoaded(resource)) {
      //执行解析
      configurationElement(parser.evalNode("/mapper"));
      //保存解析记录
      configuration.addLoadedResource(resource);
      // 绑定已经解析的命名空间
      bindMapperForNamespace();
    }

    parsePendingResultMaps();
    parsePendingCacheRefs();
    parsePendingStatements();
  }
复制代码
可以看出真正解析mapper文件的代码是configurationElement方法
private void configurationElement(XNode context) {
    try {
      //获取mapper文件中的mapper节点的namespace属性 mapper.UserMapper
      String namespace = context.getStringAttribute("namespace");
      if (namespace.equals("")) {
          throw new BuilderException("Mapper's namespace cannot be empty");
      }
      //将namespace赋值给映射 mapper解析器助理builderAssistant.currentNameSpace,即告诉mapper解析器助理现在解析的是那个mapper文件
      builderAssistant.setCurrentNamespace(namespace);
      //解析cache-ref节点
      cacheRefElement(context.evalNode("cache-ref"));
      //解析cache节点
      cacheElement(context.evalNode("cache"));
      //解析parameterMap节点,这里为什么要使用"/mapper/parameterMap"而不是直接使用"parameterMap",因为parameterMap可以配置多个,而且使用的是context.evalNodes方法,注意不是evalNode了,是evalNodes。
      parameterMapElement(context.evalNodes("/mapper/parameterMap"));
      //解析resultMap节点
      resultMapElements(context.evalNodes("/mapper/resultMap"));
      //解析sql节点
      sqlElement(context.evalNodes("/mapper/sql"));
      //解析select|insert|update|delete节点,注意context.evalNodes()方法,返回的是一个List集合。
      buildStatementFromContext(context.evalNodes("select|insert|update|delete"));
    } catch (Exception e) {
      throw new BuilderException("Error parsing Mapper XML. Cause: " + e, e);
    }
  }
复制代码
从上面代码看到,处理完namespace之后,就是解析mapper文件中的节点了 解析节点后,咱们分析下buildStatementFromContext方法 源码:
private void buildStatementFromContext(List<XNode> list) {
   //这里的confuration.getDatabaseId 是 null ,因为 configuration初始化时没有给默认值,在虚拟机实例化configuration对象时,赋予默认值null
    if (configuration.getDatabaseId() != null) {
      buildStatementFromContext(list, configuration.getDatabaseId());
    }
    buildStatementFromContext(list, null);
  }
复制代码
又调用了buildStatementFromContext 重载方法,这个方法就是遍历了所有的标签声明,并逐一解析。
private void buildStatementFromContext(List<XNode> list, String requiredDatabaseId) {
    for (XNode context : list) {
    //初始化标签声明解析器(XMLStatementBuilder)
      final XMLStatementBuilder statementParser = new XMLStatementBuilder(configuration, builderAssistant, context, requiredDatabaseId);
      try {
      // 执行标签声明的解析
        statementParser.parseStatementNode();
      } catch (IncompleteElementException e) {
        configuration.addIncompleteStatement(statementParser);
      }
    }
  }
复制代码
原来buildStatementFromContext 也是不负责解析的,真正负责解析的是final 修饰的 XMLStatementBuilder类 的实例对象 statementParser 打个断点,看一眼数据

果然,就是这狗贼通过遍历来解析的XML
XMLStatementBuilder正式开始遍历XML
同样的XMLStatementBuilder也是继承BaseBuilder的。 点进去查看以下构造方法
public XMLStatementBuilder(Configuration configuration, MapperBuilderAssistant builderAssistant, XNode context, String databaseId) {
    super(configuration);
    this.builderAssistant = builderAssistant;
    this.context = context;
    this.requiredDatabaseId = databaseId;
  }
复制代码
在buildStatementFromContext方法中,调用的是statementParser.parseStatementNode()方法,咱们点进去看一眼
public void parseStatementNode() {
    String id = context.getStringAttribute("id");
    String databaseId = context.getStringAttribute("databaseId");

    if (!databaseIdMatchesCurrent(id, databaseId, this.requiredDatabaseId)) {
      return;
    }

    Integer fetchSize = context.getIntAttribute("fetchSize");
    Integer timeout = context.getIntAttribute("timeout");
    String parameterMap = context.getStringAttribute("parameterMap");
    String parameterType = context.getStringAttribute("parameterType");
    Class<?> parameterTypeClass = resolveClass(parameterType);
    String resultMap = context.getStringAttribute("resultMap");
    String resultType = context.getStringAttribute("resultType");
    String lang = context.getStringAttribute("lang");
    LanguageDriver langDriver = getLanguageDriver(lang);

    Class<?> resultTypeClass = resolveClass(resultType);
    String resultSetType = context.getStringAttribute("resultSetType");
    StatementType statementType = StatementType.valueOf(context.getStringAttribute("statementType", StatementType.PREPARED.toString()));
    ResultSetType resultSetTypeEnum = resolveResultSetType(resultSetType);

    String nodeName = context.getNode().getNodeName();
    SqlCommandType sqlCommandType = SqlCommandType.valueOf(nodeName.toUpperCase(Locale.ENGLISH));
    boolean isSelect = sqlCommandType == SqlCommandType.SELECT;
    boolean flushCache = context.getBooleanAttribute("flushCache", !isSelect);
    boolean useCache = context.getBooleanAttribute("useCache", isSelect);
    boolean resultOrdered = context.getBooleanAttribute("resultOrdered", false);

    // Include Fragments before parsing
    XMLIncludeTransformer includeParser = new XMLIncludeTransformer(configuration, builderAssistant);
    includeParser.applyIncludes(context.getNode());

    // Parse selectKey after includes and remove them.
    processSelectKeyNodes(id, parameterTypeClass, langDriver);

    // Parse the SQL (pre: <selectKey> and <include> were parsed and removed)
    SqlSource sqlSource = langDriver.createSqlSource(configuration, context, parameterTypeClass);
    String resultSets = context.getStringAttribute("resultSets");
    String keyProperty = context.getStringAttribute("keyProperty");
    String keyColumn = context.getStringAttribute("keyColumn");
    KeyGenerator keyGenerator;
    String keyStatementId = id + SelectKeyGenerator.SELECT_KEY_SUFFIX;
    keyStatementId = builderAssistant.applyCurrentNamespace(keyStatementId, true);
    if (configuration.hasKeyGenerator(keyStatementId)) {
      keyGenerator = configuration.getKeyGenerator(keyStatementId);
    } else {
      keyGenerator = context.getBooleanAttribute("useGeneratedKeys",
          configuration.isUseGeneratedKeys() && SqlCommandType.INSERT.equals(sqlCommandType))
          ? Jdbc3KeyGenerator.INSTANCE : NoKeyGenerator.INSTANCE;
    }

    builderAssistant.addMappedStatement(id, sqlSource, statementType, sqlCommandType,
        fetchSize, timeout, parameterMap, parameterTypeClass, resultMap, resultTypeClass,
        resultSetTypeEnum, flushCache, useCache, resultOrdered,
        keyGenerator, keyProperty, keyColumn, databaseId, langDriver, resultSets);
  }
复制代码
一目了然 全是获得标签内容
databaseIdMatchesCurrent
//比较需要使用的databaseId 和 标签声明中的databaseId 同时databaseId和requiredDatabaseId 都是null
  private boolean databaseIdMatchesCurrent(String id, String databaseId, String requiredDatabaseId) {
    if (requiredDatabaseId != null) {
      if (!requiredDatabaseId.equals(databaseId)) {
        //如果不同就返回false,停止解析
        return false;
      }
    } else {
      if (databaseId != null) {
        // 这个时候requiredDatabaseId == null, 在这个requiredDatabaseId 等于 null的情况下databaseId 却不等于null,说明需要使用的databaseId 和 标签声明中的databaseId 是不相同的,就放回false,停止解析
        return false;
      }
      // skip this statement if there is a previous one with a not null databaseId 如果存在已经解析过的并且databaseId不为null的标签声明,则返回false跳过解析
      // 获取id,这个id就是标签解析器的id,从接下来的分析中可以明确看出:这个id也是标签声明类(MappedStatement)实例化对象的id。
      id = builderAssistant.applyCurrentNamespace(id, false);

      if (this.configuration.hasStatement(id, false)) {
        MappedStatement previous = this.configuration.getMappedStatement(id, false); // issue #2
        if (previous.getDatabaseId() != null) {
          return false;
        }
      }
    }
    return true;
  }
复制代码
langDriver.createSqlSource();处理sql语句
这个方法就是来处理#{}, {“是否存在来判断SQL语句是否是动态SQL语句,并且把 select * from user where id = #{id} 转换为select * from user where id = ?。同时把#{id}中的id保存起来。
builderAssistant.addMappedStatement转换为MappedStatement对象实例
简单点说就是将
<select id="selectById" resultType="domain.User" parameterType="int">
            select * from user where id = #{id}
</select>
复制代码
转换为MappedStatement对象并保持到configuration中 具体代码如下:
public MappedStatement addMappedStatement(
      String id,
      SqlSource sqlSource,
      StatementType statementType,
      SqlCommandType sqlCommandType,
      Integer fetchSize,
      Integer timeout,
      String parameterMap,
      Class<?> parameterType,
      String resultMap,
      Class<?> resultType,
      ResultSetType resultSetType,
      boolean flushCache,
      boolean useCache,
      boolean resultOrdered,
      KeyGenerator keyGenerator,
      String keyProperty,
      String keyColumn,
      String databaseId,
      LanguageDriver lang,
      String resultSets) {

    if (unresolvedCacheRef) throw new IncompleteElementException("Cache-ref not yet resolved");

    id = applyCurrentNamespace(id, false);
    boolean isSelect = sqlCommandType == SqlCommandType.SELECT;
  //初始化MappenStatement.Builder
    MappedStatement.Builder statementBuilder = new MappedStatement.Builder(configuration, id, sqlSource, sqlCommandType);
    statementBuilder.resource(resource);
    statementBuilder.fetchSize(fetchSize);
    statementBuilder.statementType(statementType);
    statementBuilder.keyGenerator(keyGenerator);
    statementBuilder.keyProperty(keyProperty);
    statementBuilder.keyColumn(keyColumn);
    statementBuilder.databaseId(databaseId);
    statementBuilder.lang(lang);
    statementBuilder.resultOrdered(resultOrdered);
    statementBuilder.resulSets(resultSets);
    setStatementTimeout(timeout, statementBuilder);

    setStatementParameterMap(parameterMap, parameterType, statementBuilder);
    setStatementResultMap(resultMap, resultType, resultSetType, statementBuilder);
    setStatementCache(isSelect, flushCache, useCache, currentCache, statementBuilder);
  // 构造MappedStatement
    MappedStatement statement = statementBuilder.build();
  // 保存
    configuration.addMappedStatement(statement);
    return statement;
  }
复制代码
到这里 第一个select id="selectById"的标签声明的解析就结束了,然后继续通过XMLStatementBuilder类继续遍历下一个,直到Mapper文件的解析结束
很遗憾的说,推酷将在这个月底关闭。人生海海,几度秋凉,感谢那些有你的时光。
原文 https://juejin.im/post/5f193f26f265da22fa61879a- 本文标签: 数据 App XML 一对多 src 文章 XMLStatementBuilder id Statement 源码 UI CTO json 参数 build ACE mapper 希望 JDBC 服务器 js 配置 空间 实例 mybatis Connection Word SqlSessionFactory Collection 连接池 rand root https map 时间 Select 插件 dataSource 生命 SqlSessionFactoryBuilder IO 构造方法 tk web ip sql 代码 DOM 组织 对象初始化 http ORM cache equals HashSet update db cat 管理 parse list provider ask Action plugin session 并发 java node 数据库 NSA 遍历 value 总结 DDL Property sqlsession HashMap stream mysql tab find IDE 解析 key final entity 处理器 动态SQL bug ResultSet 认证
- 版权声明: 本文为互联网转载文章,出处已在文章中说明(部分除外)。如果侵权,请联系本站长删除,谢谢。
- 本文海报: 生成海报一 生成海报二


![[HBLOG]公众号](https://www.liuhaihua.cn/img/qrcode_gzh.jpg)

