Spring Cloud Bus快速入门Demo
1.什么是Spring Cloud Bus?
Spring Cloud Bus 是一个用于将分布式系统的节点连接起来的框架,它使用了轻量级消息代理来实现节点之间的通信。Spring Cloud Bus 可以将配置变更事件、状态变更事件和其他管理事件广播到系统中的所有节点,以便于各个节点可以及时响应。 Spring Cloud Bus 主要由两部分组成:消息代理和事件总线。消息代理是一个可插拔的组件,它可以使用 RabbitMQ、Kafka 等流行的消息中间件实现。事件总线则是在消息代理之上构建的一个抽象层,它提供了向所有节点广播事件的机制,并且对消息的序列化、反序列化、发送和接收进行了封装,让开发者可以专注于业务逻辑的实现。 Spring Cloud Bus 主要的使用场景是在分布式系统中对配置的管理。它可以将配置的变更事件广播到所有节点,从而让节点实时获取最新的配置。此外,Spring Cloud Bus 还可以用于状态的管理和监控,例如在节点启动、停止、重启等状态变更事件发生时,将事件广播到系统中的所有节点,以便于节点可以做出相应的响应。基本原理
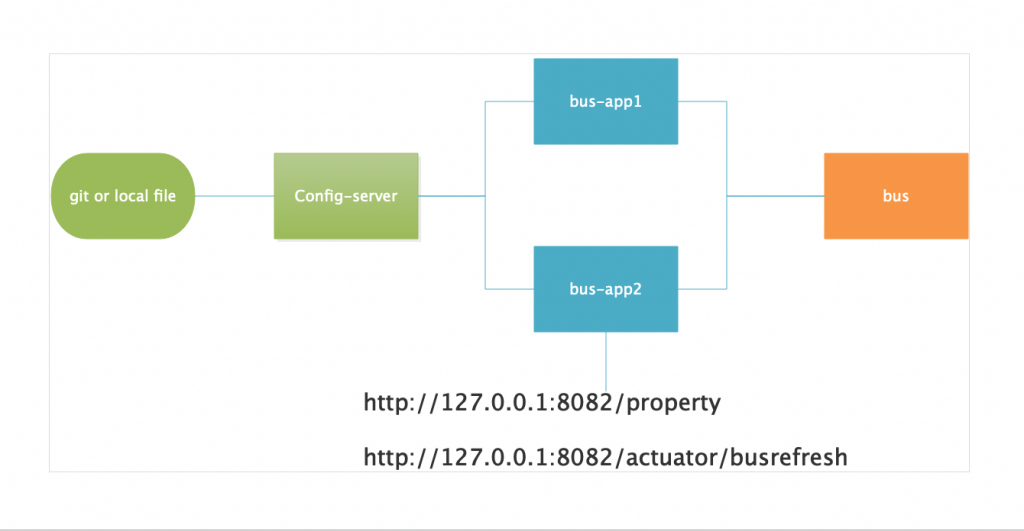
ConfigClient实例都监听MQ中同一个topic(默认是springCloudBus)。当一个服务刷新数据的时候,它会把这个信息放入到Topic中,这样其它监听同一Topic的服务就能得到通知,然后去更新自身的配置
2.环境搭建
rabbiitmqversion: '3'
services:
rabbitmq:
image: registry.cn-hangzhou.aliyuncs.com/zhengqing/rabbitmq:3.7.8-management
container_name: rabbitmq
hostname: my-rabbit
restart: unless-stopped
environment:
TZ: Asia/Shanghai
LANG: en_US.UTF-8
RABBITMQ_DEFAULT_VHOST: my_vhost
RABBITMQ_DEFAULT_USER: admin
RABBITMQ_DEFAULT_PASS: admin
volumes:
- "./rabbitmq/data:/var/lib/rabbitmq"
ports:
- "5672:5672"
- "15672:15672"docker-compose -f docker-compose-rabbitmq.yml -p rabbitmq up -d
http://127.0.0.1:15672 user/password:admin/admin

3.代码工程
实验目的
实验各个应用更新自身配置
pom.xml
<?xml version="1.0" encoding="UTF-8"?>
<project xmlns="http://maven.apache.org/POM/4.0.0"
         xmlns:xsi="http://www.w3.org/2001/XMLSchema-instance"
         xsi:schemaLocation="http://maven.apache.org/POM/4.0.0 http://maven.apache.org/xsd/maven-4.0.0.xsd">
    <parent>
        <artifactId>spring-cloud-bus</artifactId>
        <groupId>com.et</groupId>
        <version>1.0-SNAPSHOT</version>
    </parent>
    <modelVersion>4.0.0</modelVersion>

    <artifactId>bus-app1</artifactId>

    <properties>
        <maven.compiler.source>17</maven.compiler.source>
        <maven.compiler.target>17</maven.compiler.target>
    </properties>
    <dependencies>

        <dependency>
            <groupId>org.springframework.boot</groupId>
            <artifactId>spring-boot-starter-web</artifactId>
        </dependency>
        <dependency>
            <groupId>org.springframework.cloud</groupId>
            <artifactId>spring-cloud-starter-config</artifactId>
        </dependency>
        <dependency>
            <groupId>org.springframework.cloud</groupId>
            <artifactId>spring-cloud-starter-bootstrap</artifactId>
        </dependency>
        <dependency>
            <groupId>org.springframework.cloud</groupId>
            <artifactId>spring-cloud-starter-bus-amqp</artifactId>
        </dependency>
        <dependency>
            <groupId>org.springframework.boot</groupId>
            <artifactId>spring-boot-starter-actuator</artifactId>
        </dependency>
    </dependencies>
</project>
controller
package com.et.controller;

import org.springframework.beans.factory.annotation.Value;
import org.springframework.web.bind.annotation.GetMapping;
import org.springframework.web.bind.annotation.RestController;

/**
 * @author liuhaihua
 * @version 1.0
 * @ClassName DemoController
 * @Description todo
 * @date 2024/11/01/ 13:47
 */
@RestController
@RefreshScope
public class DemoController {
    @Value("${example.property}")
    private String exampleProperty;

    @GetMapping("/property")
    public String getProperty() {
        return exampleProperty;
    }
}@RefreshScope主要就是基于@Scope注解的作用域代理的基础上进行扩展实现的,加了@RefreshScope注解的类,在被Bean工厂创建后会加入自己的refresh scope 这个Bean缓存中,后续会优先从Bean缓存中获取,当配置中心发生了变更,会把变更的配置更新到spring容器的Environment中,并且同事bean缓存就会被清空,从而就会从bean工厂中创建bean实例了,而这次创建bean实例的时候就会继续经历这个bean的生命周期,使得@Value属性值能够从Environment中获取到最新的属性值,这样整个过程就达到了动态刷新配置的效果。启动类
package com.et;


import org.springframework.boot.SpringApplication;
import org.springframework.boot.autoconfigure.SpringBootApplication;

@SpringBootApplication
public class Bus1Application {


    public static void main(String[] args) {
        SpringApplication.run(Bus1Application.class, args);
    }


}server:
port: 8081
spring:
cloud:
config:
uri: http://127.0.0.1:8888/
#name: crm,config-client
name: config-client
profile: dev
rabbitmq:
host: 127.0.0.1
port: 5672
virtual-host: my_vhost
username: admin
password: admin
management:
endpoints:
web:
exposure:
include: "*"server:
port: 8082
spring:
cloud:
config:
uri: http://127.0.0.1:8888/
#name: crm,config-client
name: config-client
profile: dev
rabbitmq:
host: 127.0.0.1
port: 5672
virtual-host: my_vhost
username: admin
password: admin
management:
endpoints:
web:
exposure:
include: "*"代码仓库
4.测试
- 启动上节课讲的Config-Server应用(Spring Cloud Config快速入门Demo)
- 启动bus-app1应用
- 启动bus-app2应用
- 访问http://127.0.0.1:8082/property ,返回config-client-dev.yml文件里面配置值
- 修改config-client-dev.yml文件里面的值,然后post请求http://127.0.0.1:8082/actuator/busrefresh刷新客户端配置,
- 再次访问http://127.0.0.1:8082/property ,值变成新修改的值
- 访问http://127.0.0.1:8081/property ,值也是变成新修改的值
5.引用
正文到此结束
- 本文标签: Spring Cloud Bus Spring cloud
- 版权声明: 本文由HARRIES原创发布,转载请遵循《署名-非商业性使用-相同方式共享 4.0 国际 (CC BY-NC-SA 4.0)》许可协议授权
- 本文海报: 生成海报一 生成海报二
热门推荐
相关文章
Loading...


![[HBLOG]公众号](https://www.liuhaihua.cn/img/qrcode_gzh.jpg)

