
spring boot对接clerk 实现用户信息获取
在现代Web应用中,用户身份验证和管理是一个关键的功能。Clerk是一个提供身份验证和用户管理的服务,可以帮助开发者快速集成这些功能。在本文中,我们将介绍如何使用Spring Boot对接Clerk,以实现用户信息的获取。
1.介绍
Clerk提供了一套简单易用的API,用于处理用户身份验证、注册、会话管理等功能。通过将Clerk集成到Spring Boot应用中,我们可以轻松地获取用户信息,并在应用中实现个性化和安全的用户体验。
2.原理
Clerk通过RESTful API提供用户管理功能。我们可以使用Spring Boot的RestTemplate或WebClient来调用这些API。通过发送HTTP请求到Clerk的服务器,我们可以获取用户的详细信息,如用户名、电子邮件等。
3.实现步骤
3.1. 创建Clerk账户并设置应用
首先,你需要在Clerk官网上注册一个账户,并创建一个新的应用。获取API密钥和其他必要的配置参数。https://clerk.com/
3.2. 添加依赖
在你的Spring Boot项目的pom.xml文件中添加必要的依赖,比如用于进行HTTP请求的库。
<?xml version="1.0" encoding="UTF-8"?>
<project xmlns="http://maven.apache.org/POM/4.0.0"
         xmlns:xsi="http://www.w3.org/2001/XMLSchema-instance"
         xsi:schemaLocation="http://maven.apache.org/POM/4.0.0 http://maven.apache.org/xsd/maven-4.0.0.xsd">
    <parent>
        <artifactId>springboot-demo</artifactId>
        <groupId>com.et</groupId>
        <version>1.0-SNAPSHOT</version>
    </parent>
    <modelVersion>4.0.0</modelVersion>

    <artifactId>clerk</artifactId>

    <properties>
        <maven.compiler.source>8</maven.compiler.source>
        <maven.compiler.target>8</maven.compiler.target>
    </properties>
    <dependencies>
        <dependency>
            <groupId>org.springframework.boot</groupId>
            <artifactId>spring-boot-starter-web</artifactId>
        </dependency>

        <dependency>
            <groupId>org.springframework.boot</groupId>
            <artifactId>spring-boot-autoconfigure</artifactId>
        </dependency>
        <dependency>
            <groupId>org.springframework.boot</groupId>
            <artifactId>spring-boot-starter-test</artifactId>
            <scope>test</scope>
        </dependency>
        <dependency>
            <groupId>org.springframework.boot</groupId>
            <artifactId>spring-boot-starter-security</artifactId>
        </dependency>

        <dependency>
            <groupId>org.springframework.boot</groupId>
            <artifactId>spring-boot-starter-thymeleaf</artifactId>
        </dependency>
        <dependency>
            <groupId>com.squareup.okhttp3</groupId>
            <artifactId>okhttp</artifactId>
        </dependency>
    </dependencies>
</project>
3.3. 配置Clerk API
在application.properties或application.yml中配置Clerk相关的API密钥和URL。
clerk.api-key=sk_test_Ixxx
clerk.frontend-api-key=pk_test_cxxx
3.4. 创建服务类以调用Clerk API
使用RestTemplate创建一个服务类,用于与Clerk API进行交互。
package com.et.clerk.service;

import okhttp3.*;
import org.springframework.beans.factory.annotation.Value;
import org.springframework.stereotype.Service;

import java.io.IOException;

@Service
public class ClerkService {

    @Value("${clerk.api-key}")
    private String apiKey;

    private final OkHttpClient client = new OkHttpClient();

    public String getUserInfo(String userId) throws IOException {
        Request request = new Request.Builder()
                .url("https://api.clerk.dev/v1/users/" + userId)
                .addHeader("Authorization", "Bearer " + apiKey)
                .build();

        try (Response response = client.newCall(request).execute()) {
            if (!response.isSuccessful()) throw new IOException("Unexpected code " + response);
            return response.body().string();
        }
    }
}
3.5. 使用服务类获取用户信息
在你的控制器中调用ClerkService的方法来获取用户信息。
package com.et.clerk.controller;

import com.et.clerk.service.ClerkService;
import org.springframework.beans.factory.annotation.Autowired;
import org.springframework.web.bind.annotation.GetMapping;
import org.springframework.web.bind.annotation.PathVariable;
import org.springframework.web.bind.annotation.RequestMapping;
import org.springframework.web.bind.annotation.RestController;

import java.io.IOException;

@RestController
@RequestMapping("/api/users")
public class UserController {

    @Autowired
    private ClerkService clerkService;

    @GetMapping("/{userId}")
    public String getUserInfo(@PathVariable String userId) throws IOException {
        return clerkService.getUserInfo(userId);
    }
}
3.6. 处理响应
根据Clerk API的响应格式,解析并处理用户信息。你可以将响应转换为一个Java对象,以便在应用中更方便地使用。
代码仓库
4.测试
启动Springboot应用
登录测试
输入http://127.0.0.1:8080/login,出现登录页面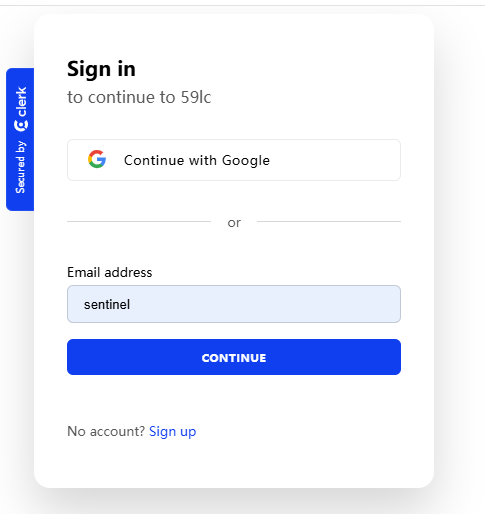
获取用户

5.总结
通过以上步骤,我们成功地在Spring Boot应用中集成了Clerk,实现了用户信息的获取。Clerk的API简单易用,可以帮助开发者快速实现用户管理功能。希望这篇文章能帮助你更好地理解如何在Spring Boot中对接Clerk。
6.引用
正文到此结束
- 本文标签:
- 版权声明: 本文由HARRIES原创发布,转载请遵循《署名-非商业性使用-相同方式共享 4.0 国际 (CC BY-NC-SA 4.0)》许可协议授权
- 本文海报: 生成海报一 生成海报二
热门推荐


相关文章


Loading...
![[HBLOG]公众号](https://www.liuhaihua.cn/img/qrcode_gzh.jpg)

