【Win10】开发中的新特性及原有的变更(二)
声明:本文内容适用于 Visual Studio 2015 RC 及 Windows 10 10069 SDK 环境下,若以后有任何变更,请以新的特性为准。
十一、x:Bind 中使用强制转换
这点是补充上一篇文章的,当时忘了写(-__-)b
场景:需要绑定显示某个纯色背景的控件的背景颜色RGB值(感觉挺绕口的)。
因为在传统的绑定里,由于是动态的,而且我们也能确保 Background 的类型为 SolidColorBrush 。
那么我们可以这么写绑定:
<Page x:Class="Build2015XamlDemo.XBindDemo2" xmlns="http://schemas.microsoft.com/winfx/2006/xaml/presentation" xmlns:x="http://schemas.microsoft.com/winfx/2006/xaml" xmlns:local="using:Build2015XamlDemo" xmlns:d="http://schemas.microsoft.com/expression/blend/2008" xmlns:mc="http://schemas.openxmlformats.org/markup-compatibility/2006" mc:Ignorable="d"> <Grid Background="{ThemeResource ApplicationPageBackgroundThemeBrush}"> <StackPanel> <Border x:Name="brd" Background="Red" Width="100" Height="100"/> <Border BorderBrush="Green" BorderThickness="2"> <StackPanel> <TextBlock Text="Binding 传统绑定" /> <TextBlock Text="{Binding ElementName=brd,Path=Background.Color.R}" /> <TextBlock Text="{Binding ElementName=brd,Path=Background.Color.G}" /> <TextBlock Text="{Binding ElementName=brd,Path=Background.Color.B}" /> </StackPanel> </Border> </StackPanel> </Grid> </Page>
尽管控件的 Background 属性的类型是 Brush,但我们已经确保为 SolidColorBrush,因此在运行时,不会发生错误。
但是,在新的绑定 x:Bind 里这就没法编译通过了,因为 Brush 类并不存在 Color 属性,但是我们已经可以确保这里的 Background 一定是 SolidColorBrush 。在 x:Bind 里我们可以使用强制转换来完成这个功能。
<Page x:Class="Build2015XamlDemo.XBindDemo2" xmlns="http://schemas.microsoft.com/winfx/2006/xaml/presentation" xmlns:x="http://schemas.microsoft.com/winfx/2006/xaml" xmlns:local="using:Build2015XamlDemo" xmlns:d="http://schemas.microsoft.com/expression/blend/2008" xmlns:mc="http://schemas.openxmlformats.org/markup-compatibility/2006" mc:Ignorable="d"> <Grid Background="{ThemeResource ApplicationPageBackgroundThemeBrush}"> <StackPanel> <Border x:Name="brd" Background="Red" Width="100" Height="100"/> <Border BorderBrush="Green" BorderThickness="2"> <StackPanel> <TextBlock Text="Binding 传统绑定" /> <TextBlock Text="{Binding ElementName=brd,Path=Background.Color.R}" /> <TextBlock Text="{Binding ElementName=brd,Path=Background.Color.G}" /> <TextBlock Text="{Binding ElementName=brd,Path=Background.Color.B}" /> </StackPanel> </Border> <Border BorderBrush="Blue" BorderThickness="2"> <StackPanel> <TextBlock Text="x:Bind 编译绑定" /> <TextBlock Text="{x:Bind Path=brd.Background.(SolidColorBrush.Color).R}" /> <TextBlock Text="{x:Bind Path=brd.Background.(SolidColorBrush.Color).G}" /> <TextBlock Text="{x:Bind Path=brd.Background.(SolidColorBrush.Color).B}" /> </StackPanel> </Border> </StackPanel> </Grid> </Page>
PS:因为 x:Bind 里没有 ElementName 这个旧绑定的属性,但是 x:Bind 的上下文为 Page 或 UserControl,而控件是 Page 或 UserControl 的成员,因此 Path 改为上面的写法。
十二、根据不同设备类型加载不同的 View
在上一篇里,我们使用了一个自定义 StateTrigger 来实现在 Desktop 和 Mobile 下显示不同的文本。这对于根据设备类型适配是很有效的。当然,园子里的东邪独孤(老周)给出的这篇 【Win 10应用开发】如何知道UAP在哪个平台上运行 ,使用后台代码来判断也是一个方法。
对于 View 里仅仅需要少量区别化的话,上面两种方法都是最理想的方案。但是,假如我们需要 Desktop 和 Mobile 下呈现完完全全不同的内容的话,上面的方法就显得难以应付了,维护起来也麻烦。因此,需要一种方案解决这种问题。而现在微软给出的方案就是类似于解决本地化的方法,使用特定名字的文件夹。

如上图,文件夹的名字需要以" DeviceFamily- "开头,并且以设备名称结尾,里面 View 的文件名必须跟文件夹外面对应的 View 的文件名一致(即这里同样是 MainPage)。
PS:目前已知的设备名称有: Desktop (代表桌面系统)、 Mobile (代表移动系统)、 Xbox (这个你懂的)、 Team (代表 Surface Hub,就是 Build 大会上那台 72 寸大家伙)。
由于目前官方文档还没出来,应该有更多的设备类型。(据说还有个 Holographic 和 IoT,不过目前情况无法测试嘛~~)
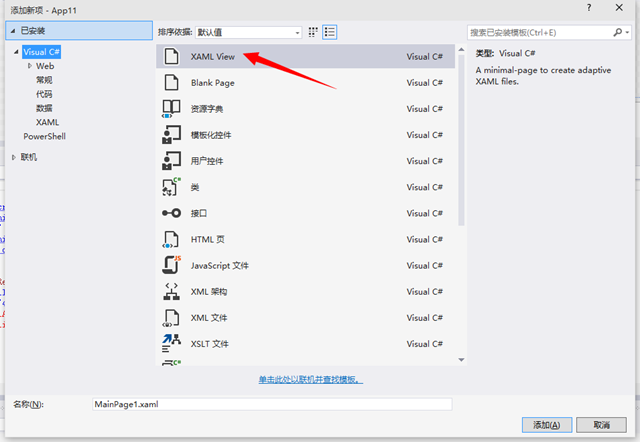
细心的你们可能发现,在上面的图片中文件夹里的 xaml 是没有后台文件的。在 Visual Studio 里创建文件选择这个就可以了:

那么创建出来的文件就会像我上面图片里的一样了。
十三、x:DeferLoadStrategy(延迟加载)
在 Web 开发中,比较常见的一个例子就是用户注册时,验证码只有在用户焦点落在输入验证码的文本框时才开始正式加载,而不是页面加载的时候就开始加载。
在 XAML 里我们以前可能比较常做的方案就是在页面里先预留一个 Image 控件,并且隐藏它,等到真正输入验证码时再设置 Image 控件的 Source。
而 x:DeferLoadStrategy 则再进一步,在需要的情况下再初始化控件。这就更加节约了内存加改善了效率了。
1、基本 Demo
XAML:
<Page x:Class="Build2015XamlDemo.XDeferLoadStrategyDemo" xmlns="http://schemas.microsoft.com/winfx/2006/xaml/presentation" xmlns:x="http://schemas.microsoft.com/winfx/2006/xaml" xmlns:local="using:Build2015XamlDemo" xmlns:d="http://schemas.microsoft.com/expression/blend/2008" xmlns:mc="http://schemas.openxmlformats.org/markup-compatibility/2006" mc:Ignorable="d"> <Grid Background="{ThemeResource ApplicationPageBackgroundThemeBrush}"> <StackPanel HorizontalAlignment="Center" VerticalAlignment="Center"> <Border Width="150" Height="100" Background="Red" x:Name="brdDeferLoad" x:DeferLoadStrategy="Lazy"></Border> <Button Content="检查" Click="BtnCheck_Click" /> <Button Content="加载" Click="BtnLoad_Click" /> </StackPanel> </Grid> </Page>
后台代码:
using System; using Windows.UI.Popups; using Windows.UI.Xaml; using Windows.UI.Xaml.Controls; namespace Build2015XamlDemo { public sealed partial class XDeferLoadStrategyDemo : Page { public XDeferLoadStrategyDemo() { this.InitializeComponent(); } private async void BtnCheck_Click(object sender, RoutedEventArgs e) { if (brdDeferLoad == null) { await new MessageDialog("还没加载").ShowAsync(); } else { await new MessageDialog("已加载").ShowAsync(); } } private void BtnLoad_Click(object sender, RoutedEventArgs e) { this.FindName(nameof(brdDeferLoad)); } } }
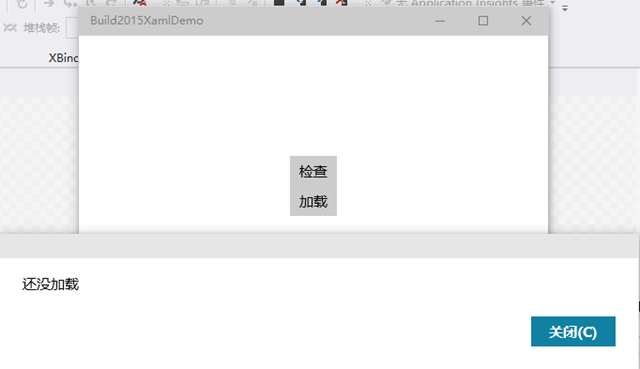
运行程序,然后点击检查按钮

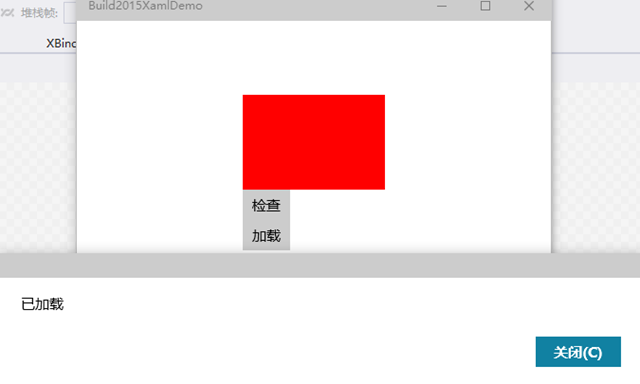
点击加载按钮

PS:执行 this.FindName 方法,XAML 树将会检索给定名字的控件,如果还没初始化的话,就会初始化。
2、使用 StateTrigger 来确定需要加载的控件
XAML:
<Page x:Class="Build2015XamlDemo.XDeferLoadStrategyDemo2" xmlns="http://schemas.microsoft.com/winfx/2006/xaml/presentation" xmlns:x="http://schemas.microsoft.com/winfx/2006/xaml" xmlns:local="using:Build2015XamlDemo" xmlns:d="http://schemas.microsoft.com/expression/blend/2008" xmlns:mc="http://schemas.openxmlformats.org/markup-compatibility/2006" mc:Ignorable="d"> <Grid Background="{ThemeResource ApplicationPageBackgroundThemeBrush}"> <VisualStateManager.VisualStateGroups> <VisualStateGroup> <VisualState x:Name="narrow"> <VisualState.StateTriggers> <AdaptiveTrigger MinWindowWidth="600" /> </VisualState.StateTriggers> <VisualState.Setters> <Setter Target="brdLeft.Visibility" Value="Visible" /> </VisualState.Setters> </VisualState> <VisualState x:Name="wide"> <VisualState.StateTriggers> <AdaptiveTrigger MinWindowWidth="850" /> </VisualState.StateTriggers> <VisualState.Storyboard> <Storyboard> <ObjectAnimationUsingKeyFrames Storyboard.TargetName="brdRight" Storyboard.TargetProperty="Visibility"> <DiscreteObjectKeyFrame Value="Visible" KeyTime="0" /> </ObjectAnimationUsingKeyFrames> </Storyboard> </VisualState.Storyboard> </VisualState> </VisualStateGroup> </VisualStateManager.VisualStateGroups> <Grid.ColumnDefinitions> <ColumnDefinition Width="500" /> <ColumnDefinition Width="250" /> <ColumnDefinition Width="*" /> </Grid.ColumnDefinitions> <Border Background="Red" /> <Border Background="Green" x:Name="brdLeft" Grid.Column="1" x:DeferLoadStrategy="Lazy" /> <Border Background="Blue" x:Name="brdRight" Grid.Column="2" x:DeferLoadStrategy="Lazy" /> </Grid> </Page>
效果:

可见,在使用 Setter 或者 Storyboard 的情况下,如果控件没加载,那么系统将会帮我们加载,不再需要在后台代码中调用 this.FindName 方法。
十四、InkCanvas 控件
这是一个新的控件,就像一个涂鸦画板一样。
测试代码:
XAML:
<Page x:Class="Build2015XamlDemo.InkCanvasDemo" xmlns="http://schemas.microsoft.com/winfx/2006/xaml/presentation" xmlns:x="http://schemas.microsoft.com/winfx/2006/xaml" xmlns:local="using:Build2015XamlDemo" xmlns:d="http://schemas.microsoft.com/expression/blend/2008" xmlns:mc="http://schemas.openxmlformats.org/markup-compatibility/2006" mc:Ignorable="d"> <Grid Background="{ThemeResource ApplicationPageBackgroundThemeBrush}"> <Grid.ColumnDefinitions> <ColumnDefinition Width="Auto" /> <ColumnDefinition /> </Grid.ColumnDefinitions> <StackPanel Grid.Column="0"> <ComboBox x:Name="cmb" SelectionChanged="ComboBox_SelectionChanged"> <ComboBoxItem IsSelected="True">Red</ComboBoxItem> <ComboBoxItem>Green</ComboBoxItem> </ComboBox> </StackPanel> <Grid Grid.Column="1" Background="DarkGray"> <Border Background="White" Margin="20"> <InkCanvas x:Name="canvas" /> </Border> </Grid> </Grid> </Page>
后台代码:
using Windows.UI; using Windows.UI.Xaml.Controls; // The Blank Page item template is documented at http://go.microsoft.com/fwlink/?LinkId=234238 namespace Build2015XamlDemo { /// <summary> /// An empty page that can be used on its own or navigated to within a Frame. /// </summary> public sealed partial class InkCanvasDemo : Page { public InkCanvasDemo() { this.InitializeComponent(); UpdateInkCanvas(); } private void UpdateInkCanvas() { var colorStr = ((ComboBoxItem)(cmb.SelectedItem)).Content.ToString(); Color color; if (colorStr == "Red") { color = Colors.Red; } if (colorStr == "Green") { color = Colors.Green; } // 必须设置,否则无法响应设备输入。 canvas.InkPresenter.InputDeviceTypes = Windows.UI.Core.CoreInputDeviceTypes.Mouse | Windows.UI.Core.CoreInputDeviceTypes.Pen | Windows.UI.Core.CoreInputDeviceTypes.Touch; var attributes = canvas.InkPresenter.CopyDefaultDrawingAttributes(); attributes.Color = color; canvas.InkPresenter.UpdateDefaultDrawingAttributes(attributes); } private void ComboBox_SelectionChanged(object sender, SelectionChangedEventArgs e) { if (canvas != null) { UpdateInkCanvas(); } } } }
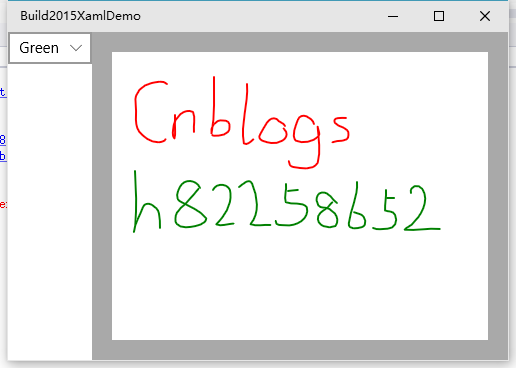
效果:

此外,attributes 对象里还有很多属性可以设置,例如笔触大小等等,做一个“图画”出来可不成问题。
今次就讲到这里了,原本还想说一个用户输入数据的验证,但是这项功能在最新的 SDK 里已经被删除了。而且 Windows 10 RTM 发行时也不会再有。(不排除以后更新会回来)
这是微软官方人员在 github 上的回答(地址: https://github.com/Microsoft/Windows-universal-samples/issues/21 ):

转载请保留到该 页面 的链接 http://www.cnblogs.com/h82258652/articles/4517357.html 。谢谢!


![[HBLOG]公众号](https://www.liuhaihua.cn/img/qrcode_gzh.jpg)

