git在eclipse中的配置(转载)
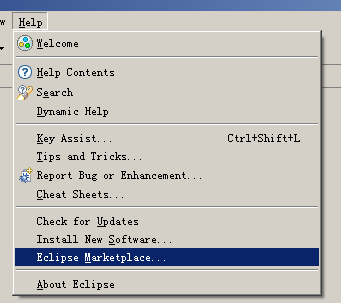
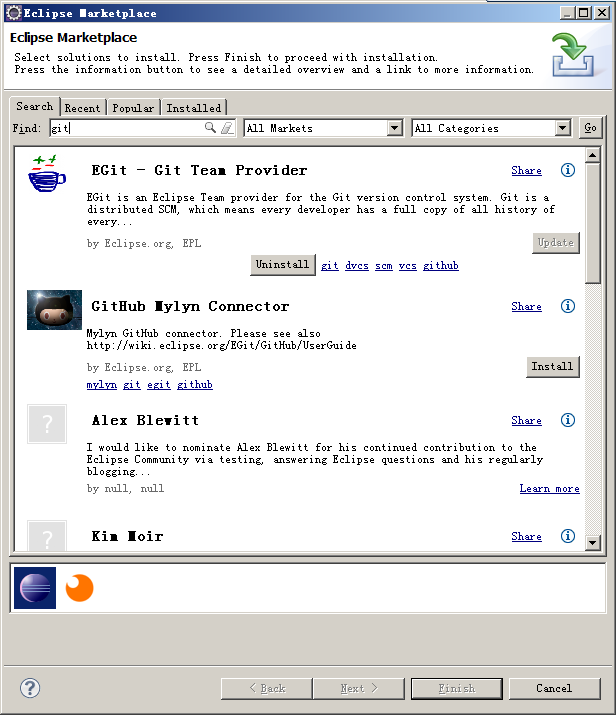
一_安装EGIT插件
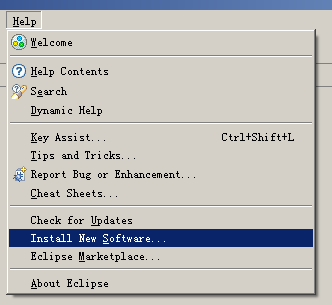
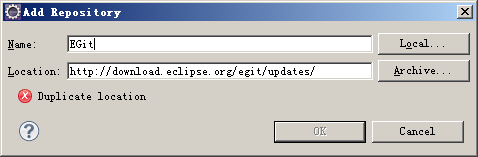
http://download.eclipse.org/egit/updates/
或者使用Eclipse Marketplace,搜索EGit
二_使用EGIT前的配置
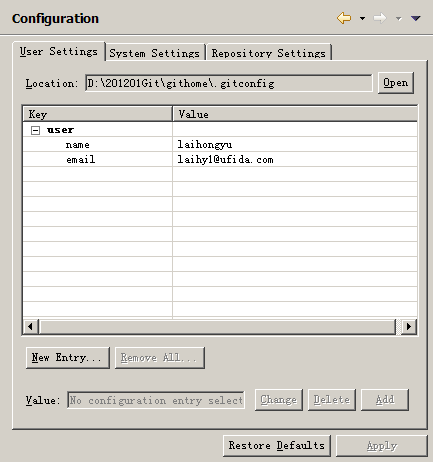
配置个人信息,最重要的是user.name和user.email
l Preferences > Team > Git > Configuration
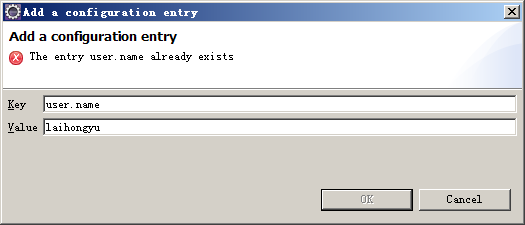
l New Entry
三_新建GIT仓库
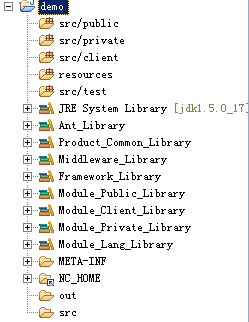
新建NC module project
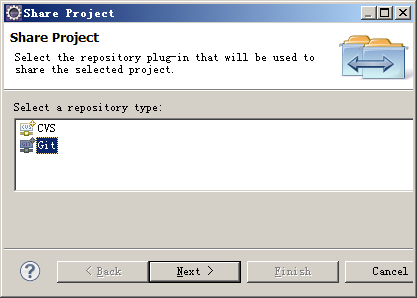
l File > Team > Share Project 选择GIT
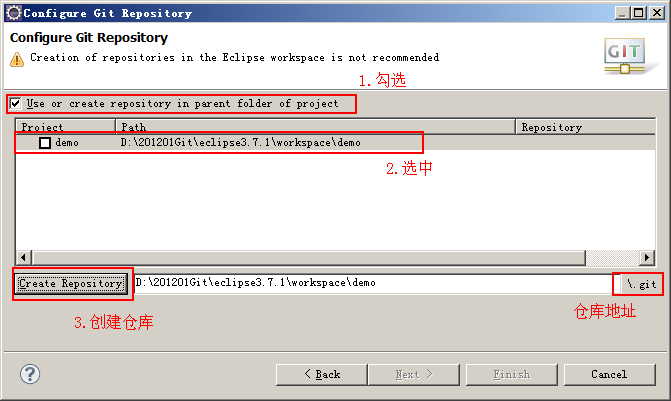
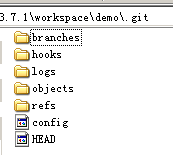
创建仓库后,在$workspacedemo目录下的.git文件夹,就是git的仓库地址。和CVS、SVN不同,GIT不会在每一个目录下建立版本控制文件夹,仅在根目录下建立仓库
同时,eclipse中的project也建立git版本控制,此时未创建分支,处于NO-HEAD状态
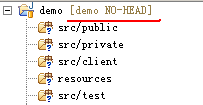
文件夹中的符号”?”表示此文件夹处于untracked状态,这样就成功创建GIT仓库。
四_配置.gitignore
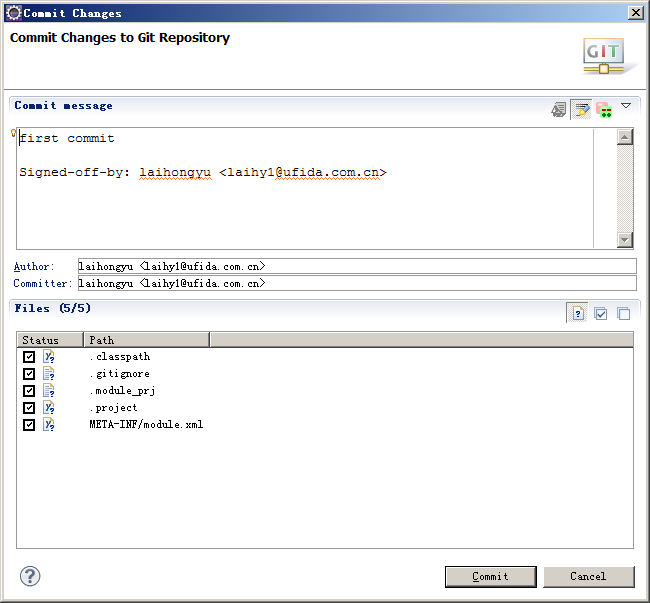
此时我们尝试做一次提交
l Team -> Commit…

如上图所示,Author和Committer会默认为Git配置的用户信息。下面的Files窗口中可以看到此次提交的文件,其中有非常多带有NC_HOME的文件,此时可以猜测出,在我们的project中链接的NC_HOME也被GIT默认到版本控制中了,如下图:

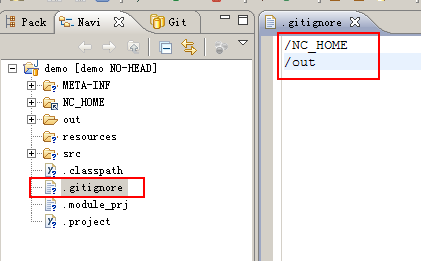
显然NC_HOME和out是不需要进行版本控制的,我们可以通过配置.gitignore来排除这两个文件夹
打开Navigator窗口,在project根目录中添加.gitignore文件,将需要排除控制的目录写入.gitignore文件中
再次尝试commit,需要提交的文件已经被过滤
首次提交后,会自动生成master分支

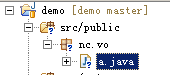
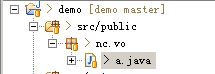
然后在public中新建一个文件,可以看到图标依然是问号,处于untracked状态,即git没有对此文件进行监控
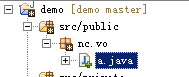
通过Team -> Add to index可以将文件加入git索引,进行版本监控

可以看到图标显示也有了变化(EGIT中只要Commit就可以默认将untracked的文件添加到索引再提交更新,不需要分开操作)
也可以通过Team -> Untrack将文件从索引控制中排除。
将此次新增的文件commit到仓库中,文件将处于unmodified状态,或者说,这就是一种staged状态
然后修改文件的内容,文件将处于modified状态
五_查看历史记录
Team -> Show in history可以查看版本历史提交记录
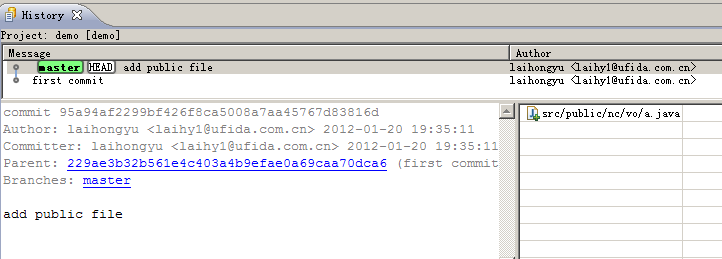
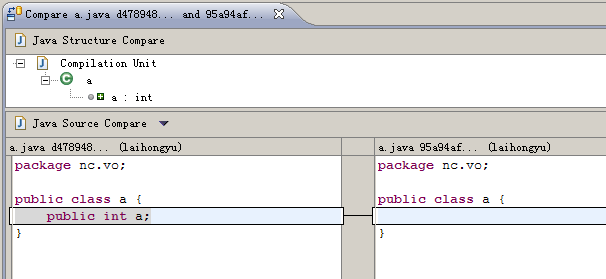
可以选择对比模式

六_远程GIT仓库
此小结的前提是已经搭建GIT服务器,并通过SSH协议连接,可参看文档《RHEL下搭建GIT服务器》《WindowsXP下搭建GIT服务器》 《GIT服务器使用基础》。本文使用RHEL5.5系统下的GIT-2012-01-11,用户root/password,GIT仓库统一存放在 /app/gitspace目录下。首先通过shell工具连接到服务器,建立空仓库gitdemo,此时的ssh访问地址如下,分别由协议名称、用户名、IP、端口、git仓库目录组成。
ssh://root@192.168.1.101:22/app/gitspace/gitdemo
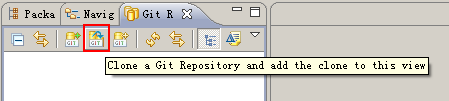
打开GIT资源库窗口,选择克隆资源库

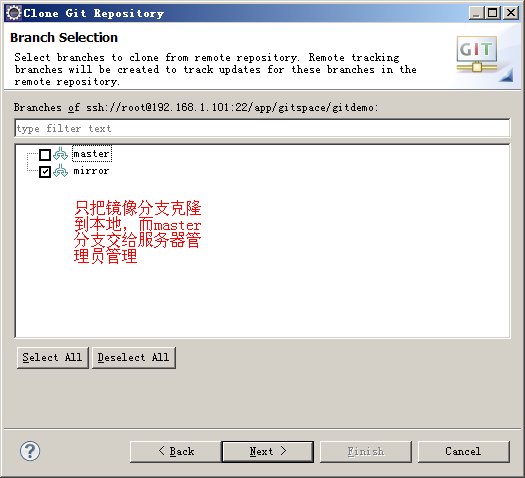

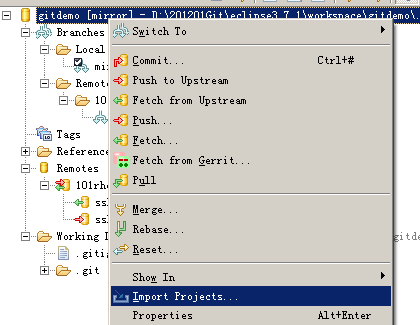
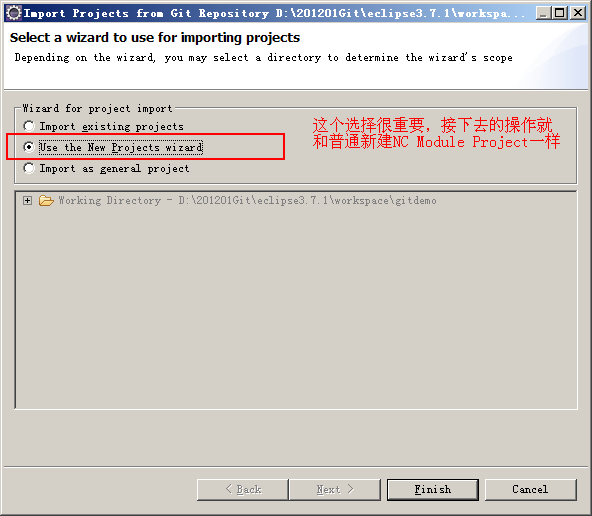
现在已经把远程的GIT仓库克隆到本地,接下来需要将仓库检出为NC模块项目。
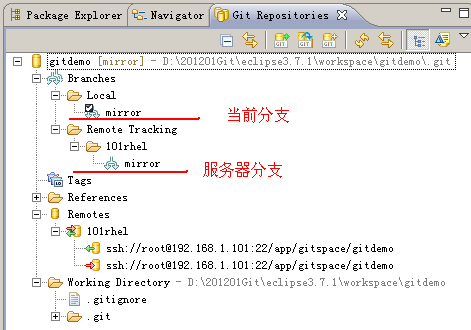
最后得到gitdemo模块项目,分支是mirror

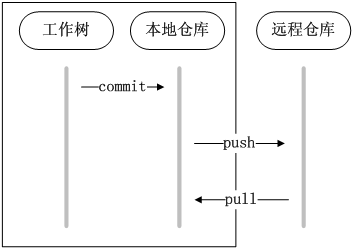
七_推送远程仓库
克隆服务器端仓库后,会在本地建立一个一样的仓库,称本地仓库。在本地进行commit操作将把更新提交到本地仓库,然后可以将服务器端的更新pull到本地仓库进行合并,最后将合并好的本地仓库push到服务器端,这样就进行了一次远程提交。
 然后push到服务器端的mirror分支,Team -> remote -> Push
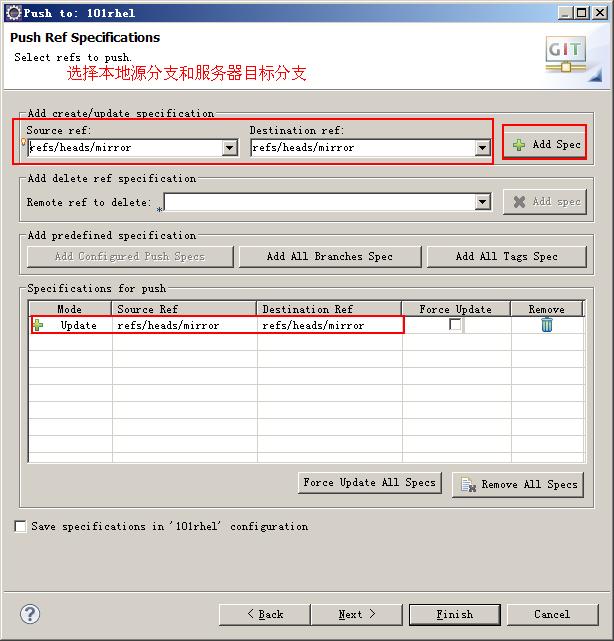 完成推送后,可以在服务器端mirror镜像的log中查看到此次记录

八_解决推送冲突
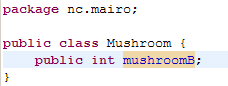
多人协作开发的情况下,往服务器推送更新时难免出现冲突,所以推送之前需要解决服务器端的最新版本和本地仓库的冲突。Pull操作就是把服务器端的更新拉拢到本地仓库进行合并,解决好合并冲突后,就可以顺利push到服务器分支了。 假设现在Mairo兄弟在用GIT协作开发NewSuperMairoBro游戏,目前服务器端的mushroom.java文件的内容如下: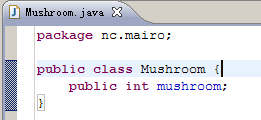 MairoBro克隆出代码后,Mairo哥哥做了如下修改
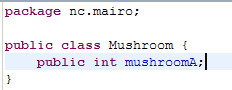 Mairo弟弟做了如下修改
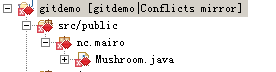
 然后Mairo弟弟先push代码,Mairo哥哥使用pull来合并本地仓库和远程仓库,将发行文件出现冲突,此时GIT会自动合并冲突的文件,如下图所示:
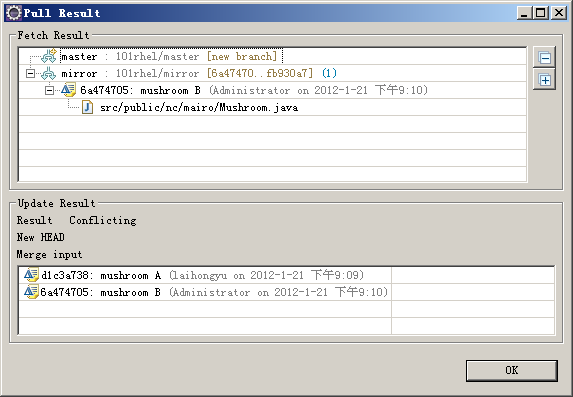
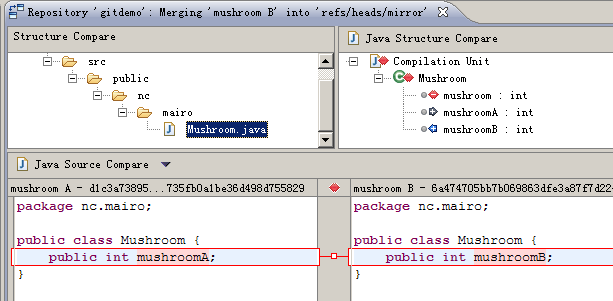
 很明显自动合并的冲突文件不能直接使用,我们可以手动调整,右键发生冲突的文件,选择Team -> Merge Tool
 第一项是将GIT自动合并过的文件和服务器端文件进行对比
第二项是用本地最新版本的文件和服务器端文件进行对比,建议用此项
接下来就是熟悉的对比界面
第一项是将GIT自动合并过的文件和服务器端文件进行对比
第二项是用本地最新版本的文件和服务器端文件进行对比,建议用此项
接下来就是熟悉的对比界面
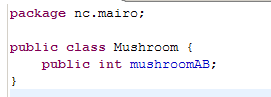
 Mairo哥哥将冲突文件修改如下
 然后右键点击此冲突文件,选择Team -> Add to index再次将文件加入索引控制,此时文件已经不是冲突状态,并且可以进行提交并push到服务器端
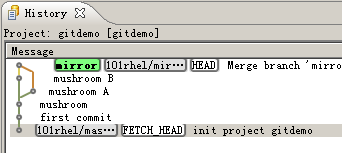
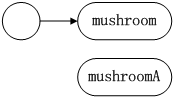
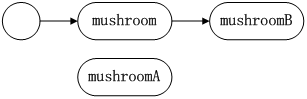
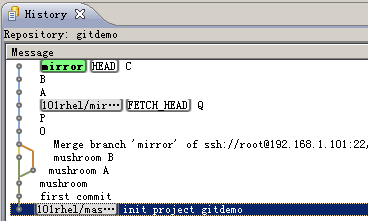
 解决合并冲突后,Mairo弟弟只需要将服务器中合并后的版本pull到本地,就完成了一次协作开发的代码合并。从历史记录中可以看到,从mushroom开始历史进入分支,先是mushroomA的记录,然后是mushroomB的记录,最后历史分支合并。
九_Rebase和Merge的区别
Rebase和Merge操作最终的结果是一样的,但是实现原理不一样。 从上面的MairoBro例子可以知道pull大概对历史记录进行了怎样的合并操作,其实默认pull的操作就是一个分支的merge操作,如下图重现一下: Mairo弟弟的提交记录如下: Mairo哥哥的提交记录如下:
 首先是Mairo弟弟把更新push到服务器,这样服务器端的记录就和Mairo弟弟本地的记录是一样的,接着Mairo哥哥执行pull操作,现在分析下pull是如何操作的。
l pull默认就是先把服务器端的最新记录更新到本地的Remote Tracking中对应的mirror分支
l 接着对Local的mirror分支和Remote Tracking的mirror分支进行merge操作
首先是Mairo弟弟把更新push到服务器,这样服务器端的记录就和Mairo弟弟本地的记录是一样的,接着Mairo哥哥执行pull操作,现在分析下pull是如何操作的。
l pull默认就是先把服务器端的最新记录更新到本地的Remote Tracking中对应的mirror分支
l 接着对Local的mirror分支和Remote Tracking的mirror分支进行merge操作
 Merge操作后的结果就是会新增加一个merge记录节点,如下所示:
 从上图可以看出,mushroomA是在mushroomB之前的,这个时间关系不取决于谁先执行push,而取决于本地仓库中谁先执行commit。所以merge会按照时间顺序严格的记录每一次commit。
接下来看看rebase,其实rebase也是把两个分支进行合并的操作,当Mairo弟弟push更新后,服务器端的mirror分支的历史如下:
Mairo哥哥本地的历史如下:
现在Mairo哥哥不是执行merge操作,而是执行rebase操作,最后结果如下:
从上图可以看出,mushroomA是在mushroomB之前的,这个时间关系不取决于谁先执行push,而取决于本地仓库中谁先执行commit。所以merge会按照时间顺序严格的记录每一次commit。
接下来看看rebase,其实rebase也是把两个分支进行合并的操作,当Mairo弟弟push更新后,服务器端的mirror分支的历史如下:
Mairo哥哥本地的历史如下:
现在Mairo哥哥不是执行merge操作,而是执行rebase操作,最后结果如下:
 很明显的区别是没有出现分支的记录,而且注意到mushroomA*,请注意这个记录和mushroomA不是同一个记录,我们先分析下rebase操作下,Mairo哥哥的历史记录都做了哪些变化:
l 先将当前分支的更新部分保存到临时区域,而当前分支重置到上一次pull的记录
很明显的区别是没有出现分支的记录,而且注意到mushroomA*,请注意这个记录和mushroomA不是同一个记录,我们先分析下rebase操作下,Mairo哥哥的历史记录都做了哪些变化:
l 先将当前分支的更新部分保存到临时区域,而当前分支重置到上一次pull的记录
 l 然后将服务器端的更新添加到当前分支,此时当前分支和服务器端分支是一样的
 l 最后将原分支的更新部分mushroomA提交到当前分支的后面,就是要在mushroomB的后面添加mushroomA的更新,当然此时更新记录已经不是之前的mushroomA了,如果出现冲突则使用对比工具解决冲突,最后记录变成mushroomA*。
如果Mairo哥哥提交过mushroomA1、mushroomA2、mushroomA3,那么执行rebase后会对mushroomA1、 mushroomA2、mushroomA3分别顺序执行上图所示的合并,最后记录为mushroomA1*、mushroomA2*、 mushroomA3*。很显然rebase操作更复杂,冲突的概率也更高,并且不是按照时间顺序记录。
l 最后将原分支的更新部分mushroomA提交到当前分支的后面,就是要在mushroomB的后面添加mushroomA的更新,当然此时更新记录已经不是之前的mushroomA了,如果出现冲突则使用对比工具解决冲突,最后记录变成mushroomA*。
如果Mairo哥哥提交过mushroomA1、mushroomA2、mushroomA3,那么执行rebase后会对mushroomA1、 mushroomA2、mushroomA3分别顺序执行上图所示的合并,最后记录为mushroomA1*、mushroomA2*、 mushroomA3*。很显然rebase操作更复杂,冲突的概率也更高,并且不是按照时间顺序记录。
十_Rebase和Merge如何选择的简单解析
此小结为什么说是简单解析呢,因为rebase和merge的选择问题讨论比较激烈,笔者也没有一个定论,而且git也处于研究发展阶段,很多理论还没有完全的纯熟。 对于一个多人开发团队频繁提交更新的情况,如果使用merge会使得历史线图非常复杂,并且merge一次就会新增一个记录点,如果使用rebase就是完全的线性开发。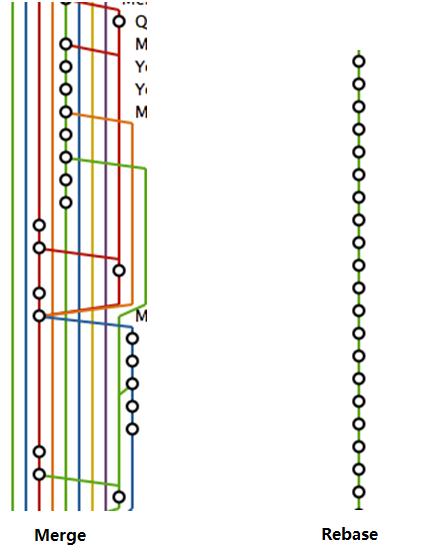 上图所示是Merge和Rebase的两个结果,显然你不想要merge的混乱结果吧,你能告诉我merge图中那条线是master分支吗?
所以给出如下建议,如果同一文件反复修改或提交次数比较多,预期会出现很多的conflict,那么可以使用merge合并,仅需要解决一次冲突即 可(不过,大范围主题式的修改,是不是应该事先就新开一个分支呢?);如果修改范围小,预期conflict少,则建议使用rebase。
EGIT中默认的pull操作是Fetch+Merge,如果要用rebase,可以分开操作。先执行Fetch更新remote tracking,再执行rebase进行合并(下一小节将介绍rebase操作)。或者修改pull的默认操作,在.git/config文件中配置:
上图所示是Merge和Rebase的两个结果,显然你不想要merge的混乱结果吧,你能告诉我merge图中那条线是master分支吗?
所以给出如下建议,如果同一文件反复修改或提交次数比较多,预期会出现很多的conflict,那么可以使用merge合并,仅需要解决一次冲突即 可(不过,大范围主题式的修改,是不是应该事先就新开一个分支呢?);如果修改范围小,预期conflict少,则建议使用rebase。
EGIT中默认的pull操作是Fetch+Merge,如果要用rebase,可以分开操作。先执行Fetch更新remote tracking,再执行rebase进行合并(下一小节将介绍rebase操作)。或者修改pull的默认操作,在.git/config文件中配置:
 上述配置只对mirror分支有效,也可做全局配置,在$HOME/.gitconfig中配置,windows系统如果没有配置HOME变量的话就默认在$documents and settings/ USER目录下:

十一_Fetch和Rebase
MairoBro来做fetch和rebase的测试,首先Mairo弟弟在client中添加文件OPQ分别提交,并push到服务器,如图: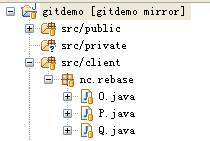
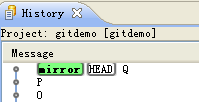 此时服务器端的历史已经被更新,但是Mairo哥哥的remote tracking中mirror分支并没有更新到最新的记录,如图:
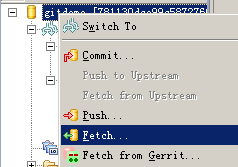
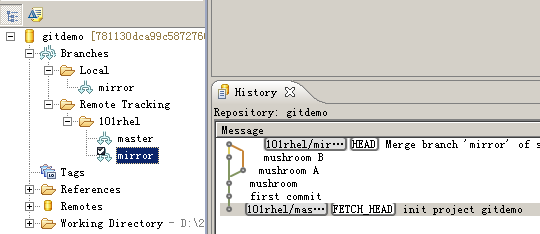 所以需要更新remote tracking中的分支,使得它与服务器端的分支同步,右键点击资源库选择Fetch
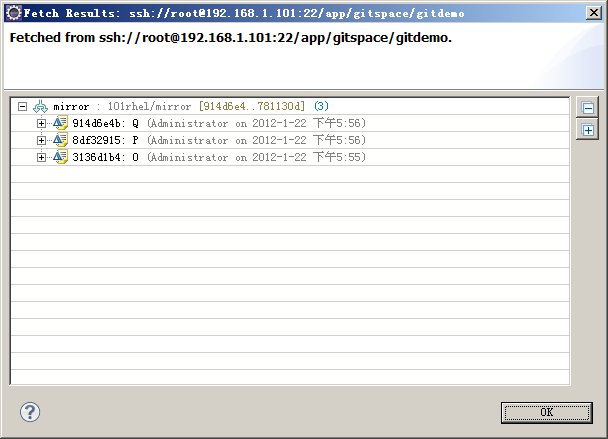 这样就更新了本地的remote tracking中的分支,使得它和服务器端分支同步。
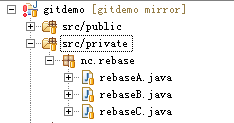
 然后Mairo哥哥在本地的private中添加文件ABC,并分别提交到本地仓库中。
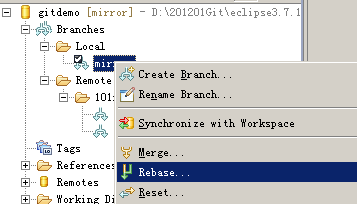
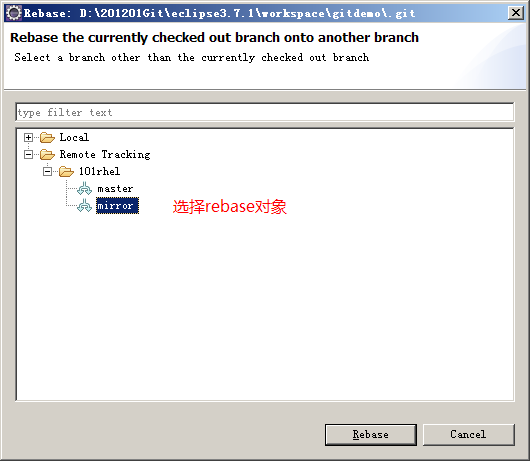
 然后将本地mirror分支和remote tracking中的mirror分支进行rebase,先checkout本地mirror分支 ,然后右键点击选择Rebase
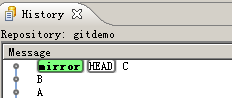
 如上图可以看到历史记录的顺序是OPQABC,已经rebase成功,接着push到服务器即可。
十二_重置功能
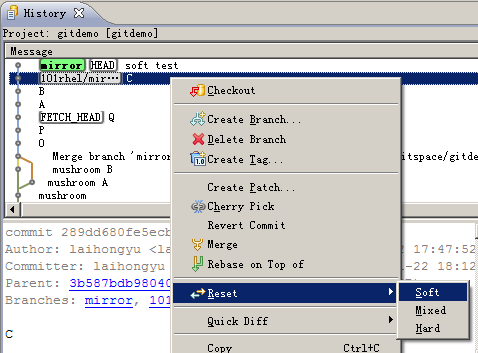
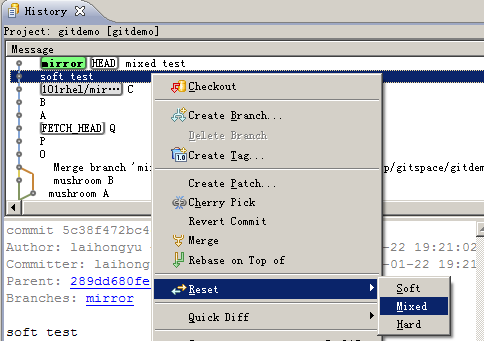
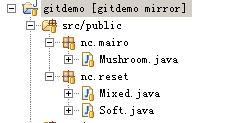
GIT中有三种重置功能,分别是soft、mixed、hard,区别如下: l Soft - 当前分支重置到指定commit记录位置,索引和工作树不变; l Mixed - 当前分支重置到指定commit记录位置,索引被更新,工作树不变; l Hard - 当前分支重置到指定commit记录位置,索引和工作树都更新。 貌似不好理解,首先要理解GIT的三个区域(工作树、索引区、仓库),可以参考文档《GIT简介》。 先做soft的测试,新建Soft.java文件,可以看到此文件未添加到索引控制 先进行一次提交,提交后在History窗口中重置此次提交,如图:
 重置后查看工作树,如图
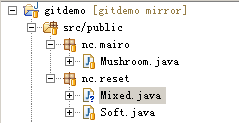
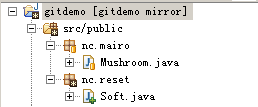 从上图可以看出,soft文件还存在,说明重置没有改变工作树,而且soft文件不是“问号”图标,说明已经添加到索引,说明索引也没有变。唯一重置的是历史记录。
然后新建Mixed.java文件,此时Mixed.java也没有添加到索引控制,然后提交。
从上图可以看出,soft文件还存在,说明重置没有改变工作树,而且soft文件不是“问号”图标,说明已经添加到索引,说明索引也没有变。唯一重置的是历史记录。
然后新建Mixed.java文件,此时Mixed.java也没有添加到索引控制,然后提交。
 在History窗口中重置
 重置后查看工作树结果如下:
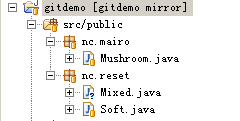 从上图可以看出,Mixed.java文件还存在,说明工作树没有改变,但是文件状态是untracked,说明索引被更新,此时文件没有添加索引控制。
最后来看hard重置,新建Hard.java文件,此时文件没有添加索引,然后提交。
从上图可以看出,Mixed.java文件还存在,说明工作树没有改变,但是文件状态是untracked,说明索引被更新,此时文件没有添加索引控制。
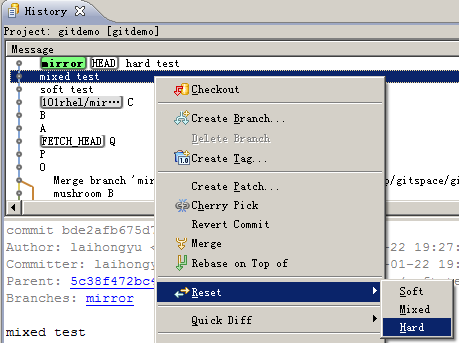
最后来看hard重置,新建Hard.java文件,此时文件没有添加索引,然后提交。
 在History界面重置此次提交,如图:
 重置后再查看工作树,结果如下:
 可以看到Hard.java文件已经不存在了,说明索引和工作树都被更新。
转载地址:http://www.cnblogs.com/zhxiaomiao/archive/2013/05/16/3081148.html
可以看到Hard.java文件已经不存在了,说明索引和工作树都被更新。
转载地址:http://www.cnblogs.com/zhxiaomiao/archive/2013/05/16/3081148.html
正文到此结束
热门推荐


近期评论
-
ws0132613@gmail.comhttps://getmacos.com/gopanel/william smith
-
谢谢
-
https://www.newcmy.com/register?aff=HBVX建议您试试草莓云机场,可以流畅观看youtube和tiktok,上reddit/x也没有问题,还有各种ai优化节点。
-
-
-
想购买您这个站,我的联系方式QQ741756694微信同步 能卖联系
-
-
-
-
Loading...
![[HBLOG]公众号](https://www.liuhaihua.cn/img/qrcode_gzh.jpg)

